
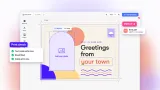

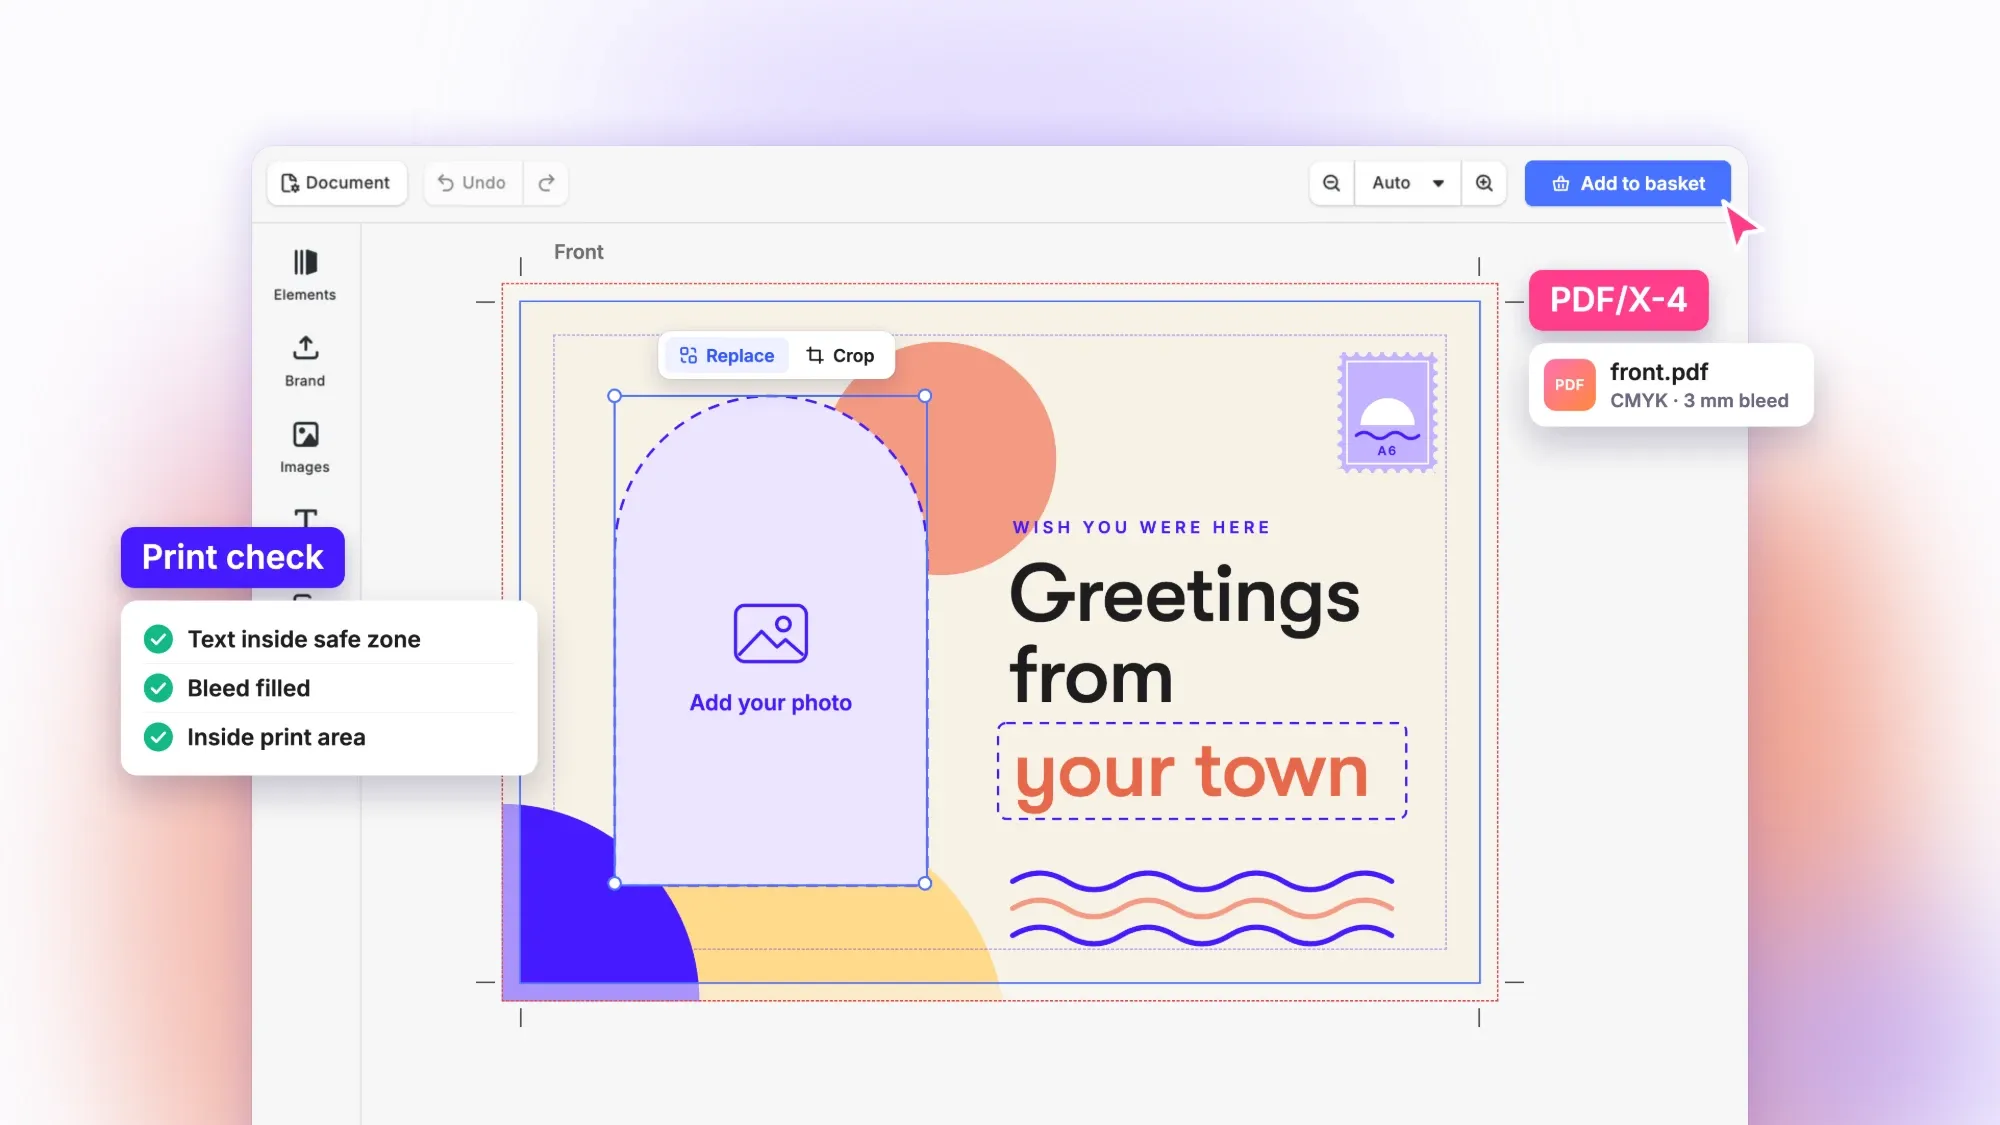
What You Will Build: A Product Customizer With Print-Ready PDF Output
By the end of this guide, you’ll have a product page where shoppers design a t-shirt, an 11 oz mug or an A6 postcard in the CE.SDK editor, all inside your own front end. While they’re busy designing, print checks warn them about soft photos and text that is too close to the cut. Add to Cart saves the design with the cart item, and when the order is paid, a headless worker renders one PDF per print area in CMYK with bleed. The code then hands the files over to your fulfillment provider.
The complete code is in the product customizer example repository on GitHub.
This guide is aimed at developers and product leads at print-on-demand, merch, photo-product and web-to-print companies who want to add a design step to the product page and get a file that their printer can accept.
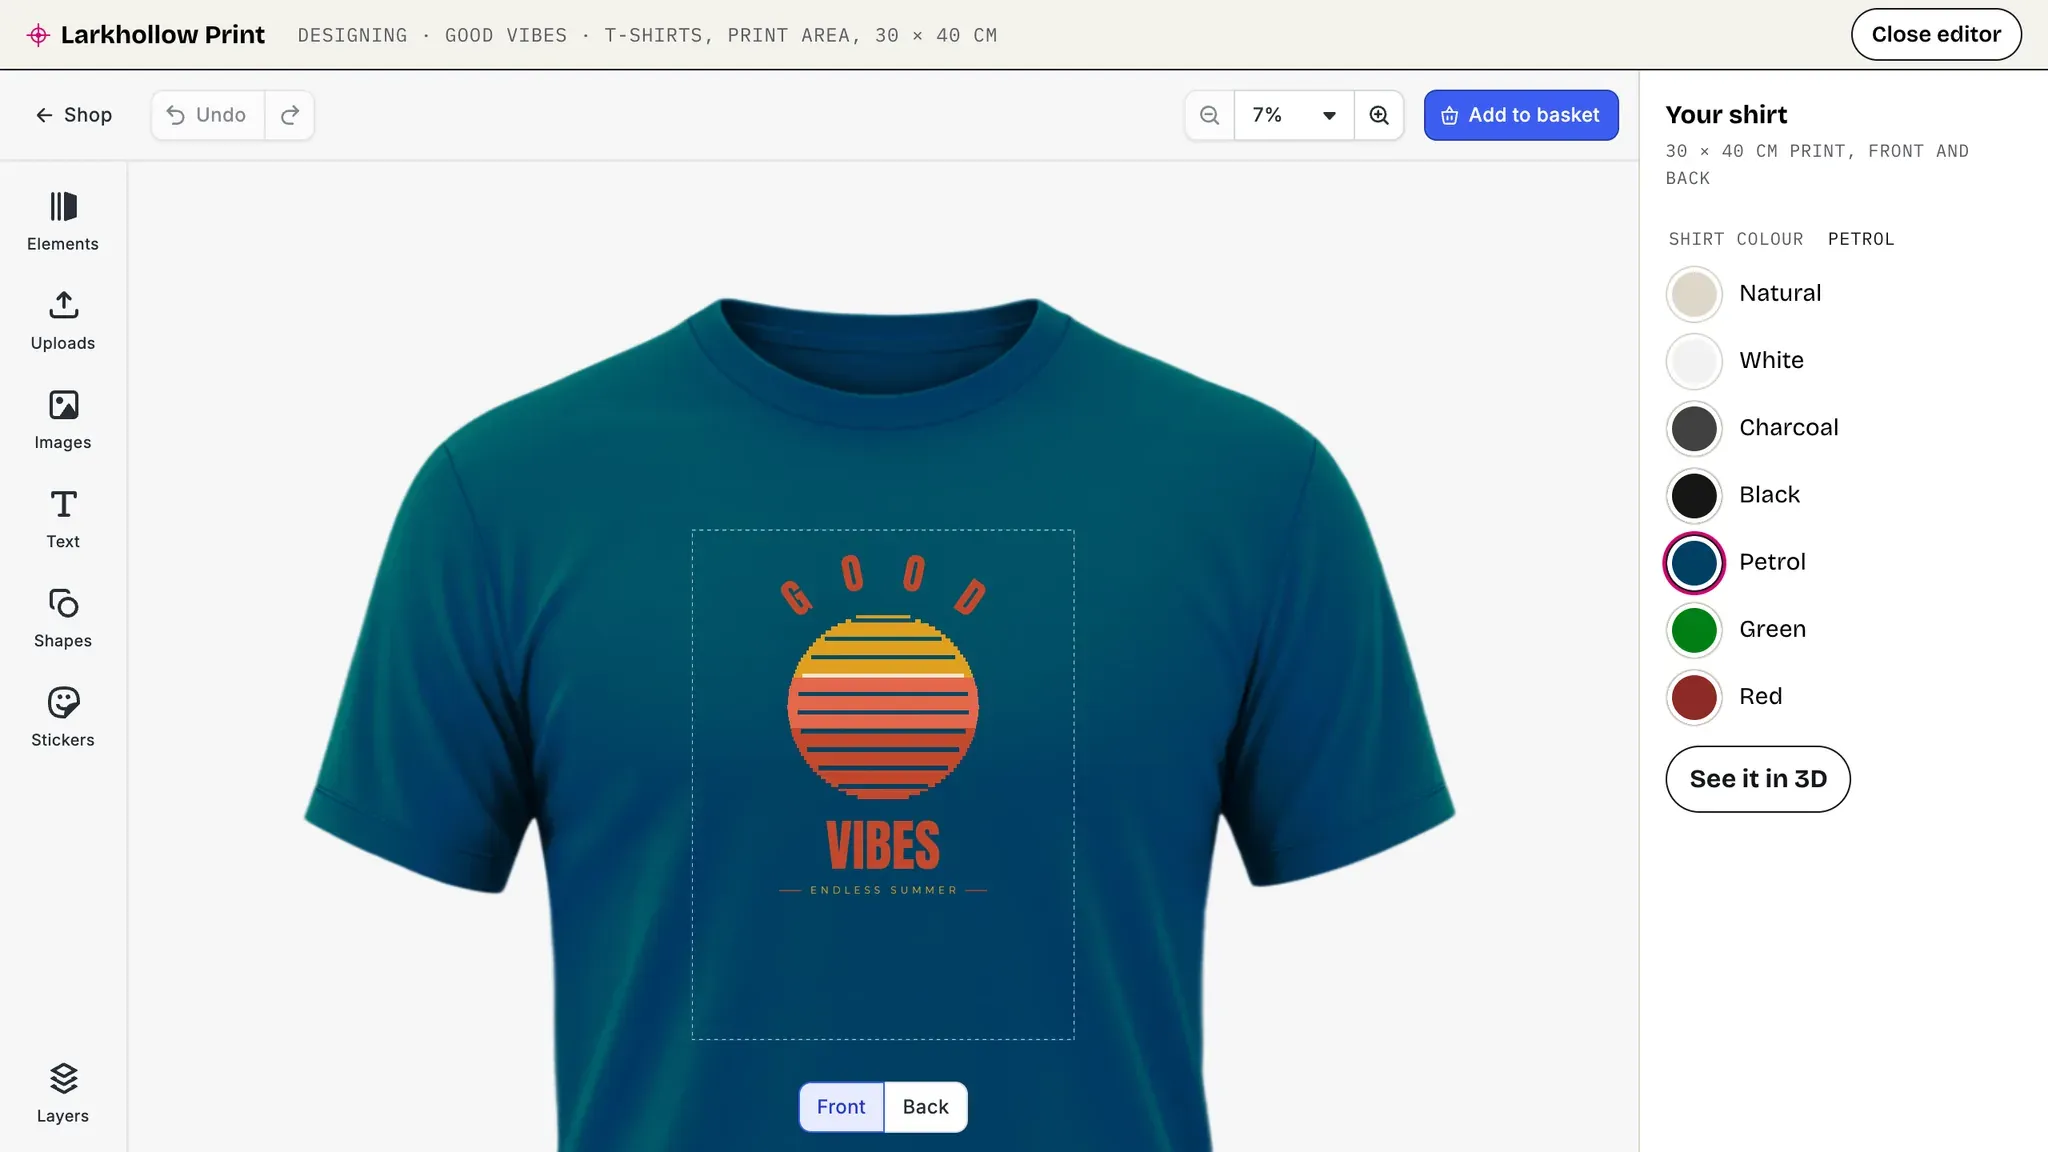
A shopper designing a t-shirt in Larkhollow Print, IMG.LY’s sample print shop.
Why Most Product Designer Tools Stop at the Preview
In reality, the shopper usually wants to see their photo on the mug before they pay for anything. The printer wants an accurate file at the exact finished size, artwork that runs past the cut line, color defined for ink, and every font and image inside the file.
Many designer tools serve the shopper first and leave parts of the print file to somebody else, such as CMYK color or the bleed, so prepress has to fix the order by hand.
Done looks like this: every order arrives with one PDF per print area at the spec’s size, with bleed, in CMYK, checked before the print shop opens it.
Swiss Post’s customers create more than a million personalized postcards a year on CE.SDK. PostBuddy launched its personalized direct mail platform on CE.SDK, and its A/B tests found a 4× gap between a plain and a polished postcard design.
Product Customizer Options Compared: Storefront Apps, Iframe Designers, Embedded SDK
| Property | Storefront customizer app | Iframe designer | Embedded SDK in your own front end |
|---|---|---|---|
| Print file output | An RGB print file per order (PNG or JPG, some also PDF or SVG) at a resolution the merchant sets | A PDF per order, rendered on the vendor’s servers | One PDF per print area, rendered by your own worker |
| CMYK output | Mostly RGB; a few apps offer CMYK for PDF or vector exports | CMYK PDF; some also offer ICC profiles and PDF/X-4 | CMYK through IMG.LY’s PDF/X exporter, with the profile set per product |
| Bleed and safe area | Bleed and a design-area guide in some apps; others leave it to how the merchant sizes the canvas | A safe-zone guide in the editor; bleed in the PDF only where the template is set up for it | In the product spec: bleed written into the PDF, safe zone drawn in the editor |
| Template locking | Option-based: the shopper fills fields or moves elements only inside zones the merchant sets | Per element, set in the vendor’s template tool | Per block: what the shopper may replace, crop or retype, and nothing else |
| Restyling to your brand | Colors and fonts in the app’s settings; custom CSS in some apps, white-label as a paid extra | Themes or custom CSS on the vendor’s interface; full white-label on higher plans | Full: your own interface around a white-label editor |
| Works in your framework | Only inside its storefront platform | Any page that loads the vendor’s script or iframe, plus store plugins | React, Vue, Angular, Svelte, Next.js and plain JavaScript |
| Mobile | Described as mobile-friendly, with no published browser or device list | A mobile layout from the vendor (device detection, a reduced phone layout or a mobile-friendly theme) | Mobile web for graphics editing (Chrome 114+ on Android and iOS, Safari 15.6+ on iOS 15+); native SDKs for iOS, Android, React Native and Flutter |
| Where the design data is stored | On the app vendor’s hosting; the order holds links, and the vendor decides how long files are kept | In the vendor’s cloud; editable designs reopen only in the vendor’s editor | With you: the design is saved with your cart item |
| Upload resolution checks | A low-resolution warning or a minimum pixel size per upload, set by the merchant | A DPI warning in some designers; none documents blocking | A live DPI warning in the editor, against the spec |
| Where rendering runs | The app vendor’s service | The vendor’s servers | Previews in the browser, print files in your worker |
| Maintenance you own | Low to install; then options or a template for every product, and re-checks after theme changes | Low with a store plugin, higher with a custom integration; a template per product in the vendor’s tool either way | Higher: the component, the specs and the worker |
| Pricing shape | Monthly subscription billed through Shopify: tiers capped by order volume, or a base fee plus a fee per order | Monthly subscription with included orders, then a fee per extra order; enterprise tiers by quote | SDK license, see pricing |
Storefront apps are the quickest to set up, but their files mostly come out in RGB. Iframe designers add CMYK PDFs; the embedded SDK also keeps the interface, the design data and the rendering in your own stack.
Step 1: Define the Product Spec (Print Area, Safe Zone, Bleed, DPI)
Each product has one JSON file in packages/core/specs/. The editor, the print checks and the order worker all read the same file, so the page that the shopper designs on is the page that gets printed.
// packages/core/specs/mug-11oz.json
{
  "id": "mug-11oz",
  "label": "11 oz mug",
  "printMethod": "Sublimation",
  "unit": "Millimeter",
  "dpi": 300,
  "outputProfile": "fogra39",
  "outputProfileNote": "Demo value. Sublimation printers often want RGB files: srgb keeps the boxes but is not PDF/X compliant.",
  "areas": [
    {
      "id": "wrap",
      "label": "Wrap",
      "trim": { "width": 200, "height": 85 },
      "bleed": 2,
      "safeZone": 5
    }
  ]
}
trim is the finished size of each print area, bleed is how far the artwork runs past it, and safeZone is how far inside it text stays. dpi is the minimum image resolution and the print file’s resolution, outputProfile is the color profile that it’s converted to, and outputProfileNote says why. The mug values are only demo values, so you’ll need to use your print partner’s template for best results.
The core turns each print area into a page. The page is the finished size, and the bleed is the page margin:
// packages/core/src/spec.ts
export function applyPrintArea(
  engine: CreativeEngine,
  page: number,
  area: PrintArea
): void {
  engine.block.setName(page, area.id);
  engine.block.setWidth(page, area.trim.width);
  engine.block.setHeight(page, area.trim.height);
  engine.block.setBool(page, 'page/marginEnabled', area.bleed > 0);
  engine.block.setBool(page, 'page/safetyEnabled', area.safeZone > 0);
  for (const side of ['top', 'bottom', 'left', 'right'] as const) {
    engine.block.setFloat(page, `page/margin/${side}`, area.bleed);
    engine.block.setFloat(page, `page/safetyInset/${side}`, area.safeZone);
  }
}
In the print file, the exporter makes the page plus bleed the BleedBox and the page the TrimBox (step 6), and the verify script checks both. The safety inset draws the safe zone in the editor and doesn’t make changes to the file.
Step 2: Embed the Customizer in React and Vue
The shared logic has no framework code: packages/core holds the specs, checks and cart code, and packages/editor the editor setup. Each example is a thin wrapper around them. In React that is in ProductCustomizer.tsx:
// examples/react/src/ProductCustomizer.tsx
export interface ProductCustomizerProps {
  productId: string;
  license?: string;
  userId?: string;
  cartEndpoint?: string;
  designUrl?: string;
  onAddToCart?: (item: CartItem) => void;
}
productId picks the spec, and license is your CE.SDK license key, which is needed because without one the editor runs with a watermark. cartEndpoint is where Add to Cart posts the design (step 5), and designUrl reopens a saved design instead of the template. onAddToCart receives the stored cart item, and the example page mounts it like this:
// examples/react/src/index.tsx
<ProductCustomizer
  key={editing?.id ?? productId}
  productId={productId}
  license={license}
  userId={USER_ID}
  cartEndpoint={CART}
  designUrl={editing?.design.url}
  onAddToCart={handleAddToCart}
/>
The key makes React mount a fresh editor when the product changes because every product has its own scene. The Vue example mounts its ProductCustomizer.vue with the same props:
<!-- examples/vue/src/App.vue -->
<ProductCustomizer
  :key="editing?.id ?? productId"
  :product-id="productId"
  :license="license"
  :user-id="userId"
  cart-endpoint="/api/cart"
  :design-url="editing?.design.url"
  @add-to-cart="handleAddToCart"
/>
Vue passes the add-to-cart event to the component as the same onAddToCart prop.
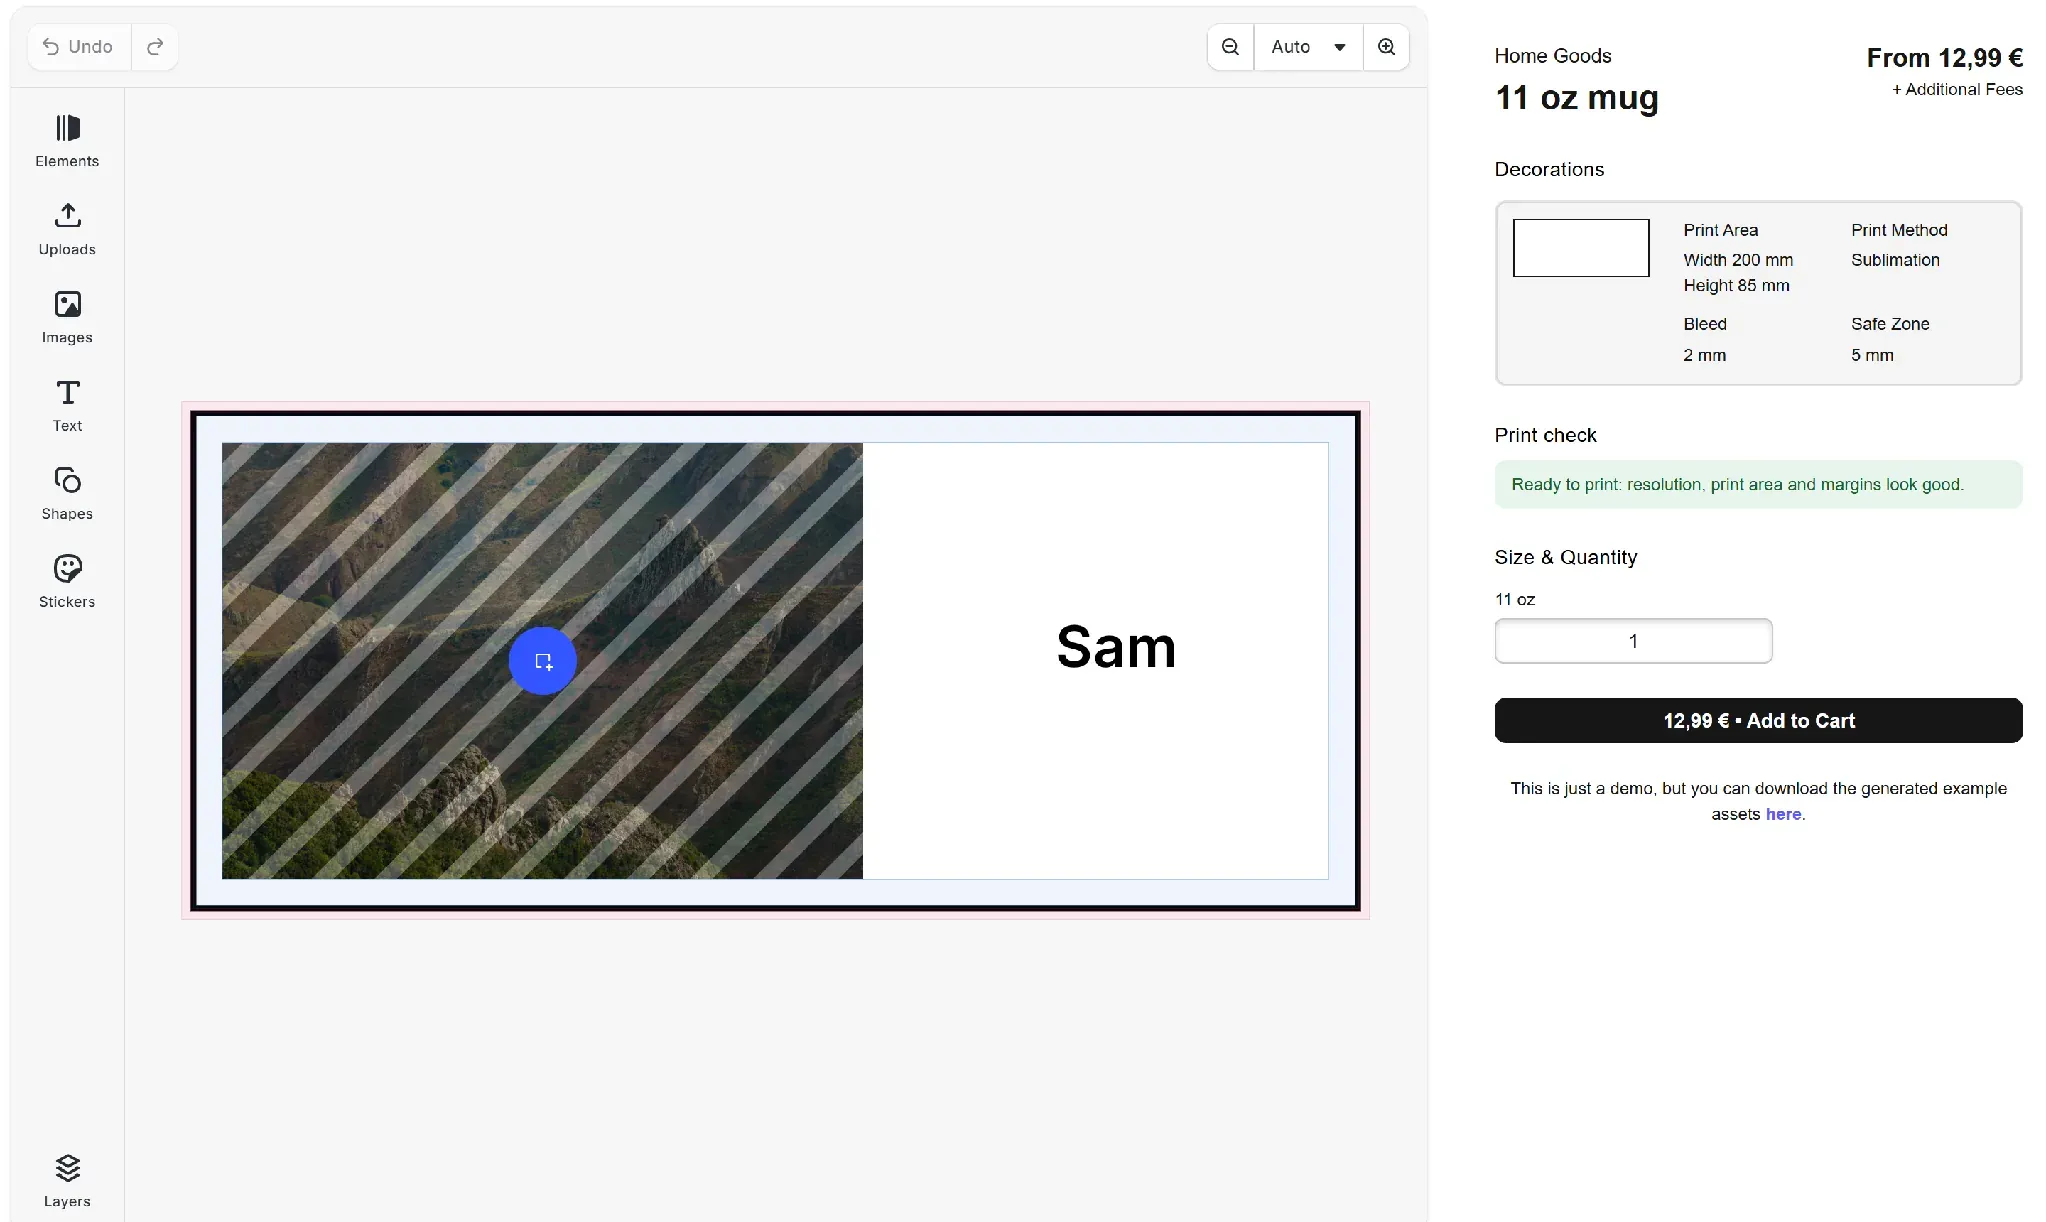
Step 3: Lock the Template So Customers Only Edit What You Allow
Each product starts from a template in packages/core/templates/ with named image and text slots per print area, displayed in millimeters. The core builds them in the Creator role, which ignores locks, switches every scope off, and turns on only what each kind of block allows:
// packages/core/src/template.ts
const ALLOWED: Record<'page' | Slot['type'], Scope[]> = {
  // Adding a block to the print area is an edit of the page.
  page: ['editor/add'],
  image: ['editor/select', 'fill/change', 'layer/crop'],
  text: ['editor/select', 'text/edit', 'text/character', 'fill/change'],
};

export function handToShopper(engine: CreativeEngine): void {
  engine.editor.setRole('Adopter');
  for (const scope of engine.editor.findAllScopes()) {
    engine.editor.setGlobalScope(scope, 'Defer');
  }
}
The shopper can replace and crop the photo and retype the text, but they can’t move, resize or delete the slots, or change the print area. Global scopes are set to Defer after the role change because setting the role resets them, and a global Allow would override the block locks.
Anything that the shopper adds, like their own text or a sticker, stays fully editable. Step 4 catches anything that goes wrong with it.
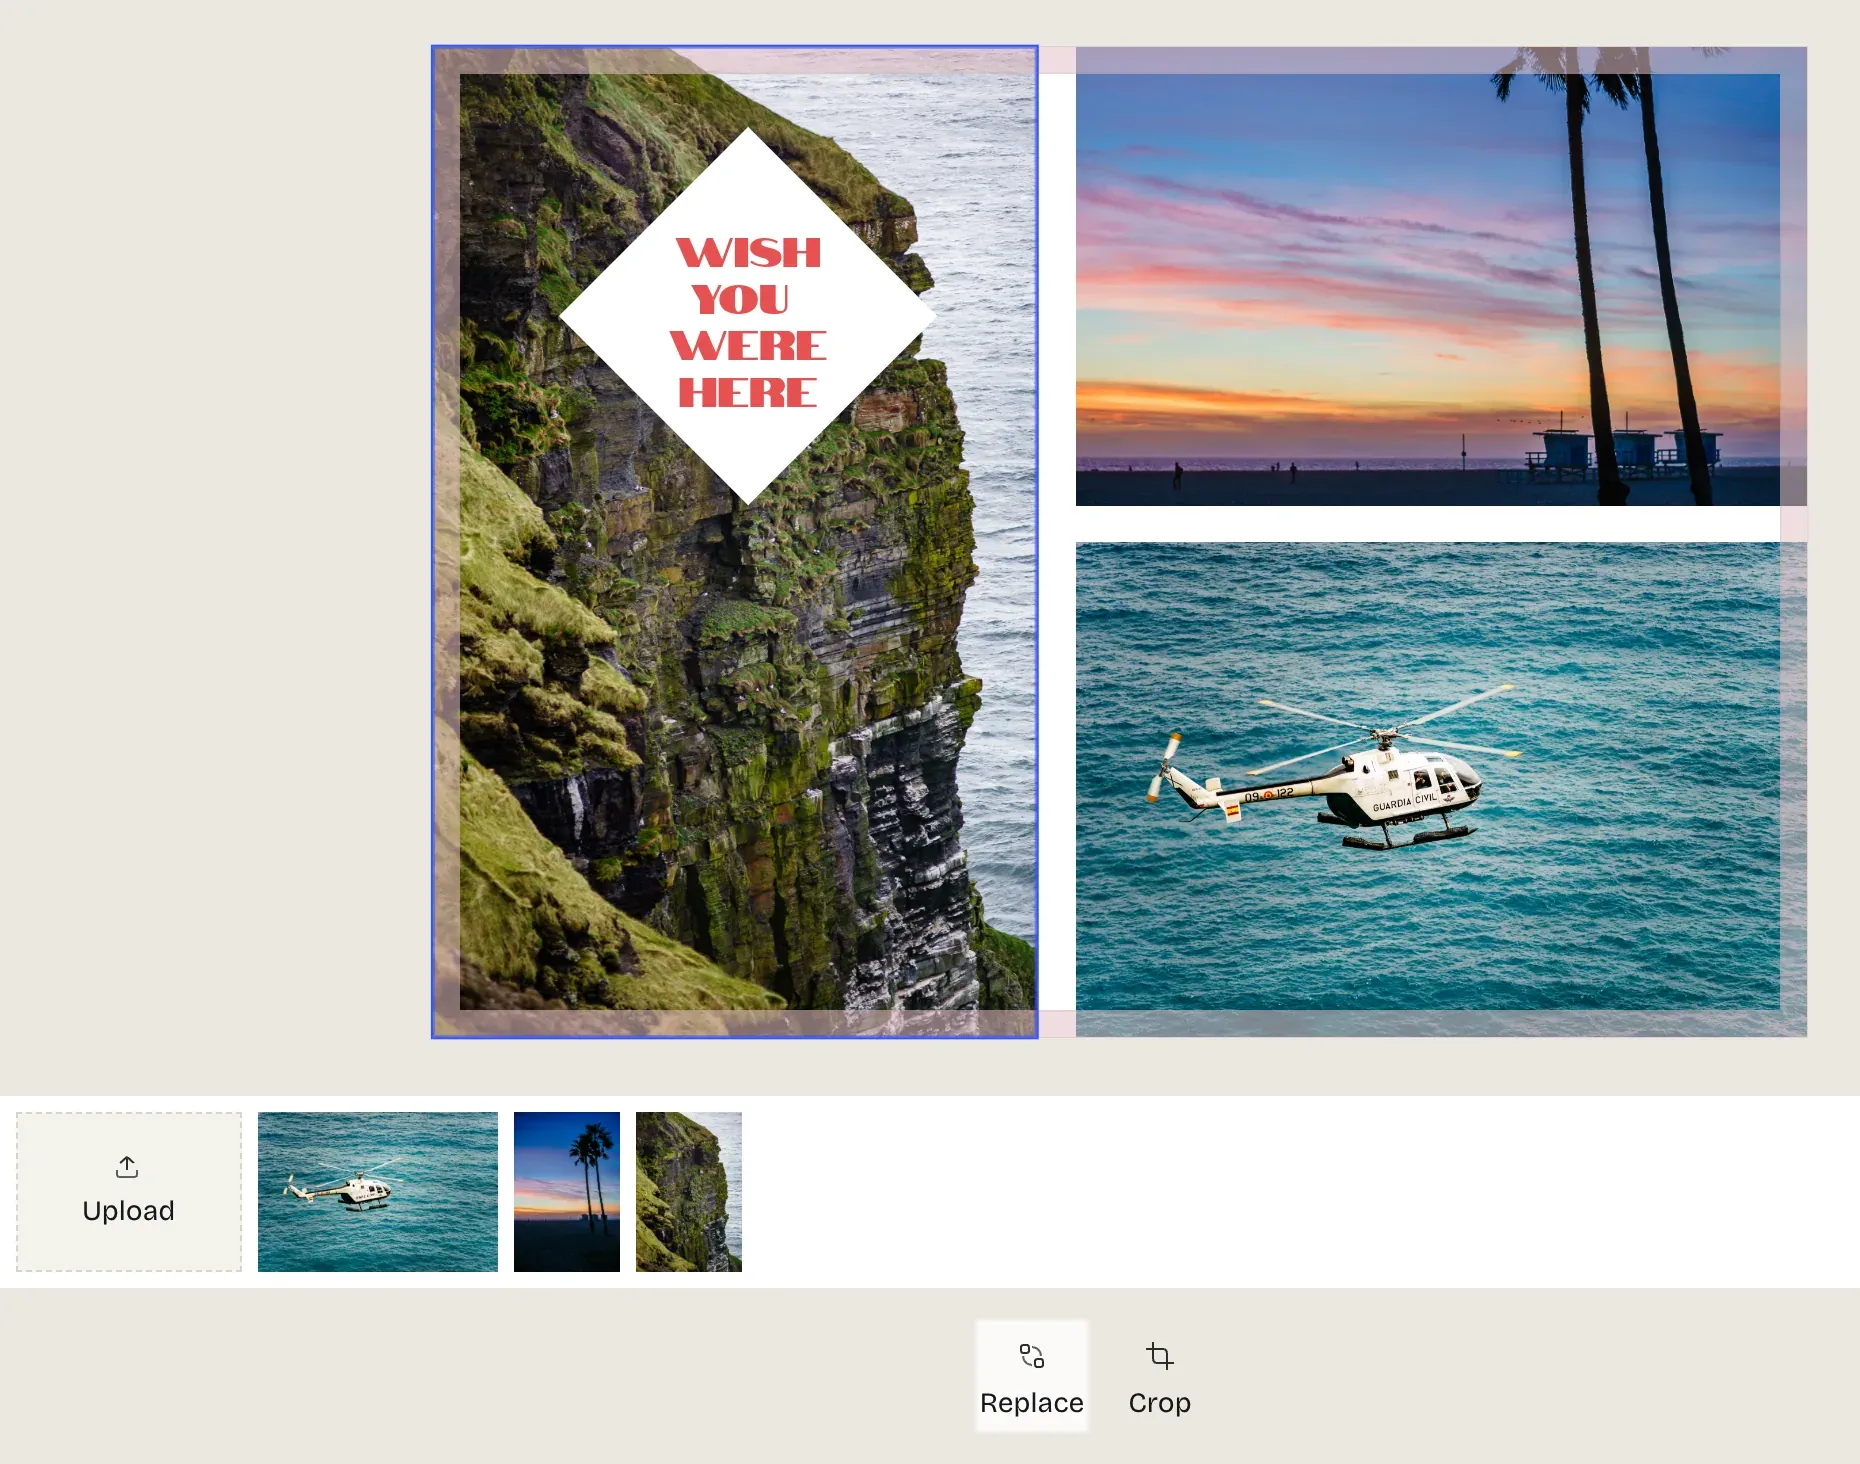
A locked photo slot in Larkhollow Print, where the shopper can only replace or crop the photo.
Step 4: Add Live Preflight Checks for Resolution and Print Area
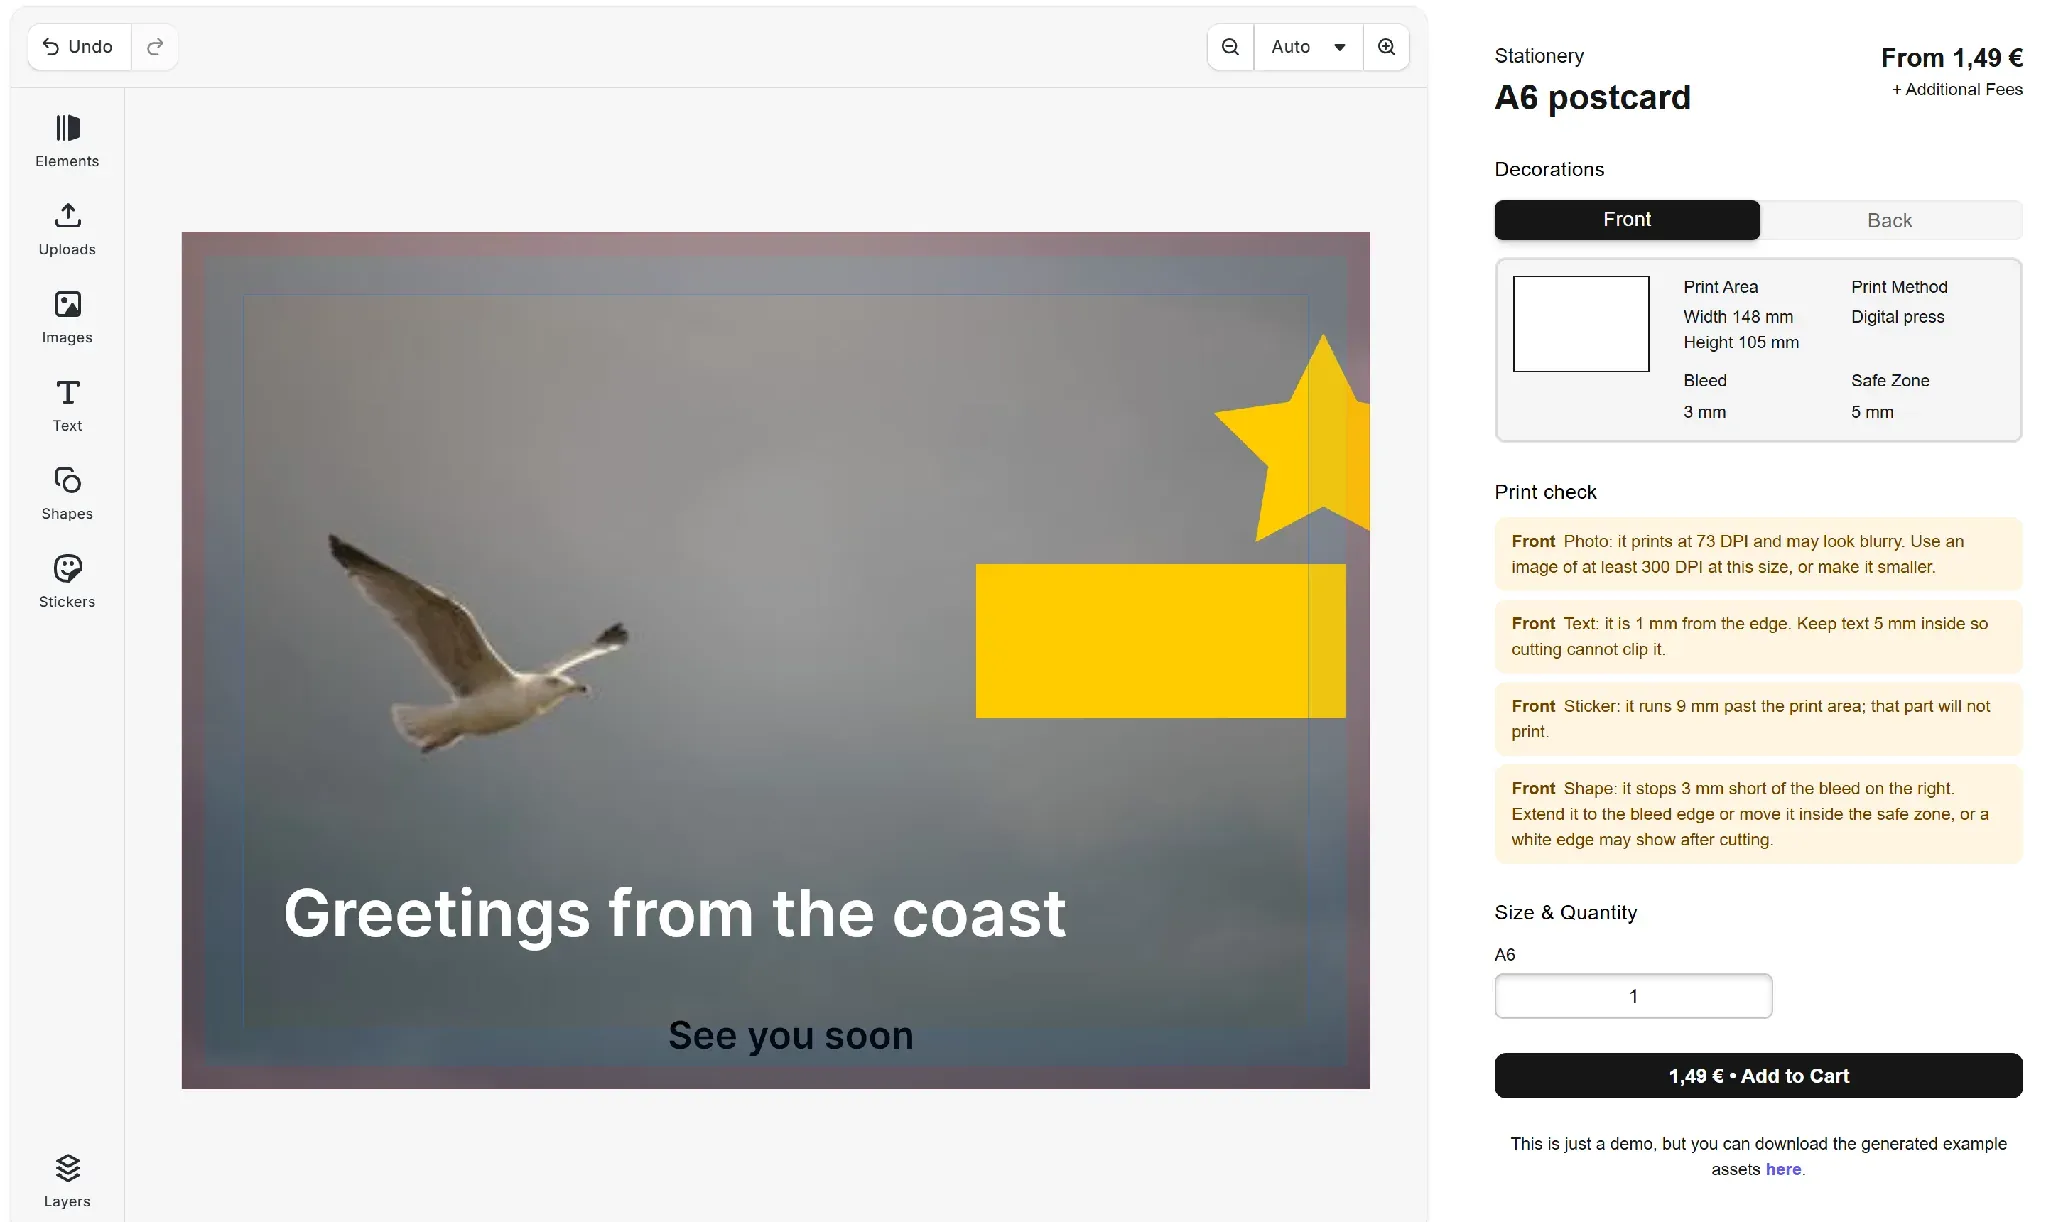
packages/core/src/preflight.ts checks the design as it is and returns one warning per problem. It warns when a photo is below the spec’s DPI, a block is past the print area, text is inside the safe zone, or a block reaches the cut line but stops short of the bleed. The resolution check divides the image’s pixels by the size that it is drawn at, which is the frame size times the crop scale:
// packages/core/src/preflight.ts
const drawnWidth =
  engine.block.getWidth(block) * engine.block.getCropScaleX(block);
const drawnHeight =
  engine.block.getHeight(block) * engine.block.getCropScaleY(block);
const dpi = Math.min(
  size.width / (drawnWidth / 25.4),
  size.height / (drawnHeight / 25.4)
);
if (dpi >= minDpi) return;
The pixel size comes from the image’s source set, which is what the uploads carry, or from the image itself, read through the engine for a reopened design. The component reruns the checks on every change that gets made:
// examples/react/src/ProductCustomizer.tsx
useEffect(() => {
  if (!cesdk) return;
  return watchPreflight(cesdk.engine, product.spec, setIssues);
}, [cesdk, product]);
In the example, a 480 by 320 pixel upload in the postcard’s photo slot sends a warning at 73 DPI. The checks warn instead of blocking the action, and clicking a warning selects the block so you can see where the issue is.
Step 5: Save the Design With the Cart Item
Add to Cart saves the scene as an archive, and that archive bundles the images that the design uses, including the shopper’s uploads. This is important because until then, they only exist in the browser tab (which is not an ideal storage location). The worker renders the print file from it, and the shopper can reopen it again to keep editing. A PNG preview per print area goes with it:
// packages/core/src/cart.ts
const archive = await engine.scene.saveToArchive();

const previews: Record<string, Blob> = {};
for (const page of engine.scene.getPages()) {
  // An editor may outline the page; the preview shows the print only.
  const stroke = engine.block.isStrokeEnabled(page);
  engine.block.setStrokeEnabled(page, false);
  try {
    const ratio = engine.block.getHeight(page) / engine.block.getWidth(page);
    previews[engine.block.getName(page)] = await engine.block.export(page, {
      mimeType: 'image/png',
      targetWidth: PREVIEW_WIDTH,
      targetHeight: Math.round(PREVIEW_WIDTH * ratio),
    });
  } finally {
    engine.block.setStrokeEnabled(page, stroke);
  }
}
addToCart posts the archive, the previews, the cart line and any open print warnings to the cart endpoint, all in one request. If warnings are open, the shopper needs to confirm them first. This is the cart item that the example’s endpoint stored for a postcard:
{
  "id": "3b27df4d-300c-41f0-b761-22ff594d993f",
  "createdAt": "2026-10-13T06:58:03.026Z",
  "productId": "postcard-a6",
  "color": "white",
  "quantities": { "A6": 1 },
  "totalQuantity": 1,
  "totalPrice": 1.49,
  "design": {
    "url": "/api/cart/3b27df4d-300c-41f0-b761-22ff594d993f/design",
    "bytes": 2248275
  },
  "previews": {
    "front": "/api/cart/3b27df4d-300c-41f0-b761-22ff594d993f/preview/front",
    "back": "/api/cart/3b27df4d-300c-41f0-b761-22ff594d993f/preview/back"
  },
  "preflight": []
}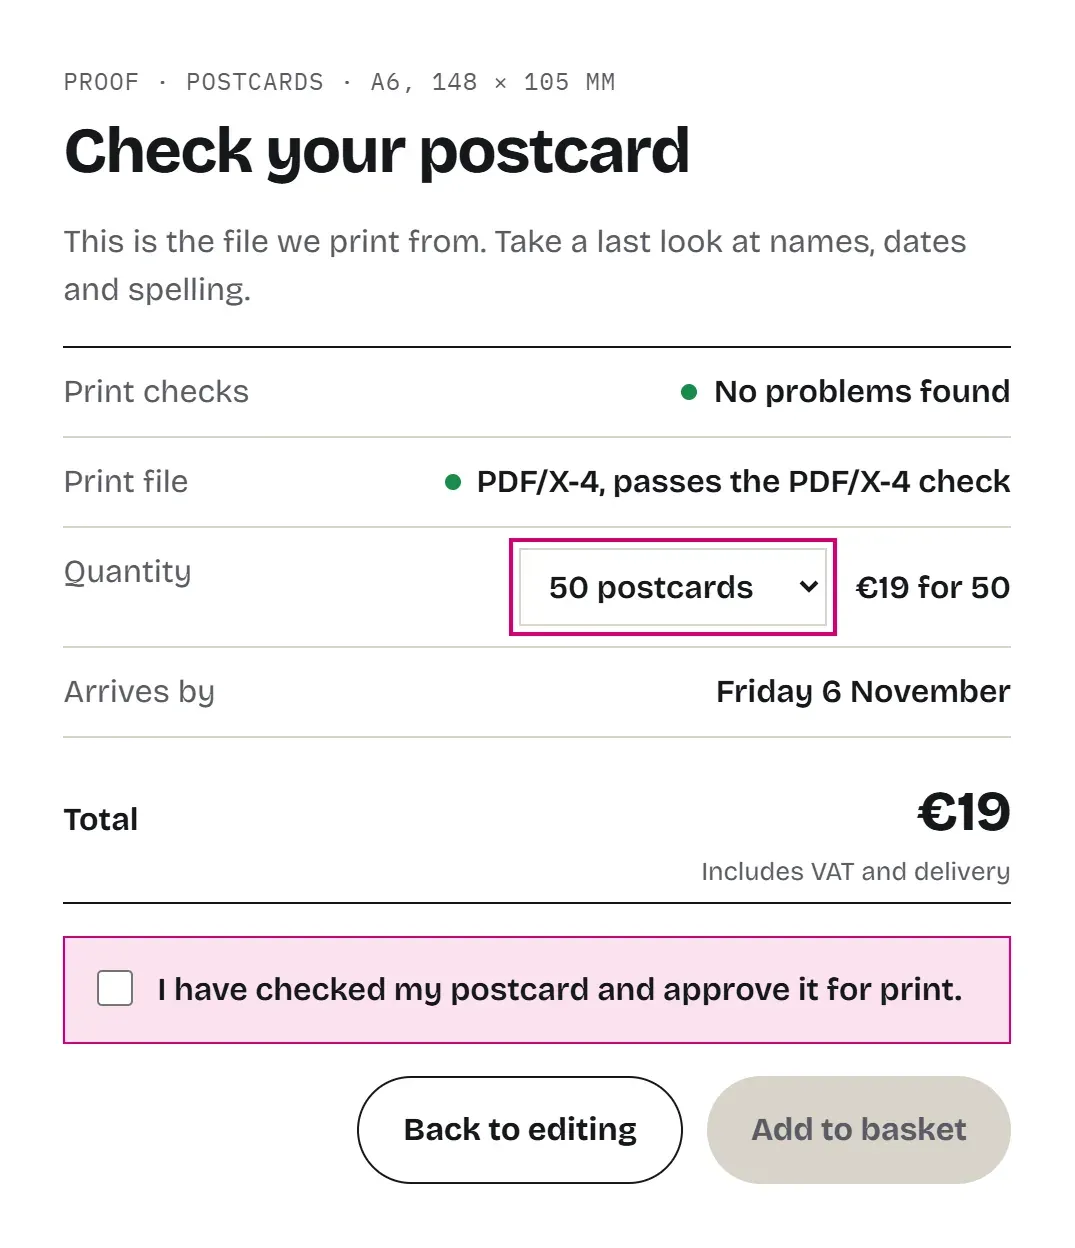
The proof step in Larkhollow Print, before the basket.
Step 6: Render a Print-Ready PDF on Order With the Headless Engine
worker/src/render.ts opens the saved archive in the headless engine, @cesdk/node, and exports one print file per print area with exportPDFX from IMG.LY’s PDF/X exporter, @imgly/pdfx-exporter:
// worker/src/render.ts
await engine.scene.loadFromArchiveURL(archiveUrl, false, true);
const spec = getSpec(engine.block.getMetadata(engine.scene.get()!, 'product'));
await mkdir(outDir, { recursive: true });

const files: PrintFile[] = [];
for (const area of spec.areas) {
  const [page] = engine.block.findByName(area.id);
  // The editor outlines the print area; the print file must not.
  engine.block.setStrokeEnabled(page, false);
  const pdf = await exportPDFX(engine, {
    blocks: [page],
    outputProfile: spec.outputProfile,
    title: `${spec.label}, ${area.label}`,
  });
  const file = `${area.id}.pdf`;
  await writeFile(join(outDir, file), Buffer.from(await pdf.arrayBuffer()));
  files.push({
    areaId: area.id,
    file,
    bytes: pdf.size,
    trim: area.trim,
    bleed: area.bleed,
  });
}
exportPDFX exports the page with its bleed in any scene layout and converts it to CMYK with the spec’s profile, as PDF/X-4 by default. The example uses FOGRA39 for all three products, but DTG and sublimation shops often want RGB files: outputProfile: 'srgb' gives an RGB file with the same boxes, which is not PDF/X compliant. Larkhollow saves its t-shirts as 300 DPI PNGs.
The exporter needs Node.js 22 or later. In the example, running on Windows, an order took 3.3 to 5.4 seconds including the engine start.
Step 7: Connect the Order Endpoint to Your Fulfillment
Next, you can call the order endpoint when the payment goes through, with the cart item id from step 5 and your own order id as orderRef. Abandoned carts never expend a render, and a repeated call doesn’t print twice. In the example, the cart panel’s Place order button is the equivalent of your checkout.
// worker/src/server.ts
const { cartItemId, orderRef } = JSON.parse(await readBody(req));

// A webhook that fires twice, or a retry after a timeout, must not print
// the order twice. Only a failed render is tried again.
const existing = (await allOrders()).find(
  (o) =>
    o.orderRef === orderRef &&
    o.cartItemId === cartItemId &&
    o.status !== 'failed'
);
if (existing) return sendJson(res, 200, existing);
When the files are ready, the worker posts a handoff to FULFILLMENT_URL. A test webhook received this for a postcard:
{
  "orderRef": "1043",
  "productId": "postcard-a6",
  "quantities": { "A6": 1 },
  "files": [
    {
      "areaId": "front",
      "url": "https://files.example.com/api/orders/2670b7ed-8918-40f3-b8e0-408e6cfe69ba/files/front.pdf",
      "trim": { "width": 148, "height": 105 },
      "bleed": 3
    },
    {
      "areaId": "back",
      "url": "https://files.example.com/api/orders/2670b7ed-8918-40f3-b8e0-408e6cfe69ba/files/back.pdf",
      "trim": { "width": 148, "height": 105 },
      "bleed": 3
    }
  ]
}
Your own checkout. You can call the order endpoint from the code that shows that an order was paid, and you can do this once per customized line item. You can also keep the design archive with the order, and a reprint requires another render of it.
A commerce platform that sends order webhooks. Save the cart item id in the line item’s custom data, and on the order-paid webhook you’ll need to verify the signature and call the order endpoint with the platform’s order id as orderRef.
A print partner with an order API. Point the FULFILLMENT_URL at a small adapter that turns the handoff into your partner’s order format. Serve the files from storage that hands out expiring links instead of from the worker.
Your own production floor. Send the handoff to your production system, or write the PDFs straight into a prepress hot folder. The trim and bleed values in the handoff let you check each file against the job ticket.
Each order carries the print warnings that the shopper accepted. You will need to decide if a warning warrants holding the order for review, but the example doesn’t have this step: it just sends the print.
How to Verify the PDF Is Print-Ready
Check the files before the first order goes to a printer, and again when you change a spec or upgrade CE.SDK. The repo’s preflight script checks every print file of an order against the product spec:
npm run verify -- 2cbcac7e-55c0-423b-a40c-2f6def6eef82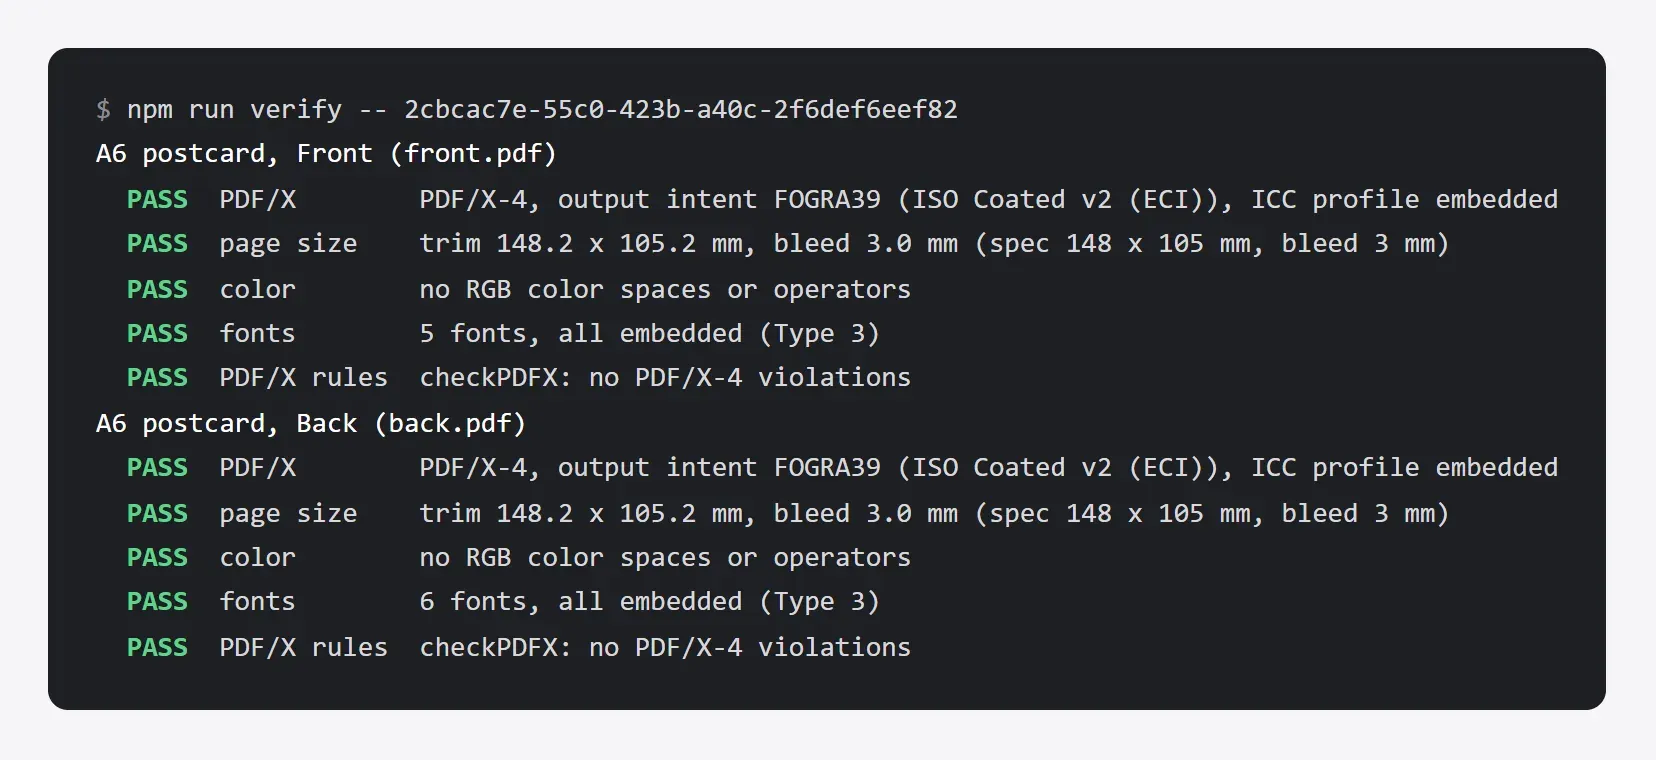
The preflight on a postcard order: both print files pass all five checks.
- PDF/X. The XMP metadata names the PDF/X version, and the output intent carries the ICC profile set by the spec’s
outputProfile. - Page size. The TrimBox is the finished size, and the BleedBox adds the bleed on every side. The engine snaps pages to whole device pixels, which the exporter’s docs put at up to 0.5 points at 300 DPI (148.17 by 105.16 mm for a 148 by 105 mm card), so the script allows 0.25 mm.
- Color. No RGB color space or color operator is anywhere on the page, including inside text glyphs, and the photo comes out as a CMYK image.
- Fonts. Every font is embedded. In the example’s files, text comes out as Type 3 fonts where the glyphs are vector outlines.
- PDF/X rules.
checkPDFXfrom the exporter checks the file against its PDF/X standard.
The script fails on bad files too. A plain engine export, which is what the editor’s download link makes, fails four of the five checks, and an srgb export fails the color check and checkPDFX.
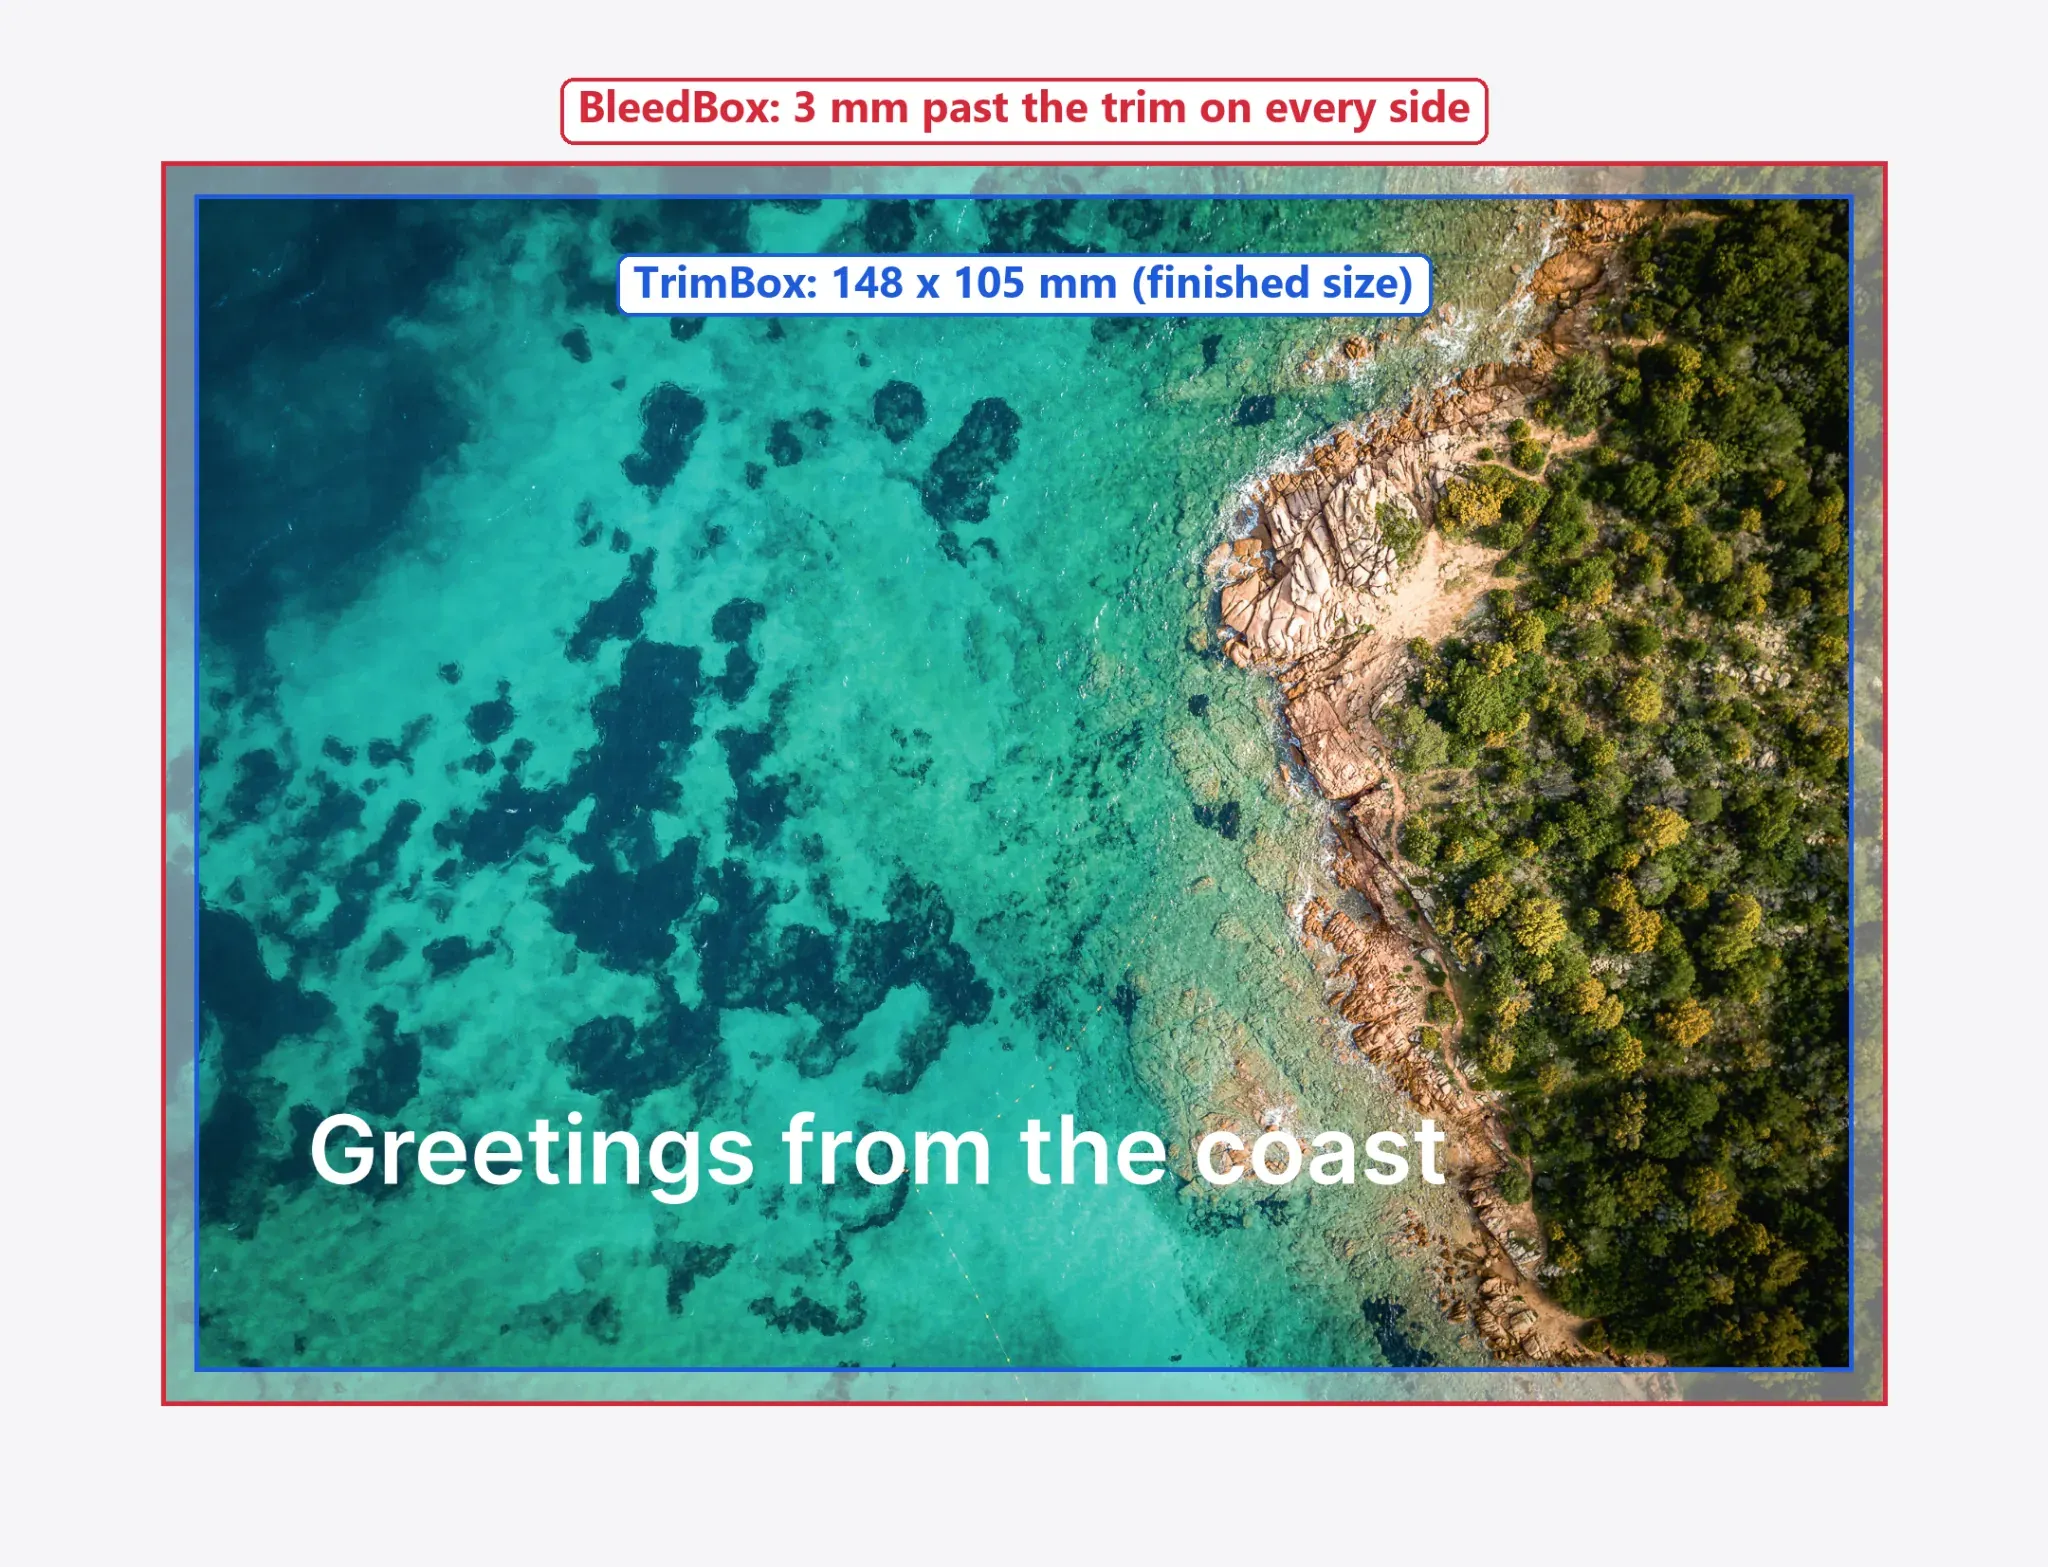
The postcard’s front.pdf rendered at 300 dpi. The TrimBox (blue) and BleedBox (red) are drawn from the values in the file. The photo runs to the edge of the bleed.
IMG.LY’s exporter docs suggest checking every exported file with checkPDFX against the standard it was exported to, which is the script’s fifth check.
When Not to Use an Embedded Product Customizer
You sell through a hosted storefront and personalize a few products. If shoppers only add a name or a photo to a handful of items then a storefront personalization app is quicker to set up, and you don’t have to run a worker.
Your print partner hosts the designer and takes the file from there. If your partner offers its own designer and prints straight from it, you get a file it already accepts without building a render pipeline.
The shopper doesn’t design anything. If every order is a fixed layout with variable data, like names and numbers for team shirts, then render the files in a batch from a template and a data file instead of putting an editor on the product page.
FAQ: Product Customizers and Print-Ready Files
Does the shopper need an account?
No. The design is saved with the cart item, and its id is all the worker needs. Sign-in is your shop’s decision for completing the transaction.
Where does the design live between design and order?
Within the cart item is the scene archive, a preview per print area and the open warnings. The example keeps them in folders but a real online store uses its database and object storage.
Can I use my own fulfillment or print partner?
Yes. The worker posts a handoff with the file URLs, trim and bleed to any webhook you set, and the color profile is a field in each product spec.
Which frameworks are supported and is the API the same in each?
The repo has React and Vue examples, and both pass the same properties to a component built on the same framework-free packages. CE.SDK’s web editor also supports Angular, Svelte, SvelteKit, Next.js, Nuxt.js and plain JavaScript.
Does it work on Shopify or WooCommerce?
This build targets your own front end. On a commerce platform, save the cart item id on the line item and call the order endpoint from the platform’s order webhook (step 7).
How do I stop low-resolution uploads?
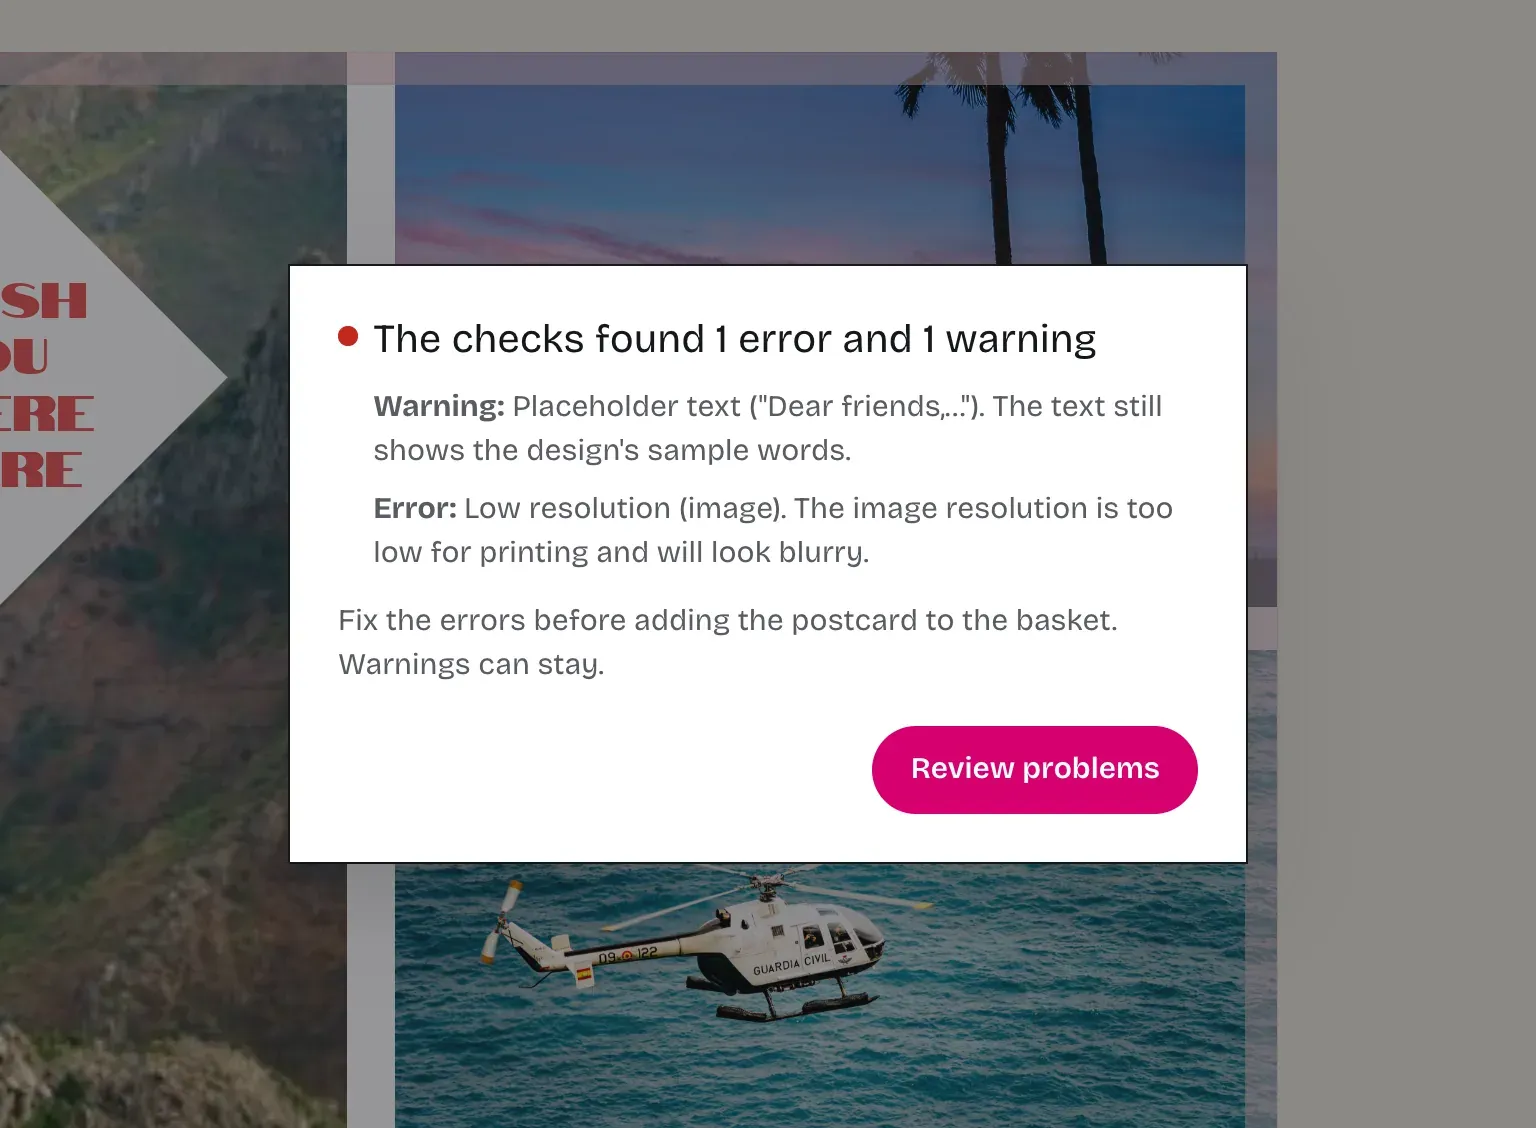
The editor’s resolution check warns as soon as a photo prints below the spec’s DPI. To block instead of warn, disable Add to Cart while a resolution warning is open. IMG.LY’s sample print shop, Larkhollow Print, works this way: Add to basket refuses a design while a print check finds an error, and lets warnings through.
Can the shopper come back and edit a saved design?
Yes. Pass the saved archive’s URL as designUrl, and the customizer reopens it with the uploads, text and locks. The cart’s Edit design link does this.
Glossary: Print Customizer Terms
Bleed. Artwork that runs past the finished edge so no white shows after cutting. Written into the PDF as the BleedBox.
Safe area. The band inside the finished edge where text shouldn’t go, because cutting can drift. The spec calls it the safe zone.
Print area. The part of a product that gets printed, such as a shirt front or a mug wrap. Each one is a page in the scene.
DTG. Direct to garment: printing onto fabric with an inkjet, with nothing cut afterwards, which is why the t-shirt has no bleed.
Cart payload. What Add to Cart sends: the cart line, the design archive, a preview per print area and the open print warnings.
Placeholder. A template slot the shopper fills, such as the photo that Replace swaps out. See placeholder.
Scene. CE.SDK’s document: the pages, blocks and settings of one design. See scene.
Headless engine. CE.SDK’s engine without the editor interface, here rendering print files on a server. See headless mode.
Next Steps
Clone the product customizer repository on GitHub and run the React or Vue example and the worker with your own license key. To see the same flow in a working shop first, design a t-shirt or a postcard in the Larkhollow Print demo store. The PDF/X exporter and T-Shirt Designer docs cover the export and the kit this build starts from. To try CE.SDK before you have a key, you can get started straight away, with no sign-up or trial key required.