




Color Correction vs. Color Grading
What Is the Difference Between Color Correction and Color Grading?
Color correction makes footage look accurate and consistent, and color grading then gives it a chosen look. Correction sets exposure and contrast, removes color casts so that white looks white, and matches each shot to the ones around it. A grade then turns the corrected footage warm and golden, cool and faded or whatever else the story or the brand calls for.
Because both often use the same controls, it is tempting to do them in one pass. In the chart below, four test patches with a warm cast get the Food look built into CE.SDK three ways, and the version that was corrected first comes closest to the goal.
Does a Look Fix a Color Cast?
Mostly not. We put a warm cast on four ColorChecker patches, ran the chart through all 61 looks built into CE.SDK and compared every result with the same look on the chart without the cast. In 50 of them, the gray patch kept at least 40 percent of the cast’s shift toward warm, so the look sat on top of the cast instead of removing it.
The order of the two steps matters as well, though less. With Food, Polaroid and Fixie, cooling the cast before the look landed closer to the goal than the same correction after it, since a correction made afterward works on colors the look has already moved.
50 of 61
looks left the cast on the gray patch
at least 40 percent of its shift toward warm
20 of 61
looks made the cast stronger
more shift toward warm than went in
11 of 61
looks mostly hid the cast
4 of them by turning the chart gray
What Are the Steps of Color Correction?
Set the brightness range first, then remove the cast, then match the other shots to a reference shot. Apple’s manual workflow for Final Cut Pro and the VEGAS guide to color correction both put exposure ahead of white balance.
Set the black and white points
Map the darkest part of the shot to black and the brightest to white, then set the exposure between them. On Final Cut Pro’s scale, that puts black at 0 and white at 100.
Neutralize the cast on something gray or white
Pick a part of the frame that should have no color, such as a white wall or a gray card, and remove the tint it carries. A color chart filmed next to the slate gives every shot of the scene the same reference.
Match every shot to a reference shot
Correct one shot of the scene first, usually the wide shot, and bring the others in line with it, which matters most when several cameras filmed the scene.
What Tools Do Color Correction and Color Grading Use?
Correction gets by with a few controls that change the whole frame and something neutral to check them against, while grading adds tools that change one color or one area.
| Color correction | Color grading | |
|---|---|---|
| Judged against | Something neutral in the frame, and a reference shot of the same scene | The look the director, the client or the brand asked for |
| Works on | Each shot, one at a time | A whole scene or project, plus single colors or areas |
| Main controls | Exposure, contrast, black and white points, white balance | Color wheels, curves, saturation, color qualifiers and masks |
| Automatic help | Automatic color balance and shot matching | Saved looks and LUTs that put one look on every clip |
When Do You Need Color Correction, and When Color Grading?
Correct whenever shots have to look true to life or match each other, and grade when the footage should carry a mood or a brand. A wedding video cut from two cameras, for example, needs correction so both cameras show the dress in the same white, and a grade so the whole film feels warm.
Correct when
-
Shots from different cameras or lights sit side by side
Matching each one to a reference shot keeps colors from jumping at every cut.
-
Products, food or skin have to look true to life
A cast shows a product in a different color from the one that arrives at the door.
-
A look is about to go on
In our test, 50 of the 61 looks built into CE.SDK left much of a warm cast in place instead of removing it.
Grade when
-
A film or a campaign needs a mood
Sunny and saturated or cold and muted is a creative choice, made on top of correct footage.
-
Every clip should share one brand look
One grade on every clip and photo keeps a channel or a catalog recognizable at a glance.
-
One part of the frame needs attention
Secondary grading darkens a sky or lifts a face without touching the rest of the shot.
How Color Correction Works in CE.SDK
The adjustments that correct a shot in CE.SDK video editing sit in the same panel as the ones that grade it, and they work on video clips and images alike. Looks come from the LUT filters next to them.
In code, the order is yours to set. CE.SDK applies the effects on an image or clip in the order they were appended, so append the adjustments effect before the LUT filter, or insert it at the start of the list when a filter is already there.
Users cool a warm cast with Temperature
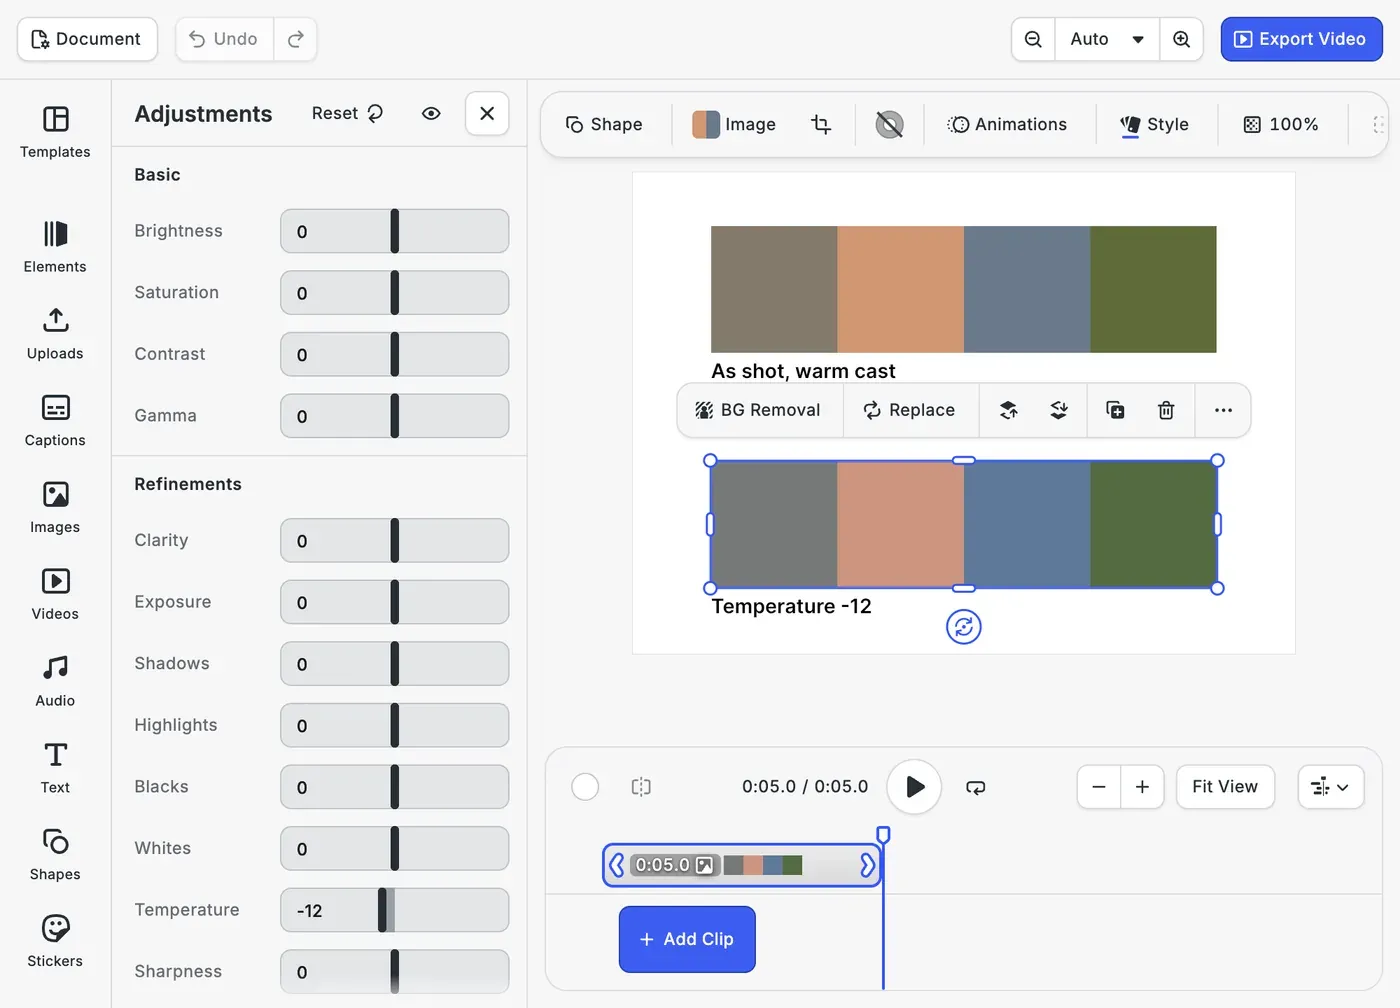
With a clip or image selected, Style in the inspector bar opens Adjustments. Exposure, Blacks and Whites set the brightness range, Shadows and Highlights the tones in between, and Temperature shifts the white balance, cooler to the left and warmer to the right. On our warm test chart, Temperature at -12 brought the gray patch back to neutral, while -25 already pushed it toward blue.
FAQs
Not quite, although the terms are often swapped. Wikipedia notes that the two are often used as synonyms, and Final Cut Pro's guide lists both fixing errors in white balance and getting a warmer or cooler look as reasons for color correction. Guides such as Videomaker's and Boris FX's still separate them by goal, with correction aiming for accurate footage and grading for a style.
After, in most workflows. Final Cut Pro's guide places color correction near the end of finishing a program, after the edit. Boris FX advises grading once the structure of the edit is settled, because a grade chosen for one shot order may no longer fit after the cuts change. Within that stage, correction comes before the grade.
A creative look usually can't. In our test, 50 of the 61 looks built into CE.SDK left at least 40 percent of a warm cast on a gray patch, and 20 of them made it stronger. A look turns each input color into the same output color in every shot, so a cast that goes in still shows when it comes out. Conversion LUTs for log footage do a different job, which our LUT page covers.
On set, it means correcting the light before it reaches the camera. Colored gels go over lamps so that mixed light sources match: a CTB (color temperature blue) gel brings tungsten light close to daylight, and a CTO (orange) gel does the reverse. Final Cut Pro's guide also suggests filming a color chip chart next to the slate, whose white chip gives the editor a reference for white balance later.
Links
Documentation and references for this concept.
Video Editor SDK
Let your users fix the color cast in each clip before a look goes on.
Adjust Colors Guide
Cool or warm an image or clip with temperature, and set its exposure, blacks and whites.
Append Effect API
Add an effect to the end of a block's effect list, so a correction appended before a LUT filter runs first.
Related Terms
Color Grading
Shaping the contrast, color casts and saturation of footage or photos so that every shot matches and shares a chosen sty…
LUT
A table that maps each input color to an output color, used to convert log footage to a display standard or to give imag…
Effects
Visual processing layers applied on top of a block's fill to modify its appearance, including LUT-based color filters, a…