Border Frames

PhotoEditor SDK includes a versatile frame tool that works with any given photo size or ratio and provides two distinct options to apply frames. The first option is to use static frames. These frames hold serveral versions of the assets, i.e. one for each supported ratio. During the rendering process the best fitting asset will be selected and used by the backend. Also the tolerance can be used to determine how close the ratio of the asset has to be to the current image ratio. Setting a higher tolerance can lead to a deformation of the frame asset, since it will be simply scaled to match the image dimensions. In the frame tool UI, only static frames with a matching asset for the current image ratio will be listed. The static frames can be used for complex and irregular creatives.
The second option is to use the all-new dynamic frames. They work perfectly for creatives with repeatable or stretchable areas. To realize these, we abandoned the 9-patch standard and replaced it with a novel and even more flexible 12-patch layout. Supported asset formats are jpeg and png.
Adding static frames#
Frames are stored in a static array of the Frame class. To add frames, simply append new Frame objects to that array.
In the example code below, we are creating a new static frame. We are adding three assets, to support the aspect ratios, 1:1, 4:6 and 6:4.
As tolerance, we set 0.1, which is our go-to value. We also set an identifier that will be used during the (de)serialization process and which must be unique. We prefixed all frame assets with imgly_frame, and we highly recommend you prefix your assets and identifiers as well.
let frame = Frame(identifier: "imgly_frame_blackwood", tolerance: 0.1)frame.accessibilityLabel = "Black wood frame"if let url1 = Bundle.imgly.resourceBundle.url(forResource: "imgly_frame_blackwood1_1", withExtension: "png") {frame.addImage(url1, thumbnailURL: nil, forRatio: 1)}if let url46 = Bundle.imgly.resourceBundle.url(forResource: "imgly_frame_blackwood4_6", withExtension: "png") {frame.addImage(url46, thumbnailURL: nil, forRatio: 4.0 / 6.0)}if let url64 = Bundle.imgly.resourceBundle.url(forResource: "imgly_frame_blackwood6_4", withExtension: "png") {frame.addImage(url64, thumbnailURL: nil, forRatio: 6.0 / 4.0)}
Adding dynamic frames#
Dynamic frames consist of four groups. Each group has a start, middle and end image. The start and end images are optional,
and for the middle image there are two modes, .repeat and .stretch. These determine whether the asset should be stretched over the area,
or if they should be repeated to fill up space. If the middle asset is set to mode .repeat the images will be made to fit the width of the section.
In some cases this results in the individual tiles being compressed or stretched a small amount, in order to fit only complete assets and avoid cutting the tiles.
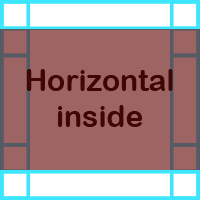
The four groups can be laid out in two ways. Horizontal inside and vertical inside, see the images below.

The idea behind the naming is, that if you imagine a box that covers the right and left groups and the top and bottom groups surrounding it, the horizontal box is inside the groups, as illustrated by the following image.

To create such a frame, you must use the initializer of the Frame class that takes a FrameBuilder, a thumbnail URL, a relative scale, and
an identifier. FrameBuilder is a protocol, and its only method takes the size of the image that the frame should be applied to, and
the relative scale as parameters, and returns the matching frame asset via completion block. The relative scale is used to describe how
big the frame should be in relation to the image it will be applied to. Lower values result in thinner, smaller frames. Currently we provide only one
class for that purpose, the CustomPatchFrameBuilder, but it is so powerful and flexible, that we were able to build all frames we needed with it.
The CustomFrameBuilder takes a CustomPatchConfiguration that holds the four groups, and their properties.
Finally, lets have a look at a real world example.

The layout mode is horizontal inside. The top and bottom group just have a middle image, containing the film strip pattern. The left and right group consist of a stretched border texture, and a start and end image to create a nice transition between the two sides of the film strip.
The code to create that frame builder looks like this:
let config = CustomPatchConfiguration()if let midURL = Bundle.imgly.resourceBundle.url(forResource: "imgly_frame_dia_top", withExtension: "png") {let topImageGroup = FrameImageGroup(startImageURL: nil, midImageURL: midURL, endImageURL: nil)config.topImageGroup = topImageGroup}if let startURL = Bundle.imgly.resourceBundle.url(forResource: "imgly_frame_dia_top_left", withExtension: "png"),let midURL = Bundle.imgly.resourceBundle.url(forResource: "imgly_frame_dia_left", withExtension: "png"),let endURL = Bundle.imgly.resourceBundle.url(forResource: "imgly_frame_dia_bottom_left", withExtension: "png") {let leftImageGroup = FrameImageGroup(startImageURL: startURL, midImageURL: midURL, endImageURL: endURL)leftImageGroup.midImageMode = .stretchconfig.leftImageGroup = leftImageGroup}if let startURL = Bundle.imgly.resourceBundle.url(forResource: "imgly_frame_dia_top_right", withExtension: "png"),let midURL = Bundle.imgly.resourceBundle.url(forResource: "imgly_frame_dia_right", withExtension: "png"),let endURL = Bundle.imgly.resourceBundle.url(forResource: "imgly_frame_dia_bottom_right", withExtension: "png") {let rightImageGroup = FrameImageGroup(startImageURL: startURL, midImageURL: midURL, endImageURL: endURL)rightImageGroup.midImageMode = .stretchconfig.rightImageGroup = rightImageGroup}if let midURL = Bundle.imgly.resourceBundle.url(forResource: "imgly_frame_dia_bottom", withExtension: "png") {let bottomImageGroup = FrameImageGroup(startImageURL: nil, midImageURL: midURL, endImageURL: nil)config.bottomImageGroup = bottomImageGroup}let builder = CustomPatchFrameBuilder(configuration: config)
And the code to create the Frame object looks like this
if let url = Bundle.imgly.resourceBundle.url(forResource: "imgly_frame_dia_thumbnail", withExtension: "png") {let dynamicFrame = Frame(frameBuilder: builder, relativeScale: 0.075, thumbnailURL: url, identifier: "imgly_frame_dia")dynamicFrame.accessibilityLabel = "Dia frame"}
Enabling frames#
After you have instantiated your instances of the Frame class, you can enable them by appending them to the AssetCatalog.frames array, which is then passed to the Configuration.
let configuration = Configuration { builder inlet assetCatalog = AssetCatalog.defaultItemsassetCatalog.frames.append(dynamicFrame)builder.assetCatalog = assetCatalog}