Migration from v10
Update dependencies#
VideoEditor SDK requires iOS 13+ and Xcode 14.3.1+ with Swift 5.8+. If you have to use older versions of Swift or support older versions of iOS, please have a look at previous versions.
Swift Package Manager#
Go to your Xcode project Package Dependencies section, make sure that the version policy for the vesdk-ios-build package includes v11:
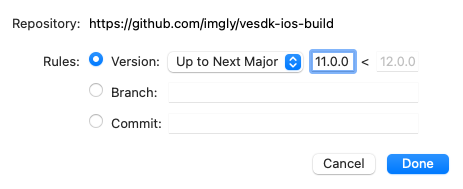
Then select File > Packages > Update to Latest Package Versions.
For more details about using Swift Package Manager see the official guide.
CocoaPods#
Your Podfile should already contain the proper entry:
pod 'VideoEditorSDK'
To perform the actual update, run the following command:
pod update VideoEditorSDK --repo-update
During a successful update to v11, you should get a similar output:
Installing VideoEditorSDK 11.0.0 (was 10.30.0)Installing imglyKit 11.0.0 (was 10.30.0)
For more details about using CocoaPods see the official guide.
Manually#
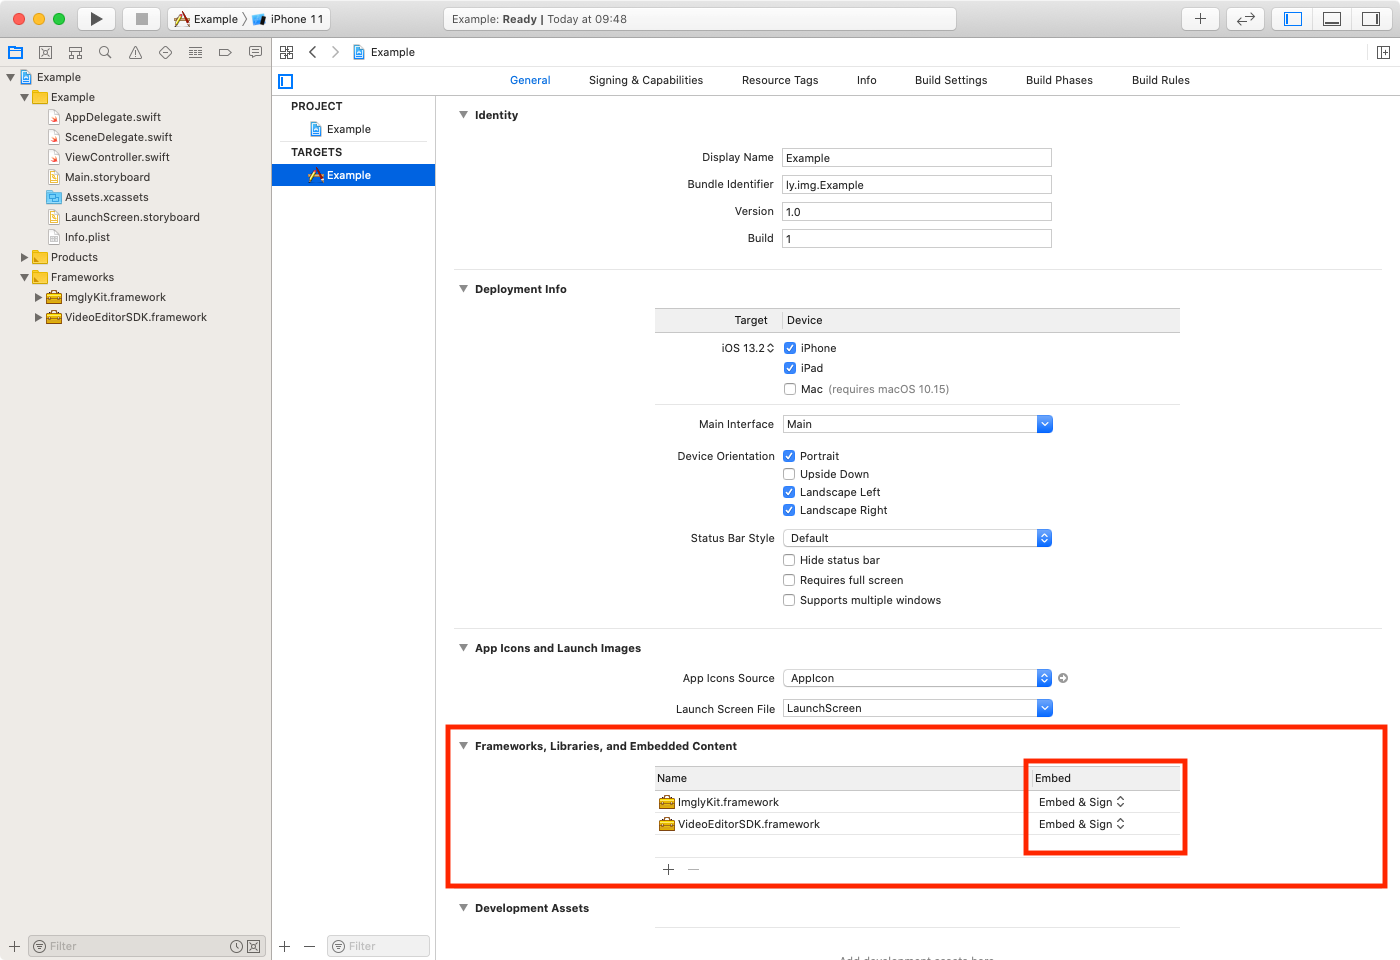
Download the latest version of the SDK here, then replace ImglyKit.framework as well as VideoEditorSDK.framework in the Frameworks, Libraries, and Embedded Content section of your target and make sure that the Embed & Sign option is selected for both of them:
For more details about manual integration see the getting started section.
UIKit#
CameraViewController#
The CameraViewController now returns its results within a single completionBlock:
- cameraViewController.completionBlock = { image, url in- // ...- }- cameraViewController.dataCompletionBlock = { data in- // ...- }+ cameraViewController.completionBlock = { result in+ // ...+ }
- [cameraViewController setCompletionBlock:^(UIImage * _Nullable image, NSURL * _Nullable url) {- // ...- }];- [cameraViewController setDataCompletionBlock:^(NSData * _Nullable imageData) {- // ...- }];+ [cameraViewController setCompletionBlock:^(PESDKCameraResult * _Nonnull result) {+ // ...+ }];
The new CameraResult parameter optionally contains either:
- JPEG
dataalong with EXIF information or - the
urlof the recorded video.
It also adds the model property to be able to pass, e.g., the filter state stored in PhotoEditModel between the camera and the editor.
To create a Video and pass it to the editor, use Video(url:) accordingly:
let cameraViewController = CameraViewController()cameraViewController.completionBlock = { [unowned cameraViewController] result inguard let url = result.url else { return }let video = Video(url: url)let videoEditViewController = VideoEditViewController(videoAsset: video)videoEditViewController.delegate = selfcameraViewController.present(videoEditViewController, animated: true, completion: nil)}present(cameraViewController, animated: true, completion: nil)
VideoEditViewControllerDelegate#
The VideoEditViewControllerDelegate uses extensible return types.
See the examples below to integrate the improved result API with your existing code.
Getting the video#
- func videoEditViewController(_ videoEditViewController: VideoEditViewController, didFinishWithVideoAt url: URL?)+ func videoEditViewControllerDidFinish(_ videoEditViewController: VideoEditViewController, result: VideoEditorResult)
The VideoEditorResult parameter has three inner properties:
output- stores theurlparameter with additional metadata (such as the type identifier),status- indicates which exact path was chosen by the user, whether the input video was processed by our rendering pipeline or just passed without changes. This extends thevideoEditViewController.hasChangesproperty.task- encapsulates the input data (context) passed to the editor.
In most cases, you will work with your output video using its URL directly. Then, you will need to replace url with result.output.url inside your delegate methods.
Error handling#
- func videoEditViewControllerDidFailToGenerateVideo(_ videoEditViewController: VideoEditViewController)+ func videoEditViewControllerDidFail(_ videoEditViewController: VideoEditViewController, error: VideoEditorError)
The VideoEditorError is passed to provide different fallback paths, as well as debugging possibilities.
You can query the error object for its reason and optional underlyingError properties:
func videoEditViewControllerDidFail(_ videoEditViewController: VideoEditViewController, error: VideoEditorError) {// There was an error generating the video.print(error.localizedDescription)switch error.reason {case .videoTooShort:()case .exportFailed:()default:()}// Dismissing the editor.presentingViewController?.dismiss(animated: true, completion: nil)}
Starting the rendering (optional)#
There is also a new optional method that you can implement to perform additional validation of the input task and interrupt the rendering process if necessary:
func videoEditViewControllerShouldStart(_ videoEditViewController: VideoEditViewController, task: VideoEditorTask) -> Bool {true}
SwiftUI#
Working with SwiftUI VideoEditor you are already familiar with VideoEditorResult
as well as with the onDidSave and onDidFail modifiers. The new version provides a consistent API with its UIKit counterpart so that you can reuse the same straightforward patterns in your closures.
Camera#
< markdownPath="../../shared/migration/camera_swiftui.mdx`
VideoEditor#
Getting the video#
.onDidSave { result in// ...}
The onDidSave modifier type did not change, but the VideoEditorResult itself is extended.
In most cases, you will work with your output video using its URL directly. Then, you will need to replace result.url with result.output.url inside your closures.
For more details about consuming the results, see the getting the video section for UIKit.
Error handling#
- .onDidFail {+ .onDidFail { error in
The onDidFail modifier passes the actual VideoEditorError that can be handled accordingly:
.onDidFail { error in// There was an error generating the video.print("Editor finished with error: \(error.localizedDescription)")switch error.reason {case .videoTooShort:()case .exportFailed:()default:()}}
Starting the rendering (optional)#
There is also a new optional modifier that you can implement to perform additional validation of the input task and interrupt the rendering process if necessary:
.onShouldStart { task intrue}
Explicit use of AssetCatalog#
< markdownPath="../../shared/migration/asset_catalog.mdx`
IMGLY extension namespace#
< markdownPath="../../shared/migration/namespacing.mdx`