Getting Started
Integration Tutorial#
Requirements#
PhotoEditor SDK 9 requires Xcode 10.0, Swift 4.2 and iOS 9 and above. If you have to use older versions of Swift or support older versions of iOS, please have a look at previous versions.
CocoaPods#
PhotoEditor SDK is available via CocoaPods. If you're new to CocoaPods, this Getting Started Guide will help you. CocoaPods is the preferred and simplest way to use the PhotoEditor SDK.
Important: Please make sure that you have a CocoaPods version >= 0.39.0 installed. You can check your version of CocoaPods with pod --version.
Here's what you have to add to your Podfile:
use_frameworks!pod 'PhotoEditorSDK'
To make sure you're fetching the latest SDK version, run pod repo update. Then run pod install to install the SDK.
License file#
Before using any components of the PhotoEditor SDK, you have to unlock the SDK using your license key file. It is important that you set the license key before using any of the SDK classes.
func application(_ application: UIApplication, willFinishLaunchingWithOptions launchOptions: [UIApplication.LaunchOptionsKey: Any]? = nil) -> Bool {if let licenseURL = Bundle.main.url(forResource: "license", withExtension: "") {PESDK.unlockWithLicense(at: licenseURL)}return true}
The license is digitally signed so it can not be altered without becoming invalid. Our sample app comes with its own license, so you can try that right away. To try our SDK in your own app, you'll have to request a trial license because a license is bound to a bundle identifier. You can request a demo license at https://www.photoeditorsdk.com/users/new.
Once you retrieved the license file it can be used to unlock the view controller. The following examples demonstrates how to unlock the SDK.
Manually#
If you prefer not to use CocoaPods, you can integrate PhotoEditor SDK into your project manually via a dynamic framework.
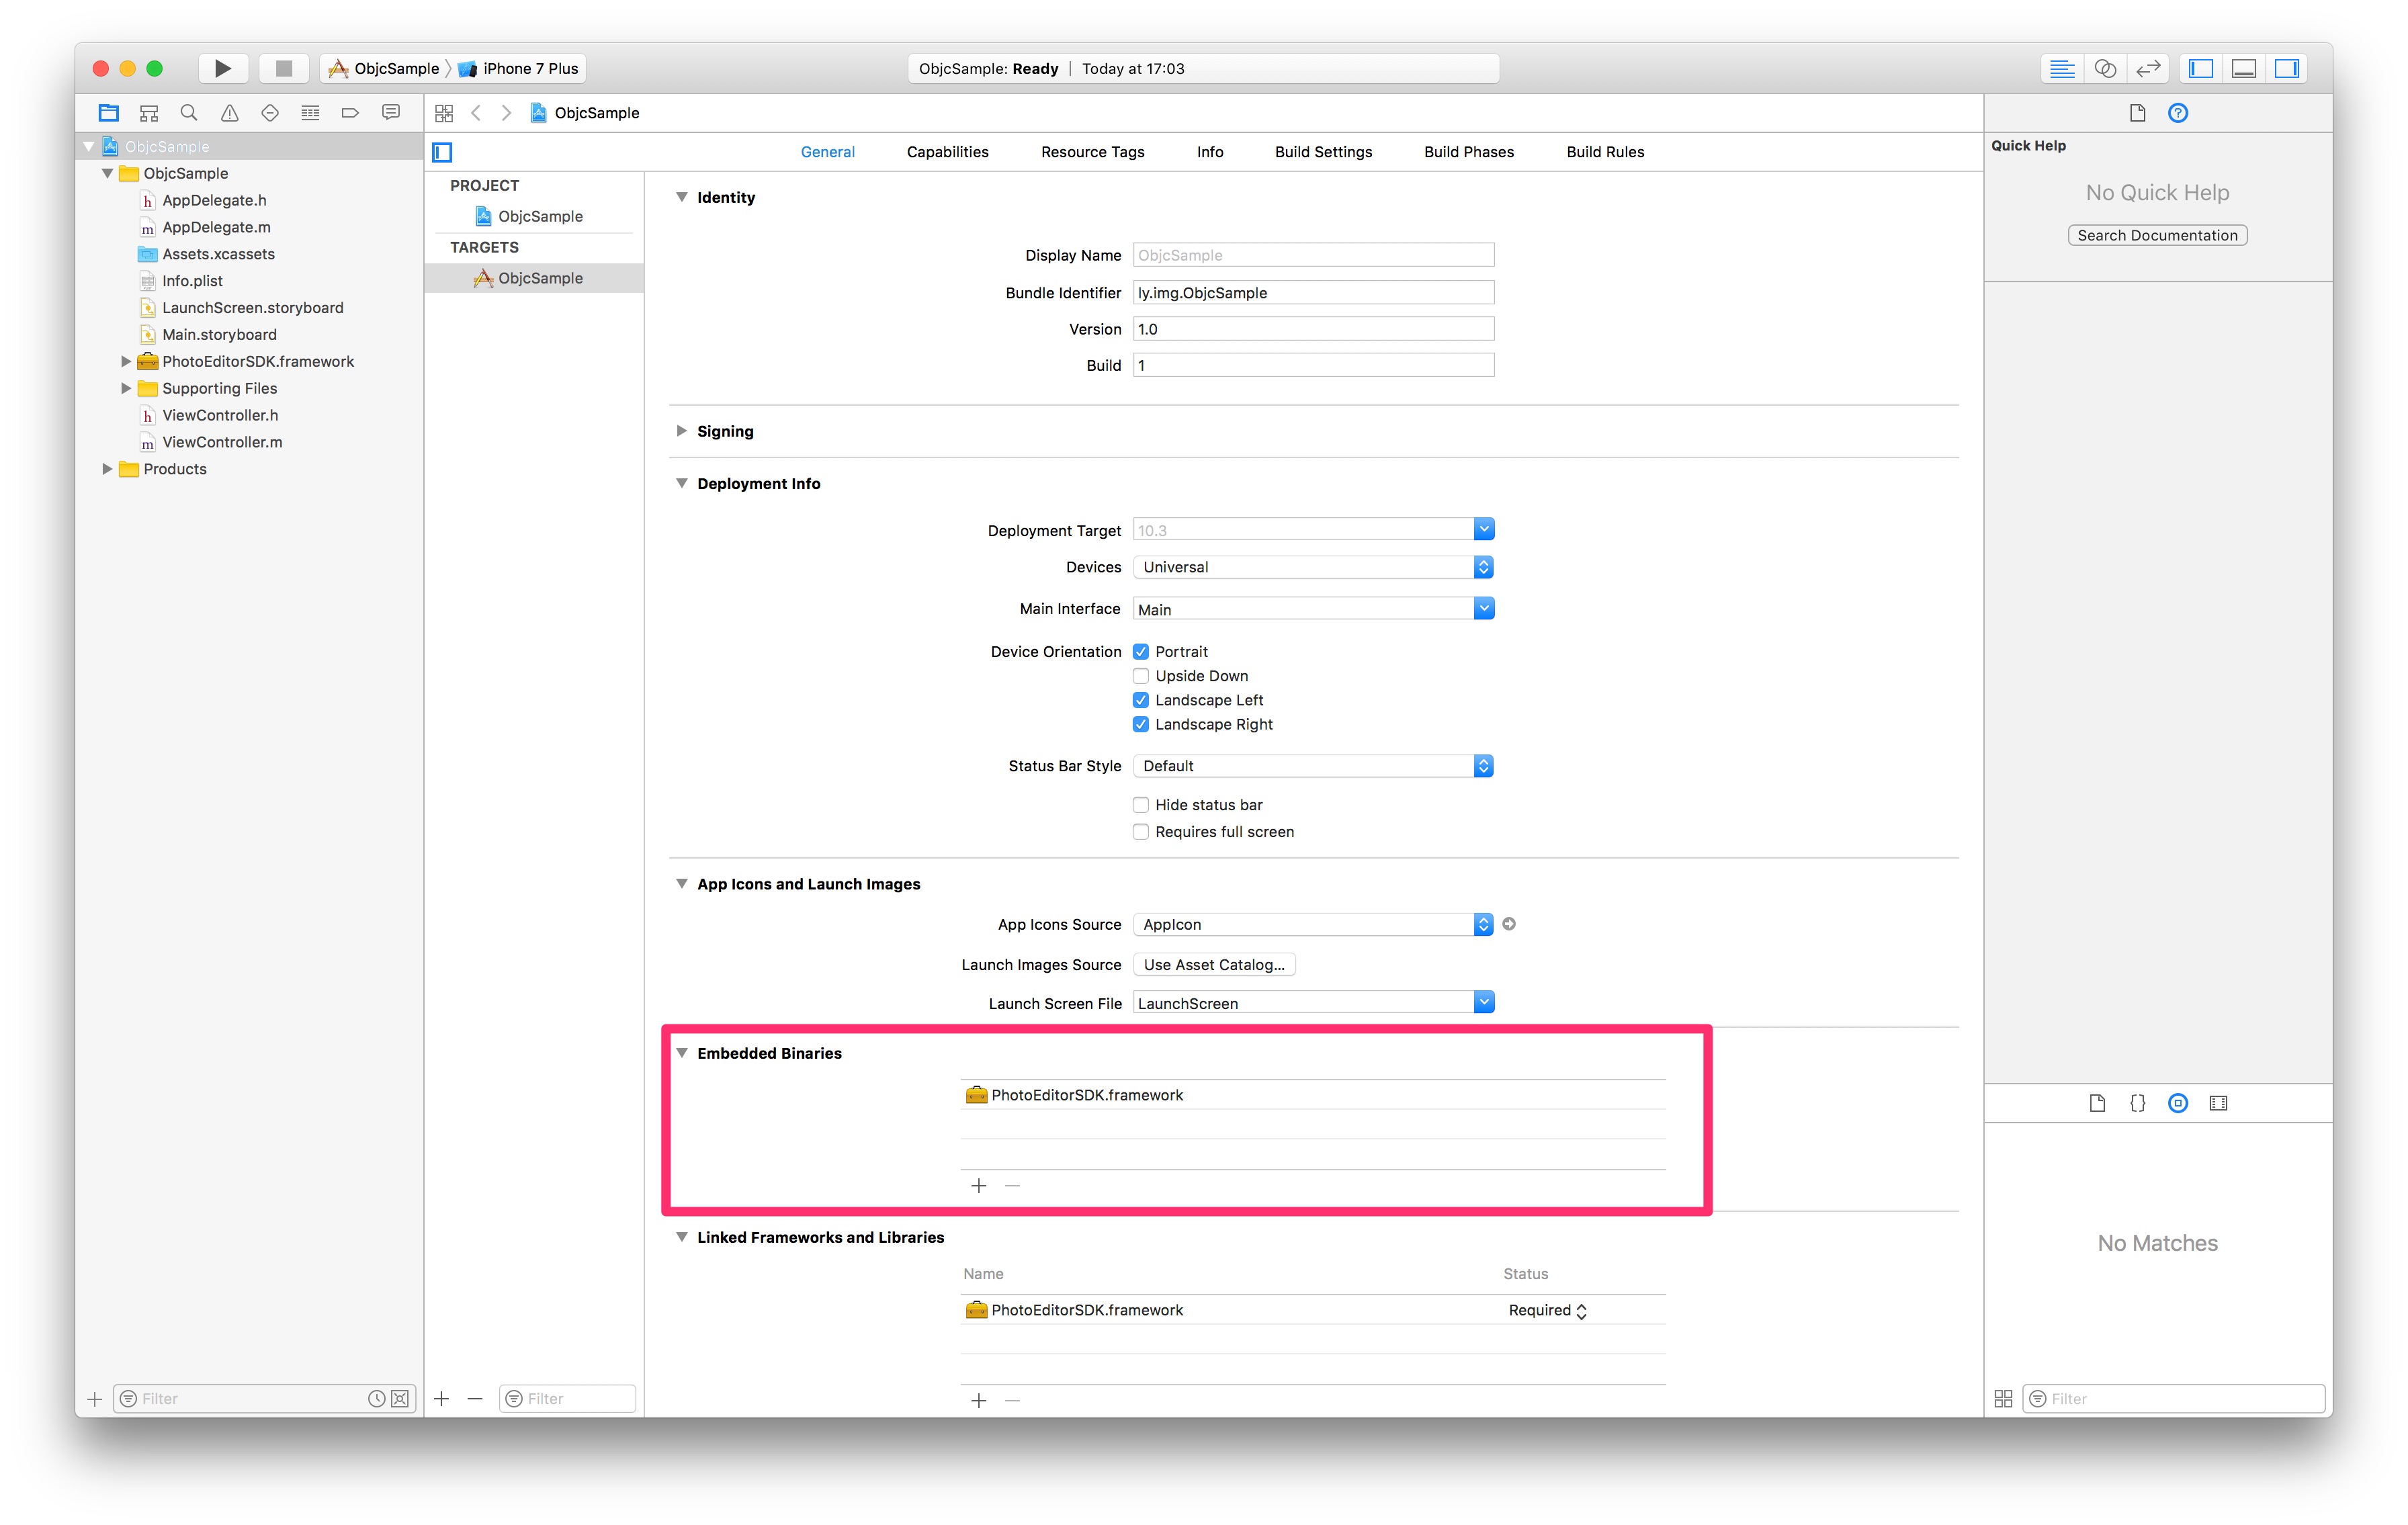
- Download the SDK here, then simply drag
PhotoEditorSDK.frameworkinto theEmbedded Binariessection of your target:
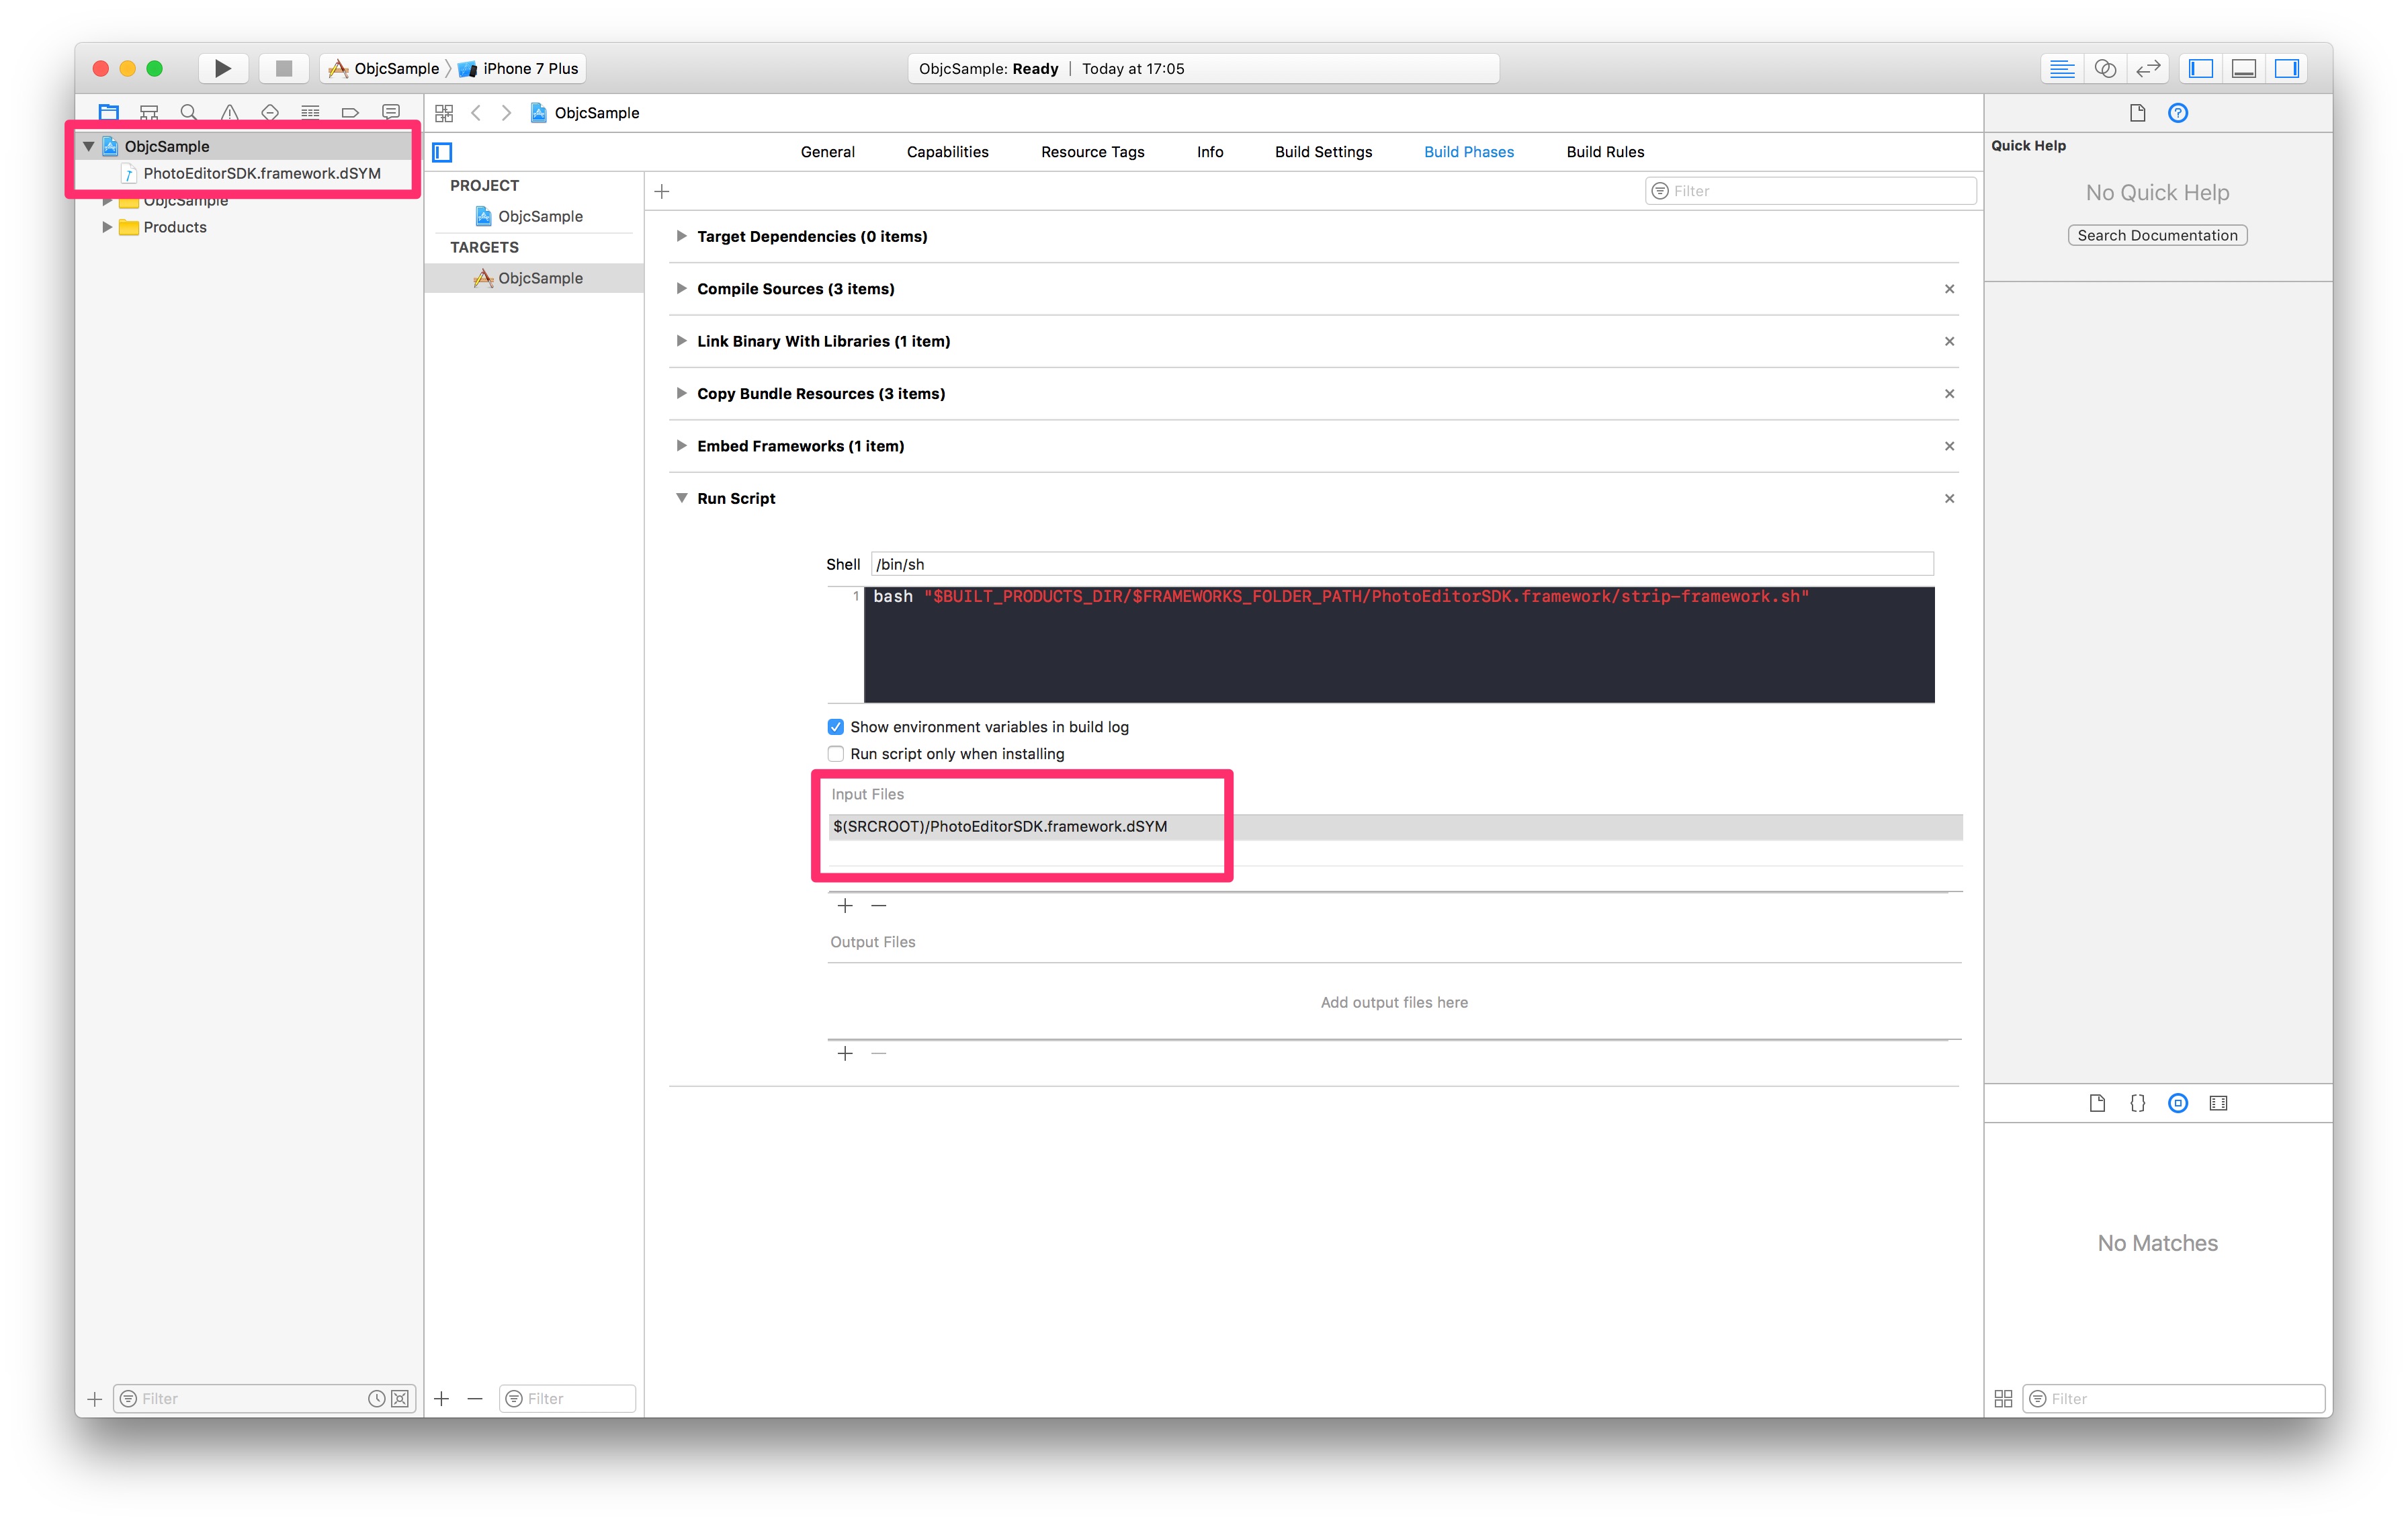
- Open your project's
Build Phasestab and add a newRun Script Phasesomewhere below theEmbed Frameworksphase. Then copy the following line into the newly created build phase's text field:
bash "$BUILT_PRODUCTS_DIR/$FRAMEWORKS_FOLDER_PATH/PhotoEditorSDK.framework/strip-framework.sh"

This script will remove the simulator slices from the universal binary, because Xcode currently does not allow uploading apps that contain slices for both, the simulator and for devices.
If you are integrating the PhotoEditor SDK into an otherwise Objective-C only project you also have to set the
Always Embed Swift Standard Librariesbuild setting in your project'sBuild Settingstab toYes.To receive symbolicated crash logs, you need to include our debug symbols. Copy the
PhotoEditorSDK.framework.dSYMfile to your project's tree without adding it to any of your targets. Then add the copied file as an input file to theRun Script Phaseof step 2.
Our SDK provides two main view controllers. One to work with the camera and the other to edit an image.
In the following section, we will first explain how the licensing works and then how the basic view controllers are set up.
We will also demonstrate how they can be embedded into a UINavigationController.
Add Import Statement#
You have to add an import statement like this:
import PhotoEditorSDK
Add a CameraViewController#
The CameraViewController class is responsible for displaying an interface to interact with the camera. It provides user interface elements among others to enable the flash, toggle the camera and choose a filter. All you have to do is the following:
let cameraViewController = CameraViewController()present(cameraViewController, animated: true, completion: nil)
The CameraViewController has a completionBlock property. When it is set to nil, the photo is passed to the PhotoEditViewController, which is then presented modally.
Add a PhotoEditViewController#
The PhotoEditViewController class is responsible for presenting and rendering an image. It can be presented modally in which case it will display a toolbar at the bottom or it can be pushed onto a UINavigationController in which case it will use the navigation controller’s navigation bar. It also handles presentation of PhotoEditToolController subclasses.
To present a PhotoEditViewController just add these few lines:
let sampleImage = UIImage(named: "sample_image")!let photo = Photo(image: sampleImage)let photoEditViewController = PhotoEditViewController(photoAsset: photo)photoEditViewController.delegate = selfpresent(photoEditViewController, animated: true, completion: nil)
Here, we set the delegate of the photoEditViewController object to self.
That means that the presenting view controller must implement the PhotoEditViewControllerDelegate protocol.
The methods of the PhotoEditViewControllerDelegate protocol are designed to inform the delegate about the result of the editing process (for example cancellation).
The method that gets called when the user confirms the changes is
func photoEditViewController(_ photoEditViewController: PhotoEditViewController, didSave image: UIImage, and data: Data).
It provides the resulting image as an UIImage and a Data object. Please note that the EXIF data of the input image is only fully contained within the Data object. Please refer to the export section for more information about EXIF handling.
Embed in an UINavigationController#
The controllers provided with the SDK can be embedded in an UINavigationController. The following code demonstrates how.
let sampleImage = UIImage(named: "sample_image")!let photo = Photo(image: sampleImage)let photoEditViewController = PhotoEditViewController(photoAsset: photo)photoEditViewController.delegate = selflet navigationController = UINavigationController(rootViewController: photoEditViewController)present(navigationController, animated: true, completion: nil)
To try these examples, and find out about more options please take a look at the sample project provided in the demo repository .