This guide shows you how to create a simple API on Amazon AWS to dynamically generate image variants based on CreativeEditor SDK (CE.SDK) templates saved in an S3 bucket by running the CE.SDK’s Creative Engine on the server.
Who is This Guide For?#
- Are using Node.js and Amazon AWS.
- Want to create a server-side API for dynamically generating images or videos based on certain events.
- Need to implement a scalable solution for creative automation in your application.
What You’ll Achieve#
- Implement CE.SDK service on AWS CDK App.
- Set up a table on DynamoDB to store image records.
- Create an image API implementing
createandgetendpoints. - Create lambda functions for creating and querying image resources as well as interpolating parameters to render an image using CE.SDK.
Prerequisites#
Follow the steps in this AWS tutorial. We are going to use AWS CDK to provision the infrastructure (API Gateway, Lambda Function, S3 buckets, DynamoDB and IAM Role) we need. You should have a basic understanding of the AWS CLI and CloudFormation.
- Install and configure the AWS CLI.
- Install the AWS CDK npm package and bootstrap the necessary resources.
- Get a valid CE.SDK license key.
Step 1: Create the AWS CDK App#
Create the AWS CDK app, for this example, we’ll create an app called “cesdk-aws-lambda”, but you’ll probably want to opt for a more descriptive name for your use case.
mkdir cesdk-aws-lambdacd cesdk-aws-lambdacdk init --language javascriptThe main entry point for our app will be bin/cesdk-aws-lambda and the stack script we’ll use to provision our resources will be located in lib/cesdk-aws-lambda-stack.js.
Run the following command to test that everything is working correctly:
cdk synthSince we haven’t added anything to our stack file this will synthesize an empty stack.
Step 2: Create a CE.SDK service#
Create a CDK service file under lib/cesdk-service.js to configure our stack. We’ll create the necessary resources for the images API endpoint first; a REST API using APIGateway that integrates with a lambda handler that in turns creates and queries the DynamoDB table:
const { Construct } = require('constructs');const apigateway = require('aws-cdk-lib/aws-apigateway');const lambda = require('aws-cdk-lib/aws-lambda');
class CESDKService extends Construct {  constructor(scope, id) {    super(scope, id);
    const tableName = 'ImagesTable';
    // lambda function for images endpoint creating new images and returning images    const imagesHandler = new lambda.Function(this, 'ImagesHandler', {      runtime: lambda.Runtime.NODEJS_20_X,      code: lambda.Code.fromAsset('src'),      handler: 'images-handler.main',      environment: {        TABLE_NAME: tableName,      },    });
    // Set up REST api for images    const api = new apigateway.RestApi(this, 'cesdk-api', {      restApiName: 'CESDK Service',      description: 'This service renders cesdk templates.',    });
    const CESDKIntegration = new apigateway.LambdaIntegration(imagesHandler, {      requestTemplates: { 'application/json': '{ "statusCode": "200" }' },    });
    const imagesResource = api.root.addResource('images');    imagesResource.addMethod('POST', CESDKIntegration); // POST /images
    const imageResource = imagesResource.addResource('{id}');    imageResource.addMethod('GET', CESDKIntegration); // GET /images/{id}  }}
module.exports = { CESDKService };
This service has to be added to the stack definition in the lib/cesdk-aws-lambda-stack file.
const { Stack } = require("aws-cdk-lib");const CESDKService = require("../lib/cesdk-service");
class CesdkAwsLambdaStack extends Stack {  /**   *   * @param {Construct} scope   * @param {string} id   * @param {StackProps=} props   */  constructor(scope, id, props) {    super(scope, id, props);
    // The code that defines your stack goes here    new CESDKService.CESDKService(this, "CESDK Service");  }}
module.exports = { CesdkAwsLambdaStack };
Test that the app runs and synthesizes a stack with cdk synth.
Step 3: Create a Lambda Function to Create Images#
Create an src directory and run npm init.
We’ll install all necessary dependencies inside the src directory, since only code specified via code: lambda.Code.fromAsset("src") in our service file will be made available to our lambda function.
yarn add @cesdk/node @aws-sdk/client-dynamodb uuidNext initialize an images-handler.js file inside it. This lambda function handles the POST and GET image requests.
In the first case, we create a unique image id and a file name derived from it, then we add a new image record in our DynamoDB table storing the parameter from the request that should be interpolated, the id and file name as well as a creation status (initially PENDING) of the image that the client can query.
The second case takes the image id from the request and simply returns the record from the database.
const { DynamoDBClient } = require("@aws-sdk/client-dynamodb");const {  DynamoDBDocumentClient,  GetCommand,  PutCommand,} = require("@aws-sdk/lib-dynamodb");const { v4: uuidv4 } = require("uuid");
const dynamoDBClient = new DynamoDBClient({});const dynamoDBDocClient = DynamoDBDocumentClient.from(dynamoDBClient);
const tableName = process.env.TABLE_NAME;
exports.main = async function (event) {  const routeKey = `${event.httpMethod} ${event.resource}`;
  try {    switch (routeKey) {      case "POST /images":        const id = uuidv4();        const filename = `awesome-headline-${id}.png`;        const requestBody = JSON.parse(event.body);        // Create a new item in the DB table        const putCommand = new PutCommand({          TableName: tableName,          Item: {            id,            filename,            interpolationParams: JSON.stringify({              headline: requestBody.headline,            }),            creationStatus: "PENDING",            url: "",          },        });        await dynamoDBDocClient.send(putCommand);        var body = { id };        break;
      case "GET /images/{id}":        const getCommand = new GetCommand({          TableName: tableName,          Key: {            id: event.pathParameters.id,          },        });        const getResponse = await dynamoDBDocClient.send(getCommand);        body = getResponse.Item;        break;    }
    return {      statusCode: 200,      headers: {},      body: JSON.stringify(body),    };  } catch (error) {    var body = error.stack || JSON.stringify(error, null, 2);    return {      statusCode: 400,      headers: {},      body: JSON.stringify(body),    };  }};
After saving the function, you can run cdk synth again as sanity check that we’re still synthesizing an empty stack.
Step 4: Integrating the Creative Engine#
Now, we need another lambda function to perform the heavy lifting of running the Creative Engine and rendering the image.
For this add a cesdk-handler.js file in the src directory and create a lambda handler there.
We’ll initialize the CreativeEngine and load the template from the URL we’ll provide through an environment variable. Of course, in most use cases you will want to dynamically retrieve templates from file storage, but for illustration purposes we hardcode the template here.
const CreativeEngine = require('@cesdk/node');
const templateURL = process.env.TEMPLATE_URL;
const config = {  // license: 'YOUR_CESDK_LICENSE_KEY',};
exports.main = async function (event) {  try {    const engine = await CreativeEngine.init(config);    // load scene from remote template file    await engine.scene.loadFromURL(templateURL);  } catch (error) {    console.warn(error);  }};
Now to access the newly created image record, we need to set the cesdkHanlder as a lambda trigger for our DynamoDB table.
Inside the cesdk-service.js we’ll first define the lambda function increasing the memory available to the function as well as the timeout to allow for more computation-heavy renderings.
Then we’ll grant the required permissions to perform updates to the images table and finally, we’ll add a DynamoDB event stream to the cesdkHandler. The complete cesdk-service.js file is as follows:
const { Construct } = require("constructs");const apigateway = require("aws-cdk-lib/aws-apigateway");const lambda = require("aws-cdk-lib/aws-lambda");const s3 = require("aws-cdk-lib/aws-s3");const cdk = require("aws-cdk-lib");const dynamodb = require("aws-cdk-lib/aws-dynamodb");const iam = require("aws-cdk-lib/aws-iam");const eventsource = require("aws-cdk-lib/aws-lambda-event-sources");
class CESDKService extends Construct {  constructor(scope, id) {    super(scope, id);
    const tableName = "ImagesTable";    const bucket = new s3.Bucket(this, "CESDKStore");
    // lambda function for images endpoint creating new images and returning images    const imagesHandler = new lambda.Function(this, "ImagesHandler", {      runtime: lambda.Runtime.NODEJS_20_X,      code: lambda.Code.fromAsset("src"),      handler: "images-handler.main",      environment: {        TABLE_NAME: tableName,      },    });
    // lambda function running CE.SDK and rendering image    const cesdkHandler = new lambda.Function(this, "CESDKHandler", {      runtime: lambda.Runtime.NODEJS_20_X,      code: lambda.Code.fromAsset("src"),      handler: "cesdk-handler.main",      environment: {        BUCKET: bucket.bucketName,        TABLE_NAME: tableName,        TEMPLATE_URL:          "https://cdn.img.ly/assets/demo/v3/ly.img.template/templates/cesdk_postcard_1.scene",      },      timeout: cdk.Duration.minutes(5),      memorySize: 2048,    });
    // Create dynamo db table for storing image objects    const imagesTable = new dynamodb.Table(this, "ImagesTable", {      tableName: "ImagesTable",      billingMode: dynamodb.BillingMode.PROVISIONED,      removalPolicy: cdk.RemovalPolicy.DESTROY,      partitionKey: { name: "id", type: dynamodb.AttributeType.STRING },      pointInTimeRecoverySpecification: {        PointInTimeRecoveryEnabled: true,      },      stream: dynamodb.StreamViewType.NEW_IMAGE,    });
    // Configure lambda permissions for resources    bucket.grantReadWrite(cesdkHandler);
    const imagesTablePermissionPolicy = new iam.PolicyStatement({      actions: [        "dynamodb:BatchGetItem",        "dynamodb:GetItem",        "dynamodb:PutItem",        "dynamodb:UpdateItem",      ],      resources: [imagesTable.tableArn],    });
    const imagesTablePermissions = new iam.Policy(      this,      `${this.appName}-ImagesTablePermissions`,      {        statements: [imagesTablePermissionPolicy],      }    );
    imagesHandler.role?.attachInlinePolicy(imagesTablePermissions);    cesdkHandler.role?.attachInlinePolicy(imagesTablePermissions);
    cesdkHandler.addEventSource(      new eventsource.DynamoEventSource(imagesTable, {        startingPosition: lambda.StartingPosition.LATEST,      })    );
    // Set up REST api for images    const api = new apigateway.RestApi(this, "cesdk-api", {      restApiName: "CESDK Service",      description: "This service renders cesdk templates.",    });
    const CESDKIntegration = new apigateway.LambdaIntegration(imagesHandler, {      requestTemplates: { "application/json": '{ "statusCode": "200" }' },    });
    const imagesResource = api.root.addResource("images");    imagesResource.addMethod("POST", CESDKIntegration); // POST /images
    const imageResource = imagesResource.addResource("{id}");    imageResource.addMethod("GET", CESDKIntegration); // GET /images/{id}  }}
module.exports = { CESDKService };
The reason we are initializing the CE.SDK outside of our lambda handler is that this allows resource sharing among lambda requests and decreases our response time.
To receive only events of new image records having been added to the table, we need to add the following config option to the imagesTable definition:
stream: dynamodb.StreamViewType.NEW_IMAGE;Step 5: Filling a Template and Generating an Image#
Now we can finally get to the meat of the matter and populate a CE.SDK template with data submitted via our API.
We receive the newly created image record via the event that is passed into the lambda handler, after interpolating the headline parameter and rendering the final image, we’ll store it in an S3 bucket and generate a signed URL to the image.
Lastly, we update the image with the URL and set the creationStatus to FINISHED. The complete handler file now looks as follows:
const CreativeEngine = require("@cesdk/node");const { DynamoDBClient } = require("@aws-sdk/client-dynamodb");const {  DynamoDBDocumentClient,  UpdateCommand,} = require("@aws-sdk/lib-dynamodb");const { PutObjectCommand, S3Client } = require("@aws-sdk/client-s3");const { getSignedUrl } = require("@aws-sdk/s3-request-presigner");
const s3Client = new S3Client({});const dynamoDBClient = new DynamoDBClient({});const dynamoDBDocClient = DynamoDBDocumentClient.from(dynamoDBClient);
const bucketName = process.env.BUCKET;const templateURL = process.env.TEMPLATE_URL;const tableName = process.env.TABLE_NAME;
const { MimeType } = CreativeEngine;
const config = {  license: "<your-license-here>",};
exports.main = async function (event) {  try {    const engine = await CreativeEngine.init(config);    // load scene from remote template file    await engine.scene.loadFromURL(templateURL);    for (const record of event.Records) {      const item = record.dynamodb.NewImage;      const filename = item.filename.S;      const id = item.id.S;      const interpolationParams = JSON.parse(item.interpolationParams.S);      // Interpolate the text content from request params      engine.block.setString(        engine.block.findByType("text")[0],        "text/text",        interpolationParams.headline      );
      const [page] = engine.block.findByType("page");      const renderedImage = await engine.block.export(page, {        mimeType: "image/png",      });      const imageBuffer = await renderedImage.arrayBuffer();
      const putObjectCommand = new PutObjectCommand({        Bucket: bucketName,        Body: Buffer.from(imageBuffer),        ContentType: "image/png",        Key: filename,      });      // Store rendered image in S3 bucket      await s3Client.send(putObjectCommand);      // Retrieve image url      const signedUrl = await getSignedUrl(s3Client, putObjectCommand, {        expiresIn: 3600,      });      // Update the item in DB with the signed URL and status      const updateCommand = new UpdateCommand({        TableName: tableName,        Key: { id },        UpdateExpression: "SET #status = :statusValue, #url = :signedUrl",        ExpressionAttributeNames: {          "#url": "url",          "#status": "creationStatus",        },        ExpressionAttributeValues: {          ":signedUrl": signedUrl,          ":statusValue": "FINISHED",        },        ReturnValues: "UPDATED_NEW",      });      await dynamoDBDocClient.send(updateCommand);    }  } catch (error) {    console.warn(error);  }};
Step 6: Test the Integration#
- Configure your AWS credentials via
aws configureand entering your AWS Access Key ID, Secret Access Key, and region. These can usually be acquired on your AWS access portal. - Run
cdk deployto deploy the stack. - Access API Gateway in your AWS console and select
CESDK Service. Under Resources menu, select to/imagesPOST.
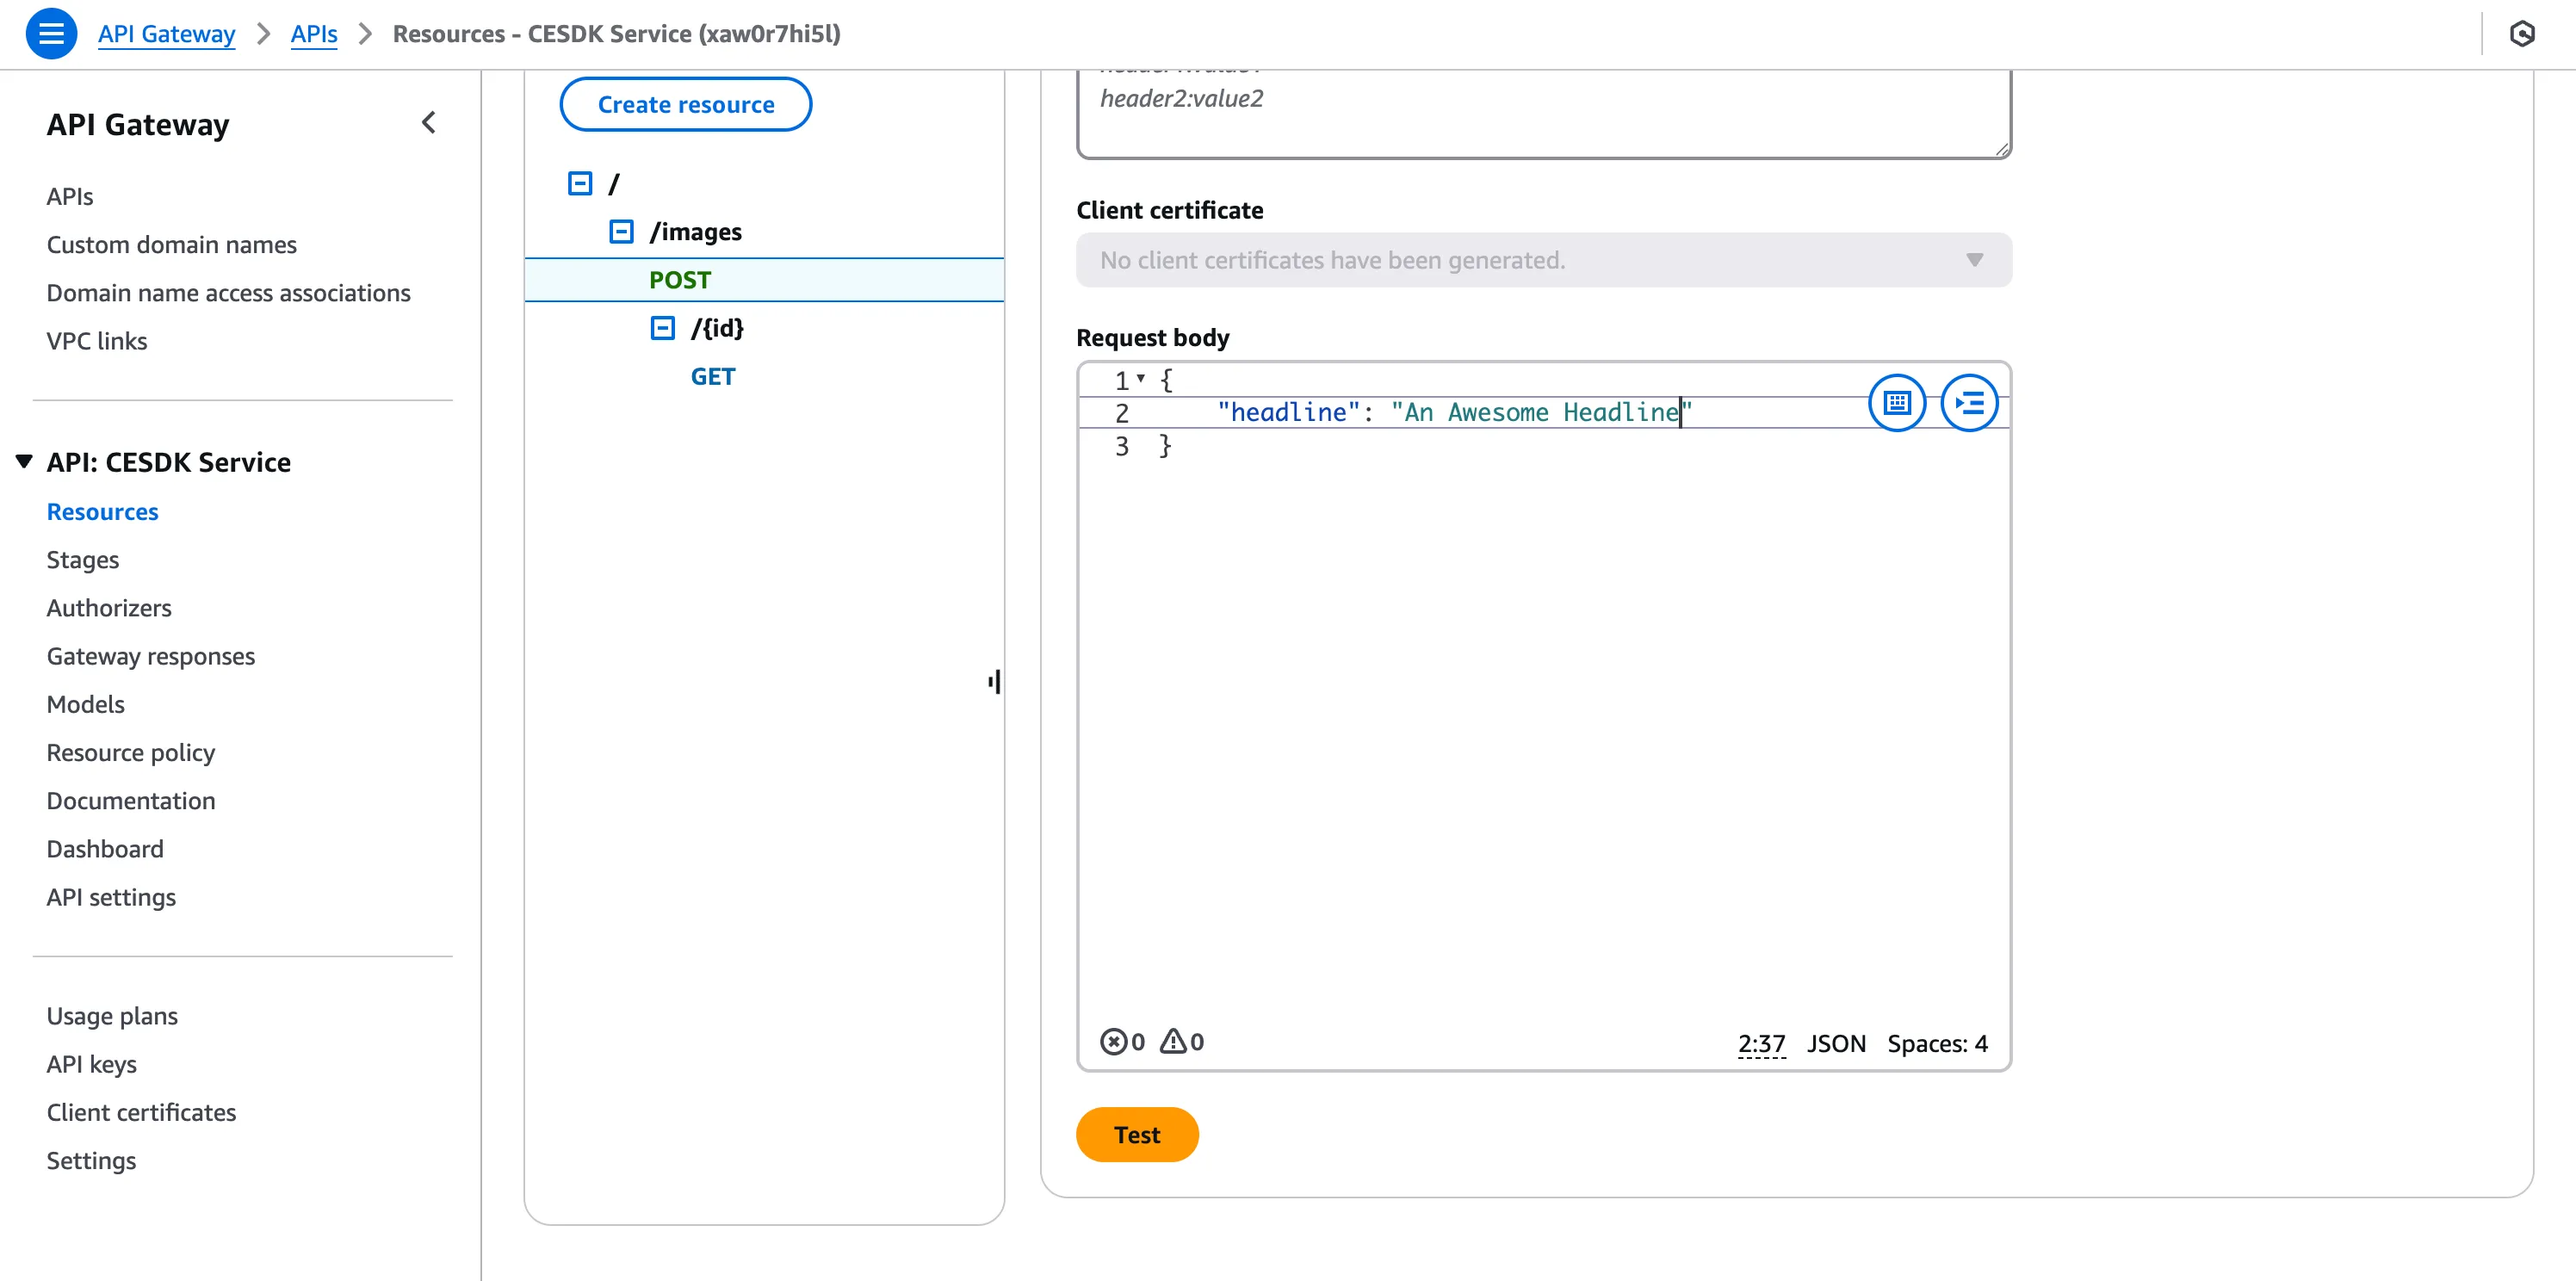
Then on ‘Test’ tab, test the API with a JSON body like this:
{ "headline": "An Awesome Headline"}You’ll receive a 200 response with the resulting image id. For the image rendering status to be FINISHED, you might need to wait a few seconds.
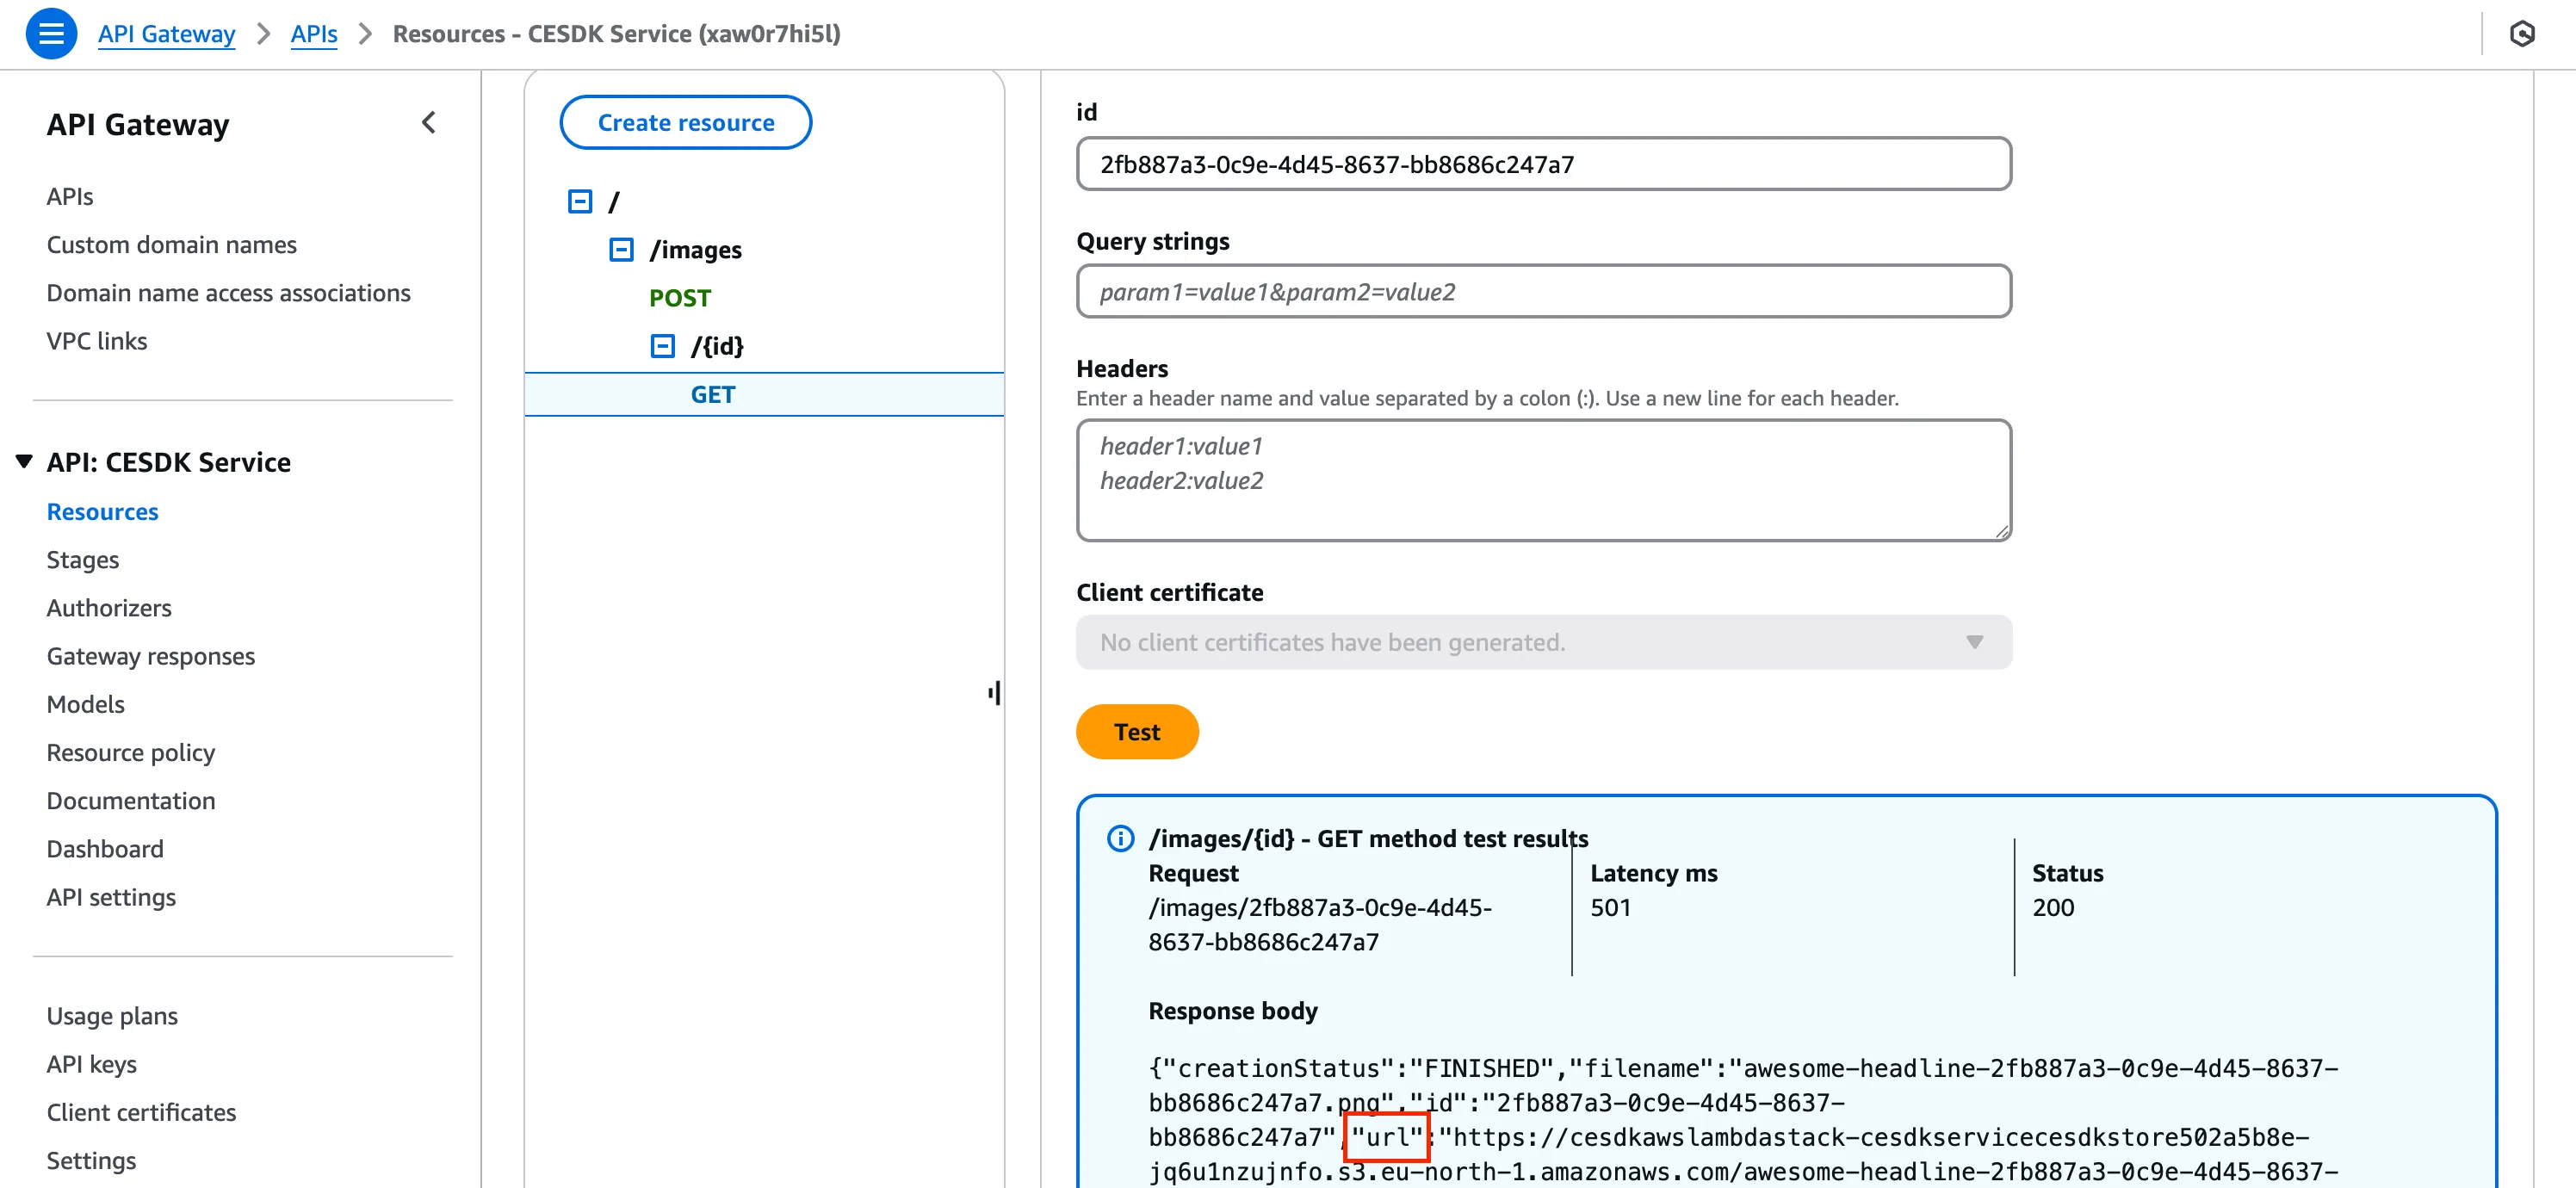
- Now select
/images/{id}GET and test the API with the image id you received from the previous step. You should receive a 200 response with a response body includingurlandcreationStatus.
- Check your S3 bucket for the newly created image, or test the image URL in your browser. You should see the rendered image with the headline you provided in the request.

Troubleshooting & Common Errors#
❌ Error: Invalid license key
- Verify that your license key is valid and not expired.
❌ Error: Need to perform AWS calls for account ..., but no credentials have been configured
- Make sure your AWS CDK Credentials are set up correctly and still valid before deploying the stack. You can re-configure the credentials by running
aws configureand provide the valid ones.
❌ Error: Access Denied
- When you receive an
Access Deniederror while trying to access the image URL, ensure that you have set the correct permissions for the S3 bucket.
Next Steps#
We now have a simple API endpoint that renders and stores a CE.SDK template from a set of input parameters.
It’s easy to extrapolate this setup to any number of design automation use cases. We could load the template dynamically based on the request, provide images to replace template placeholders and provide more detailed specifications such as font, size and color of the text: