In this guide you’ll learn how to apply CameraConfiguration to the IMGLY Camera to:
- Adjust the visual accents and recording limits.
- Discover the different
modeproperties of the camera. - Understand where to find the localizable strings.
What You’ll Learn#
- How to configure properties of the
CamerausingCameraConfiguration - How to initialize each of the available camera modes
- How to localize the strings that the
Camerashows to the user
Using CameraConfiguration#
The CameraConfiguration structure has properties to:
- Control the tint of various controls on the camera.
- Limit the total duration of video
- Lock the camera into a particular screen mode.

In the images above:
- On the left the mode switching button is enabled and visible.
- During recording The tint of the recording indicators is the default red color.
- There is no limit on the length of video.
Change the Properties#
To change the properties:
- Create a
CameraConfigurationstructure. - Pass it to the
Cameraobject during initialization.
let engineSettings = EngineSettings(license: "<your license key>")let cameraConfig = CameraConfiguration(recordingColor: .green,                                       highlightColor: .purple,                                       maxTotalDuration: 10.0,                                       allowExceedingMaxDuration: false,                                       allowModeSwitching: false)

Camera(engineSettings, config) { result in  //handle videos here  }
The code above sets all available properties of CameraConfiguration. Each property has a default value. When creating your structure, you only need to include the properties you want to configure.
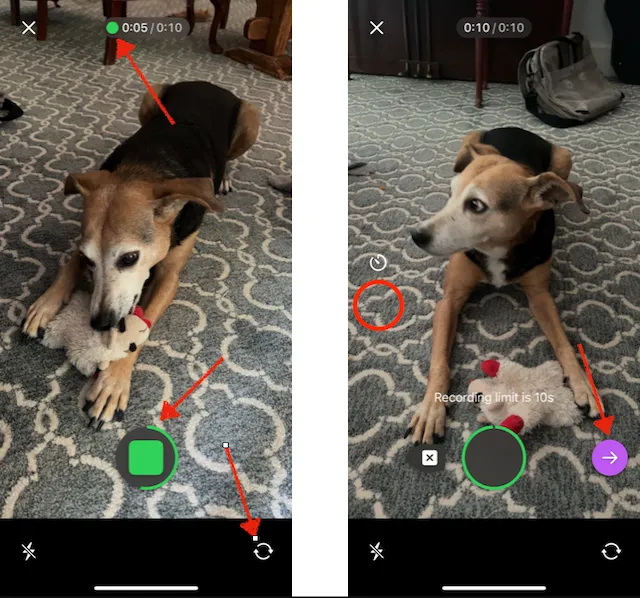
In the preceding images:
- The mode switching button is no longer visible.
- The recording indicators are now green.
- The limit of 10 seconds appears in the time stamp window at the top—when the user reaches the limit, a message appears.
- The highlight of the control button is purple.
Camera Modes#
The Camera has a number of different modes. They are not set with a CameraConfiguration structure but are an argument when initializing the camera. Each mode has its own guide to explore it in much more detail.
The modes are:
.standard: the regular camera..dualCamera(layoutMode): records with both front and back camera at the same time. Learn more about this mode in the Dual Camera guide.reaction(layoutMode, URL, positionsSwapped): records with the camera while playing back a video. Learn more about this mode in the Record Reaction guide
Camera(engineSettings, config: cameraConfig, mode: .standard) { result in //do something with the resulting video }The code above:
- Initializes the camera with the same
engineSettingsandcameraConfigas earlier in the guide. - Sets the
modeproperty.
Localization and Languages#
The CE.SDK camera currently supports these languages on iOS:
- English
- German
However, it provides a convenient API to:
- Replace the values of existing localization keys.
- Add support for more languages.
All the camera keys are located in the GitHub repository and they all follow strict naming conventions to make locating keys simple and self-explanatory.
For instance:
- The
ly_img_camera_timer_option_offkey provides the timer off button. - The
ly_img_camera_dialog_delete_last_recording_titlekey enables the configuration of the title in the alert dialog that appears when deleting the last recording.
Replacing Existing Keys#
In order to replace any of the existing camera keys, find the key of the desired text, add the key to Localizable.xcstrings file of your app and replace with the desired value or copy the IMGLYCamera.xcstrings file to your app and edit it. Keys defined in Localizable.xcstrings take precedence over the ones defined in IMGLYCamera.xcstrings.
Supporting New Languages#
In order to add support for a language that is not supported by the CE.SDK camera add a new language to your Localizable.xcstrings or IMGLYCamera.xcstrings file and replace the values with desired translations.