
Whether making a slide show or breaking up video tracks with title scenes, inserting still images into a video file can be tricky. This tutorial will show you how to convert still images into standard Quicktime video files so you can work with them further in your favorite video editor. This tutorial was created and tested with Xcode 13 and Swift 5. This tutorial will discuss two strategies:
- convert each image to a separate movie and stitch them together later (this is best suited for times you want to interleave the images and other video files using some other editing workflow)
- create a “blank” video and use the
applyingCIFiltersWithHandlervariation to overlay the images (this is best suited for times you want to make a quick slide show with no further editing)
As with most AVFoundation code, the Xcode simulator is not always the best platform for running the code. Test on an actual device if you can. A demo project with this code (and some extra goodies) can be found on GitHub.
The Problem with an Image
The basic models that are used in AVFoundation for making video files are AVAsset and AVAssetTrack. You can compose multiple tracks and assets together to make a single video file. All tracks must have some media data and a duration. Static image files don’t have a duration. This is the primary problem you have to overcome when you want to add static images to video.
Fortunately, you can use many of the same AVFoundation tools that are used for video capture and frame manipulation. However instead of using a CADisplayLink and AVPlayerItemVideoOutput or an AVCaptureDevice to provide frame buffers to save, you will create the frame buffers manually. Then you can use AVAssetWriter to convert the frame buffers into a video file.
Some items to consider before you actually generate the video file are:
- What framerate to use? Because the image doesn’t have any motion, you can use a very low frame rate to create smaller file sizes. However, this might cause issues if you are interleaving it with regular video, which usually has a frame rate of 30 or 60 fps (or higher, for slow motion video)
- What dimensions will the final video have? It is easy to resize an image and add padding using
CoreImageor some image editing software before it becomes a video. As the image becomes a video and moves through different steps in anAVFoundationpipeline, the different classes inAVFoundationwill resize or crop the images in different ways when the input dimensions and output dimension don’t match.
Writing Buffers using AVAssetWriter
The AVAssetWriter exists to encode media to a file on disk. Though this tutorial will use a single video input AVAssetWriter supports multiple inputs of different kinds (audio, video, metadata). It is quite similar to AVAssetExportSession. The difference is that AVAssetWriter uses multiple inputs and each input is a single track where the AVAssetExportSession takes a single AVAsset as an input. The result of both is a single file.
As indicated above, our basic strategy will be:
- Create a pixel buffer that is the correct color space and size to hold the image
- Render the image into the pixel buffer
- Create an
AVAssetWriterwith a single video input - Decide how many frames will be required to create a video of the desired duration
- Make a loop, and each time through the loop, append the pixel buffer
- Clean up
Create the Pixel Buffer
The code below creates a CIImage from an image file. Then it creates a pixel buffer the same size as the image and uses a standard color space. Finally, a CIContext renders the image into the pixel buffer.
//create a CIImage
guard let uikitImage = UIImage(named: imageName), var staticImage = CIImage(image: uikitImage) else {
  throw ConstructionError.invalidImage //this is an error type I made up
}
//create a variable to hold the pixelBuffer
var pixelBuffer: CVPixelBuffer?
//set some standard attributes
let attrs = [kCVPixelBufferCGImageCompatibilityKey: kCFBooleanTrue,
     kCVPixelBufferCGBitmapContextCompatibilityKey: kCFBooleanTrue] as CFDictionary
//create the width and height of the buffer to match the image
let width:Int = Int(staticImage.extent.size.width)
let height:Int = Int(staticImage.extent.size.height)
//create a buffer (notice it uses an in/out parameter for the pixelBuffer variable)
CVPixelBufferCreate(kCFAllocatorDefault,
                    width,
                    height,
                    kCVPixelFormatType_32BGRA,
                    attrs,
                    &pixelBuffer)
//create a CIContext
let context = CIContext()
//use the context to render the image into the pixelBuffer
context.render(staticImage, to: pixelBuffer!)
Though we generally think of CIImage as an image, Apple is clear that it is not an image by itself. CIImage needs a context for rendering. This is where a lot of the power of CoreImage and filters and GPU rendering come from, the fact that CIImage is just the instructions for creating an image. Note: You can also use CGImage and the CoreGraphics framework to create pixel buffers. I find it easier to use the CoreImage framework.
Configure AVAssetWriter
Now with a buffer created, you can configure the AVAssetWriter. It will take several parameters as a dictionary to determine the dimensions and format of the outputs. You can either set them individually or else Apple provides presets.
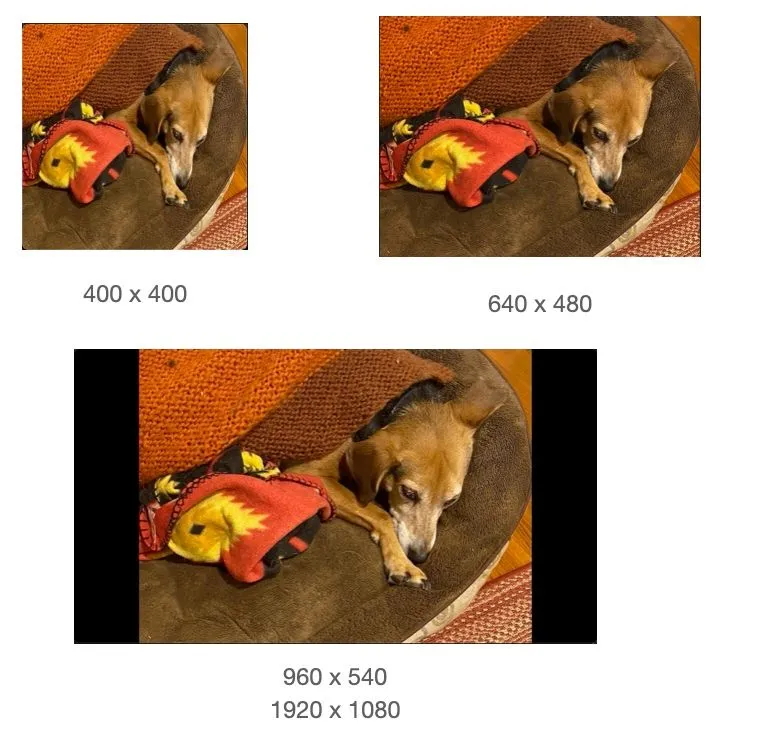
One of the most important settings is the output dimension. If the output dimension matches the original image, the video file will show no distortion or letterboxing. However, if the output is smaller, it will compress the image until it fits. If the output is larger, the image will expand until its width or height matches the output size and then will letterbox. Note: if an image expands too much, it will appear grainy. The image below shows different output sizes for a 640 x 480 input image.
To create your settings for the AVAssetWriter first create a dictionary containing the different values. The example here sets an output dimension of 400 x 400 and provides for .h264 encoding.
let assetWriterSettings = [AVVideoCodecKey: AVVideoCodecType.h264, AVVideoWidthKey : 400, AVVideoHeightKey: 400] as [String : Any]To use one of the presets, use the AVOutputSettingsAssistant. You can read about the different settings in the Apple documentation. An example to create 1080p video output would look like this:
let settingsAssistant = AVOutputSettingsAssistant(preset: .preset1920x1080)?.videoSettingsWrite the pixel buffer to the video file
With the settings configured, the asset writer can loop through and append the contents of the pixel buffer to create each frame of the video. Something important to notice in the code below is that AVFoundation has a philosophy to preserve data. So, it will make copies, and it will generally not overwrite files. That is why you have to delete any old files before you can create the new AVAssetWriter.
//generate a file url to store the video. some_image.jpg becomes some_image.mov
guard let imageNameRoot = imageName.split(separator: ".").first, let outputMovieURL = FileManager.default.urls(for: .documentDirectory, in: .userDomainMask).first?.appendingPathComponent("\(imageNameRoot).mov") else {
  throw ConstructionError.invalidURL //an error i made up
}
//delete any old file
do {
  try FileManager.default.removeItem(at: outputMovieURL)
} catch {
  print("Could not remove file \(error.localizedDescription)")
}
//create an assetwriter instance
guard let assetwriter = try? AVAssetWriter(outputURL: outputMovieURL, fileType: .mov) else {
  abort()
}
//generate 1080p settings
let settingsAssistant = AVOutputSettingsAssistant(preset: .preset1920x1080)?.videoSettings
//create a single video input
let assetWriterInput = AVAssetWriterInput(mediaType: .video, outputSettings: settingsAssistant)
//create an adaptor for the pixel buffer
let assetWriterAdaptor = AVAssetWriterInputPixelBufferAdaptor(assetWriterInput: assetWriterInput, sourcePixelBufferAttributes: nil)
//add the input to the asset writer
assetwriter.add(assetWriterInput)
//begin the session
assetwriter.startWriting()
assetwriter.startSession(atSourceTime: CMTime.zero)
//determine how many frames we need to generate
let framesPerSecond = 30
//duration is the number of seconds for the final video
let totalFrames = duration * framesPerSecond
var frameCount = 0
while frameCount < totalFrames {
  if assetWriterInput.isReadyForMoreMediaData {
    let frameTime = CMTimeMake(value: Int64(frameCount), timescale: Int32(framesPerSecond))
    //append the contents of the pixelBuffer at the correct time
    assetWriterAdaptor.append(pixelBuffer!, withPresentationTime: frameTime)
    frameCount+=1
  }
}
//close everything
assetWriterInput.markAsFinished()
assetwriter.finishWriting {
  pixelBuffer = nil
  //outputMovieURL now has the video
  Logger().info("Finished video location: \(outputMovieURL)")
}
}
Now, your image has become a Quicktime video of whatever duration you specified and is ready for use as any other video file! You can now continue with the like of VideoEditor SDK to trim videos, and add filters or overlays. You might also want to combine the video with other video files to make a new creation.
Say hi to my dog! A plain video from still images
Creating a Blank Video
The previous example created a single .mov file for each of your images. The most robust way to get these images into a video with sound, transitions, etc., is to use AVMutableComposition with multiple tracks and layer instructions. However, for a quick slideshow with just a few elementary transitions, a strategy is to create a blank movie and then use AVVideoComposition with (asset: AVAsset, applyingCIFiltersWithHandler applier: @escaping (AVAsynchronousCIImageFilteringRequest) -> Void). That will let you use CIImage and CIFilter to paint each frame of the blank movie with images.
Our basic strategy for this method will be:
- Create a pixel buffer that is the right color space and size and fill it with a solid color
- Create an
AVAssetWriterwith a single video input - Decide how many frames will be required to create a video of the desired duration
- Make a loop and each time through the loop append the pixel buffer
- Create an
AVVideoCompositionto add the images to the individual frames of the video - Let
AVPlayercombine the video and the composition
In the first strategy, you started by making a pixel buffer and using an AVAssetWriter to create the video file using this code:
guard let uikitImage = UIImage(named: imageName), var staticImage = CIImage(image: uikitImage) else {
  throw ConstructionError.invalidImage //this is an error type I made up
    }
However, this time, instead of using a source image, you create a CIImage that is a single color.
let staticImage = CIImage(color: bgColor).cropped(to: CGRect(x: 0, y: 0, width: 960, height: 540))The CIImage(color:) initializer creates an image that is of infinite size and is just a single color. Using the .cropped(to:) modifier lets you make it the same size as the AVAssetWriter output so that there won’t be any letterboxing. The rest of the code is the same as before and the end result will be a video file that is just the single color.
Adding a Composition
Once the video file has been created and saved to disk, load it as an asset, then create an AVVideoComposition. This allows you to generate individual frames. The function below uses the request property of the composition. This has a CIImage representation of the current frame as well as the timestamp of when this frame will appear. The .fetchSlide(forTime:) is a helper function in the demo app that returns the appropriate CIImage for the slide to display. Then the .sourceOverCompositing filter combines the original frame image with the slide. Using a CGAffineTransform moves the slide across the screen as the video plays.
func createComposition(_ asset: AVAsset) {
  let slideshowComposition = AVVideoComposition(asset: asset) {[weak self] request in
    guard let self = self else { return }
    let slide = self.fetchSlide(forTime: request.compositionTime)
    let compose = CIFilter.sourceOverCompositing() //filter to join two images
    compose.backgroundImage = request.sourceImage
    compose.inputImage = slide?.transformed(by: CGAffineTransform(translationX: request.compositionTime.seconds * 50, y: 0))
    //always finish with the last output of the pipeline
    request.finish(with: compose.outputImage!, context: nil)
  }
  self.outputSlideshow = slideshowComposition
}
Because the creation of the video is done asynchronously, you can composite images over the original frame and add filters without the danger of impacting the final frame rate. Recall that CIFilter works as a pipeline, each CIFilter has an .outputImage and most have .inputImage and some configuration settings. Feeding the output from one filter to the input of the next will let you build complex compositions. Once a composition has been created, AVPlayer can join the original video with the composition for playback or export.
let item = AVPlayerItem(asset: self.outputMovie!)
item.videoComposition = outputSlideshow
self.player = AVPlayer(playerItem: item)
The code above might generate a video like this one.
As with the first video, the final video is a plain .mov file.
Going Further
In this tutorial, you saw two ways to convert static images into .mov files that you can then edit with any video editor. The sample project also has some code for exporting your creation as a .mov file and code for adding sound to the creation.
These are not the only ways to go about solving this problem. For example, instead of creating a blank video and overlaying the images, using a stock video of waves at the beach and overlaying the images might work better for your project. Conversely, because the initial pixel buffer is created from a CIImage, there is no reason that the CIImage cannot be the end of a long pipeline of CIFilters. This way the composition is done at the beginning, and the AVAssetWriter is the only tool needed. The best strategy is the one that makes sense to you and that works with the kinds of media you have.
Thanks for reading! We hope that you found this tutorial helpful. Feel free to reach out to us on Twitter with any questions, comments, or suggestions!
Looking to integrate video capabilities into your app? Check out our Video Editor SDK, Short Video Creation, and Camera SDK!
To stay in the loop with our latest articles and case studies, subscribe to our Newsletter.