Photo/video editing capabilities with CE.SDK without mounting an editor. Explore five applications, edit sandboxed JavaScript, and see your changes exported automatically.
Prerequisites#
Use Node.js 22 or later and a supported browser with WebGL. The engine runs in the browser and requires a DOM even though it mounts no editor UI. Request a license from IMG.LY.
Step 1: Create a New Project#
Create a Vue application with TypeScript, then follow the shared integration steps below.
npm create vite@latest headless-app -- --template vue-ts
cd headless-app
npm install
npm create vite@latest headless-app -- --template vue-ts
cd headless-app
npm installStep 1: Open Your Project#
Start in the root of your existing application. The same integration steps below apply.
cd your-projectcd your-projectStep 2: Copy the Starter Kit#
Copy the framework-independent engine workflow and optional demo controls into src/headless.
The published repository uses src/ for every framework; the destination matches your application.
git clone https://github.com/imgly/starterkit-headless-ts-web.git .headless-starterkit
mkdir -p src/headless
cp -R .headless-starterkit/src/imgly src/headless/imgly
cp .headless-starterkit/src/demo.ts .headless-starterkit/src/presets.ts .headless-starterkit/src/highlight-code.ts .headless-starterkit/src/style.css src/headless/
git clone https://github.com/imgly/starterkit-headless-ts-web.git .headless-starterkit
mkdir -p src/headless
cp -R .headless-starterkit/src/imgly src/headless/imgly
cp .headless-starterkit/src/demo.ts .headless-starterkit/src/presets.ts .headless-starterkit/src/highlight-code.ts .headless-starterkit/src/style.css src/headless/Step 3: Install Dependencies#
The browser engine is the only runtime dependency of the kit:
npm install @cesdk/engine@1.86.0npm install @cesdk/engine@1.86.0Step 4: Serve Engine Assets#
The kit uses baseURL: '/assets' in exportDesign in both imgly/index.ts
and the editable example in presets.ts. Copy the matching engine assets below.
Adjust both URLs if your application uses a deployment prefix.
Copy assets from the installed engine into public/assets so they are served at /assets.
mkdir -p public
cp -R node_modules/@cesdk/engine/assets public/assets
cp -R .headless-starterkit/public/designs public/designs
mkdir -p public
cp -R node_modules/@cesdk/engine/assets public/assets
cp -R .headless-starterkit/public/designs public/designsSet the license in src/headless/demo.ts; the demo passes it to exportDesign(license).
Keep the engine asset URL inside the export function in src/headless/imgly/index.ts.
Step 5: Add the Demo Component#
Create src/headless/HeadlessDemo.vue. Import HeadlessDemo in src/App.vue and render <HeadlessDemo />.
<script setup lang="ts">import { onMounted, onBeforeUnmount, ref } from 'vue';import './style.css';
const root = ref<HTMLElement | null>(null);let stopped = false;let cleanup = () => {};onMounted(() => {  import('./demo').then(({ mountDemo }) => {    if (!stopped && root.value) {      cleanup = mountDemo(root.value);    }  }).catch(error => {    if (!stopped && root.value) {      root.value.textContent = String(error);    }  });});onBeforeUnmount(() => { stopped = true; cleanup(); });</script>
<template><main ref="root" /></template>
The demo owns its preset controls, code editor, result preview, and inline errors. Its cleanup callback removes listeners and releases preview URLs on unmount. An in-flight export finishes and disposes its engine without updating an unmounted component.
Step 6: Run the Demo#
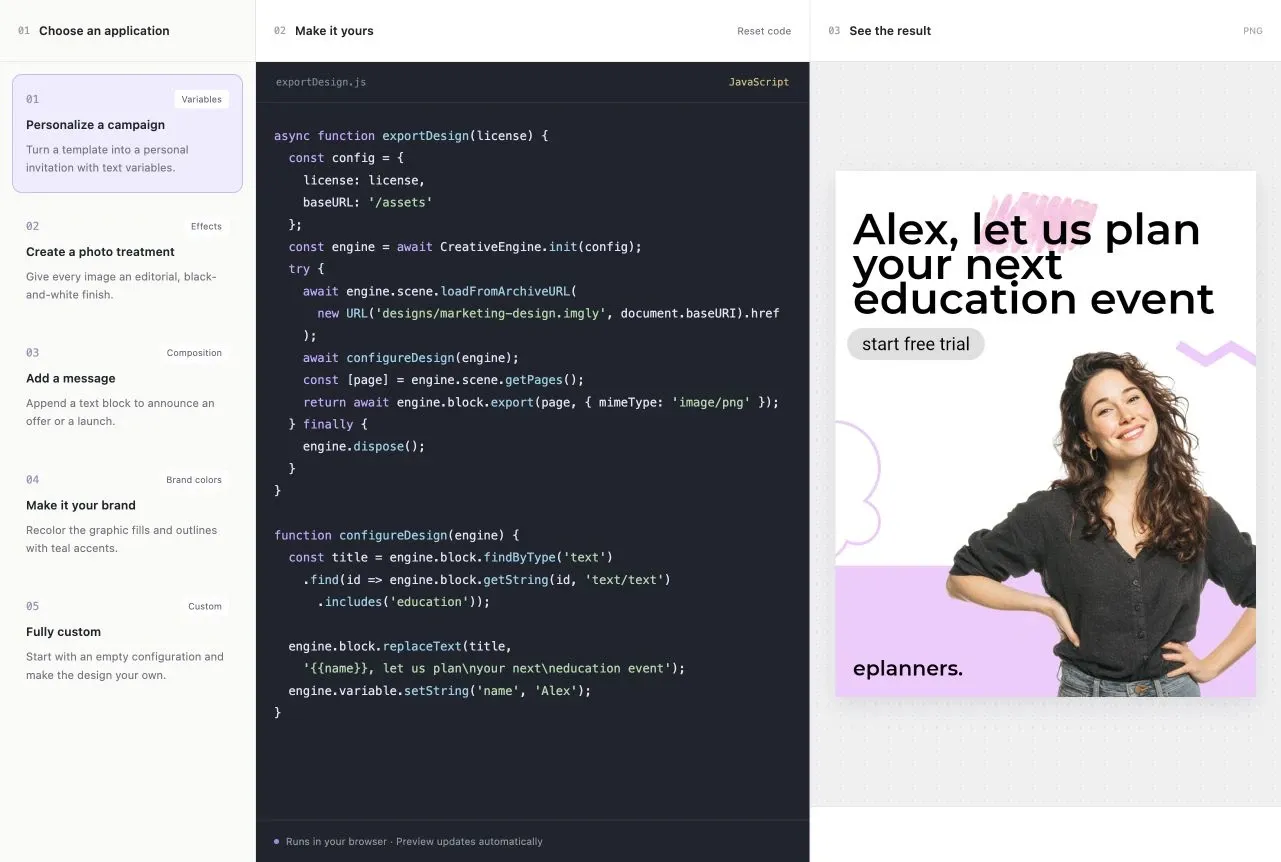
npm run devnpm run devOpen the local application. Choose one of the five presets: personalize a campaign,
apply photo effects, append a text block, change brand colors, or start fully custom
with an empty configureDesign(engine). Edit the JavaScript
in the single middle-panel editor. Both exportDesign(license) and
configureDesign(engine) are editable together with JavaScript syntax highlighting.
The preview exports automatically when the demo opens, when you select an application,
and when you reset the code. Code edits trigger export after a 400ms pause.
The export function includes engine creation and disposal in finally.
Switching applications loads its complete example; Reset code restores both functions.
Only one export runs at a time. New changes replace the pending source; an active run
finishes and disposes its engine before the latest source runs. Superseded results
and errors are discarded. The right panel shows the exported design.
Every export starts from the original template, so edits do not accumulate.
Customize the Headless Workflow#
For the editable demo, set your license in demo.ts. The runner passes it to
exportDesign(license) so the code editor contains no embedded license key. Edit
the asset and design URLs inside the export function; update exportDesignCode in
presets.ts to persist those defaults. When using the reusable TypeScript workflow
outside the playground, pass your license to exportDesign(license) directly.
The demo interface belongs to demo.ts. It passes the complete edited source to
imgly/run-design.ts, which executes the source in the browser and calls
exportDesign(license). CreativeEngine is provided to the edited code;
use plain JavaScript without imports or TypeScript annotations. The default export
function mirrors the reusable TypeScript workflow in
imgly/index.ts, which has no framework dependency:
import CreativeEngine from '@cesdk/engine';import { configureDesign } from './configure-design';

export async function exportDesign(license: string): Promise<Blob> {  const config = {    license: license,    baseURL: '/assets'  };  const engine = await CreativeEngine.init(config);  try {    await engine.scene.loadFromArchiveURL(      new URL('designs/marketing-design.imgly', document.baseURI).href    );    await configureDesign(engine);    const [page] = engine.scene.getPages();    return await engine.block.export(page, { mimeType: 'image/png' });  } finally {    engine.dispose();  }}
exportDesign(license) receives the license as a string argument. The asset location
and design URL remain explicit inside the function. It loads the archive into a fresh engine, calls
await configureDesign(engine), and exports its first page as a PNG. The
configureDesign implementation reads the demo textarea (#code), executes its
JavaScript in the browser, and awaits the configuration before export. The included marketing design comes from the Design Editor
starter kit. It bundles its images and fonts in public/designs/marketing-design.imgly.
Keep that directory available next to the application’s entry URL. For nested routes
or subpath hosting, change the URL literal inside exportDesign(license) to the public
archive location. Packaged Electron renderers should use an absolute HTTP(S) URL.
The Personalize a campaign preset supplies this configuration. It replaces the
headline with {{name}}, let us plan your next education event and sets name to Alex:
function configureDesign(engine) {  const title = engine.block.findByType('text')    .find(id => engine.block.getString(id, 'text/text')      .includes('education'));
  engine.block.replaceText(title,    '{{name}}, let us plan\nyour next\neducation event');  engine.variable.setString('name', 'Alex');}
presets.ts contains five editable examples. Each defines configureDesign(engine),
which can be async and receives the current engine instance. The edited JavaScript
runs in the page’s browser context, with access to browser APIs. It uses the regular
engine API without an additional engine sandbox or execution limits.
If your application sets a Content Security Policy, the editable demo needs
'unsafe-eval' in script-src to compile the JavaScript entered in the textarea.
A fixed configuration function can be called directly without runtime compilation.
The function awaits export before disposing the engine in finally. Loading,
script, and export failures reject its promise. The demo displays the thrown message
as plain text below the preview and lets the user edit and retry. A failed run leaves the
previous result available. Editing code or switching presets automatically retries with
the latest source. Errors from superseded runs are discarded.
For your own interface, copy src/imgly/, set the asset configuration and archive
URL, and replace the #code textarea lookup in imgly/configure-design.ts with your
JavaScript source string.
Call exportDesign(license) from your export handler, handle rejection, and consume the Blob. The complete demo also needs
demo.ts, presets.ts, highlight-code.ts, style.css, and public/designs/. It retains the latest
export promise as window.headlessExport for inspection.
Build and Deploy#
Build your application with its normal production command. Serve the generated files and matching engine assets over HTTP(S). Configure a license for the deployment origin. See Serve Assets for asset-hosting guidance.
This kit uses @cesdk/engine. It does not load @cesdk/cesdk-js or its editor UI.
A DOM-free server needs a server engine package instead; see
Headless Mode for runtime choices.
Troubleshooting#
-
Keep both function names, return a PNG Blob from
exportDesign(license), and preserve engine disposal infinally. -
Read the error below the preview and fix the code or asset configuration. The preview retries automatically after editing.
-
Keep the
configureDesignfunction name. Syntax errors and thrown messages appear below the preview.