In this article, you will see how to use Swift and AVKit to crop a video clip and how to trim a video’s timeline. Then you will learn how to use AVAssetExportSession to write your edited video to disk. The code in this article uses Swift 5 and Xcode 12.5. Clone this repository for a sample project and example code.
Anatomy of a Video File
The AVFoundation and AVKit frameworks are what Swift and iOS use to manage audio and video. When starting out, you may use an AVPlayerViewController for playback with the same controls and features as the native players. You can also use an AVPlayer object and provide your own playback and editing controls. Whichever you choose, you begin by loading a media file (.mp3, .mov, etc.) into an AVPlayerItem. Inside the AVPlayerItem, the media becomes an AVAsset which may have many tracks of video, audio, text, closed captions etc.
To manipulate an AVAsset, Apple provides the AVComposition class. The AVComposition can act on a single track or many tracks to filter and mix underlying media and produces a single output. An AVPlayer shows the output of an AVComposition on a device. When it is time to export, you can use an AVAssetExportSession with the same AVComposition to write to disk or upload to a server.
Cropping Video to a Rectangle
Apple provides some different AVComposition classes optimized for common tasks. Apple recommends using one of these classes instead of writing custom AVComposition classes whenever possible. The reason for this is that when Apple introduces new technologies (like HDR Video), they will ensure it works with their classes. If you’ve written your own, you will have to update it to work with the new technologies. In this article you will crop the video to a rectangle and let the audio pass through as recorded. A good class to use for this task will be the AVMutableVideoComposition with the init(asset: AVAsset, applyingCIFiltersWithHandler applier: @escaping (AVAsynchronousCIImageFilteringRequest) -> Void) initializer. This will allow you to apply a CIFilter to each frame of the video. Apple provides an efficient cropping filter called CICrop.
func transformVideo(item: AVPlayerItem, cropRect: CGRect) {

  let cropScaleComposition = AVMutableVideoComposition(asset: item.asset, applyingCIFiltersWithHandler: {request in

    let cropFilter = CIFilter(name: "CICrop")! //1
    cropFilter.setValue(request.sourceImage, forKey: kCIInputImageKey) //2
    cropFilter.setValue(CIVector(cgRect: cropRect), forKey: "inputRectangle")


    let imageAtOrigin = cropFilter.outputImage!.transformed(by: CGAffineTransform(translationX: -cropRect.origin.x, y: -cropRect.origin.y)) //3

    request.finish(with: imageAtOrigin, context: nil) //4
    })

  cropScaleComposition.renderSize = cropRect.size //5
  item.videoComposition = cropScaleComposition  //6
}
The applyingCIFiltersWithHandler will execute for every frame in the asset of the AVPlayerItem. Here is what the code above will do:
- Create a CICrop filter (note that this demo uses
!to force unwrap, production code should handle failure) - Add the
.sourceImage(aCIImage) from the request to the filter. - Move the cropped image to the origin of the video frame. When you resize the frame (step 4) it will resize from the origin.
- Output the transformed frame image
- Set the size of the video frame to the cropped size
- Attach the composition to the
videoCompositionproperty of theasset
Notice that the transformation does not alter the underlying asset. It creates a videoComposition filter to attach to the item during playback. After the transformation, AVPlayer will display the new creation when executing its .play() function.
Sharp eyed readers will have noticed that the init method mentions “applying CIFilters” plural. Instead of one filter, you can create an entire pipeline of CIFilter objects to manipulate the visual properties of the frames. The request object also contains the compositionTime so filters can change at different parts of the video.
Trimming the Time of a Video
When an AVPlayer loads an AVItem the start time of the video will be at CMTime.zero. The end will be the duration property of the AVItem. To adjust the playback times, you call the .seek function to move to the new start time and set the forwardPlaybackEndTime to the new end time. Now the player will only play the part of the clip between those times.
//The player object is already created and configured to play video in the ViewController

//load a video .mov file
self.player = AVPlayer(url: Bundle.main.url(forResource: "grocery-train", withExtension: "mov")!)

//Set the start time to 5 seconds.
let startTime = CMTimeMakeWithSeconds(5, preferredTimescale: 600)

//Convert the duration of the video to seconds
let videoDurationInSeconds = self.player!.currentItem!.duration.seconds

//Subtract 5 seconds from the end time
let endTime = CMTimeMakeWithSeconds(videoDurationInSeconds - 5, preferredTimescale: 600)

//Assign the new values to the start and end time
self.player?.seek(to: startTime)
self.player?.currentItem?.forwardPlaybackEndTime = endTime

//Play the video
self.player?.play()
The CMTime (Core Media Time) object uses timescales and Int values to map to the individual frames of tracks. Video tracks commonly come to your app with 24, 30, 60 or 120 frames per second. Converting between these different formats using Floats or Doubles would be imprecise. When converting seconds to CMTime with video, 600 is the commonly used timescale because it is a common multiple of all of the standard frames per second.
Exporting the Video
As with the videoComposition property, setting the start and end times of the player only modifies the playback of the video clip. The underlying asset remains unchanged. When you use the AVAssetExportSession, the new video file will have the change. The export session applies time range and video composition objects as it writes the file. A function to export might look like:
func export(_ asset: AVAsset, to outputMovieURL: URL, startTime: CMTime, endTime: CMTime, composition: AVVideoComposition) {

    //Create trim range
  let timeRange = CMTimeRangeFromTimeToTime(start: startTime, end: endTime)

    //delete any old file
  do {
    try FileManager.default.removeItem(at: outputMovieURL)
  } catch {
    print("Could not remove file \(error.localizedDescription)")
  }

    //create exporter
  let exporter = AVAssetExportSession(asset: asset, presetName: AVAssetExportPresetHighestQuality)

    //configure exporter
  exporter?.videoComposition = composition
  exporter?.outputURL = outputMovieURL
  exporter?.outputFileType = .mov
  exporter?.timeRange = timeRange

    //export!
  exporter?.exportAsynchronously(completionHandler: { [weak exporter] in
    DispatchQueue.main.async {
      if let error = exporter?.error {
        print("failed \(error.localizedDescription)")
      } else {
        print("Video saved to \(outputMovieURL)")
      }
    }
  })
}
Going Further
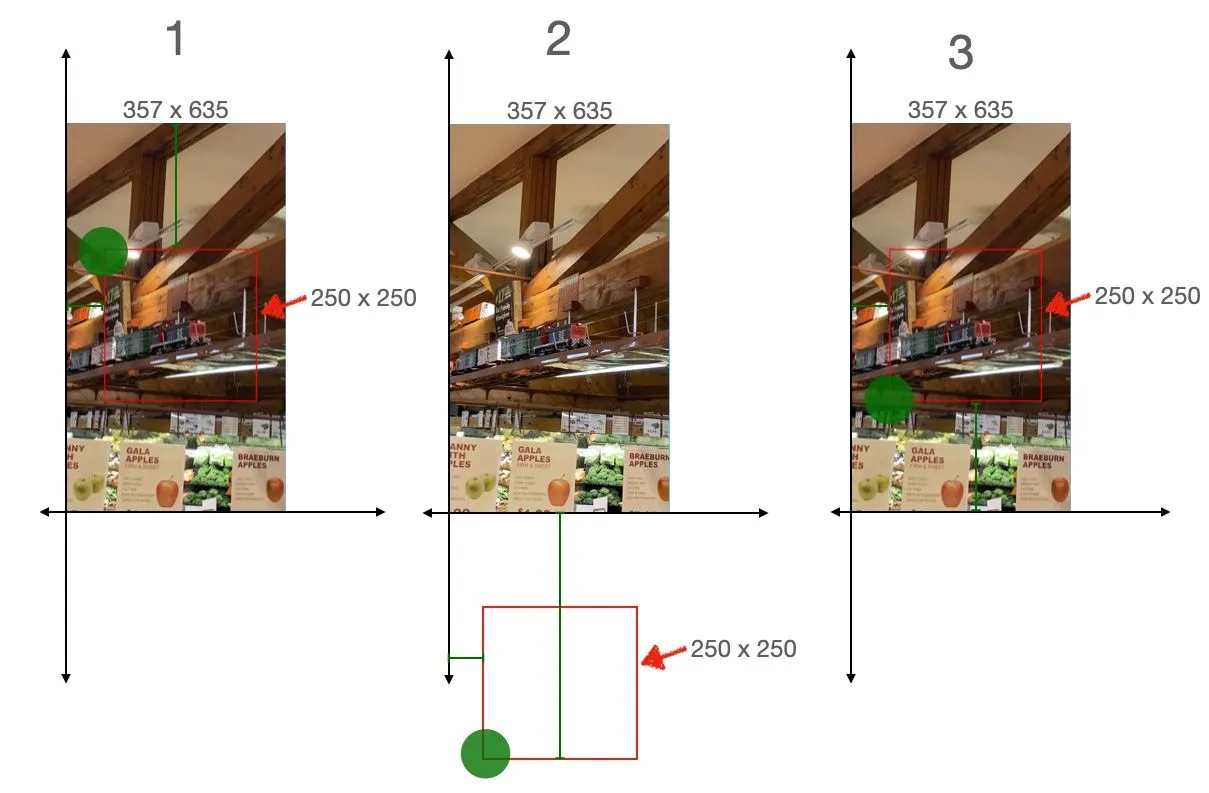
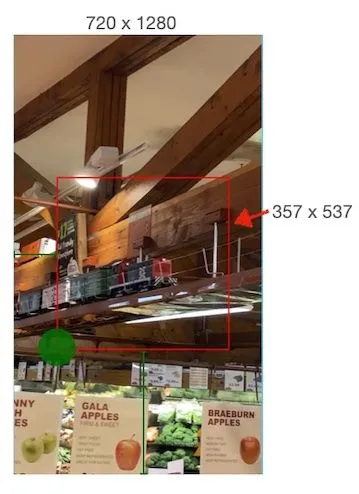
AVKit and AVFoundation provide simple objects for manipulating video files. The difficulty when working with video and audio tracks usually comes while providing editing controls for a user. The image below shows how the original video dimensions might change from creation to display.
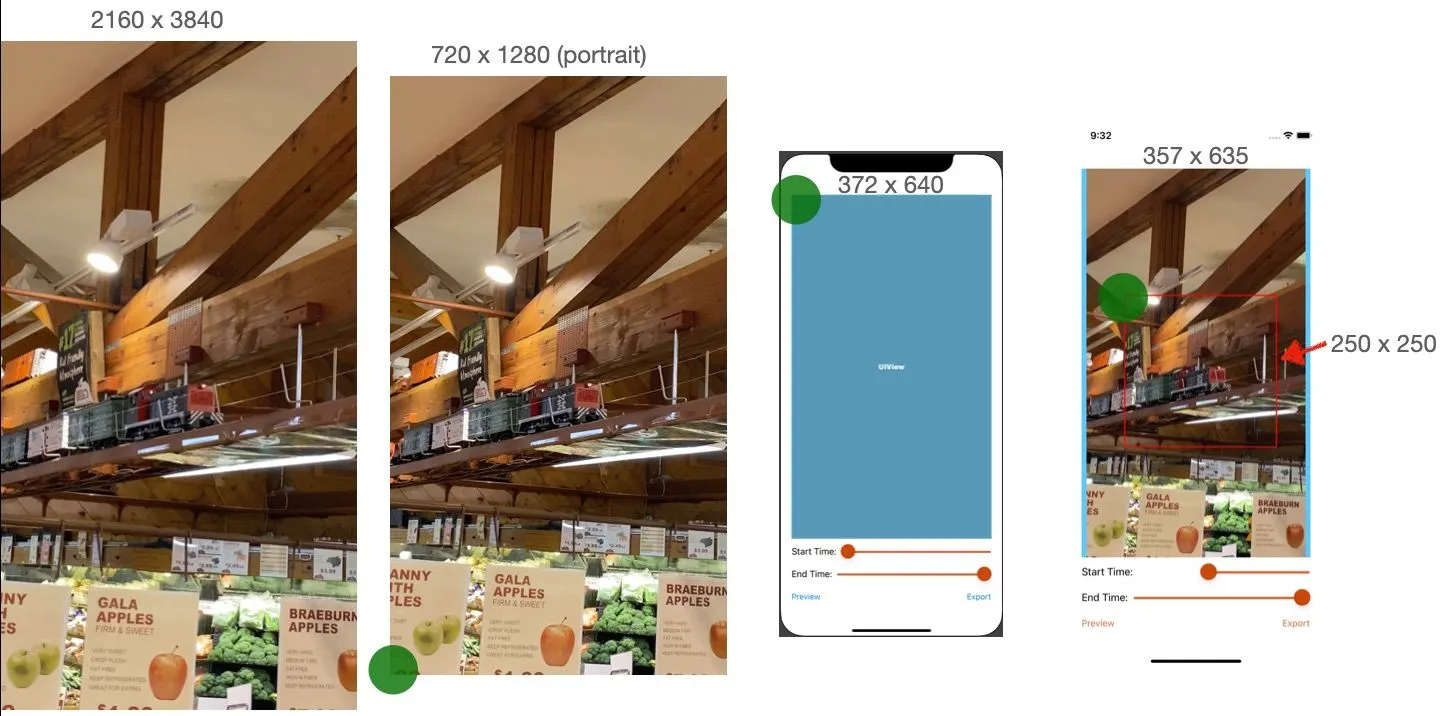
The original 2160x3840 video appears on an iPhone in a 357x635 frame. Additionally the origin point (green dot) of the video file and the origin point of the UIViews are not equal. Passing the frame of the red, cropping rectangle to an AVComposition would not work as expected. Inside of the AVComposition the video resumes it’s 720x1280 dimensions while the 250x250 cropping rectangle would remain 250x250.
Before using a UIView rectangle with an AVComposition it needs to resize and the origin point needs to align to the video’s origin. Your app must apply a CGAffineTransform to reorient the origin points.
var cropRect = self.croppingView.frame //1
let originFlipTransform = CGAffineTransform(scaleX: 1, y: -1)
let frameTranslateTransform = CGAffineTransform(translationX: 0, y: renderingSize.height)
cropRect = cropRect.applying(originFlipTransform) //2
cropRect = cropRect.applying(frameTranslateTransform) //3
Now you apply regular ratio math to the dimensions of the cropping rectangle to match the video dimensions.
let renderingSize = playerItem.presentationSize
let xFactor = renderingSize.width / playerView.bounds.size.width
let yFactor = renderingSize.height / playerView.bounds.size.height
let newX = croppingView.frame.origin.x * xFactor
let newW = croppingView.frame.width * xFactor
let newY = croppingView.frame.origin.y * yFactor
let newH = croppingView.frame.height * yFactor
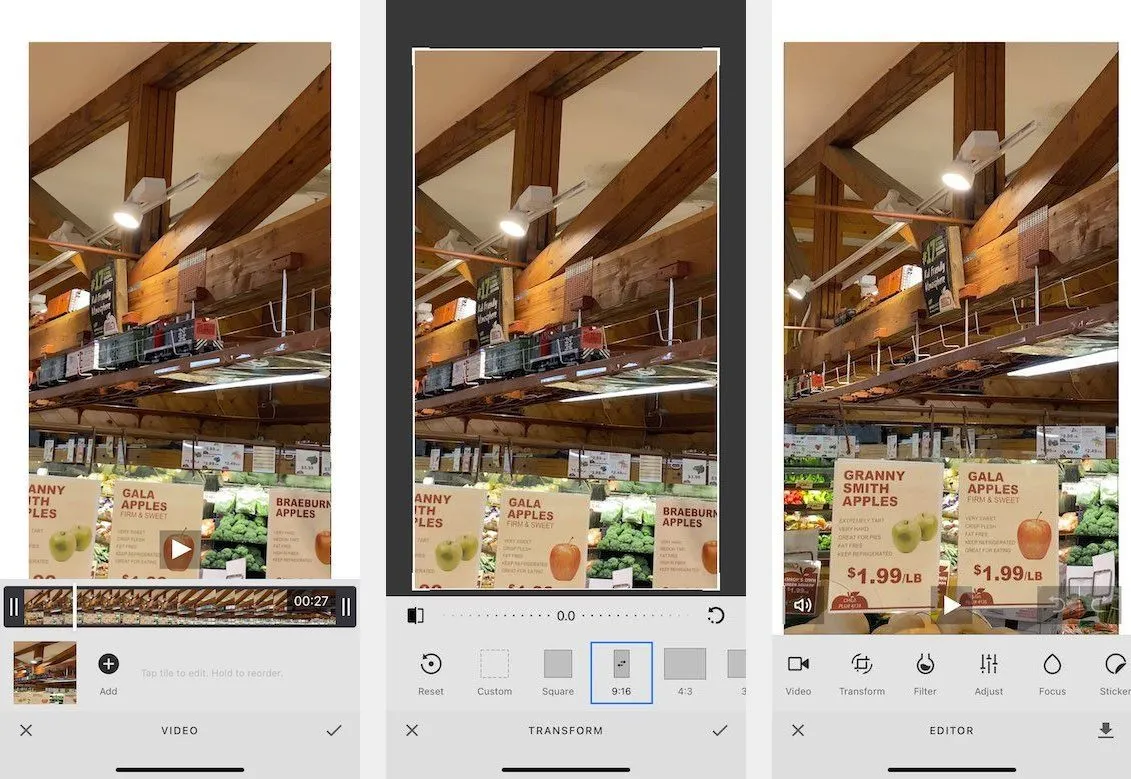
var cropRect = CGRect(x: newX, y: newY, width: newW, height: newH)The transformations above are standard when working with AVKit and UIKit or SwiftUI in an app. The math is not complex, but it is tedious. Unless your app is a custom video editing application, you may find that using a commercial solution such as VideoEditorSDK is a better approach. By adding the VideoEditorSDK, your app can have professional appearing trim and crop controls as well as filtering, text and more.
Wrapping Up
In this article, you saw how to crop a video image and how to trim time from a track, all in Swift. Further, you saw how using an SDK such as VideoEditorSDK allows you to provide full-featured video editing for any application.
Looking for more video capabilities? Check out our solution for Short Video Creation, and Camera SDK!
Thanks for reading! We hope that you found this tutorial helpful. Feel free to reach out to us on Twitter with any questions, comments, or suggestions.