In this tutorial, you will learn how to use machine learning to identify an image background and mask it out. This is particularly useful for making stickers or avatars or adding a fake background to a video call. The process of assigning the pixels in an image to a specific object is called “segmentation”. Apple provides an optimized method with pictures of people in its Vision framework. For performing the same tasks with non-human subjects, you can use the DeepLabV3 machine learning model with Core ML. The code examples in this tutorial have been tested using Xcode 13 and Swift 5. Because of the use of Core ML, Vision, and CoreImage in this tutorial, you should run the demo code on a device, not on the Simulator. An iOS project with the demo code is on GitHub.
Image segmentation is a different process and requires other machine learning models than image recognition. With recognition, the model produces bounding rectangles that the system believes to contain the entire object. With segmentation, the model identifies the actual pixels of the object.
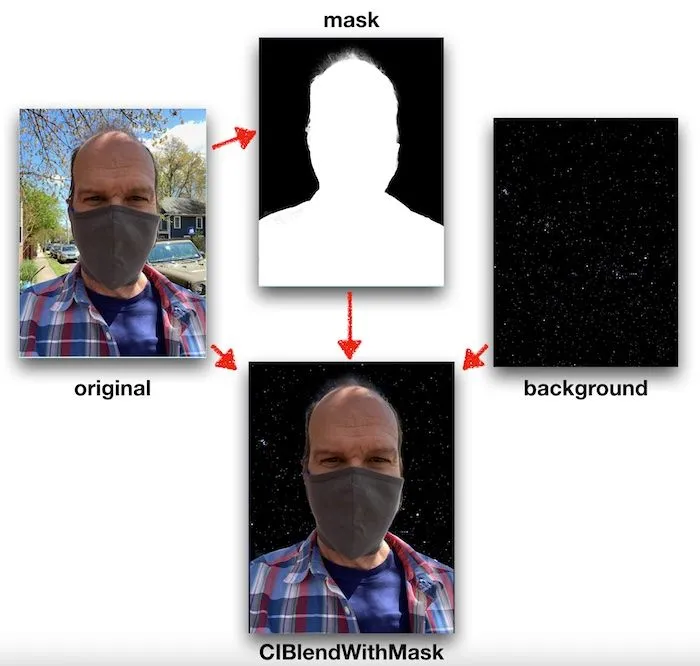
In this tutorial, you’ll start with an image of your subject. Then you’ll generate a mask for the background using Vision. Finally, you’ll use CoreImage filters to blend the original image, image mask, and the new image background.
Whether using the Vision framework alone or supplementing Vision with another Core ML model – the process will be the same:
- Create a Vision request object with some parameters.
- Create a Vision request handler with the image to be processed.
- Process the image with the handler and object.
- Process the results into the final image using CoreImage.
When working with still images, Apple’s CoreImage framework is usually the best option, mainly because of the large number of available filters and the ability to create reusable pipelines that you can run on the CPU or the GPU.
Using Vision to Segment People
Without an external model, Vision can only segment documents or people in an image. It is vital to understand that Vision will only identify a pixel in the image as “this pixel is part of a person” or “this pixel is not part of a person.” If an image contains a group of people, Vision will not be able to separate individuals.
To segment the image, start by creating an instance of a VNGeneratePersonSegmentationRequest.
var segmentationRequest = VNGeneratePersonSegmentationRequest()
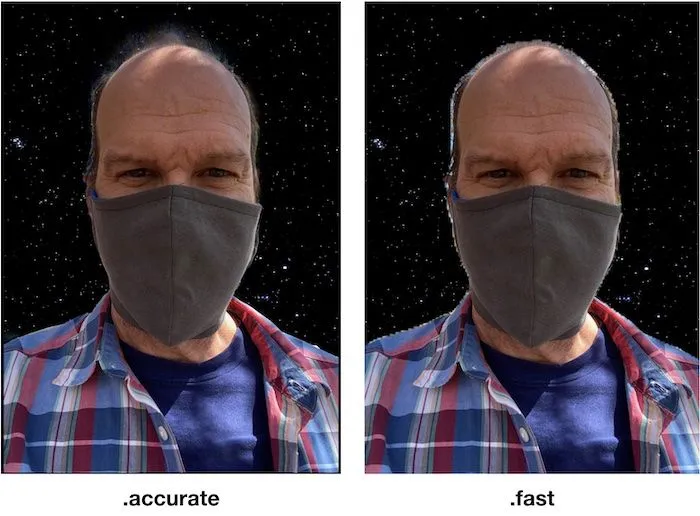
segmentationRequest.qualityLevel = .balancedThis type of request has a few options you can set. .qualityLevel can be .fast, .balanced or .accurate. The level of .accurate is the default. This will determine how closely the mask conforms to the boundaries of the original image. The different levels process at different speeds. The .fast setting is intended for use in a video so that frames don’t get dropped. Using .balanced or .accurate causes noticeable delay in an app processing the image on most devices. Experiment with different settings depending on your needs.
The output of the segmentation request will be a CVPixelBuffer. This is a structure that contains information for each pixel of the image. Most of Apple’s video frameworks as well as CoreImage can work with pixel buffers. The default for VNGeneratePersonSegmentationRequest is a buffer where the color of each pixel is represented by an 8-bit number. Any pixel that Vision thinks contains part of a person will be white and any not-a-person will be black and represented by zero. This will be exactly what you want for generating a mask to work with CIBlendWithMask.
Next, create a VNImageRequestHandler with the image to be processed. The handler class has a number of initializers for different types of data. In this example we will use CGImage, but you could also start with CIImage, CVPixelbuffer, Data, or others. You can also specify options for the handler. In this tutorial we will not specify any, but one of the options is to pass in a CIContext. This can help with performance as you can tell your app to do all of the processing with a single context on the GPU using Metal.
guard let originalCG = originalImage?.cgImage else { abort() }
let handler = VNImageRequestHandler(cgImage: originalCG)
try? handler.perform([segmentationRequest])
guard let maskPixelBuffer =
  segmentationRequest.results?.first?.pixelBuffer else { return }
let maskImage = CGImage.create(pixelBuffer: maskPixelBuffer)
In the code above, the originalImage (which happens to be a UIImage) gets converted to a CGImage. Then we use the image to initialize a request handler. The VNImageRequestHandler has a method .perform which takes an array of all of the Vision requests you want to use to process the image. The .perform method will not return until all of the requests in the array have been completed. Depending on how you want to structure your code, you can either provide a completion handler to use with each of the requests or just process the results in-line. In this example, we’ll process in-line.
If the segmentationRequest found any people in the image, the results array will contain a .pixelBuffer. Create the mask we need by converting the pixelBuffer into a CGImage. To convert to a CGImage, the example uses some helper methods that Matthijs Hollemans published to GitHub specifically for working with Core ML inputs and outputs.
Now that we have the mask image, use CIFilter to compose the final image. It will take a few steps. First, resize the new background, mask, and original image to the same size. Then, blend the three images.
//Convert main image to a CIImage and get the size
let mainImage = CIImage(cgImage: self.originalImage!.cgImage!)
let originalSize = mainImage.extent.size
//Convert the maskimage to CIImage and set the size
//to be the same as the original
var maskCI = CIImage(cgImage: maskImage!)
let scaleX = originalSize.width / maskCI.extent.width
let scaleY = originalSize.height / maskCI.extent.height
maskCI = maskCI.transformed(by: .init(scaleX: scaleX, y: scaleY))
//Convert the new background to a CIImage and set the size
//to be the same as the original
let backgroundUIImage = UIImage(named: "starfield")!.resized(to: originalSize)
let background = CIImage(cgImage: backgroundUIImage.cgImage!)
//Use CIBlendWithMask to combine the three images
let filter = CIFilter(name: "CIBlendWithMask")
filter?.setValue(background, forKey: kCIInputBackgroundImageKey)
filter?.setValue(mainImage, forKey: kCIInputImageKey)
filter?.setValue(maskCI, forKey: kCIInputMaskImageKey)
//Update the UI
self.filteredImageView.image = UIImage(ciImage: filter!.outputImage!)
The above code resizes the images to match the size of the original image and converts them to CIImage. Many machine learning models commonly resize inputs and outputs. For example, the output of the VNGeneratePersonSegmentationRequest using the demo image is 384x512.
Both CIImage and UIImage formats describe an image but do not always have a bitmap representation. That is why each image gets converted to a CGImage first. Though this guarantees that the demo code will work, converting formats makes the code run slower. In your app, you should experiment with different methods to get your images into CIImage format for filtering. Also, the above code uses Matthijs’ resized helper method to do some of the resizing.
With everything resized, the CIBlendWithMask filter stitches the images together. In place of the black pixels in the mask, the final image will show the background – for white pixels, the foreground. Wherever the mask image has a gray pixel, the final image will blend background and foreground.
Now let’s see how to use an additional CoreML model to process images that don’t have a person as the main subject.
Choosing a Model
Apple provides a number of pre-built models for text and image processing. The DeepLab v3 Machine Learning model can perform segmentation requests on images that have subjects like dogs. You can download it from Apple directly or also find it at the DeepLab repo on GitHub. Once you have downloaded the model, add it to your Xcode project the same as any other file. The DeepLab model will recognize people, the same as the VNPersonSegmentationRequest, but also other objects. This does come at a cost in an increased filesize for your application. You may notice that Apple provides multiple versions of the model of different file sizes. They all perform the same task, but differ in how they represent the output and a few other things.
Models on Apple’s website are packaged to work with Core ML and Xcode, so you can easily try a different model. The input and output method names will be the same. It is beyond the scope of this tutorial, yet Apple provides tutorials and example scripts on how to convert TensorFlow and other machine learning models to work with Core ML.
Core ML and Xcode
When you are working with a Core ML model, Xcode provides some convenient tools. Access them by highlighting the name of the model in the File Navigator pane of Xcode. For instance, clicking “Preview” will let you test the model with your data.
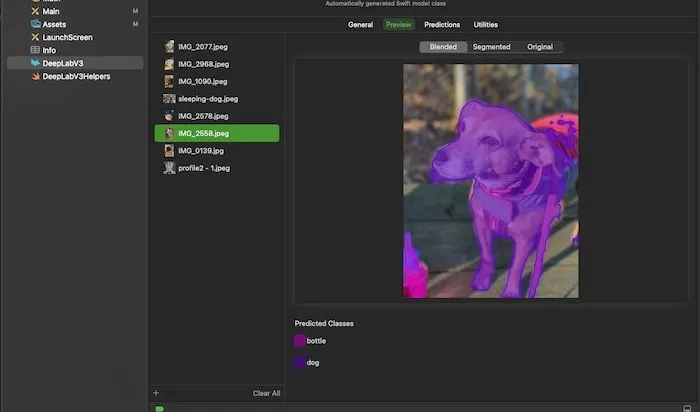
You can also use the “Predictions” tab to determine how the input needs to be formatted and what to expect for the output.
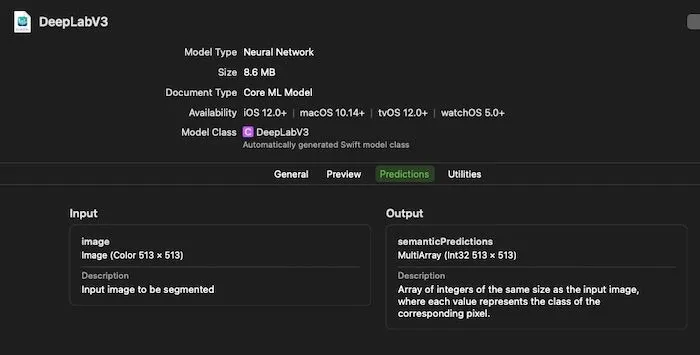
Here you can see that the DeepLabV3 model expects images to be 513 x 513 and will output a multidimensional array of integers that is 513 x 513 in size.
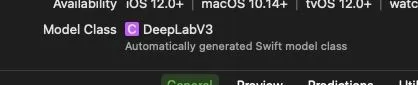
Finally, on this screen, you can see an entry for the “Model Class” in the headers. Double-click on the name to jump into the Swift wrapper class for the model to see how to call the model in your code and work with the inputs and outputs.
The DeepLabV3 Model
The DeepLab model input will be a color image that is 513 x 513 pixels. The Vision framework will handle resizing the input, but you can provide options on how that resize should work. The DeepLabV3 model has been trained to recognize and segment these items:
- aeroplane
- bicycle
- bird
- boat
- bottle
- bus
- car
- cat
- chair
- cow
- dining table
- dog
- horse
- motorbike
- person
- potted plant
- sheep
- sofa
- train
- tv or monitor
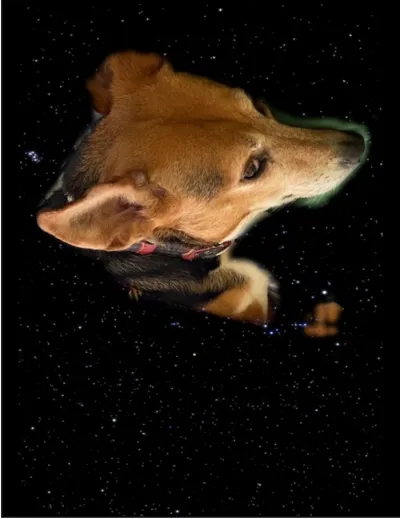
Anything that the model does not recognize, it will consider a background. After performing the recognition, the model returns a two-dimensional 513 x 513 array. Each entry in the array corresponds to one pixel in the original 513 x 513 input image. For instance, every pixel in the original image that shows a dog will be represented in the output by a 12 in the corresponding array entry. Any pixel that is not a recognized object will be given a 0 in the output array to represent a background.
If the model recognizes multiple objects, there will be multiple numbers in the array. If that is not what you want, you need to make changes to the array before creating the mask. For example, using an image of a dog riding a horse, some entries in the array will be 12, others will be 13, and the rest will be 0. To filter out the horse, you need to loop through the array and change any 13s to 0s.
Segmentation with DeepLab
To use the DeepLab model in your code, you again use a request to the Vision framework but this time you can specify a model.
let config = MLModelConfiguration()
var segmentationModel = try! DeepLabV3(configuration: config)
if let visionModel = try? VNCoreMLModel(for: segmentationModel.model) {
  self.request = VNCoreMLRequest(model: visionModel)
  self.request?.imageCropAndScaleOption = .scaleFill
}
In the code above, we create an instance of the DeepLab Core ML object and then initialize a generic VNCoreMLRequest with its model. The only option we set on the request is to tell it how to modify the image when it resizes it for input.
Now the code is very similar to the first example.
let cgImage = originalImage?.cgImage
let handler = VNImageRequestHandler(cgImage: cgImage, options: [:])
try? handler.perform([request])
if let observations = request.results as? [VNCoreMLFeatureValueObservation],
  let segmentationmap = observations.first?.featureValue.multiArrayValue {
  guard let maskUIImage = segmentationmap.image(min: 0.0, max: 1.0) else { return }
  applyBackgroundMask(maskUIImage)
}
Because we are using a generic VNCoreMLRequest we have to cast the results as VNCoreMLFeatureValueObservation. The DeepLab model returns a .multiArrayValue instead of a .pixelBuffer so we will again rely on the helper methods to convert it to an image. Now that the mask image has been created, applying the background is the same as in the original example.
Going Further
This tutorial focused on still images, yet both the standard Vision segmentation requests and DeepLabV3 allow processing video input as they can work with CVPixelBuffer and VNSequenceRequestHandler.
The rest of the process will be almost identical to our example. You will need to finetune the performance, or else you will experience frame drops.
Apple provides another method for identifying the background and primary subject in a still image: Portrait mode. When a device renders Portrait mode, it takes pictures with all cameras on the device and stitches them together. This way, the depth of field can change, and you can adjust what items are in focus or blurred.
If the DeepLab model does not cover your subject matter, you can train the DeepLabV3 model to recognize other objects using your own data.
However, you may consider using SDKs such as PE.SDK and VE.SDK. Enabling background removal for your users is easy: all it takes is a few lines in your configuration as described in the official PE.SDK documentation for iOS and Android, which adds a control to the photo editor to toggle the setting.
Integrate a fully customizable photo editor with Background Removal into your app with PE.SDK.
The latest VE.SDK release introduced Background Removal for stickers. This feature recognizes people in pictures and removes the background with one tap – no need for manual outlines or masks.

Let your users create beautiful visuals with Sticker Background Removal.
This feature is available on Android and iOS 15.0 and higher only. See the official documentation for Sticker Background Removal on Android or iOS.
Using an SDK will simplify and accelerate your app development, as you can save time and resources, and focus on the growth and innovation of your application instead.
Wrapping Up
In this tutorial, you saw how to use Vision and Core ML to segment an image of a person and remove the background. You also saw how to use DeepLab to work with images of non-persons.
Thanks for reading! We hope that you found this tutorial helpful. Feel free to reach out on Twitter with any questions, comments, or suggestions.