

Creating content and sharing it with others has become one of the core features offered by online services. As users publish their content to your website, you want to consider implementing a system to prevent inappropriate posts. Ideally, content will be programmatically moderated before it is uploaded on your platform. That is what you will learn in this article!
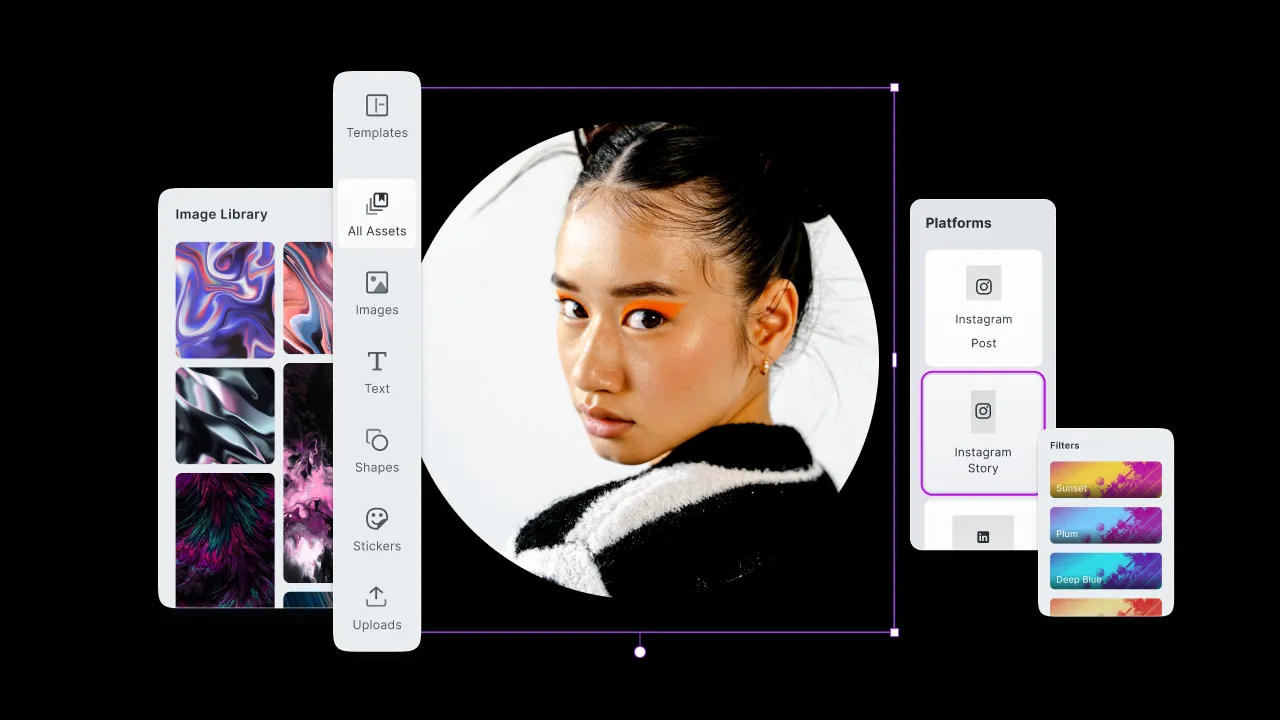
Follow this step-by-step tutorial and learn how to integrate content moderation with Sightengine in your design process built with CreativeEditor SDK in React. At the end of this tutorial, you will achieve the following result:
Why You Should Moderate User-Generated Content
User-generated content represents a large portion of online content, whether text or multimedia. Empowering users with tools and features to create high-quality content is excellent. However, it is a common concern that potentially inappropriate content on your website will be associated with your brand. Naturally, you will want to avoid this.
A recent example from the web-to-print industry serves as a cautionary tale: the German e-commerce company Spreadshirt neglected to moderate content on its t-shirt printing platform, leading to a wave of outrage on social media. Even though the company reacted swiftly and stated an apology, Spreadshirt could have avoided most of the damage if it had implemented a system that automatically flags potentially harmful content. Of course, a religious or cultural symbol is not inherently inappropriate, but the misuse is.
It is highly advisable to take precautions to prevent your company from facing similar adversity. A common problem, however, is the costly and time-consuming manual moderation, epecially when controlling multimedia files like images.
Luckily, you can use CE.SDK and Sightengine to programmatically integrate moderation into your content design process without manual reviews.
What is CE.SDK?
CreativeEditor SDK (CE.SDK) is a powerful, easy-to-use, and fully customizable design editor. With just a few lines of code, CE.SDK provides your application with template-based workflows and automation.
The role-specific editing UI focuses on keeping content adaptation dead simple: in Creator Mode, you have the liberty to create a design from scratch or customize existing templates. When creators are ready to share a design for others to use and customize in Adopter Mode (Default UI), creators may decide which elements can be changed. See CE.SDK in action or try it for free.
What is Sightengine?
Sightengine is a convenient tool for automatic content moderation. It detects and filters unwanted content in photos, videos, and live streams through fast, accurate, easy-to-integrate, privacy-compliant APIs.
Sightengine offers you APIs to get moderation results instantly and effectively. The API-centric approach allows you to scale to up to tens of millions of images per month. You can have a look at the Sightengine demo or try it for free.
Integrate Content Moderation into CE.SDK
Let us look at how to implement an image editor with content moderation for your users. For this, you will learn how to use CE.SDK and React to implement an image design component and use the CE.SDK APIs to programmatically moderate the content with Sightengine on a Node.js server. You can try out a live showcase of content moderation with CE.SDK.
With the following steps, you can easily achieve this result with CE.SDK, React, Sightengine, and Node.js.
1. Get Started with CE.SDK
Integrate CreativeEditor SDK with React by using the official documentation. As you will see in the final snippet, this takes only a few lines of code.
Now that you have a working CE.SDK instance, your users may unleash their creativity by designing templates and sharing them with others. The powerful APIs ensure control at every step of the editing process and allow programmatically performing operations, such as content moderation.
2. Build a Content Moderation API with Sightengine
Let’s move on to content moderation with Sightengine. Keep in mind that any backend technology will work, but here you will implement a content moderation API based on Sightengine in Node.js.
2.1 Getting Started with Sightengine
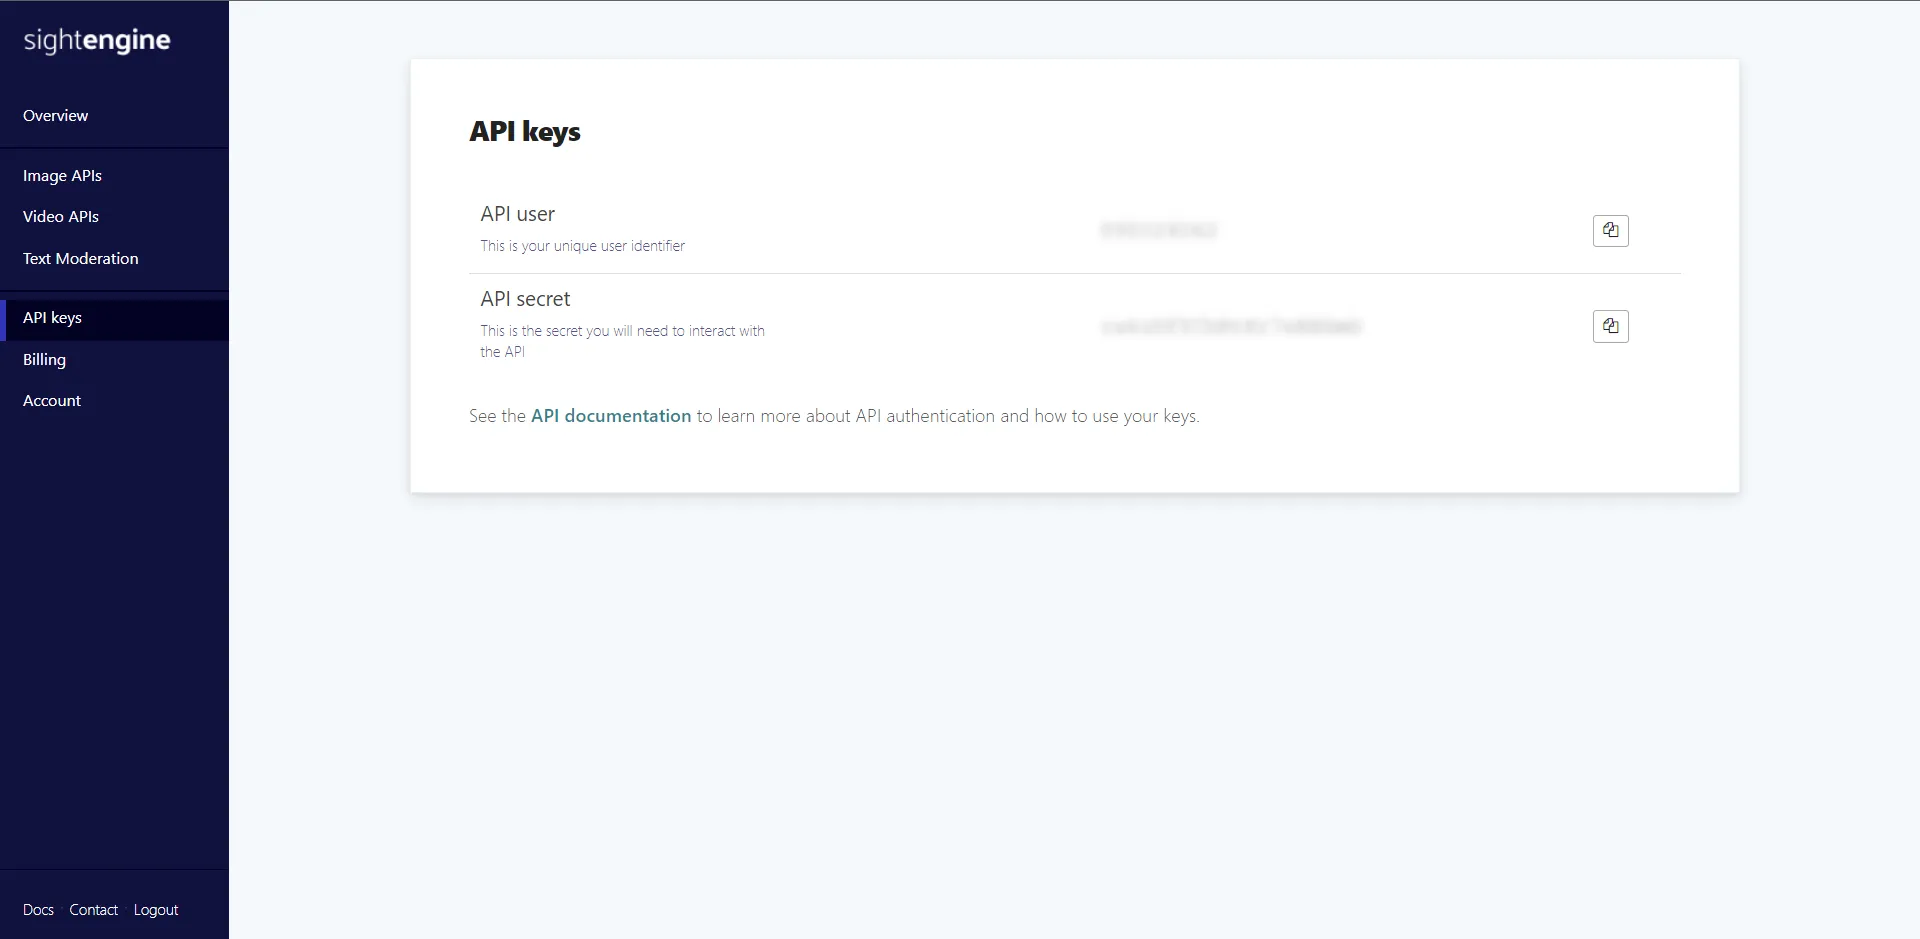
First, you need a Sightengine account. If you do not have one yet, you can create a free account. Fill out the form, click Sign Up, and receive a verification email in your inbox. Click on the verification link and activate your account.
Then, navigate to API Keys on your Sightengine Dashboard page and retrieve your API user and secret credentials. You will need them to interact with the Sightengine moderation APIs.
2.2 Prerequisites
Here is a list of all prerequisites for the backend application you are going to build:
- Node.js and npm 8.x and higher
express>= 4.xnode-fetch>= 3.x
You can add express and node-fetch to your project’s dependencies with the following command:
npm install --save express node-fetch2.3 Setting up a Node.js Express Server
Follow this step-by-step guide to set up a Node.js Express development server. You will need this to perform an API call to Sightengine to moderate your content server-side. Any Sightengine API call involves your Sightengine user and secret pair of credentials, and you do not want to expose them.
You may also want to store the result of the moderation API in your database, as well as other data. For example, you might be interested in keeping track of how many times a particular user has violated the moderation rules to warn or ban them.
2.4 Implementing a Content Moderation API in your Node.js Server
You can now implement a content moderation API in your Node.js Express server as follows:
    const fetch = require("node-fetch")

    router.get('/content-moderation', function (req, res) {
      if (!req.query.url) {
            res.status(404).send("Please provide an image url")
            return
        }

        // defining the Sightengine API parameters
        const params = {
            url: req.query.url,
            models: "nudity,wad,offensive",
            api_user: "YOUR_SIGHTENGINE_USER",
            api_secret: "YOUR_SIGHTENGINE_SECRET",
        }

        // generating the Sightengine API URL
        const queryString = new URLSearchParams(params).toString();
        const requestOptions = {
            method: "GET",
        }
        const sightengineUrl = "https://api.sightengine.com/1.0/check.json?" + queryString

        // calling the Sightengine moderation API
        const externalRes = await fetch(SightengineUrl, requestOptions)
        // retrieving the moderation result from the Sightengine API
        const moderationResultText = await externalRes.text()

        res.append("Access-Control-Allow-Origin", ["*"])
        res.append("Access-Control-Allow-Methods", "GET")
        res.append("Access-Control-Allow-Headers", "Content-Type")

        // returning the Sightengine moderation result text
        res.status(200).send(text)
    })
Take care of replacing YOUR_SIGHTENGINE_USER and YOUR_SIGHTENGINE_SECRET with your Sightengine pair of credentials retrieved before.
Now, launch your Node.js server and reach the following URL below to use Sightengine to moderate the images specified in the URL query parameter:
http://localhost:3000/content-moderation?url=<your_image_url>3. Moderate Images Made with CE.SDK
We will now use CE.SDK and Sightengine to programmatically moderate user-generated images. Before we can dive in, check the following requirements.
3.1 Prerequisites
This is the list of all the prerequisites you need to build for the frontend demo application:
- Node.js and npm 8.x and higher
- React >= 17
@cesdk/cesdk-js>= 1.5.0
You can add the @cesdk/cesdk-js library to your project’s dependencies with the following command:
npm install --save @cesdk/cesdk-jsAlso, the demo application will use other libraries, although they are not strictly required to achieve the goals of this tutorial and can be omitted here.
3.2 Getting Started
You can try out the demo application by cloning the GitHub repository that supports this article with the following commands:
git clone https://github.com/Tonel/content-moderation-with-cesdk-and-sightengine
cd content-moderation-with-cesdk-and-sightengine
npm i
npm start
Otherwise, keep following this tutorial and build the demo application for content moderation by yourself.
First, initialize a React project called content-moderation-with-cesdk-and-sightengine by employing the Create React App command below:
npx content-moderation-with-cesdk-and-sightengineNow, the content-moderation-with-cesdk-and-sightengine folder should have the following file structure:
content-moderation-with-cesdk-and-sightengine
├── README.md
├── node_modules
├── package.json
├── .gitignore
├── public
│   ├── favicon.ico
│   ├── index.html
│   ├── logo192.png
│   ├── logo512.png
│   ├── manifest.json
│   └── robots.txt
└── src
   ├── App.css
   ├── App.js
   ├── App.test.js
   ├── index.css
   ├── index.js
   ├── logo.svg
   ├── reportWebVitals.js
   └── setupTests.js
Enter the content-moderation-with-cesdk-and-sightengine folder and start a local server with these two commands:
cd content-moderation-with-cesdk-and-sightengine
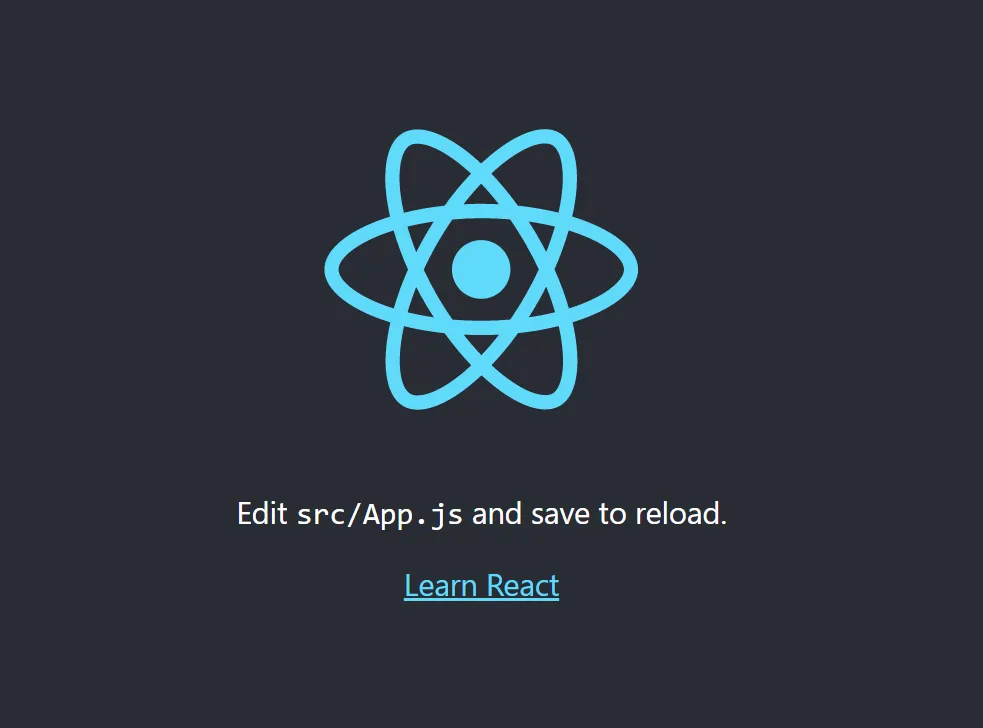
npm startVisit http://localhost:3000/ in your browser, and you should now be seeing the default Create React App screen below:
3.3 Integrate the Moderation Check into your Design Process
Notice that the demo application you are about to implement is just a simplified version of the app you can find in this GitHub repository. This demo app integrates the Sightengine moderation functionality with the CE.SDK design capabilities.
Now, let’s move on to the main component where the integration takes place:
import CreativeEditorSDK from '@cesdk/cesdk-js';
import ValidationBox from '../ui/ValidationBox/ValidationBox';
import React, { useCallback, useEffect, useRef, useState } from 'react';
import { ReactComponent as RefreshIcon } from './refresh.svg';
import { moderateImages } from './moderationUtils';
import styles from './ImageModerator.module.css';
import classNames from 'classnames';

function selectBlock(cesdk, blockId) {
  // deselecting all blocks
  cesdk.engine.block
    .findAllSelected()
    .forEach((block) => cesdk.engine.block.setSelected(block, false));

  // selecting the block having the blockId passed as parameter
  cesdk.engine.block.setSelected(blockId, true);
}

const ImageModerator = () => {
  const cesdkContainerDiv = useRef(null);
  const cesdkRef = useRef(null);
  const [validationResults, setValidationResults] = useState([]);

  useEffect(() => {
    // initializing CE.SDK if it has not been initialized yet
    if (cesdkContainerDiv.current && !cesdkRef.current) {
      const config = {
        role: 'Adopter',
        theme: 'light',
        initialSceneURL: `${window.location.protocol + '//' + window.location.host}/cases/content-moderation/example.scene`,
        ui: {
          elements: {
            panels: {
              settings: true,
            },
            navigation: {
              action: {
                save: true,
              },
            },
          },
        },
        callbacks: {
          // calling this function when the
          // user presses the "Save" button
          onSave: () => runImageModerationCheck(),
        },
      };
      CreativeEditorSDK.init(cesdkContainerDiv.current, config).then(
        (instance) => {
          cesdkRef.current = instance;
          // running the moderation check on initialization
          runImageModerationCheck();
        }
      );
    }
    return () => {
      if (cesdkRef.current) {
        cesdkRef.current.dispose();
      }
    };
  }, [cesdkContainerDiv]);

  const runImageModerationCheck = useCallback(async () => {
    if (!cesdkRef.current) {
      return;
    }
    // retrieving the moderation results
    const validationResults = await moderateImages(cesdkRef.current);
    setValidationResults(validationResults);
  }, []);

  return (
    <div className={classNames(styles.wrapper, 'space-y-2')}>
      <div className={styles.header}>
        <div className={styles.headerDiv}>
          <div>
            <h3 className="h4" style={{ color: 'white' }}>
              Content Moderation
            </h3>
            <p className={styles.headerDivMessage}>
              Check images for compliance with your content guidelines before
              further processing and provide user feedback.
            </p>
          </div>
          <button
            onClick={() => runImageModerationCheck()}
            className={'button button--white space-x-2'}
          >
            <span>Validate Image Content</span>
            <RefreshIcon />
          </button>
        </div>
        <ValidationBox
          results={validationResults}
          onSelect={(blockId) => {
            selectBlock(cesdkRef.current, blockId);
          }}
        />
      </div>
      <div className={styles.cesdkWrapper}>
        <div ref={cesdkContainerDiv} className={styles.cesdk}></div>
      </div>
    </div>
  );
};

export default ImageModerator;
In the first useEffect() hook, CE.SDK is initialized, and a callback on the save action is registered. This will take care of calling the runImageModerationCheck() function when the user presses the CE.SDK Save button. For more information on how callbacks work in CE.SDK, see the official documentation on observing events.
runImageModerationCheck() retrieves the moderation results obtained from Sightengine and then stores it in the validationResults array variable. This is then passed to the ValidationBox component, which will show the results of the validation process to the end-user. None of this would be possible without the moderateImages() function from the moderationUtils.js file below:
export const moderateImages = async (cesdk) => {
  // retrieving all image blocks with a name
  const imageBlocksData = cesdk.engine.block
    .findByType('image')
    .map((blockId) => ({
      blockId,
      url: cesdk.engine.block.getString(blockId, 'image/imageFileURI'),
      blockType: cesdk.engine.block.getType(blockId),
      blockName: cesdk.engine.block.getName(blockId),
    }))
    .filter((block) => {
      return block.blockName !== '';
    });

  console.log('Moderation check launched...');

  // turning the moderation results on each image block into
  // a flat array
  const imagesWithValidity = await Promise.all(
    imageBlocksData.flatMap(async (imageBlockData) => {
      // retrieving the moderation results
      const imageModerationResults = await callSightengineModerationAPI(
        imageBlockData.url
      );

      console.log(imageBlockData.blockName, imageModerationResults);

      return imageModerationResults.flatMap((checkResult) => ({
        ...checkResult,
        ...imageBlockData,
      }));
    })
  );

  console.log('Moderation check completed');

  return imagesWithValidity.flat();
};

// a cache variable to avoid
// calling the Sightengine API when not necessary
const complianceCache = {};

const callSightengineModerationAPI = async (url) => {
  // if the url is already present in the cache, then
  // return the result previously retrieved
  if (complianceCache[url]) {
    return complianceCache[url];
  }

  // calling the Sightengine moderation API
  const response = await fetch(
    // your endpoint URL
    'https://europe-west3-img-ly.cloudfunctions.net/sightengineApiProxy?url=' +
      encodeURIComponent(url),
    {
      method: 'get',
      headers: {
        accept: 'application/json',
        'Accept-Language': 'en-US,en;q=0.8',
        'Content-Type': 'multipart/form-data;',
      },
    }
  );

  const results = await response.json();

  if (results.error) {
    console.error(results.error);
    return [];
  } else {
    const checkResults = [
      {
        name: 'Weapons',
        description: 'Handguns, rifles, machine guns, threatening knives...',
        state: percentageToState(results.weapon),
      },
      {
        name: 'Alcohol',
        description: 'Wine, beer, cocktails, champagne...',
        state: percentageToState(results.alcohol),
      },
      {
        name: 'Drugs',
        description: 'Cannabis, syringes, glass pipes, bongs, pills...',
        state: percentageToState(results.drugs),
      },
      {
        name: 'Nudity',
        description: 'Images that contain either raw nudity or partial nudity.',
        state: percentageToState(1 - results.nudity.safe),
      },
    ];

    // storing the Sightengine results in the cache
    complianceCache[url] = checkResults;
    return checkResults;
  }
};

const percentageToState = (percentage) => {
  // defining the custom moderation logic based on the
  // percentage returned by Sightengine
  if (percentage > 0.8) {
    return 'failed';
  } else if (percentage > 0.4) {
    return 'warning';
  } else {
    return 'success';
  }
};
Here, we use the CE.SDK reference variable to retrieve all images in the scene through the CE.SDK APIs. Then, these are converted into URLs and passed callSightengineModerationAPI() function, which takes care of calling the Sightengine moderation API, retrieving the results, using them to produce a new output, and returning it to the caller.
We used an IMG.LY endpoint here to evade putting together a backend application. In a real-world scenario, replace https://europe-west3-img-ly.cloudfunctions.net/sightengineApiProxy?url= with the URL of the /content-moderation endpoint of your backend application. Also, note that a cache system was set up to avoid calling the Sightengine API too many times and using up call credits.
This is what the demo application will look like after being launched and the moderation check has been executed:
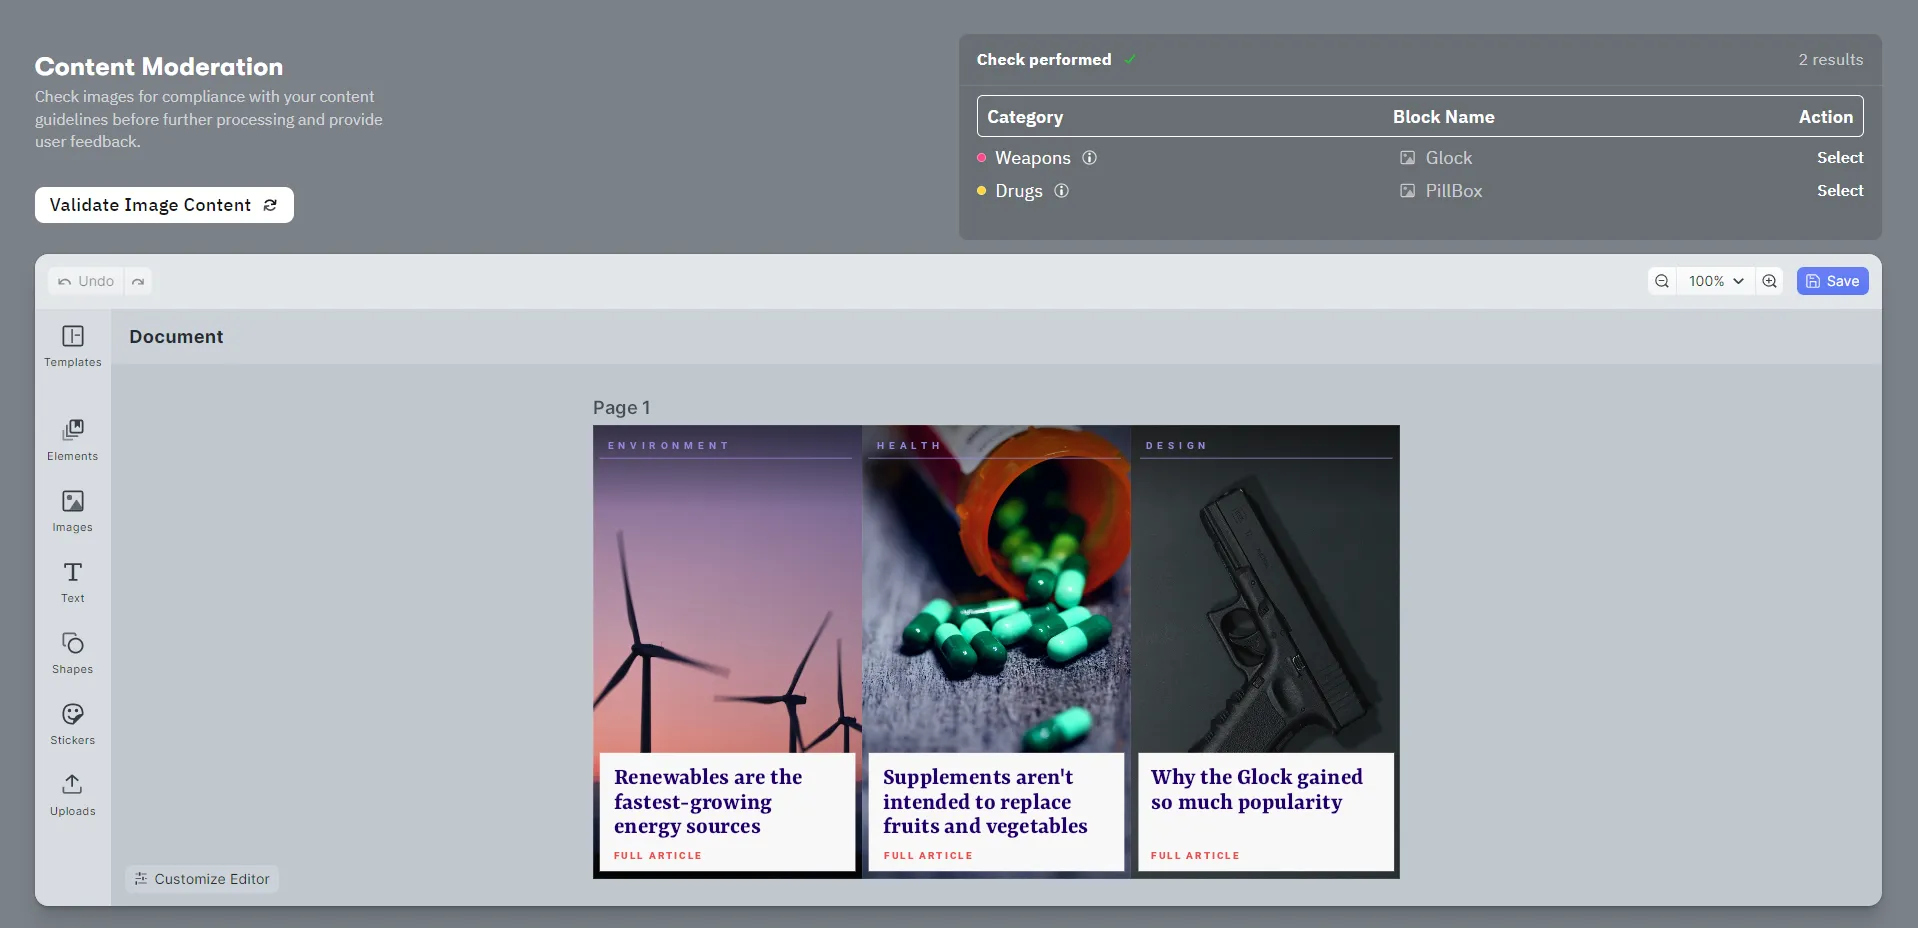
As you can see, the Sightengine API correctly detects drugs and weapons. Next, remove the rightmost image containing a gun and click Save to re-run the moderation check.
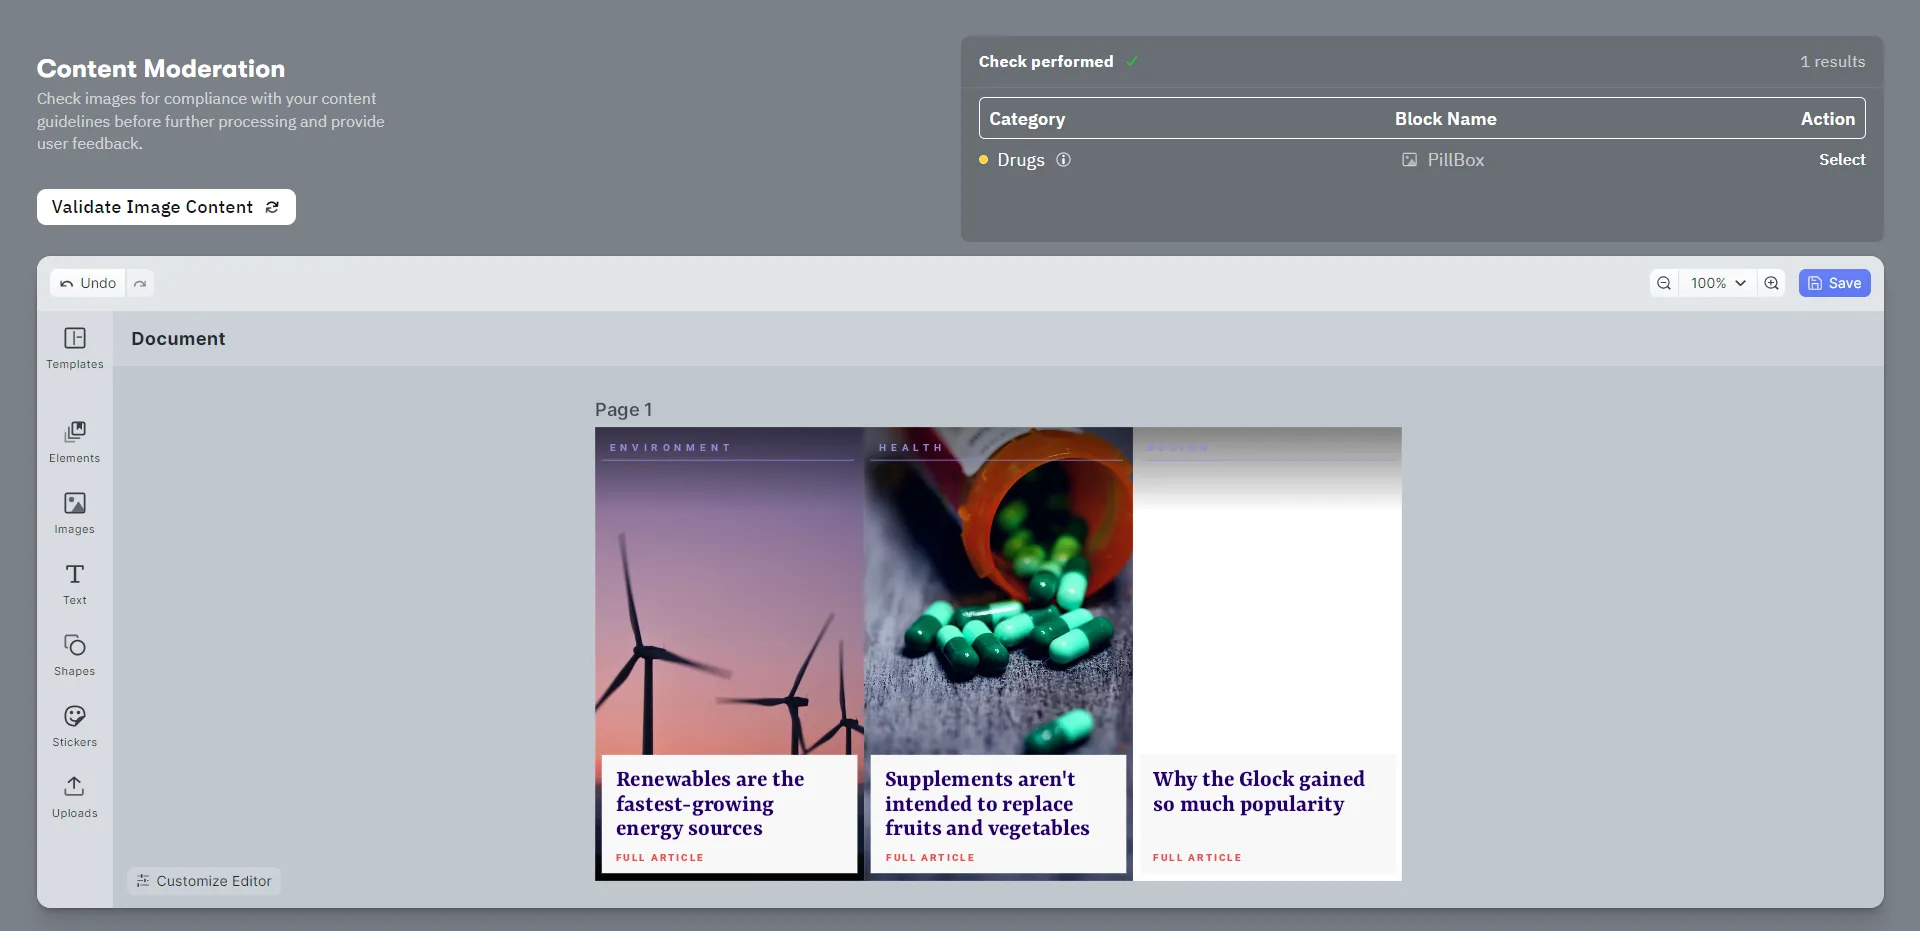
Sightengine no longer detects weapons in the image, proving that the moderation process is working as expected.
Et voilà! You have learned to implement content moderation for user-generated images with CE.SDK and Sightengine.
Conclusion
A challenge of user-generated content is avoiding the risk of hosting and displaying offensive or outright illegal content. Inappropriate content affects your user community and brand reputation and may even cause legal action against you.
In this article, we used CE.SDK to initialize a fully-featured design editor in React. We employed its API to programmatically call a Node.js server using Sightengine to perform content moderation on images. This allows moderation of user-generated content automatically and prevents the upload of inappropriate content to your website.
We are only scratching the surface of what is possible with CE.SDK – you can implement any UI on top of its powerful image processing API and extend the core functionality with features such as placeholders and define validation rules to guide your users’ creation process.
Thanks for reading! We hope that you found this article helpful. Feel free to reach out on Twitter with any questions, comments, or suggestions.