

Canva has popularized image editing, and user expectations of creative capabilities have increased accordingly. If your web or mobile application includes any design functionality - for book covers, t-shirt designs, or social media content - it has to be on par with the design experience offered by prosumer creation tools such as Canva.
Allowing users to edit images through an easy user interface, define high-quality templates, and give them the ability to share them with the community is a great way to boost engagement, add virality, and potentially new revenue streams.
You might think this requires a lot of time and effort, but that is not the case. CreativeEditor SDK makes it dead simple to build a Canva-like design editor in minutes. I’ll show you how!
Follow this step-by-step tutorial and learn how to implement a Canva clone in React with CE.SDK. At the end of this tutorial, you will achieve the following result:
Try the final result live on CodeSandbox.
What is Canva?
Canva is a free graphic design tool for image editing featuring a drag-and-drop interface for composing different elements on a canvas. You can easily create flyers, invitations, business cards, and more with professionally designed templates. You can think of it as a basic version of Photoshop that anyone can use.
You can create Canva templates in a web browser or on the official app for iOS or Android, share them and collaborate easily. Templates make Canva a powerful tool - that is also true for CE.SDK, which makes it a perfect harbor to set sail for new horizons and create an excellent editor. Before we learn how to replicate Canva, let us evaluate the SDK in question.
What is CE.SDK?
CreativeEditor SDK (CE.SDK) is a fully customizable, user-friendly design editor tool. You can integrate it easily into your application with just a few lines of code and benefit from the template-based editor in no time.
The role-specific editing UI focuses heavily on content adaptation. CE.SDK offers two modes: in Creator Mode, you can create a design from scratch or customize existing templates. Once ready, creators can share their templates and decide which elements others can change and to what degree. Then, users can import the template and customize it in Adopter Mode (Default UI).
Try CE.SDK live demos or start a free trial.
Designing and Sharing a Template in Creator Mode
The Creator Mode is the most powerful and least restrictive role in CE.SDK. It empowers you to unleash your creativity and create custom templates for every imaginable use case. Add, move, modify, and delete elements as you wish and define constraints. Further elevate your designs with photo editings, such as filters, effects, and background removal.
The well-rounded text editor also allows you to define variables and programmatically give them a value using the CE.SDK Variable API. For example, you may introduce a {{Name}} Variable and have CESDK import names from a database. This automation is perfect for batch-processing designs, such as greeting cards. Based on this principle, we have built an example NFT Art Collection Generator in React with CE.SDK.
In the Creator Mode, you also can define placeholders. Turning an element into a placeholder will let you determine if it can be deleted, styled, or duplicated by the adopter.
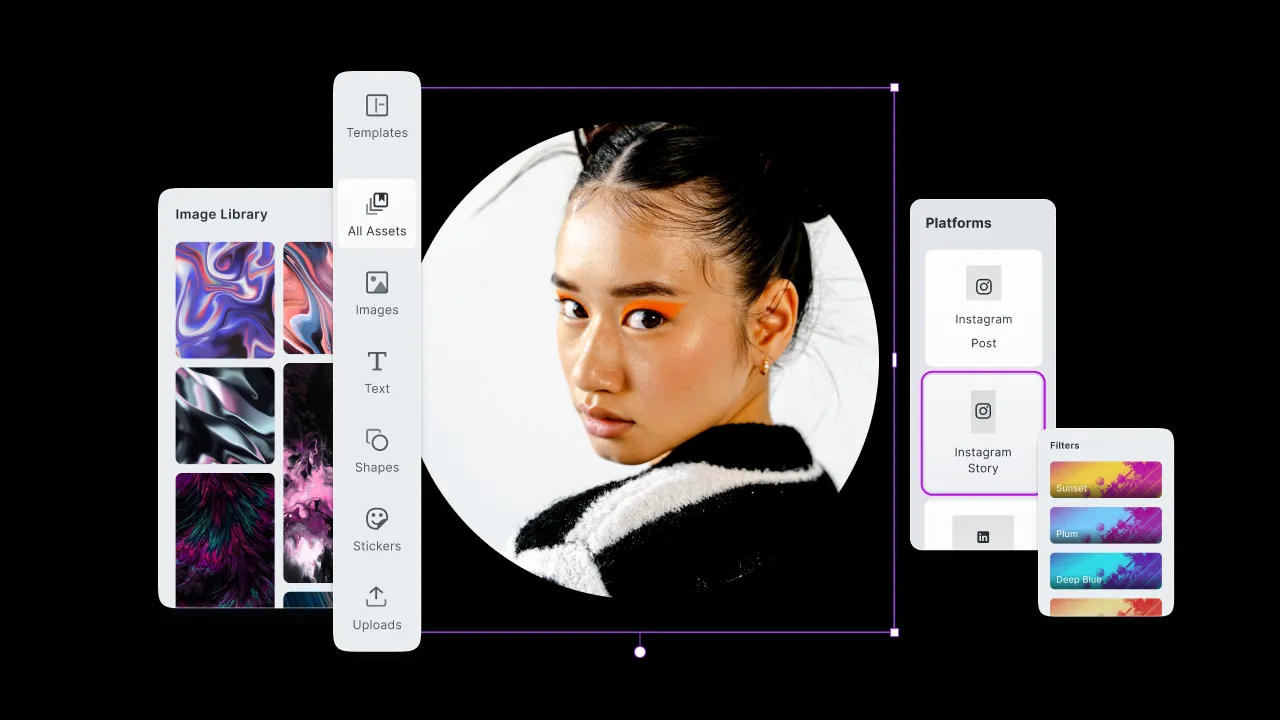
This is what the CE.SDK Creator Mode looks like:
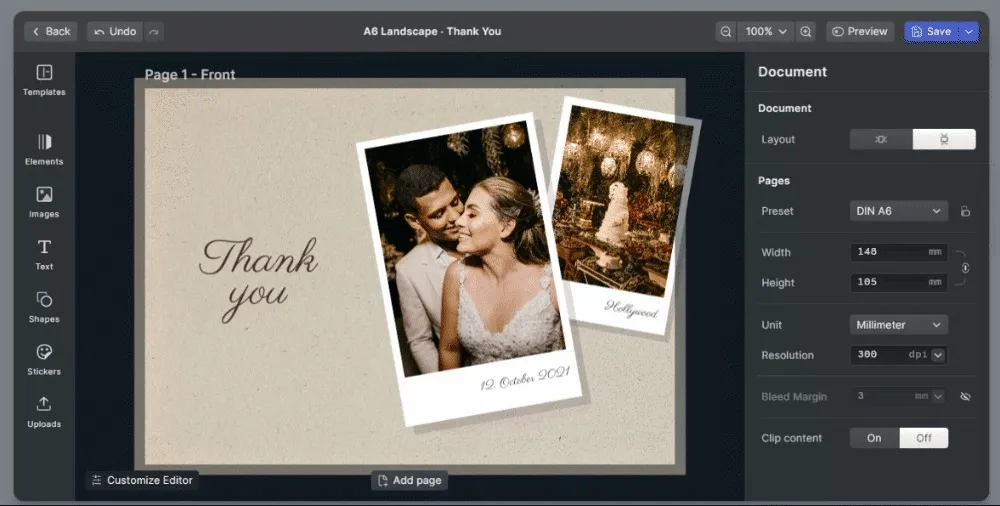
As you can see, you can use CE.SDK to easily create a wedding invitation card template. This is just an example, and you can find other cool sample templates for greeting cards, flyers, postcards, and business cards on showcase page.
What Adopter Mode Offers You
You can test the adopter view of the wedding invitation card template shown above here.
This is what the Adopter Mode looks like:
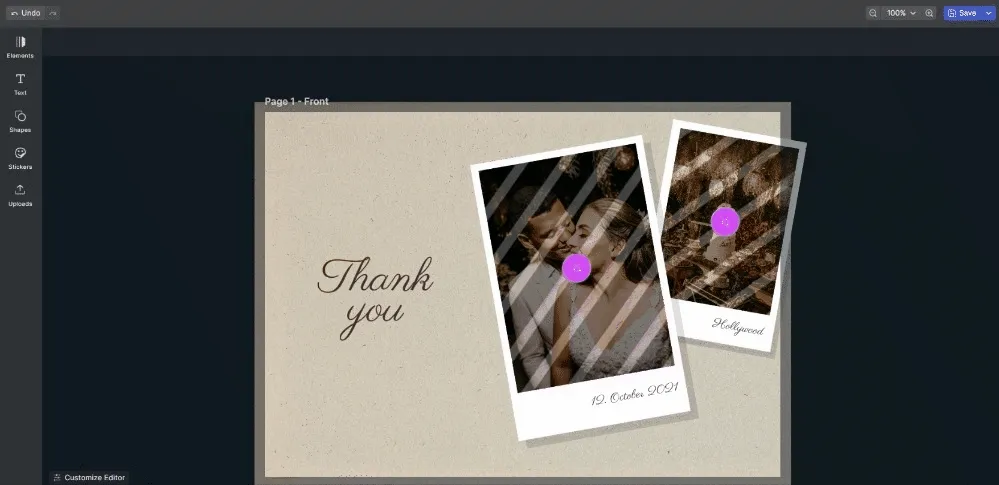
As shown above, CE.SDK’s Adopter Mode enables you to add and modify colors, text, and images based on the constraints enabled by the creator of the template. This mode provides the Adopter users with a simple interface, narrowed down to the properties that they are allowed to change. This prevents adopters from accidentally changing or deleting parts of a design that should not be modified.
Implement a Canva Clone with CE.SDK
Let’s now learn how to use CE.SDK to build a Canva clone in React.
Prerequisites
This is the list of all the prerequisites for the Canva clone application you are going to build:
- Node.js and npm 8.0+ and higher
- React >= 18
@cesdk/cesdk-js> 1.6.3
Add @cesdk/cesdk-js to your project’s dependencies with the following command:
npm install @cesdk/cesdk-jsInitialize a React Project
You can try out the Canva clone by cloning the GitHub repository supporting the article and running the demo web application with the following commands:
git clone https://github.com/Tonel/canva-clone-cesdk-imgly
cd canva-clone-cesdk-imgly
npm i
npm start
Otherwise, follow this step-by-step tutorial and learn how to build the Canva clone with CE.SDK by yourself.
First, you need to initialize a canva-clone-cesdk-imgly React project. You can do it with Create React App by launching the command below:
npx create-react-app canva-clone-cesdk-imglyNow, the canva-clone-cesdk-imgly folder will have the following file structure:
canva-clone-cesdk-imgly
├── README.md
├── node_modules
├── package.json
├── .gitignore
├── public
│   ├── favicon.ico
│   ├── index.html
│   ├── logo192.png
│   ├── logo512.png
│   ├── manifest.json
│   └── robots.txt
└── src
    ├── App.css
    ├── App.js
    ├── App.test.js
    ├── index.css
    ├── index.js
    ├── logo.svg
    ├── reportWebVitals.js
    └── setupTests.js
Move into the canva-clone-cesdk-imgly folder and start a local development server with:
cd canva-clone-cesdk-imgly
npm start
Reach http://localhost:3000/ in your browser and make sure you see the default Create React App screen below:

You are now ready to code!
Build the Canva Clone Component with CE.SDK
If you want your image editing component to provide a Canva-like experience, it must include key features, such as template and custom resource management. Let’s see how to implement them all with CE.SDK.
Configure CE.SDK to use templates
Managing templates in CE.SDK is easy. All you have to do is configure the set of predefined templates loaded by CE.SDK on initialization, as explained in the official documentation on adding templates. You can achieve this as below:
useEffect(() => {
  let cesdk;

  let config = {
    // initializing CE.SDK with a few templates
    presets: {
      templates: {
        postcard_1: {
          label: 'Postcard Design',
          scene: `https://cdn.img.ly/packages/imgly/cesdk-js/latest/assets/templates/cesdk_postcard_1.scene`,
          thumbnailURL: `https://cdn.img.ly/packages/imgly/cesdk-js/latest/assets/templates/cesdk_postcard_1.png`,
        },
        postcard_2: {
          label: 'Postcard Tropical',
          scene: `https://cdn.img.ly/packages/imgly/cesdk-js/latest/assets/templates/cesdk_postcard_2.scene`,
          thumbnailURL: `https://cdn.img.ly/packages/imgly/cesdk-js/latest/assets/templates/cesdk_postcard_2.png`,
        },
        business_card_1: {
          label: 'Business card',
          scene: `https://cdn.img.ly/packages/imgly/cesdk-js/latest/assets/templates/cesdk_business_card_1.scene`,
          thumbnailURL: `https://cdn.img.ly/packages/imgly/cesdk-js/latest/assets/templates/cesdk_business_card_1.png`,
        },
        instagram_photo_1: {
          label: 'Instagram photo',
          scene: `https://cdn.img.ly/packages/imgly/cesdk-js/latest/assets/templates/cesdk_instagram_photo_1.scene`,
          thumbnailURL: `https://cdn.img.ly/packages/imgly/cesdk-js/latest/assets/templates/cesdk_instagram_photo_1.png`,
        },
        instagram_story_1: {
          label: 'Instagram story',
          scene: `https://cdn.img.ly/packages/imgly/cesdk-js/latest/assets/templates/cesdk_instagram_story_1.scene`,
          thumbnailURL: `https://cdn.img.ly/packages/imgly/cesdk-js/latest/assets/templates/cesdk_instagram_story_1.png`,
        },
        poster_1: {
          label: 'Poster',
          scene: `https://cdn.img.ly/packages/imgly/cesdk-js/latest/assets/templates/cesdk_poster_1.scene`,
          thumbnailURL: `https://cdn.img.ly/packages/imgly/cesdk-js/latest/assets/templates/cesdk_poster_1.png`,
        },
        presentation_4: {
          label: 'Presentation',
          scene: `https://cdn.img.ly/packages/imgly/cesdk-js/latest/assets/templates/cesdk_presentation_1.scene`,
          thumbnailURL: `https://cdn.img.ly/packages/imgly/cesdk-js/latest/assets/templates/cesdk_presentation_1.png`,
        },
        collage_1: {
          label: 'Collage',
          scene: `https://cdn.img.ly/packages/imgly/cesdk-js/latest/assets/templates/cesdk_collage_1.scene`,
          thumbnailURL: `https://cdn.img.ly/packages/imgly/cesdk-js/latest/assets/templates/cesdk_collage_1.png`,
        },
      },
    },
  };

  if (cesdkContainer.current) {
    CreativeEditorSDK.init(cesdkContainer.current, config).then((instance) => {
      cesdk = instance;
    });
  }

  return () => {
    if (cesdk) {
      cesdk.dispose();
    }
  };
}, [cesdkContainer]);
Thanks to the presets.templates, you can specify all the CE.SDK templates to be made available to users.
Note that the cesdkContainer variable stores the React reference to the div where to mount CE.SDK.
This is what the CE.SDK template section will look like:

As you can see, all eight templates loaded with presets.templates.
Integrate External Asset Sources Into CE.SDK
CE.SDK supports external asset sources, meaning you can give your users a vast library of resources to supercharge their creative workflows. Instead of spending time building a repository of images manually, you can provide your users with image resources retrieved dynamically by connecting to services like Unsplash and Airtable. Learn how to integrate external asset sources in CE.SDK, or see a live demo based on the Unsplash and Airtable integration.
Add Custom Images to CE.SDK
You can load custom resources and make them available to users with CE.SDK. For example, you would like to add this Flaticon below to the available images in CE.SDK:
![]()
All you need to do is define a new asset source as explained in the documentation page on Integrating Custom Resources into CE.SDK.
You can achieve this as follows:
useEffect(() => {
  // path to the local image to load into CE.SDK
  const customImagePath = `${window.location.protocol + '//' + window.location.host}/resources/programming.png`;

  let cesdk;

  let config = {
    // loading the business card template as default template
    initialSceneURL: `https://cdn.img.ly/packages/imgly/cesdk-js/latest/assets/templates/cesdk_business_card_1.scene`,
    // loading the external asset sources
    assetSources: {
      // loading a custom image into CE.SDK
      custom: {
        findAssets: () => {
          return {
            assets: [
              {
                id: 'custom-image-1',
                type: 'ly.img.image',
                locale: 'en',
                label: 'Programming',
                thumbUri: customImagePath,
                size: {
                  width: 512,
                  height: 512,
                },
                meta: {
                  uri: customImagePath,
                },
                context: {
                  sourceId: 'custom',
                },
                credits: {
                  name: 'Freepik',
                  url: 'https://www.flaticon.com/free-icon/programming_1208884?related_id=1208782&origin=search',
                },
              },
            ],
            currentPage: 1,
            total: 1,
            nextPage: undefined,
          };
        },
      },
    },
    // translating the labels associates with the external asset sources
    i18n: {
      en: {
        'libraries.custom.label': 'Custom',
      },
    },
    // initializing CE.SDK with a few templates
    presets: {
      templates: {
        // ...
        business_card_1: {
          label: 'Business card',
          scene: `https://cdn.img.ly/packages/imgly/cesdk-js/latest/assets/templates/cesdk_business_card_1.scene`,
          thumbnailURL: `https://cdn.img.ly/packages/imgly/cesdk-js/latest/assets/templates/cesdk_business_card_1.png`,
        },
        // ...
      },
    },
  };

  if (cesdkContainer.current) {
    CreativeEditorSDK.init(cesdkContainer.current, config).then((instance) => {
      cesdk = instance;
    });
  }

  return () => {
    if (cesdk) {
      cesdk.dispose();
    }
  };
}, [cesdkContainer]);
The customImagePath variable stores the path to the local image file programming.png located in the public/resources folder of the React project. This variable is used in the findAssets() function. This function is important because it defines the complete asset source. In other words, you only need one function to implement the custom asset retrieval logic. Note that providing images with labels is useful to make them searchable through the CE.SDK UI.
Now, users will be able to use the image in their template.
![]()
Tie it Together
This is what the final CanvaClone component looks like:
import './CanvaClone.css';
import CreativeEditorSDK from '@cesdk/cesdk-js';
import React, { useEffect, useRef } from 'react';
import { findAirtableAssets } from './airtableAssetLibrary';
import { findUnsplashAssets } from './unsplashAssetLibrary';

function CanvaClone({
  // initializing Airtable as default external asset library
  assetLibrary = 'airtable',
}) {
  const cesdkContainer = useRef(null);

  useEffect(() => {
    const externalAssetSources = {
      ...(assetLibrary === 'airtable' && {
        airtable: {
          findAssets: findAirtableAssets,
          credits: {
            name: 'Airtable',
            url: 'https://airtable.com/shr4x8s9jqaxiJxm5/tblSLR9GBwiVwFS8z?backgroundColor=orange',
          },
        },
      }),
      ...(assetLibrary === 'unsplash' && {
        unsplash: {
          findAssets: findUnsplashAssets,
          credits: {
            name: 'Unsplash',
            url: 'https://unsplash.com/',
          },
          license: {
            name: 'Unsplash license (free)',
            url: 'https://unsplash.com/license',
          },
        },
      }),
    };

    // path to the local image to load into CE.SDK
    const customImagePath = `${window.location.protocol + '//' + window.location.host}/resources/programming.png`;

    let cesdk;

    let config = {
      // loading the business card template as default template
      initialSceneURL: `https://cdn.img.ly/packages/imgly/cesdk-js/latest/assets/templates/cesdk_business_card_1.scene`,
      // loading the external asset sources
      assetSources: {
        // loading the AirTable or Unsplash asset library
        ...externalAssetSources,
        // loading a custom image into CE.SDK
        custom: {
          findAssets: () => {
            return {
              assets: [
                {
                  id: 'custom-image-1',
                  type: 'ly.img.image',
                  locale: 'en',
                  label: 'Programming',
                  thumbUri: customImagePath,
                  size: {
                    width: 512,
                    height: 512,
                  },
                  meta: {
                    uri: customImagePath,
                  },
                  context: {
                    sourceId: 'custom',
                  },
                  credits: {
                    name: 'Freepik',
                    url: 'https://www.flaticon.com/free-icon/programming_1208884?related_id=1208782&origin=search',
                  },
                },
              ],
              currentPage: 1,
              total: 1,
              nextPage: undefined,
            };
          },
        },
      },
      // translating the labels associates with the external asset sources
      i18n: {
        en: {
          'libraries.airtable.label': 'Airtable',
          'libraries.unsplash.label': 'Unsplash',
          'libraries.custom.label': 'Custom',
        },
      },
      // initializing CE.SDK with a few templates
      presets: {
        templates: {
          postcard_1: {
            label: 'Postcard Design',
            scene: `https://cdn.img.ly/packages/imgly/cesdk-js/latest/assets/templates/cesdk_postcard_1.scene`,
            thumbnailURL: `https://cdn.img.ly/packages/imgly/cesdk-js/latest/assets/templates/cesdk_postcard_1.png`,
          },
          postcard_2: {
            label: 'Postcard Tropical',
            scene: `https://cdn.img.ly/packages/imgly/cesdk-js/latest/assets/templates/cesdk_postcard_2.scene`,
            thumbnailURL: `https://cdn.img.ly/packages/imgly/cesdk-js/latest/assets/templates/cesdk_postcard_2.png`,
          },
          business_card_1: {
            label: 'Business card',
            scene: `https://cdn.img.ly/packages/imgly/cesdk-js/latest/assets/templates/cesdk_business_card_1.scene`,
            thumbnailURL: `https://cdn.img.ly/packages/imgly/cesdk-js/latest/assets/templates/cesdk_business_card_1.png`,
          },
          instagram_photo_1: {
            label: 'Instagram photo',
            scene: `https://cdn.img.ly/packages/imgly/cesdk-js/latest/assets/templates/cesdk_instagram_photo_1.scene`,
            thumbnailURL: `https://cdn.img.ly/packages/imgly/cesdk-js/latest/assets/templates/cesdk_instagram_photo_1.png`,
          },
          instagram_story_1: {
            label: 'Instagram story',
            scene: `https://cdn.img.ly/packages/imgly/cesdk-js/latest/assets/templates/cesdk_instagram_story_1.scene`,
            thumbnailURL: `https://cdn.img.ly/packages/imgly/cesdk-js/latest/assets/templates/cesdk_instagram_story_1.png`,
          },
          poster_1: {
            label: 'Poster',
            scene: `https://cdn.img.ly/packages/imgly/cesdk-js/latest/assets/templates/cesdk_poster_1.scene`,
            thumbnailURL: `https://cdn.img.ly/packages/imgly/cesdk-js/latest/assets/templates/cesdk_poster_1.png`,
          },
          presentation_4: {
            label: 'Presentation',
            scene: `https://cdn.img.ly/packages/imgly/cesdk-js/latest/assets/templates/cesdk_presentation_1.scene`,
            thumbnailURL: `https://cdn.img.ly/packages/imgly/cesdk-js/latest/assets/templates/cesdk_presentation_1.png`,
          },
          collage_1: {
            label: 'Collage',
            scene: `https://cdn.img.ly/packages/imgly/cesdk-js/latest/assets/templates/cesdk_collage_1.scene`,
            thumbnailURL: `https://cdn.img.ly/packages/imgly/cesdk-js/latest/assets/templates/cesdk_collage_1.png`,
          },
        },
      },
    };
    if (cesdkContainer.current) {
      CreativeEditorSDK.init(cesdkContainer.current, config).then(
        (instance) => {
          cesdk = instance;
        }
      );
    }

    return () => {
      if (cesdk) {
        cesdk.dispose();
      }
    };
  }, [cesdkContainer, assetLibrary]);

  return (
    <div className="caseContainer">
      <div className="wrapper">
        <div ref={cesdkContainer} className="cesdk"></div>
      </div>
    </div>
  );
}

export default CanvaClone;
The findAirtableAssets() and findUnsplashAssets() functions come from the GitHub repo associated with the Unsplash and Airtable integration showcase page.
These functions allow CE.SDK to dynamically retrieve resources from online services. A search for images in the CE.SDK UI will perform a query on Airtable or Unsplash and provides them to your users. With just a few lines of code, you are making massive resources available to your users.
Conclusion
Canva has rapidly become one of the most popular graphic design tools. It is so prevalent that users expect similar features in your web and mobile applications. Building a Canva clone from scratch would take months, but with CreativeEditor SDK, it only takes minutes.
In this article, we used CE.SDK to initialize an advanced design editor in React. We adopted its API to configure and customize a design editor to build a Canva clone. This would not be possible without the intuitive UI offered by CE.SDK and its advanced features, such as placeholders and the possibility to define validation rules to guide your users’ creation process.
Here we only scratched the surface of what is possible with CE.SDK – you can use its powerful image processing API to implement many more features and make your Canva clone more and more complex. This is only the beginning!
See how IMG.LY compares to Canva Connect API and check out all the use cases of CreativeEditor SDK or contact sales to learn more!