
In this guide, we'll go through the hot topics of FFmpeg. But before that, we'll cover some base ground to help you understand basic media concepts and FFmpeg. Feel free to skip the parts that are already trivial for you!
Introduction to FFmpeg
FFmpeg.org's definition is the following: "FFmpeg is the leading multimedia framework, able to decode, encode, transcode, mux, demux, stream, filter and play pretty much anything that humans and machines have created. It supports the most obscure ancient formats up to the cutting edge. No matter if they were designed by some standards committee, the community or a corporation."
I think of FFmpeg as the go-to application for audio/video manipulation in an automated or scripted manner.
When you need to implement a service that manipulates video, or just have 300 media files that need to be converted into a different format, FFmpeg is your - nerdy - friend.
FFmpeg can do large chunks of the basic functionalities of a modern Non-linear (NLE) video editors, e.g., Davinci Resolve Studio or Premiere Pro. But, it does not have a graphical interface in that sense as those behemoths do, and unarguably it is way less friendly.
In a general NLE, you might do things like these:
- Click to import a file
- Drop it into the timeline
- Trim and Cut
- Add an overlay image
- Crop that overlay
- Add vignette
- Add some color changing effects, e.g. change the hue
- Add an extra audio track to the mix
- Change the volume
- Add some effects, e.g.: echo
- Export into various formats
- Export into a deployable video format
- Export the master audio in wav
Learn how to crop and trim videos in Flutter. Or, to achieve the exact same thing, you could also execute this command:
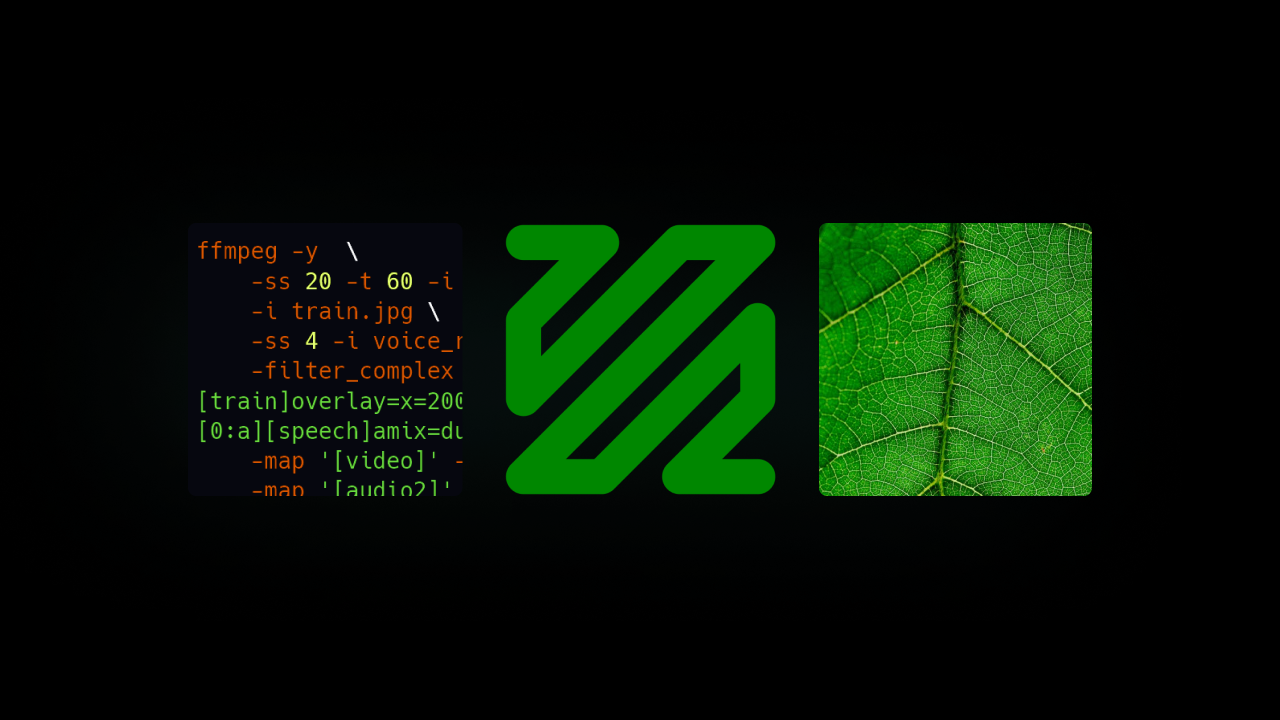
ffmpeg -y  \
    -ss 20 -t 60 -i bbb_sunflower_1080p_60fps_normal.mp4 \
    -i train.jpg \
    -ss 4 -i voice_recording.wav \
    -filter_complex "[0:v]hue=h=80:s=1[main] ; [1:v]crop=w=382:h=304:x=289:y=227[train] ; [main][train]overlay=x=200:y=200,vignette=PI/4[video] ; [2:a]volume=1.5,aecho=0.8:0.9:100:0.3[speech] ; [0:a][speech]amix=duration=shortest,asplit[audio1][audio2]" \
    -map '[video]' -map '[audio1]' -metadata title="Editor's cut" bbb_edited.mp4 \
    -map '[audio2]' bbb_edited_audio_only.wav
Yes, it isn't friendly at all, but it is very, very powerful once you become friends with FFmpeg.
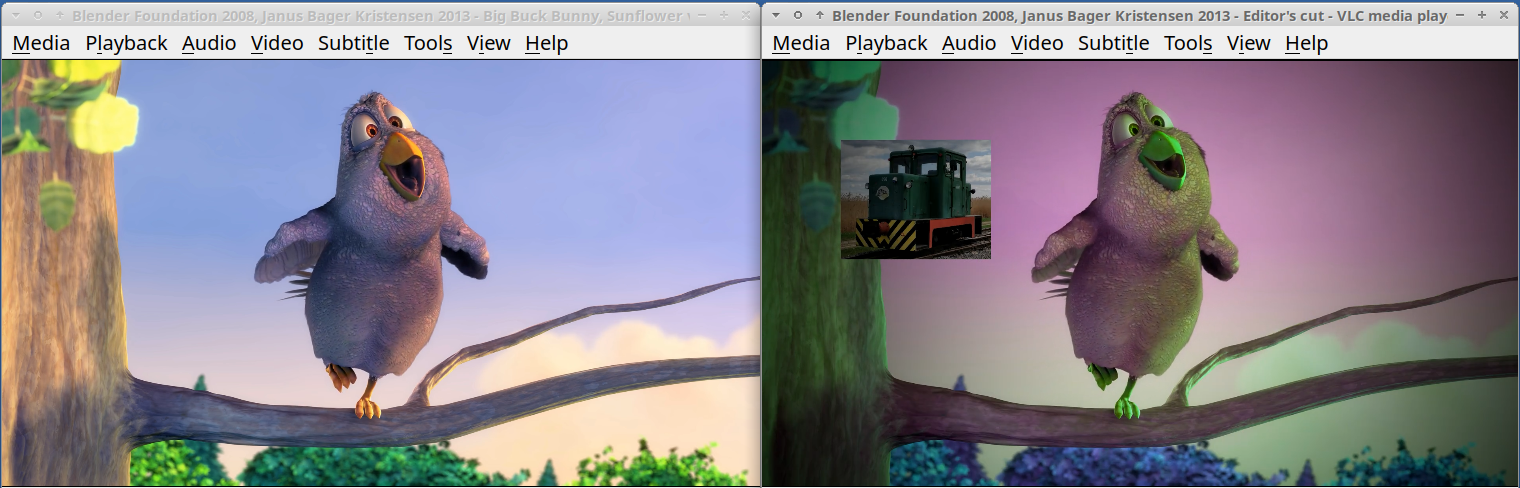
Check out this comparison of the original and the edited one:
If you want to try this command out, get the example files and see it for yourself!
Installing FFmpeg
FFmpeg is available for most common and even uncommon platforms and architectures. You can be on Linux, Mac OS X or Microsoft Windows, and you'll be able to run or link to FFmpeg.
Installing FFmpeg is easy on most platforms! There is no installer, usually just a compressed archive you need to get for your platform and architecture.
In the case of Linux, most distributions include a pre-built FFmpeg in their software repositories. Therefore, you can install FFmpeg from those even more quickly.
FFmpeg history
The project was started in 2000 by the awesome Fabrice Bellard. The name is a concatenation of "FF" meaning "fast-forward" and MPEG, the name of a video standards group. It has been very well, active and alive since then, releasing a new release about every three months.
FFmpeg supported codecs and formats
The default FFmpeg shipped with my Ubuntu Linux distribution supports about 460 codecs and 370 formats.
See it for yourself:
ffmpeg -codecs
ffmpeg -formats
Compilation of FFmpeg
Keep in mind that the supported codecs and formats (and filters, demuxers, muxers, input and output methods, etc.) are highly dependent on the so-called compilation flags.
This means that the above number only represents the fact that it supports at least this many codecs and formats. Still, there are even more that the package builders excluded for various reasons, e.g.: licensing, architecture, size considerations, etc.
Since FFmpeg is open source, you can compile FFmpeg for yourself at any time.
Suppose for example, that you care about your layer's size (therefore the bootstrap speed) in AWS Lambda. In this case, you can compile an FFmpeg binary that only contains the mp3 encoder for example, and nothing else. For a full tutorial on running FFmpeg on AWS Spot Instances, see our cloud guide. Prefer Google Cloud? Our guide on running FFmpeg on Google Cloud Platform shows you how.
Also, you might not want to run into licensing issues and leave out stuff that would cause problems for your use case. Therefore you choose to leave out particular codecs/formats. I highly recommend checking out the "--enable-gpl", "--enable-nonfree" and "--enable-version3" compilation flags in this case, as well as this.
Or you might want to have a standalone FFmpeg binary in your project (e.g.: embedded, or some cloud instance), that does not depend on any operating system libraries. Then you want to make a so-called static build, that compiles in all the libraries into a single binary file, and does not depend on your OS' libraries and the runtime loading of other FFmpeg libraries. Search around for "--enable-static" in this case.
Finally, you can find pre-built static FFmpeg builds right here too. Alternatively, you can package FFmpeg in a Docker container for consistent environments - our Docker guide covers this approach.
FFmpeg's strengths
FFmpeg reads and writes most video and audio formats that matter for most of us. It is a very capable and high-performance tool for converting and manipulating these formats.
But FFmpeg can do even more! For examples of these operations integrated into an automated pipeline, read our article on a batch video processing server.
Filtering
FFmpeg has vast amounts of filters for audio and video. Therefore, video manipulation is also a key feature of FFmpeg.
Hardware acceleration
It does support many kinds of hardware accelerations! Video encoding is a very resource-intensive operation, and you might come across quite a few hardware devices or features that might speed up your process!
Most notably, if you have an NVIDIA card, you can increase your H.264 or H.265 encoding and decoding throughput by multipliers compared to your CPU. But other things, such as VDPAU, VAAPI, or OpenCL, can be leveraged to boost your pipeline's throughput.
Learn more about the supported hardware acceleration methods here.
Versatile input/output methods
FFmpeg is also very capable when it comes to accessing input and output data.
Just to name a few: it can use your webcam, record from your microphone, grab your screen, or capture from your Blackmagic DeckLink. But FFmpeg can download directly from a web address, open all kinds of streams, read from a pipe, a socket, and of course, from files.
The same holds true for outputting the data. It can write to your webcam, play audio on your microphone... Just kidding:) It can output to files, streams, pipes, sockets and so on.
Running example commands
This article is full of FFmpeg commands that are working examples. The reason for that is that you could test these out for yourself! But the command line interfaces of different operating systems are slightly different, so the commands in this article are meant to be executed in a Linux bash shell.
To adopt these command lines to Microsoft Windows, you might need to:
- Change (cd) into the directory where you extracted the ffmpeg.exe. Alternatively, add that directory to the path to make it callable from anywhere.
- You might need to replace "ffmpeg" to "ffmpeg.exe"
- You will need to replace "\"-s (backslashes) at the end of the lines with "^"-s (hats)
- You'll need to replace the
fontfileargument's value to something like this:fontfile=/Windows/Fonts/arial.ttfto get commands with the drawtext filter working.
MacOS users will need steps #1 and #4.
Introduction to media concepts
Now let's have a quick overview of media concepts. These concepts will be vital for us if we want to understand the latter sections of this article and FFmpeg's workings. To keep this section brief, it is a higher-level, simplified explanation of these concepts.
Audio
We'll briefly cover the following terms:
- Sampling rate
- Bitrate
- Channels
Sampling Rate
The sampling rate is the factor that shows how many times we measure/scan/sample the input data stream.
The image below shows the measurement windows (quantization) as gray bars.
Why does this matter? Because it is a balancing act. If we measure the signal less often, we'll lose more details (bad). Also, by having fewer samples, we'll have less data in the end. Therefore the file size will be smaller (good).

Here are some ballpark values:
- 8 kHz (GSM - Low quality)
- 44.1 kHz (CD - High quality)
- 48 kHz (Very high quality)
- 88.2 kHz (Insane - usually for production only)
- 96 kHz (Insane - usually for production only)
There are no definite "right answers" here. The question is what is "good enough" for your use case? GSM focuses on speech, and not even quality but understandability and the least possible amount of data. Therefore, they found that 8 kHz is enough (there are quite a few more tricks), for their purposes.
The "CD quality" aimed for high quality. Therefore they chose 44.1 kHz, that number has some history in it, but the main reason for aiming above 40 kHz lies in physics and how the human ear works.
There were two very smart guys whose theorem basically says that if you want a quite good signal representation, you have to sample it at twice the speed as its original frequency. Human hearing generally works up until about 20 kHz, so if you want "good quality", you should aim for at least 40 kHz. And 40 kHz + some headroom + some more physics + historical reasons = 44.1 kHz! :)
As for the higher rates, those are only used when very high-quality audio editing is needed.
Bitrate
Bitrate represents the amount of data per second that results from our transcoding/quantization process. If it is 1411 kbit/s, that means that for every second of audio data, about 1411 kbit of output data will be produced.
Therefore, you can say that 1 minute of audio with 1411 kbit/sec will require:
(1411 kbit / 8) kbyte * 60 second = 10582 kbyte = 10.33 mbyte
Now, it is only easy like that with raw audio data and with a few simple codecs, e.g. PCM in WAVs.
Codecs compressing hard might throw your numbers around a little, as input data might be compressible with different rates. Variable bitrate is usually happening to save space. The encoder might output a lower bitrate if the data is "simple" and does not require high precision.
Here are some ballpark values:
- 13 kbits/s (GSM quality)
- 320 kbit/s (High-quality MP3)
- 1411 kbit/s (16bit WAV, CD quality, PCM)
Channels
Inside of most audio formats, you can have more audio channels. This means multiple, separated audio streams can be in the same file.
Many times, multiple channels have their own name:
- If you have a single microphone, you will most probably record it into a single channel called Mono.
- General music from the FM radio or streaming services usually has two channels in a so-called "Stereo" configuration.
With stereo, there could be several methods how the audio "image" can be made richer by leveraging audio panning, time and phase-shifting and much more. There is a special recording technique too, called Binaural recording, which is super awesome. Wear headphones for this, and don't be scared:)
For example, here are Big Buck Bunny's audio waveforms in Audacity:

You can see that there are two lines of waveforms and also that they are pretty similar. That is normal, as you usually hear the same thing with your two ears, but the matter is in the subtle differences between the two. That's where directionality, richness, and all kinds of other effects lie.
But why stop at two? The list continues:
- 2.1, as it is often called, means three channels: 2 for stereo and one for the LFE ("low-frequency effects" a.k.a.: "bass").
- 5.1 is similar, with five directional channels (2 front, 1 center, 2 rear) and the LFE.
So channels are just separate "recordings" or "streams" of audio signals.
Image properties
For images, there are quite a few parameters, but we'll check out only these:
- Resolution
- Bit-depth
- Transparency
Resolution
An image consists of pixels, single points that have a single color. The resolution of an image determines how many columns and rows of pixels are in an image. In other words: an image has a width and a height.
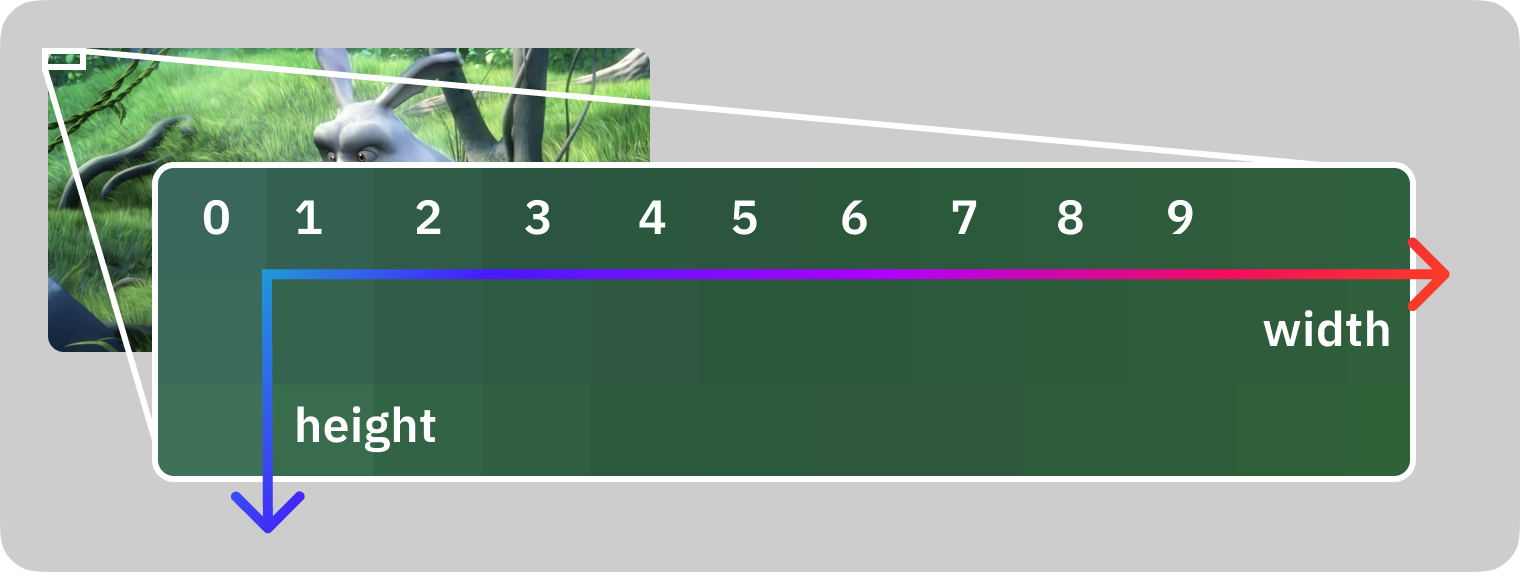
This image shows the first 10 pixels in the first row.
Here are some ballpark values for resolution:
- "HD" or "Full HD" or "1K" or "1080p" means 1920x1080 pixels.
- "4K" could mean a few values, but it should be about 3840x2160 pixels.
- A regular 16mp photo you make of your cat is about 4608x3456 pixels.
- General social media image posts are about 1080x1080 pixels.
Bit-depth
Bit-depth represents the number of bits used for storing a single pixel's color value. This is the same balancing game, and you need to decide between quality or file size.
General ballpark values for bit-depth:
| Bits | Colors | Notes |
|---|---|---|
| 1 | 2 | Black & White |
| 8 | 256 | B/W or Limited color palette |
| 24 | 16.7m | 3x8 bit for R-G-B "True color" |
| 30 | 1073m | 3x10 bit for R-G-B "Deep color" |
These last two sometimes are referred to as "8 bit" or "10 bit" respectively, especially when talking about videos. That means 8/10 bits per single color channel.
Transparency
Some image formats support an additional channel together with the red, green, and blue components: the alpha channel. The alpha channel determines how transparent a single pixel is, and it can have different bit-depths, it is usually either 1, 8 or 16 bits.
If the alpha channel is 1 bit, then the format can encode a pixel to be either transparent or non-transparent. If it is 8 or more bits, then the format can encode 256 or more steps of transparency.
Video properties
Video data is built by single images shown right after each other. This brings in most attributes of images and a few more!
So a video has a resolution that is its width and height.
Then the first obvious parameter of a video is the framerate, which defines how many images are shown in a second. Common values for this are 24, 25, 30, or 60.
A video file also has a codec assigned to it, which is the format describing how all those images were compressed into this video file. There are many more attributes of videos, but this is a good start.
Video codecs
Compression is a super important thing when it comes to video because you have thousands of images to keep together. If you aren't doing it in a smart way, then the resulting video will be very, very large.
Just imagine a 2-minute video, with 30 fps. That means it will have 60 s * 2 * 30 fps = 3600 frames! I have just taken a screenshot of an HD video, which was 730 kbyte in JPEG format. Now 3600 frame * 730 kbyte equals 2.5 gigabytes!
Can you imagine that? I hope not, and that's because compression brings that way, way down, to the level of tens of megabytes. These days a video of that size is quite high quality and about 2 hours long. Also, don't forget, that JPEG is already compressed, a single frame would be 6 mbyte when uncompressed. Now that 2-minute video would be 21 gigabytes if we'd store it uncompressed.
Standard codecs such as H.264 and H.265 are doing very clever and complex operations to achieve high compression ratios with good quality.
Just think about that, most frames in a video are quite similar, only containing small differences. So if we could only store that little difference between frames, we'd won a huge bonus! And that's just one of the many tricks codecs do.
Codec designers are also exploiting the weaknesses and features of the human eye. Such as the fact that we are more sensitive to light intensity changes than color changes (say hello to YUV). And they can get away with lower quality details for parts that are moving fast, and so on.
Because why lose precious bits for things that you can't even notice?!
There are many codecs out there, with different goals in mind, although the majority focus on keeping the file size low.
- H.264, H.265: These are the most common ones, with the widest support in browsers, phones, players, etc. It focuses on small file sizes with good quality. (At the cost of resource intensiveness.)
- Apple ProRes, DNxHD: These are common formats for production. They focus on quality and ease of processing and not on file size.
Audio codecs
The goal of audio codecs is the same as what we saw with the video codecs. It is just harder to demonstrate it as audio does not consist of single image frames but audio frames/packets. So an analog audio signal is of an almost infinite, or at least very high quality if you think of it.
At the lowest level, the speed and amplitude resolution is very high. We could say "atomic", as we need to measure and store the speed and direction of atoms. So if you want to store that exactly, that will require a super high-quality measurement, which will also result in a very high bitrate data stream.
Thankfully, the sound is at least not propagating with light speed so we can save quite a lot just by that fact. (There's no need for an extreme sampling rate.) Then our hearing is very limited if we take the previous paragraph as a scale, so we win there again. We don't need most of that high precision that is there.
But still, if we take our hearing capability and want to store raw audio data with about 44.1 kHz of sample rate with about 1 Mbit/sec bitrate, we'd still get quite a lot of data. Check the calculations in the audio bitrate section above.
So raw audio can be compressed further, which is what many popular codecs do. They also exploit the human senses, but this time the human ear. We started with the basics that the human ear has a limit on the frequencies it can detect. Therefore, we can save a lot by cutting out the range of frequencies outside our hearing range. Unless you are a bat, you are fine between 20-20khz! :)
But there are other tricks, for example, auditory masking. That means that the presence of one frequency can affect your capability to detect a different frequency. From the codec's viewpoint, it can skip encoding a few frequencies if it is smart enough to know which ones you'll not notice. I'm sure there are a lot more tricks, let me know if you know about a few more interesting ones!
Here is a list of common codecs:
- MP3, AAC, OGG: These are common lossy audio formats.
- PCM (e.g. in a WAV container), FLAC: These are lossless formats.
- MIDI: It is a funny format. It is like a music sheet that might sound different on different players or settings. It is usually not made from real audio data, but from recording a digital keyboard or as an output from an audio composing software.
Containers
Now we got through the fundamental building blocks, the image, the video, the video codecs, and the audio codecs, and we reached the top of this iceberg: the containers.
A container is a format specification, that combines all these streams into a single file format. It defines how to put all these data together, how to attach metadata (e.g. author, description, etc), how to synchronize these streams, and sometimes a container even contains indexes to aid seeking.
So, for example, a MOV container can contain an H.264 video stream and an AAC audio stream together.
Common containers:
- MOV
- MP4
- MKV
- WebM
- WAV (audio only)
Example Material
I will use these example materials as inputs in the following parts of this article. If you'd like to follow along, save these files for yourself!
| Name | Resource |
|---|---|
| Big Buck Bunny | http://distribution.bbb3d.renderfarming.net/video/mp4/bbb_sunflower_1080p_60fps_normal.mp4 |
| Train | train.jpg |
| Smiley | smiley.png |
| Voice recording | voice_recording.wav |
| Big Buck Bunny's audio | ffmpeg -i bbb_sunflower_1080p_60fps_normal.mp4 -map 0:1 bbb_audio.wav |
And we will make our own audio file by extracting the audio from the Big Buck Bunny movie! We'll use this file as an example, so after downloading the video file, please execute this:
ffmpeg -i bbb_sunflower_1080p_60fps_normal.mp4 -map 0:1 bbb_audio.wavBy the middle of this article, you'll understand this command, but for now, just make sure to have the WAV file next to your video file to test out the commands later in the article.
We'll use these files in the following parts of this article. Therefore make sure to get them!
FFplay and FFprobe
FFmpeg is the name of the main binary and the project itself, but it is shipped together with two other binaries, ffplay and ffprobe.
Let's check them out quickly, right in the command line!
FFplay
FFplay is a basic video player, that can be used for playing media. It's not a friendly video player, but it is a good testing ground for various things.
To execute it, just simply supply a media file:
ffplay bbb_sunflower_1080p_60fps_normal.mp4If you want to test this exact command, you'll need to get the example files.
For example, it can be used to preview filters (we'll discuss those later), but let's see an example:
ffplay -vf "drawtext=text='HELLO THERE':y=h-text_h-10:x=(w/2-text_w/2):fontsize=200:f
FFprobe
FFprobe, as its name implies, is a tool for getting information about media files.
This command:
ffprobe bbb_sunflower_1080p_60fps_normal.mp4Will return us some general information about the video file:
Input #0, mov,mp4,m4a,3gp,3g2,mj2, from 'bbb_sunflower_1080p_60fps_normal.mp4':
  Metadata:
[...]
    title           : Big Buck Bunny, Sunflower version
    artist          : Blender Foundation 2008, Janus Bager Kristensen 2013
[...]
  Stream #0:0[0x1](und): Video: h264 [...]
[...]
  Stream #0:1[0x2](und): Audio: mp3 [...]
[...]
  Stream #0:2[0x3](und): Audio: ac3 [...]
I have abbreviated it heavily, as we'll check this out later.
But FFprobe is way more powerful than just this!
With the following command, we can get the same listing in JSON format, which is machine-readable!
ffprobe -v error -hide_banner -print_format json -show_streams bbb_sunflower_1080p_60fps_normal.mp4The explanation of this command is the following:
- "-v error -hide_banner": This part hides extra output, such as headers and the default build information.
- "-print_format json": Obviously, this causes ffprobe to output a JSON.
- "-show_streams" is the main switch that requests the stream information.
{
  "streams": [
    {
      "index": 0,
      "codec_name": "h264",
      "codec_long_name": "H.264 / AVC / MPEG-4 AVC / MPEG-4 part 10",
      "width": 1920,
      "height": 1080,
      "bit_rate": "4001453",
      "duration": "634.533333",
      "############################": "[~50 lines removed]"
    },
    {
      "index": 1,
      "codec_name": "mp3",
      "channels": 2,
      "bit_rate": "160000",
      "############################": "[~40 lines removed]"
    },
    {
      "index": 2,
      "codec_name": "ac3",
      "channels": 6,
      "############################": "[~20 lines removed]"
    }
  ]
}
In this output, you can see three streams of data in this video file. The first (index: 0) is a video stream, that is an HD video with an H.264 codec. Then we have two audio streams, the first (index: 1) is a simple mp3 stream with stereo audio, and the second (index: 2) is an ac3 stream with 6 channels, most likely in an 5.1 configuration.
I have removed quite a lot of output for brevity, but you can get way more information out of these streams, e.g. fps for the video stream and so on.
Other than -show_streams, there are 3 more: -show_format, -show_packets and -show_frames. Unless you are really deep in the rabbit hole, you'll not need the last two, but -show_format could be useful:
ffprobe -v error -hide_banner -print_format json -show_format bbb_sunflower_1080p_60fps_normal.mp4{
"format": {
"filename": "bbb_sunflower_1080p_60fps_normal.mp4",
"nb_streams": 3,
"nb_programs": 0,
"format_name": "mov,mp4,m4a,3gp,3g2,mj2",
"format_long_name": "QuickTime / MOV",
"start_time": "0.000000",
"duration": "634.533333",
"size": "355856562",
"bit_rate": "4486529",
"probe_score": 100,
"tags": {
"major_brand": "isom",
"minor_version": "1",
"compatible_brands": "isomavc1",
"creation_time": "2013-12-16T17:59:32.000000Z",
"title": "Big Buck Bunny, Sunflower version",
"artist": "Blender Foundation 2008, Janus Bager Kristensen 2013",
"comment": "Creative Commons Attribution 3.0 - http://bbb3d.renderfarming.net",
"genre": "Animation",
"composer": "Sacha Goedegebure"
}
}
}This is an overview of "what is this file". As we see, it is a MOV file (format_name), with three streams (nb_streams), and it is 634 seconds long. Also, there are some tags where we can see the title, the artist, and other information.
FFmpeg concepts
Here is a quick intro to how FFmpeg actually works!
For those who are just joining in: please get the example assets if you want to test out the commands shown in this chapter!
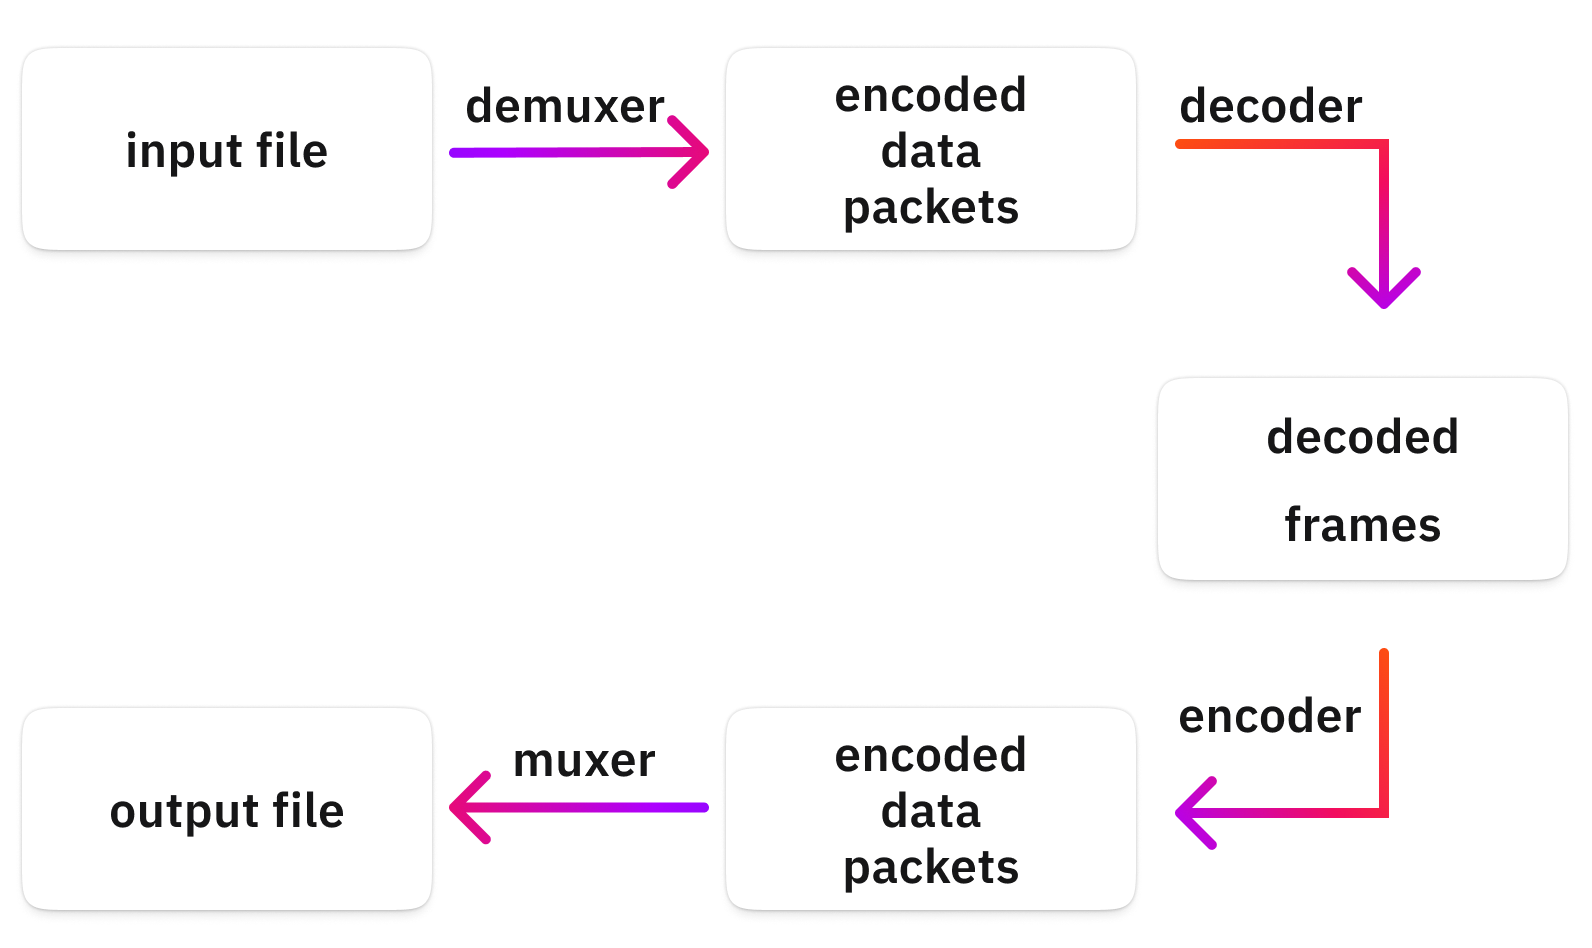
FFmpeg opens the file, decodes it into memory, then encodes the in-memory packets back and puts them into some container: some output file. The term "codec" is a mix of the words "coder & encoder". Those are the magic parts before and after the "decoded frames".
The decoded frames are uncompressed images in-memory, e.g. the most basic pixel format for video frames is called "rgb24". This just stores red, green, and blue values right after each other in 3x8 bits, or 3x1 byte, which could hold 16m colors.
The importance of this is that other than a few exceptions, you can only manipulate or encode the decoded frames. So when we get to different audio/video filters or transcoding, you'll need the decoded frames for all that. But don't worry, FFmpeg does this automatically for you.
Inputs
So you see and probably guessed, that FFmpeg must access the input data somehow. FFmpeg knows how to handle most media files, as the awesome people who develop FFmpeg and the related libraries made encoders and decoders for most formats available!
Don't think that it is a trivial thing. Many formats are reverse engineered, a hard task requiring brilliant people.
So although we often refer to input files, the input could come from many sources, such as the network, a hardware device and so on. We'll learn more about that later on in this article.
Many media files are containers for different streams, meaning that a single file might contain multiple streams of content.
For example, a .mov file might contain one or more streams:
- video tracks
- audio tracks (e.g. for the different languages or audio formats such as stereo or 5.1)
- subtitle tracks
- thumbnails
- ...
All these are streams of data from the viewpoint of FFmpeg. Input files and their streams are numerically differentiated with a 0-based index. So, for example, 1:0 means the first(0) stream of the second(1) input file. We'll learn more about that later too!
Important to note that FFmpeg can open any number of input files simultaneously, and the filtering and mapping will decide what it will do with those. Again more on that later!
Streams
As we have seen in the previous section, streams are the fundamental building blocks of containers. So every input file must have at least one stream. And that's what you can list by the simple ffmpeg -i command for example.
A stream might contain an audio format such as MP3, or a video format such as an H.264 stream.
Also, a stream, depending on the codec, might contain multiple "things". For example, an mp3 or a WAV stream might include various audio channels.
So the building block hierarchy, in this case is: File → Stream → Channels.
Outputs
Of course, an output could be a local file, but it doesn't need to be. It could be a socket, a stream and so on. In the same way as with inputs, you could have multiple outputs, and the mapping determines what goes into which output file.
The output also must have some format or container. Most of the time FFmpeg can and will guess that for us, mostly from the extension, but we can specify it too.
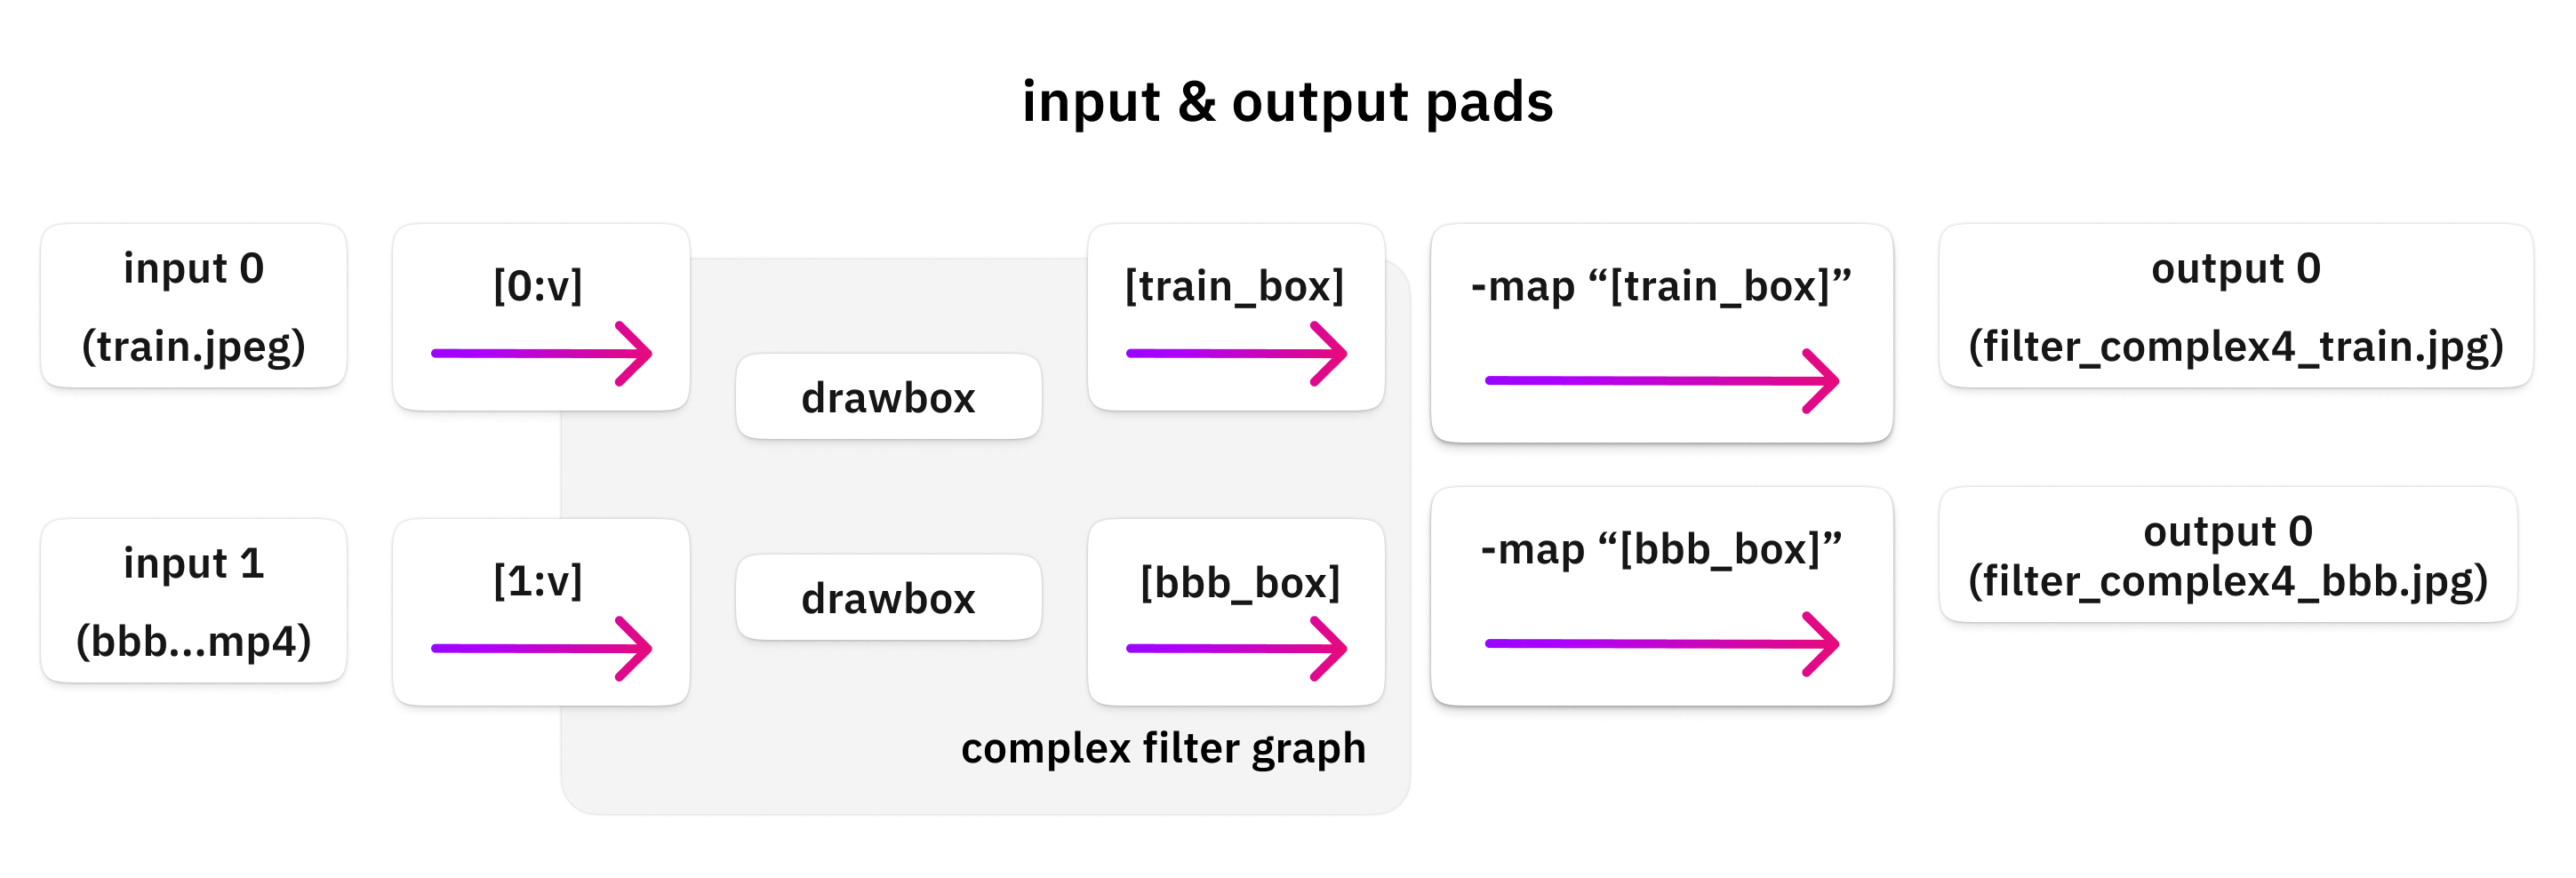
Mapping
Mapping refers to the act of connecting input file streams with output file streams. So if you give 3 input files and 4 output files to FFmpeg, you must also define what should go to where.
If you give a single input and a single output, then FFmpeg will guess it for you without specifying any mapping, but make sure you know how exactly that happens, to avoid surprises. More on all that later!
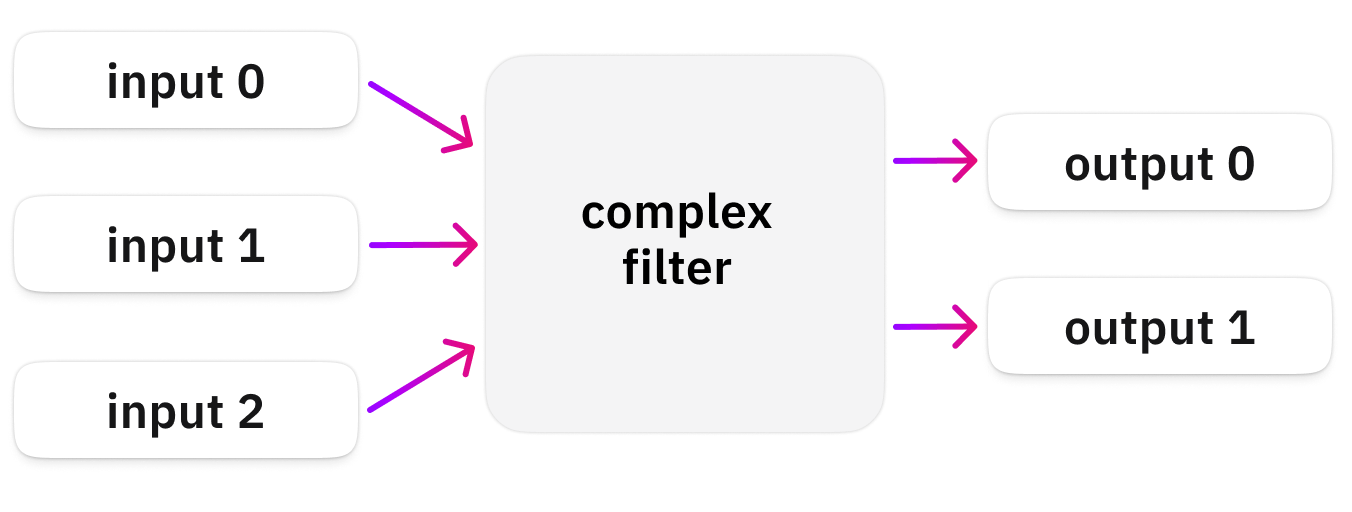
Filtering
Filtering stands for the feature of FFmpeg to modify the decoded frames (audio or video). Other applications might call them effects, but i'm sure there is a reason why FFmpeg calls them filters.
There are two kinds of filtering supported by FFmpeg, simple and complex. In this article we'll only discuss the complex filters, as it is a superset of the simple filters, and this way, we avoid confusion and redundant content.
Simple filters are a single chain of filters between a single input and output. Complex filters can have more chains of filters, with any number of inputs and outputs.
The following figure extends the previous overview image with the filtering module:
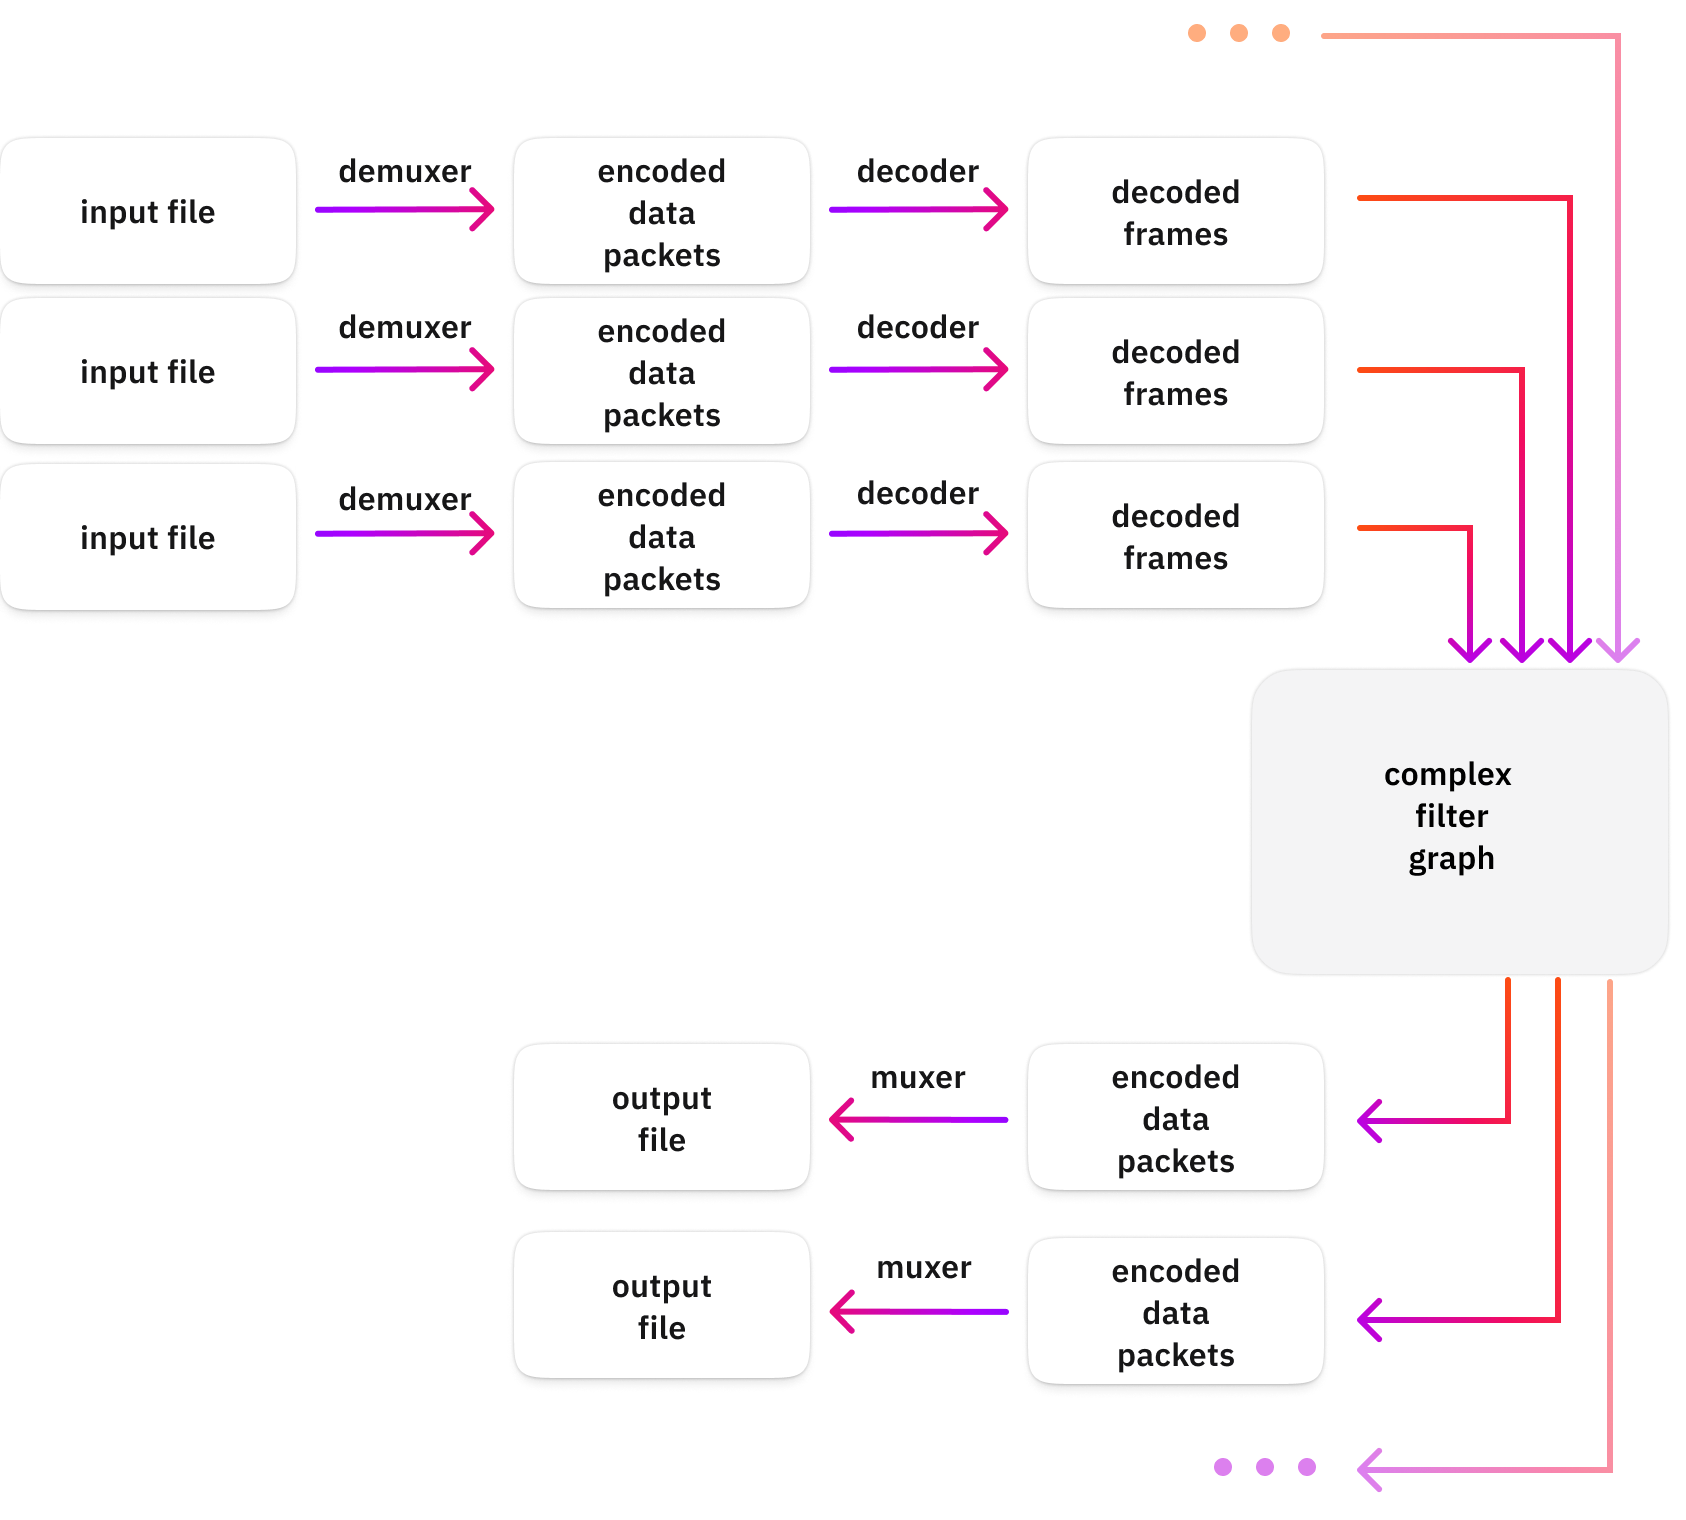
A complex filter graph is built from filter chains, which are built from filters.
So a single filter does a single thing, for example, changes the volume. This filter is quite trivial, it has a single input, changes the volume, and it has a single output.
For video, we could check out the scale filter, which is also quite straightforward: it has a single input, scales the incoming frames, and it has a single output too.
You can chain these filters, meaning that you connect the output of one to the input of the next one! So you can have a volume filter after an echo filter, for example, and this way, you'll add echo, and then you change the volume.
This way, your chain will have a single input, and it will do several things with it and will output something at the end.
Now, the "complex" comes in when you have multiple chains of these filters!
But before we go there, you should also know that some single filters might have multiple inputs or outputs!
For example:
- The overlay filter puts 2 video streams above each other and will output a single video stream.
- The split filter splits a single video stream into 2+ video streams (by copying).
So let's discuss a complex example from a bird's eye view! I have two video files, I want to put them above each other, and I want the output in two files/sizes, 720p and 1080p.
Now, that's where complex filtering will be faithful to its name: to achieve this, you'll need several filter chains!
- Chain 1:
[input1.mp4] [input2.mp4]→ overlay → split →[overlaid1] [overlaid2] - Chain 2:
[overlaid1]→ scale →[720p_output] - Chain 3:
[overlaid2]→ scale →[1080p_output]
As you see, you can connect chains, and you can connect chains to output files. There is a rule that you can only consume a chain once, and that's why we used split instead of the same input for chains 2 and 3.
The takeaway is this: with complex filter graphs (and mapping), you can:
- build individual chains of filters
- connect input files to filter chains
- connect filter chains to filter chains
- connect filter chains to output files
FFmpeg's command line system
For those who are just joining in: please get the example assets if you want to test out the commands shown in this chapter!
FFmpeg CLI
Finally, we arrived at FFmpeg, and trust me, we'll execute it quite a lot of times! Let's see how FFmpeg's command line options are organized, as that is the first tricky part we need to understand!
FFmpeg mostly thinks about input and output files and their options together with global options. You specify input files with the "-i" flag followed by a file name. For the output file, specify it as-is without any preceding CLI (command line interface) flag.
Specifying an input file
Let's specify just an input file:
ffmpeg -i bbb_sunflower_1080p_60fps_normal.mp4 The following image helps to understand the output:
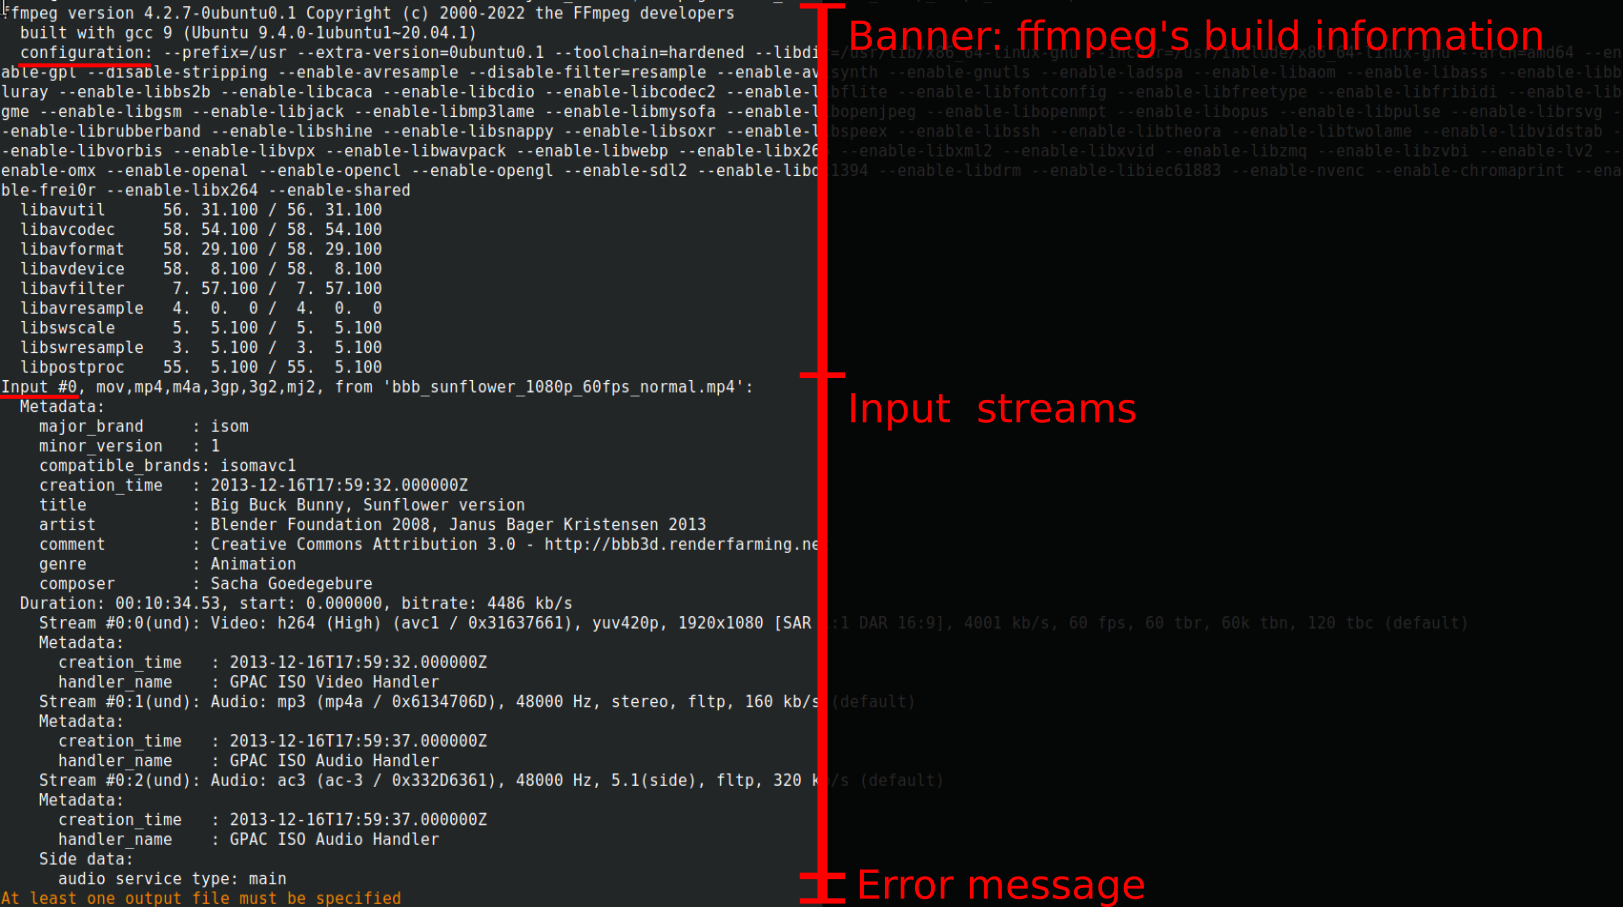
- First, you get the "banner", where you see the build information and lib versions. If you watch closely, you'll see the compilation flags, starting with --, e.g. --enable-shared.
- Then you get the same output as we have seen with ffprobe earlier.
- And then you get a complaint that there is no output file(s) specified. That's fine for now.
You can remove the banner here with "-hide_banner", but for brevity's sake I'll not include that anymore in the commands here, and I will leave it out from the outputs too.
Now, let's get brave, and specify an output file!
Specifying an output
As I've said earlier, the output file is understood by FFmpeg as it is just a filename. But more specifically, it is after the input(s) specifications, and it is not a value of any other switches.
Don't be confused for now, but yes, FFmpeg can have as many inputs and outputs as you'd like. We'll cover that in more detail soon!
This command line specifies a single output file:
ffmpeg -i bbb_sunflower_1080p_60fps_normal.mp4 audio_only.wavBefore taking a look at the output, let me congratulate you! You have just converted a video file into an audio file, by keeping just the audio content!
This is how you transcode! Of course, you'll want to specify more parameters later on.
So, here is the output:
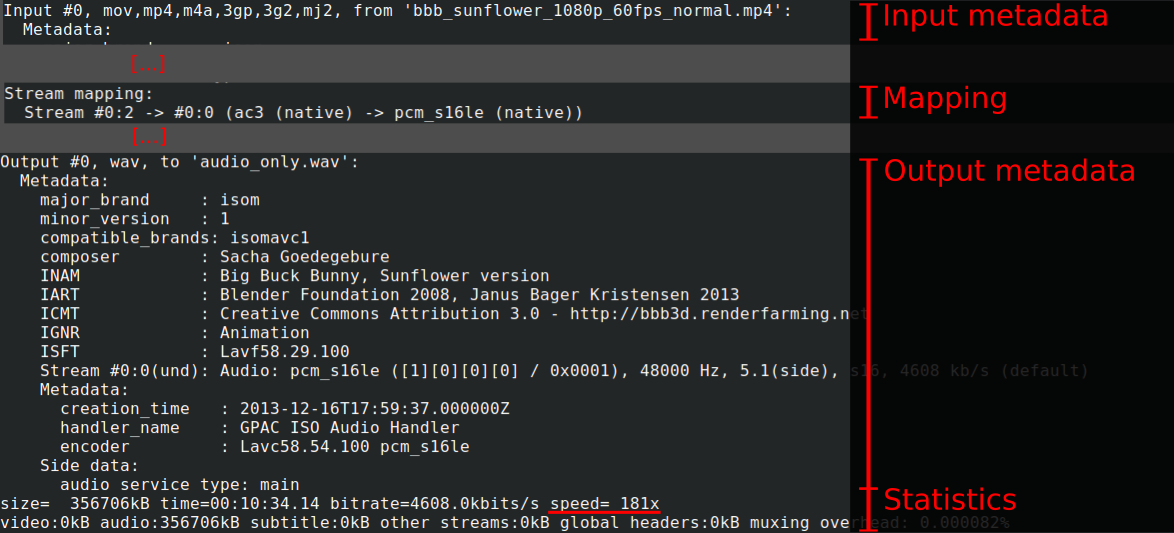
Let's analyze it!
(1) First, we have our input metadata printing, which we saw many times already.
(2) Then we have something called "stream mapping". We forced FFmpeg into a decision situation, as we specified an input file with 1 video and 2 audio streams. We said we wanted an audio output (guessed from the .wav extension). But we didn't specify which audio stream we wanted, so let's see what FFmpeg decided:
- "Stream #0:2" means "The first input file's third stream" or "input file index 0's stream with index 2." This is the input.
- "-> #0:0" means the first output file's first stream. This is the output.
- Here you can learn more about how FFmpeg decide this.
- Later on, we'll manually override the mapping.
- Summary: FFmpeg decided to convert the third stream in the input file (the ac3 5.1 audio) into the first stream of the output file.
(3) Then we have our output metadata information. This reveals what FFmpeg will output. It usually copies most of the metadata, and here you also see the container/format information too.
(4) And then we see the output summary. For example, the transcoding was 181x faster than the playback speed. Nice!
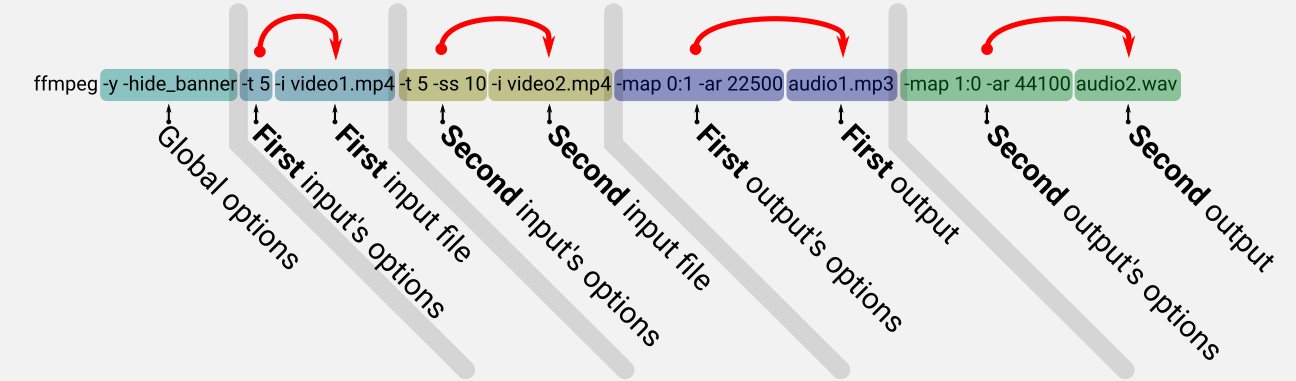
Understanding the command line order
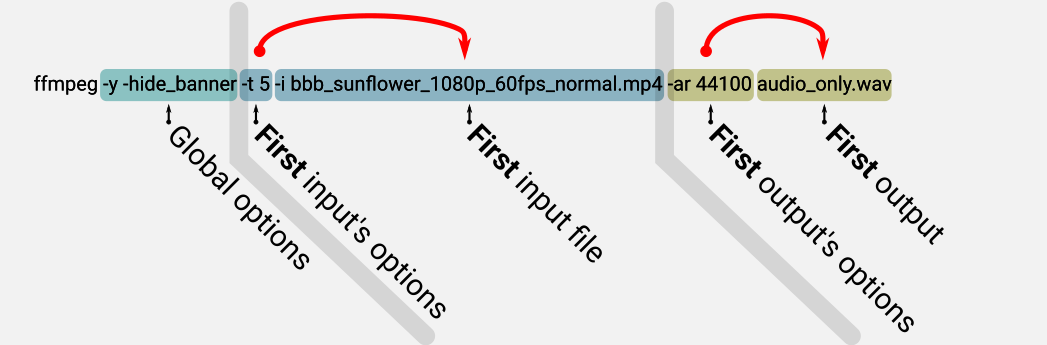
Before going further, let's understand FFmpeg's command line arguments from a bird's eye view!
In the manual, you'll see this:
ffmpeg [global_options] {[input_file_options] -i input_url} ... {[output_file_options] output_url} ...(Parts in [...] are meant to be optional, and parts in {...} are meant to be specified 1 or more times.)
This is the general outline of how to specify inputs, outputs, input options, output options, and global options. The order matters, but it is easy to remember: global options, inputs and outputs. Also, i/o options come BEFORE the i/o specification.
Let's put these into pseudo command line options, to understand it better:
# One inputs, one output, nothing fancy
ffmpeg -i input1.mp4 output1.wav

# Two inputs, one output
ffmpeg -i input1.mp4 -i input2.mp4 output1.wav

# Two inputs, two outputs
ffmpeg -i input1.mp4 -i input2.mp4 output1.wav output2.mp3

# One input, one output, with options
ffmpeg [input1 options] -i input1.mp4 [output2 options] output1.wav

# Two inputs, two outputs with options
ffmpeg [input1 options] -i input1.mp4 \
       [input2 options] -i input2.mp4 \
       [output1 options] output1.wav \
       [output2 options] output2.mp3
As for the global options, these are the ones you might care about:
- -hide_banner: To skip printing the banner.
- -y: To overwrite the output even if it exists.
For example, you can run this as many times as you want:
ffmpeg -y -hide_banner -i bbb_sunflower_1080p_60fps_normal.mp4 audio_only.wavAnd it will overwrite the output and be less verbose than earlier.
Without explaining the options themselves, let's just see some real-world examples with options:
And here it is with two inputs and two outputs:
Mapping files
We saw above that this command:
ffmpeg -i bbb_sunflower_1080p_60fps_normal.mp4 audio_only.wav... will result in an audio file that contains one of the audio streams from the input video chosen by FFmpeg. This automatic stream selection is usually handy when it is trivial. For example, when you have one stream as input and one output file, you don't need to specify any mapping manually.
But in cases where it is not so trivial, you are usually better off manually specifying what you really want to do.
The following image summarises what our current situation is:
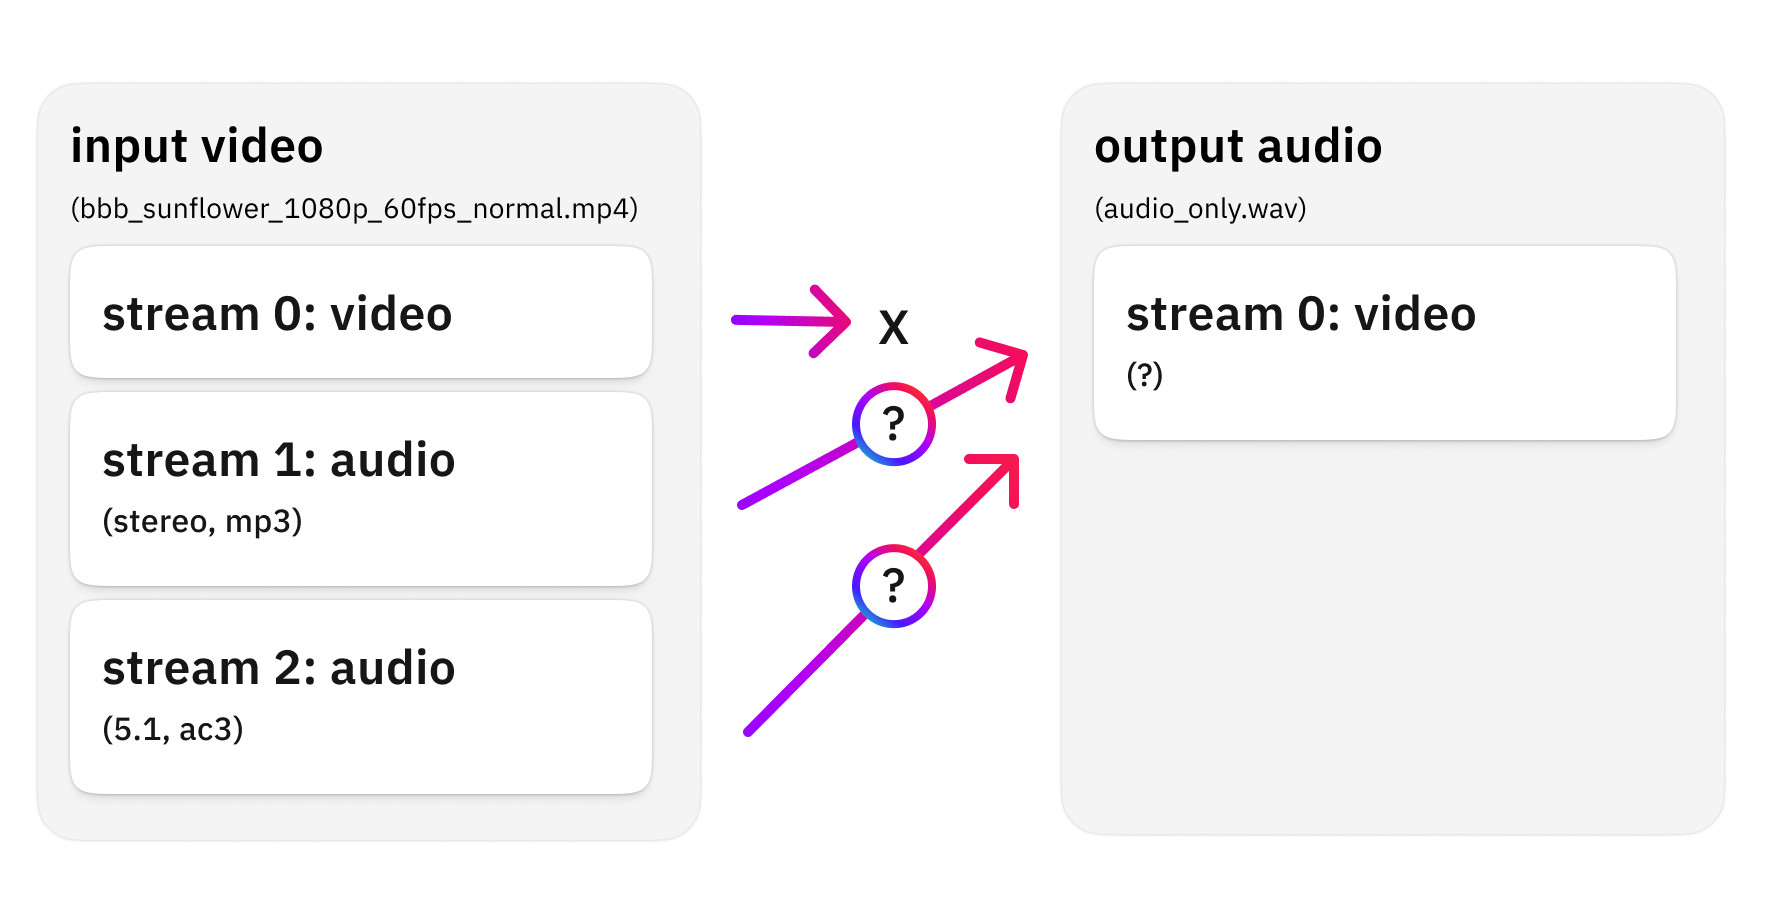
The video stream was not matched, as the output format was an audio file (.wav). But then FFmpeg chose Stream #2, because it has more channels.
So what if we'd like to get the stereo track instead? That is where mapping comes in! The mapping is a parameter of the OUTPUT file. Therefore the mapping arguments should come right before our output file definition!
ffmpeg -i bbb_sunflower_1080p_60fps_normal.mp4 -map 0:1 stereo_audio_only.wavThe argument -map 0:1 means, that in the output (since we specify it as an output option) we'd like to have Input #0's (the first input file) Stream #1!
Let's see the relevant parts from the output!
Input #0, mov,mp4,m4a,3gp,3g2,mj2, from 'bbb_sunflower_1080p_60fps_normal.mp4':

[...]

Stream mapping:
  Stream #0:1 -> #0:0 (mp3 (mp3float) -> pcm_s16le (native))

[...]

Output #0, wav, to 'stereo_audio_only.wav':
  Metadata:
[...]
    Stream #0:0(und): [...] stereo [...]
The "Stream #0:1 -> #0:0" part means that we have successfully overridden the mapping, to get the mp3 stream (0:1) into our output! Also, the output metadata reveals that we'll get a stereo result instead of the 5.1 earlier.
Multiple outputs
You can have multiple outputs from a single input, let's see when that might be useful!
Let's say, we want to extract BOTH audio streams into two separate WAV files! It is super easy:
ffmpeg -y -i bbb_sunflower_1080p_60fps_normal.mp4 -map 0:1 stereo_audio_only.wav -map 0:2 ac3_audio_only.wavSee? I have just specified two output files with two mapping specifications! Also, I have sneaked in the "-y" to have it overwrite our previous file!
Let's check out the relevant parts of the output!
Input #0, mov,mp4,m4a,3gp,3g2,mj2, from 'bbb_sunflower_1080p_60fps_normal.mp4':

[...]

Stream mapping:
  Stream #0:1 -> #0:0 (mp3 (mp3float) -> pcm_s16le (native))
  Stream #0:2 -> #1:0 (ac3 (native) -> pcm_s16le (native))

[...]

Output #0, wav, to 'stereo_audio_only.wav':
    Stream #0:0(und): [...] stereo

[...]

Output #1, wav, to 'ac3_audio_only.wav':
    Stream #1:0(und): Audio: [...] 5.1(side)
Now the mapping reveals two lines, as we have two outputs! And indeed, you'll get two .wav files as the output, one is stereo, and one is 5.1!
There might be several other reasons why you'd want to get multiple outputs. Let's briefly check out a few!
Different formats:
ffmpeg -y -i bbb_sunflower_1080p_60fps_normal.mp4 stereo_audio_only.wav stereo_audio_only.mp3 Wow, did you catch that? We just created a WAV and an mp3 in a single command line! I've reverted to the automatic stream selection for brevity's sake.
A bit closer to real-life needs, you might want different output qualities:
ffmpeg -y  -i bbb_sunflower_1080p_60fps_normal.mp4  \
-map 0:1 -b:a 320k stereo_audio_only_high_quality.mp3 \
-map 0:1 -b:a 64k  stereo_audio_only_low_quality.mp3
Here -b:a 320k means "bitrate of audio should be around 320 kbit/sec". So I have requested FFmpeg to make two mp3s for me, from the stereo stream of the input.
Checking on the files, this is what we got:
 25Mb stereo_audio_only_high_quality.mp3
4,9Mb stereo_audio_only_low_quality.mp3
One more common reason for having multiple outputs or using mapping is when we introduce filters into our pipeline, but that will be discussed later!
Now you understand the foundations of how to communicate your basic requirements to FFmpeg via its command line! Great job! Now we can dive even deepert.
Hands-on with FFmpeg
In this section, we will discover and even try out some common features of FFmpeg!
For those who are just joining in: please get the example assets if you want to test out the commands shown in this chapter!
Inputs
Let's see the common ways FFmpeg is fed with different data!
File
Of course, you have already seen that if you have a local file on your filesystem, FFmpeg is happy to read it!
ffmpeg -i bbb_sunflower_1080p_60fps_normal.mp4 -map 0:1 stereo_audio_only.wavThis command which is exactly the same as one of our previous ones just reads a local file. Really, that's it.
Network
Did you know, that FFmpeg can open a file directly on the network?!
ffmpeg -t 5 -i http://distribution.bbb3d.renderfarming.net/video/mp4/bbb_sunflower_1080p_60fps_normal.mp4 bbb_first_5_seconds.mp4The command above opens the file directly from the network and saves the first 5 seconds into a local file!
I wanted to spare bandwidth for these awesome guys over renderfarming.net, so I added the duration flag: -t 5. FFmpeg doesn't even download the full video for this operation. Isn't that wonderful?!
Webcam
FFmpeg can also open your webcam!
This is an example command for Linux:
ffmpeg -f v4l2 -framerate 25 -video_size 640x480 -t 10 -i /dev/video0 10seconds_of_webcam.webmThis would record 10 seconds of your webcam!
Accessing the webcam happens differently on different platforms. Also specifying parameters is different for each platform, so for this reason, if you'd like to access your webcam with FFmpeg, please refer to the documentation:
Microphone
Let's record some audio directly from your microphone!
List microphones:
arecord -lStart 10 seconds of recording:
ffmpeg -f alsa -i hw:0,0 -t 10 out.wavThis command was meant to work on Linux, but you can check out how to do that on Microsoft Windows or macOS.
Pipe
Finally, FFmpeg can read from a pipe, and also output to a pipe.
On Linux, you could do something like this:
cat bbb_sunflower_1080p_60fps_normal.mp4 | ffmpeg -i - -f wav pipe:1 | pv > output.wav

# Alternative, without pv:
cat bbb_sunflower_1080p_60fps_normal.mp4 | ffmpeg -i - -f wav pipe:1 > output.wav
This command would use the cat program to simply read in the video file and output it to its standard output. Then this output is piped INTO FFmpeg, through its standard input. The combination "-i -" means "read from standard input". By the way, standard input would be your keyboard otherwise, if we wouldn't use any redirection here.
Then we specify the required output format for FFmpeg, with "-f wav". This is needed because now we'll have no output file name, and FFmpeg will not be able to guess the format. Then we specify "pipe:1" as an output, meaning we'd like FFmpeg to output to its standard output.
From then, we pipe the data into a program called "pv", it is just a metering tool, that dumps information on the throughput (from its stdin to its stdout). Finally, we redirect pv's output into a WAV file.
You might ask why we'd want to do that, why we talk about this. Piping can be useful if you build a complex pipeline from different programs or if you want to spare reading and writing to a local file.
For example, the node package fluent-ffmpeg can leverage this functionality by supplying input and output streams. For example, you can read from an S3 bucket and write to one directly.
But be warned, hell is awaiting you on that road. No kidding. You need to research the limitations of this technique. For example, many formats can not be streamed in this manner, as they need random access to the output data to write the indices at the beginning of the file after processing.
Outputs
FFmpeg can output into many protocols, from local file storage and ftp to message queue protocols all the way to streaming protocols.
For more information, check out the documentation here.
Transcoding audio with FFmpeg
In this chapter, we'll be going to see how to transcode into audio with FFmpeg!
The general formula is:
ffmpeg -i {input audio or video file with audio} [output options] output_audio.extChoosing a format
FFmpeg is quite smart, and by the extension, it can determine which codec to use. If you specify "audio.wav" or "audio.mp3" for example, FFmpeg will use the appropriate codec to do the encoding.
It is perfectly guessing most of the time. But if you want to specify the format manually, then the "-f" flag is your friend.
For this, you might want to consult the list of formats:
ffmpeg -formatsSo, these three commands will do exactly the same, but the last two requires the -f flag.
# Output codec is determined from the extension
ffmpeg -i bbb_audio.wav bbb_audio.mp3

# No extension in the filename
ffmpeg -i bbb_audio.wav -f mp3 bbb_audio

# Piped output therefore no filename, so no extension to use for guessing
ffmpeg -i bbb_audio.wav -f mp3 pipe:1 > bbb_audio
Setting the bitrate
In most cases. you want to specify the target bitrate you expect from your codec to output. If you are unsure what bitrate is, please read this article's audio bitrate section.
To specify the audio bitrate, use the "-b:a" option with a corresponding value, e.g.:
- -b:a 320k: For the mp3 codec this is considered high quality.
- -b:a 128k: Lower quality.
- -b:a 64k: Low quality.
For example:
ffmpeg -i bbb_audio.wav -b:a 320k bbb_audio_320k.mp3Setting the sample rate
You may want to specify the sample rate to ensure quality or low output file size. Half the sample rate could mean half the output file size. If you are unsure what the sample rate is, please read the "audio sample rate" section of this article.
To specify the audio sample rate, use the "-ar" option with a corresponding value, e.g.:
- -ar 48000: For high quality.
- -ar 44100: For CD quality (still high).
- -ar 22500: A bit of a compromise, not recommended for music, but for speech, it might be enough.
- -ar 8000: Low quality, e.g. if you only want "understandable" speech.
For example:
ffmpeg -i bbb_audio.wav -ar 44100 bbb_audio_44100khz.mp3Setting the channel count
Setting the channel count can be useful, for example, if you have a stereo recording of a single person's speech. In that case, you might be content with just a mono output half the size of the original recording.
If you are unsure what an audio channel is, please read the "audio channels" section of this article.
To specify the channel count use the "-ac" option with a corresponding value, e.g.:
- -ac 1: For mono
- -ac 2: For stereo
- -ac 6: For 5.1
For example:
ffmpeg -i bbb_audio.wav -ac 1 bbb_audio_mono.mp3Complete command line for converting audio with FFmpeg
This is how you produce a high-quality output:
# Convert wav to mp3
ffmpeg -i bbb_audio.wav -ac 2 -ar 44100 -b:a 320k bbb_audio_hqfull.mp3

# Convert wav to m4a (aac)
ffmpeg -i bbb_audio.wav -ac 2 -ar 44100 -b:a 320k bbb_audio_hqfull.m4a

# Convert wav to ogg (vorbis)
ffmpeg -i bbb_audio.wav -ac 2 -ar 44100 -b:a 320k bbb_audio_hqfull.ogg
Check out this documentation about good quality audio transcoding too!.
Lossless formats
If you want to convert audio into a lossless format, here are a few choices for you:
# Convert to flac (Free Lossless Audio Codec)
ffmpeg -i bbb_audio.wav -compression_level 12 bbb_audio_lossless_12.flac # Best compression, slowest
ffmpeg -i bbb_audio.wav -compression_level 5 bbb_audio_lossless_5.flac   # Default
ffmpeg -i bbb_audio.wav -compression_level 0 bbb_audio_lossless_0.flac   # Least compression, fastest


# Convert to wav
cp bbb_audio.wav bbb_audio_lossless.wav # Just kidding:)

# Convert to wav
ffmpeg -i any_audio.ext bbb_audio_lossless.wav
It's good if you know that flac results in a smaller file than WAV, as WAV doesn't actually compress by default:
117M bbb_audio.wav
52M  bbb_audio_lossless_0.flac
45M  bbb_audio_lossless_5.flac
43M  bbb_audio_lossless_12.flac
WAV is generally thought of as a lossless format, but keep in mind that the WAV container can contain lossy content too, but by default FFmpeg uses the pcm_s16le format, which is the 16 bit PCM, that could be understood as lossless.
Transcoding video with FFmpeg
In this chapter, we'll be going to see how to transcode a video file into the two most common formats!
Converting to H.264
H264 is one of the most popular video codecs. Most devices, browsers and video players understand how to play it. It is efficient in storing video content, but as with most advanced video codecs, it is a resource intensive-process to encode and decode.
A complete command line for a high-quality H.264 transcoding with high-quality AAC audio is the following:
ffmpeg -y -i bbb_sunflower_1080p_60fps_normal.mp4 \
-c:v libx264 -preset slow -crf 22 \
-profile:v main -g 250 -pix_fmt yuv420p \
-map 0:0 -map 0:1 \
-acodec aac -ar 44100 -b:a 320k bbb_transcoded_h264_HQ.mov
Make sure to understand this command and to customize it to match your needs.
To help you do that, let's dissect this command!
Global options:
- -y: Overwrite the output.
Input options:
- -i bbb_sunflower_1080p_60fps_normal.mp4: The input file.
Output options:
-c:v libx264: Set the codec to libx264.
-preset slow: libx264 has a lot of variables that you can be tune, and most of them balance the coding speed and the resulting file size. To make your life easier, there are presets by which you can easily declare what you need: small size or speed.
-crf 22: This is the constant rate factor, the main option for setting image quality. It is a number between 0-51, where 0 is lossless, and 51 is the worst quality. Generally, you want something between 17 and 28. This is the option to tune the balance between image quality and file size. Check my comparison video here.
-profile:v main -g 250 -pix_fmt yuv420p: These are advanced options, guaranteeing you a quite backward compatible result. (See this, this, and this.)
-map 0:0 -map 0:1: You might not need this: these options are selecting the correct video and audio streams. In our case, we have two audio streams, and we need the stereo one to avoid some issues with our aac stream.
-acodec aac: Select the AAC (Advanced Audio Coding) codec for the audio in the output. We need to be more specific than just -f for the format. We need to specify the audio codec here manually.
-ar 44100: Set the audio sampling rate (learn more about that in previous chapters of this article).
-b:a 320k: Set the audio bitrate (learn more about that in previous chapters of this article).
30seconds_of_bb.mkv: The output file name. All the options since the last -i (or the last output file) considered to be a modifier for this output.
Let's see the output:
Input #0, mov,mp4,m4a,3gp,3g2,mj2, from 'bbb_sunflower_1080p_60fps_normal.mp4':

[...]

Stream mapping:
  Stream #0:0 -> #0:0 (h264 (native) -> h264 (libx264))
  Stream #0:1 -> #0:1 (mp3 (mp3float) -> aac (native))

[...]

Output #0, mov, to 'bbb_transcoded_h264_HQ.mov':
    Stream #0:0(und): Video: h264 (libx264) (avc1 / 0x31637661), yuv420p(progressive), 1920x1080 [SAR 1:1 DAR 16:9], q=-1--1, 60 fps, 15360 tbn, 60 tbc (default)
    Stream #0:1(und): Audio: aac (LC) (mp4a / 0x6134706D), 44100 Hz, 5.1(side), fltp, 320 kb/s (default)

[...]

frame=38074 fps= 35 q=-1.0 Lsize=  324855kB time=00:10:34.51 bitrate=4194.1kbits/s dup=2 drop=0 speed=0.58x
From this, we understand that FFmpeg chose the mp3 stream from the input file because we told it to do so. (Remember, it has two audio streams in it, a stereo mp3 and a 5.1 ac3.) We also see that my machine could transcode with 35fps (0.58 times the playback speed), and our settings resulted in an average video bitrate of 4200 kbit/s.
The video bitrate is an interesting question in this mode. With the CRF option, we specify the "constant visual quality" we want. To reach a constant visual quality, the encoder works hard to guess how much it can compress certain parts of every frame, and the result of that guess defines the final average video bitrate.
If you want even better results with H.264, and you can afford a bit more processing time and a bit more complicated process, check out the 2-pass encoding instead of the constant rate factor method introduced above.
To learn more about these two different rate control methods, read the awesome Understanding Rate Control Modes article. And to learn more about the intricacies of H.264 encoding, check out the H264 encoding guide.
Finally, later on, I will show you a comparison video that shows how different CRF values perform!
Converting to H.265
H.265 is the successor of H.264, according to the official FFmpeg manual, it offers 25-50% bitrate savings while retaining the same visual quality.
A complete command line for a high-quality H.265 transcoding with high-quality AAC audio is the following:
ffmpeg -y -i bbb_sunflower_1080p_60fps_normal.mp4 \
-c:v libx265 -preset slow -crf 27 \
-profile:v main -g 250 -pix_fmt yuv420p \
-map 0:0 -map 0:1 \
-acodec aac -ar 44100 -b:a 320k bbb_transcoded_h265_HQ.mov
And the result is:
...
encoded 38074 frames in 3384.84s (11.25 fps), 1720.32 kb/s, Avg QP:35.29
H.265 also has multiple rate control algorithms, I used the CRF method here. If you want to use a different rate control algorithm, then you may check out the H.265 encoding guide. Also, check out the next section, where I'll reveal how different CRF values perform!
This command is almost the same as what we used in the H.264 example above, so please refer to that section to understand the arguments.
If we compare H.264 and H.265 with our commands above, taking into account this 10-minute long video on my system, these are the results:
- H.264 is 3 times faster (35 fps vs 11 fps)
- H.264 produces a 2 times larger file (318 mb vs 156 mb)
Comparing CRF values with H.264 and H.265
I have created a video for your convenience, that shows the different crf values in action. The selected frame had some movement on it with the leaves in the bunny's hand. Movement is important with video codecs, as usually that's where quality losses are first visible.
This video shows how the different CRF values perform, from 0-51 with the H.264 and H.265 formats!
H.264 & H.265 CRF comparison video
(Can you guess which program I was using to make this?:))
Basic editing with FFmpeg
In this section, we'll achieve basic editing tasks by using FFmpeg only!
We'll just get a basic mp4 with default settings in these examples to keep things simple. But to encode the result in a proper, high quality way, please check the earlier sections where we learned how to encode into H.264 and H.265!
Trimming from the beginning of the clip
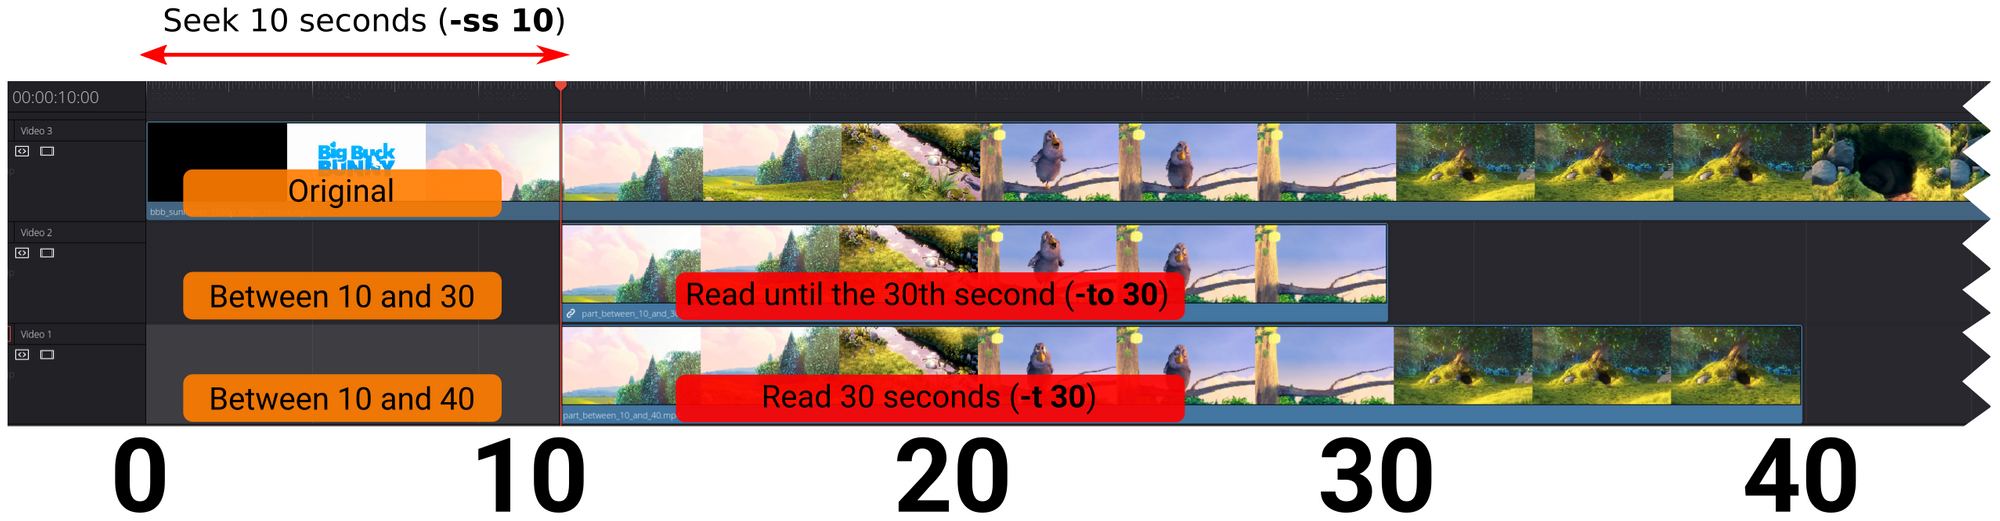
It is possible to specify an in-point for a media file. By doing that, you essentially cut off the specified amount from the beginning of the input file. Therefore, FFmpeg will skip the first part of the file and only transcode the remainder!
For this, you need the "-ss" flag! The value can be specified in seconds (5 or 5.2) or as a timestamp (HOURS:MM:SS.MILLISECONDS).
To get the outro only, we could seek all the way to the end of the video! (It is 00:10:34.53 or 635 seconds long!)
# Get
# 635 - 4 = 631
ffmpeg -y -ss 631 -i bbb_sunflower_1080p_60fps_normal.mp4 last_4_seconds.mp4


# 00:10:34.53 - 4 = 00:10:30.53
ffmpeg -y -ss 00:10:30.53 -i bbb_sunflower_1080p_60fps_normal.mp4 last_4_seconds.mp4
Seeking can be a bit tricky, so you may want to learn more about seeking here.
Trimming from the end of the clip
You can also set an out-point for an input file, therefore shortening it. There are two options for this:
- -t: This sets the duration.
- -to: This sets the timestamp where the input video should stop.
These two are mutually exclusive, and also they do the same if no -ss is specified. The value can be specified in seconds (5 or 5.2) or as a timestamp (HOURS:MM:SS.MILLISECONDS).
Let's experiment with them!
# "Get 30 seconds of the input."
ffmpeg -y -t 30 -i bbb_sunflower_1080p_60fps_normal.mp4 first_30_seconds.mp4
ffmpeg -y -t 00:00:30.0 -i bbb_sunflower_1080p_60fps_normal.mp4 first_30_seconds.mp4

# "Get everything until the content's 30th second."
ffmpeg -y -to 30 -i bbb_sunflower_1080p_60fps_normal.mp4 first_30_seconds.mp4
ffmpeg -y -to 00:00:30.0 -i bbb_sunflower_1080p_60fps_normal.mp4 first_30_seconds.mp4
All four above commands result in exactly the same video. (For nerds: even the md5sum is the same.)
But let's see how they perform when we introduce seeking!
# "Seek to the 10th second and get me 30 seconds of the input."
ffmpeg -y -ss 10 -t 30 -i bbb_sunflower_1080p_60fps_normal.mp4 part_between_10_and_40.mp4

# "Seek to the 10th second and get the content until the 30th second."
ffmpeg -y -ss 10 -to 30 -i bbb_sunflower_1080p_60fps_normal.mp4 part_between_10_and_30.mp4
The first command will result in a 30 second long video, while the second command will be 20 seconds long only!
The figure below shows the difference:
Editing without reencoding
FFmpeg can do something I'm not aware of in any other popular NLE: it can edit videos without reencoding them!
The usual workflow is to decode the data frames (a/v) into memory, modify them as much as we like and then encode them into a new video file. The problem with this is that unless you work with raw or lossless codecs, you'll lose some quality in the process. Another issue with this approach is that it is computationally intensive.
For certain operations, you can configure FFmpeg, to keep the data frames intact, and this way, you can avoid decoding and encoding them! This is incredibly faster than regular transcoding, usually hundreds of times faster.
The "certain operations" are those that don't need to modify the data frames themselves. For example, you can cut and trim this way. Also, you can manipulate streams while keeping others, like you can replace the audio track without touching the video frames.
All this is a bit of magic, and there are caveats you need to prepare for, but it is good if you know about this, as it is often handy!
The trick lies in two options:
- -c:v copy: The "copy" video codec
- -c:a copy: The "copy" audio codec
Let's see a few examples!
Remove audio while keeping the video without reencoding
ffmpeg -i bbb_sunflower_1080p_60fps_normal.mp4 -c:v copy -an copied_video_only.mp4Here, we used the "-an" option, which removes all audio streams. I remembered it as "audio no", but that is just my mnemonic:)
Let's see how fast it was:
frame=38072 fps=20950 q=-1.0 Lsize= 310340kB time=00:10:34.51 bitrate=4006.7kbits/s speed= 349xSo It processed the whole 10 minutes of video in 2 seconds, 349x faster than playback, with 20950 fps!
Remove video while keeping the audio without reencoding
ffmpeg -i bbb_sunflower_1080p_60fps_normal.mp4 -c:a copy -vn copied_audio_only.wavHere, we used the "-vn" option, which removes all video streams. I remembered it as "video no".
Let's see how fast it was:
size= 24772kB time=00:10:34.14 bitrate= 320.0kbits/s speed= 776x 776x faster than playback, finished in about a second, not bad!
Cut and trim without reencoding
ffmpeg -ss 10 -t 10 -i bbb_sunflower_1080p_60fps_normal.mp4 -c:a copy -c:v copy part_from_10_to_20_copied.mp4There could be precision issues with seeking while you do this, so you may want to learn more about seeking and copying here.
Replace audio on video file without reencoding
We have removed audio and video already, but what if we want to swap them?
ffmpeg -y \
-i bbb_sunflower_1080p_60fps_normal.mp4 \
-i voice_recording.wav \
-map "0:v" -map "1:a" \
-c:v copy -c:a copy \
bbb_with_replaced_audio.mov
There is quite a lot going on in here, so let's explain the parts!
First, we have two inputs (-i), meaning we are better off manually specifying the mapping. The command would work without the "-map" options, but it would ignore our second input.
-map "0:v" -map "1:a" means that please use the first file's (first) video stream and the second file's (first) audio stream.
With -c:v copy -c:a copy, we require FFmpeg to copy the already encoded data packets without touching them. Therefore FFmpeg's work is mostly really just copying bytes, no decoding, no encoding.
Not surprisingly, that's what we see in the stream mapping too:
Stream mapping:
  Stream #0:0 -> #0:0 (copy)
  Stream #1:0 -> #0:1 (copy)
Press [q] to stop, [?] for help
frame=38072 fps=9750 q=-1.0 Lsize=  320645kB time=00:10:34.51 bitrate=4139.7kbits/s speed= 162x
And since it is just copying, it was crazy fast, 162x of the playback speed, or almost 10k frames per second!
But!
Execute the exact same command, but with "bbb_with_replaced_audio.mp4" (.mp4 container instead of .mov) as an output file! You'll get this:
Could not find tag for codec pcm_s16le in stream #1, codec not currently supported in containerThe message is quite clear. You can not have a pcm_s16le (raw WAV, say that 10 times:)) stream in an MP4 container. I'm not sure if it is FFmpeg's or the container's lack of support, but we need to solve this. If you run into this situation, you might consider two solutions:
- Change the container: I've just tried MOV, and it worked.
- Encode the audio: We still copy the video data, and encoding audio isn't that painful.
I just showed you option #1, so let's see option #2:
ffmpeg -y \
-i bbb_sunflower_1080p_60fps_normal.mp4 \
-i voice_recording.wav \
-map "0:v" -map "1:a" \
-c:v copy \
-c:a aac -b:a 320k -ar 44100 \
bbb_with_replaced_audio_aac.mp4
This copies the video frames and encodes our WAV into a supported codec to be held in the mp4 container. You can refer back to the audio encoding section if you want to learn more about that.
Here is the output:
Stream mapping:
  Stream #0:0 -> #0:0 (copy)
  Stream #1:0 -> #0:1 (pcm_s16le (native) -> aac (native))
Press [q] to stop, [?] for help
...
frame=38072 fps=2176 q=-1.0 Lsize=  313058kB time=00:10:34.51 bitrate=4041.8kbits/s speed=36.3x
"Only" 36x faster than playback, 2176 fps, still not that bad!
Filtering overview
FFmpeg supports many audio and video filters. Currently, there are 116 audio and 286 video filters, but there are a bit more if we count the hardware accelerated ones too.
So how do we leverage them?
There are two ways to define filters, but I'm going to explain the complex filter, as the difference is not much, but it is more versatile. So there is a global option for FFmpeg, called: -filter_complex. With quite a weird syntax, you can specify all your filters and their parameters right after this option.
You can imagine the process with the following image:
Basically, your filter graph can access all the inputs (-i a.mp4 -i b.mp4 -i c.mp4), and it can produce as many outputs as you like (-map might be needed).
Basic syntax
Let's take a look at a simple, basic example:
ffmpeg -y  -t 5 \
-i bbb_sunflower_1080p_60fps_normal.mp4 \
-filter_complex "drawtext=text='HELLO THERE':y=20:x=30:fontsize=200:fontfile=/usr/share/fonts/truetype/freefont/FreeSerif.ttf" \
filter_complex1.mp4
Although -filter_complex is a global option, I like to put it after the inputs and before the outputs as it is a bit easier to overlook the whole command that way. Thankfully the command line parser of FFmpeg is smart enough, and it works.
The command above produces a 5-second-long video, where the text "HELLO THERE" is overlaid on the intro of Big Buck Bunny.
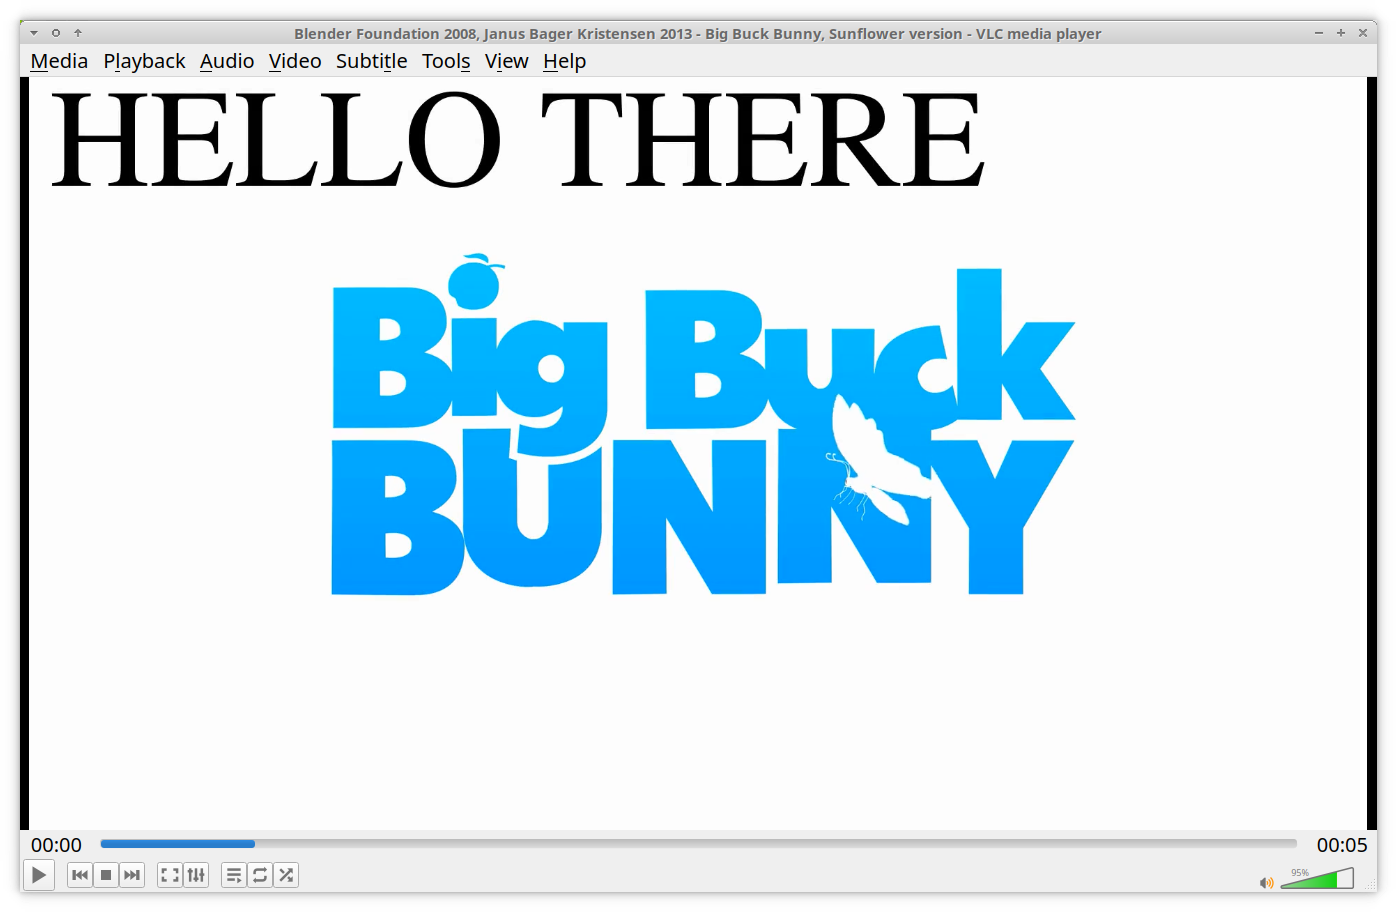
Let's understand the weird format for specifying filters!
We'll go bottom-up, and we'll build it from there. So the most basic format is this:
FILTER_NAME=ARGUMENT1=VALUE1:ARGUMENT2=VALUE2For example:
drawtext=text='HELLO THERE':y=20:x=30The first thing before the first equal (=) sign is the filter's name, which is the drawtext filter in this case. Then we have our first argument, "text" and its value "'HELLO THERE'". Right after that, separated with a colon (:) comes the next argument, "y" with a value of "20".
You can guess what each of the text, y, x, fontsize and fontfile arguments do, as it is quite self-explaining. But especially for the first time, you'll heavily rely on the filtering documentation to understand every filter and every argument.
Also, several characters are reserved, such as: , : = and a few others depending on your environment, so sooner or later you need to learn about escaping too.
To recap, our pipeline looks like this now:
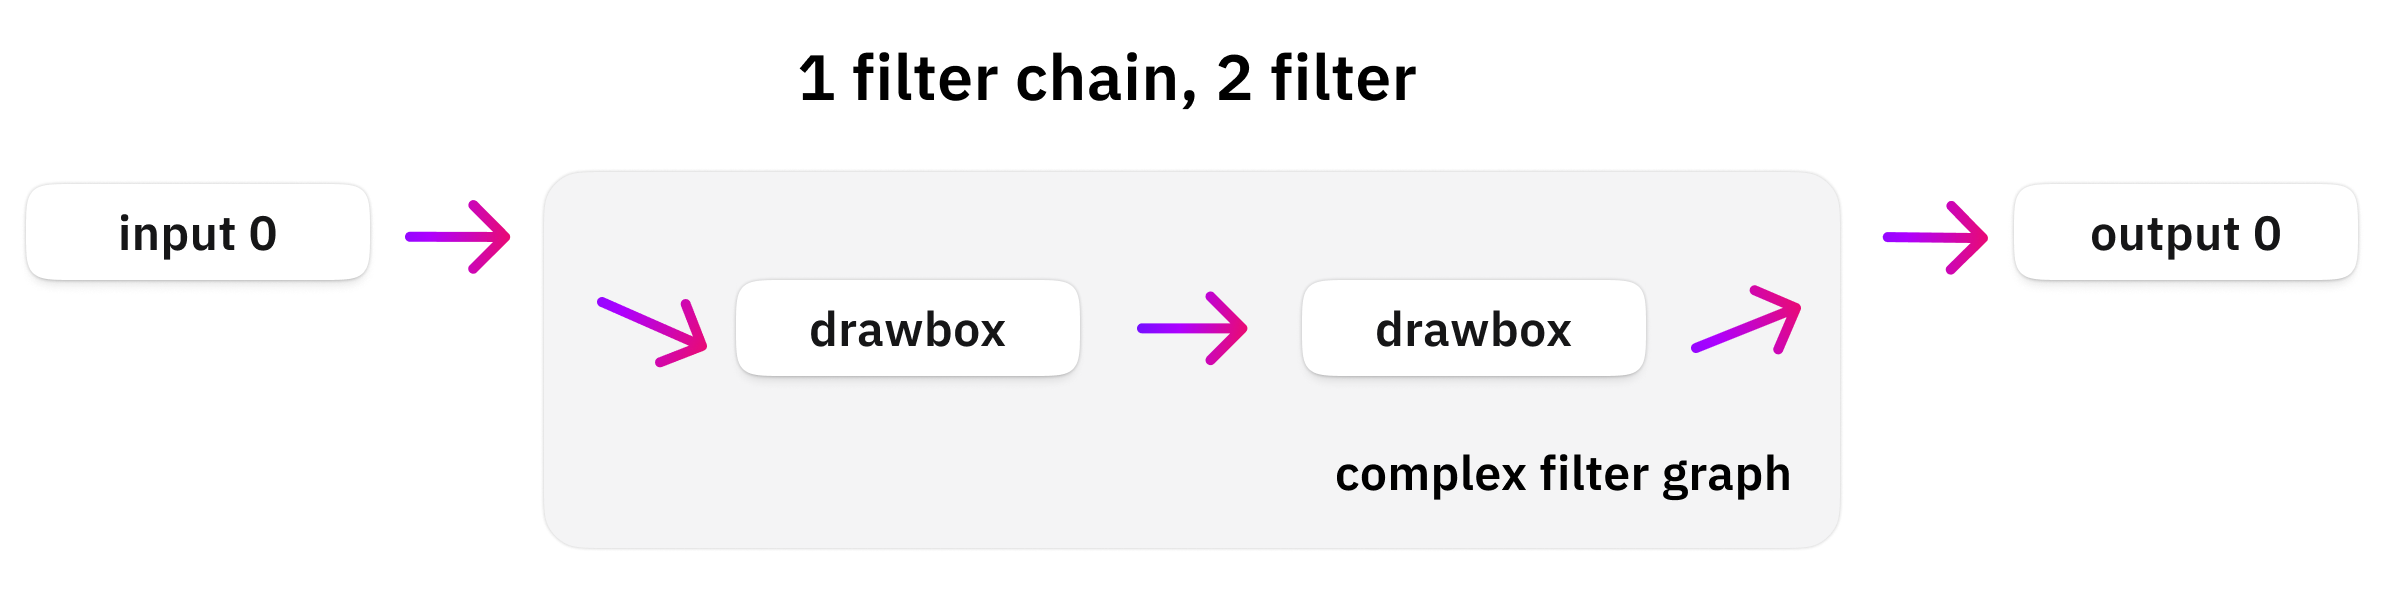
Multiple filters in a chain
This previous command is a single filter chain that consists of a single filter only, but you could have more filters put right after each other! It means that the output of one filter will be the input for the next! The way to do this is by separating them with a comma!
Let's draw two boxes with the drawbox filter!
ffmpeg -y  -t 5 \
-i bbb_sunflower_1080p_60fps_normal.mp4 \
-filter_complex "  drawbox=x=10:y=10:w=100:h=100:color=red  ,  drawbox=x=200:y=200:w=100:h=100:color=blue  " \
filter_complex2.mp4
See? The output of the first filter is passed to the output of the second filter!

Let's visualize our pipeline again:
Input and output pads
Now, we have skipped something this far, because for simple uses FFmpeg is smart enough to do it for us. And this is the specification of a chain's input and output pads!
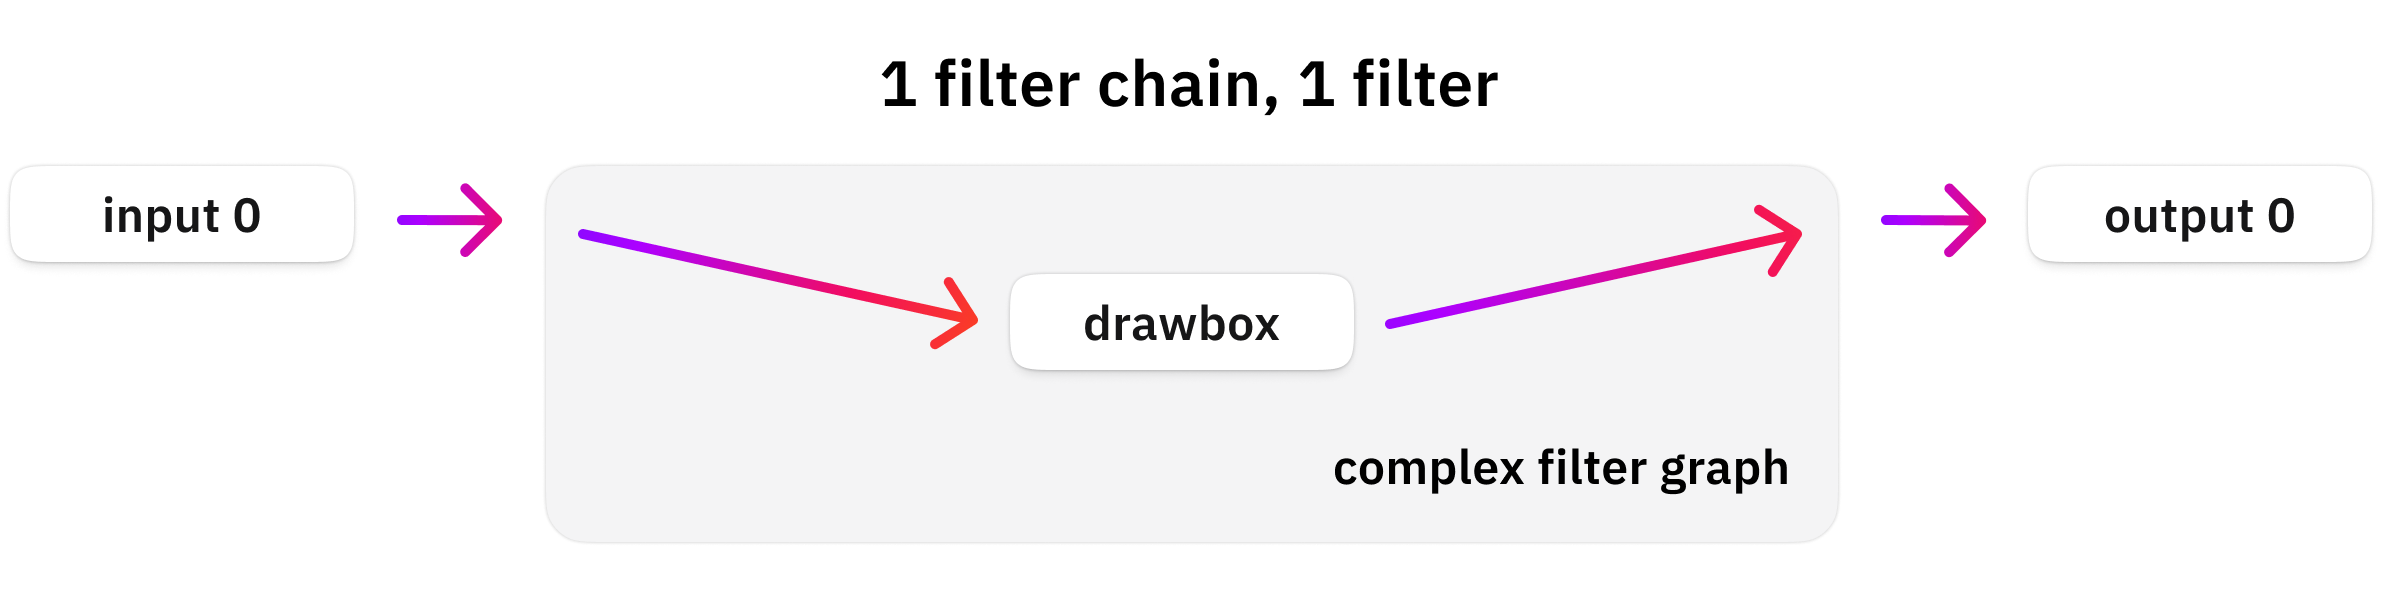
Let's draw just a single rectangle for now:
ffmpeg -y -t 5 -i bbb_sunflower_1080p_60fps_normal.mp4 -filter_complex "drawbox=x=10:y=10:w=100:h=100:color=red" filter_complex3.mp4FFmpeg sees that the input for our filter chain is a single video file, and the output is a single output video file. Therefore, it safely assumes that we want that single input as the input of our single filter chain. And that single output should be the single output of our single output chain.
That's really nice, as, in simple situations like this, we don't need to assign and map inputs and outputs manually! But when we get more inputs, filter chains, or outputs, it is no longer possible. Therefore, we need to understand how to assign inputs and outputs!
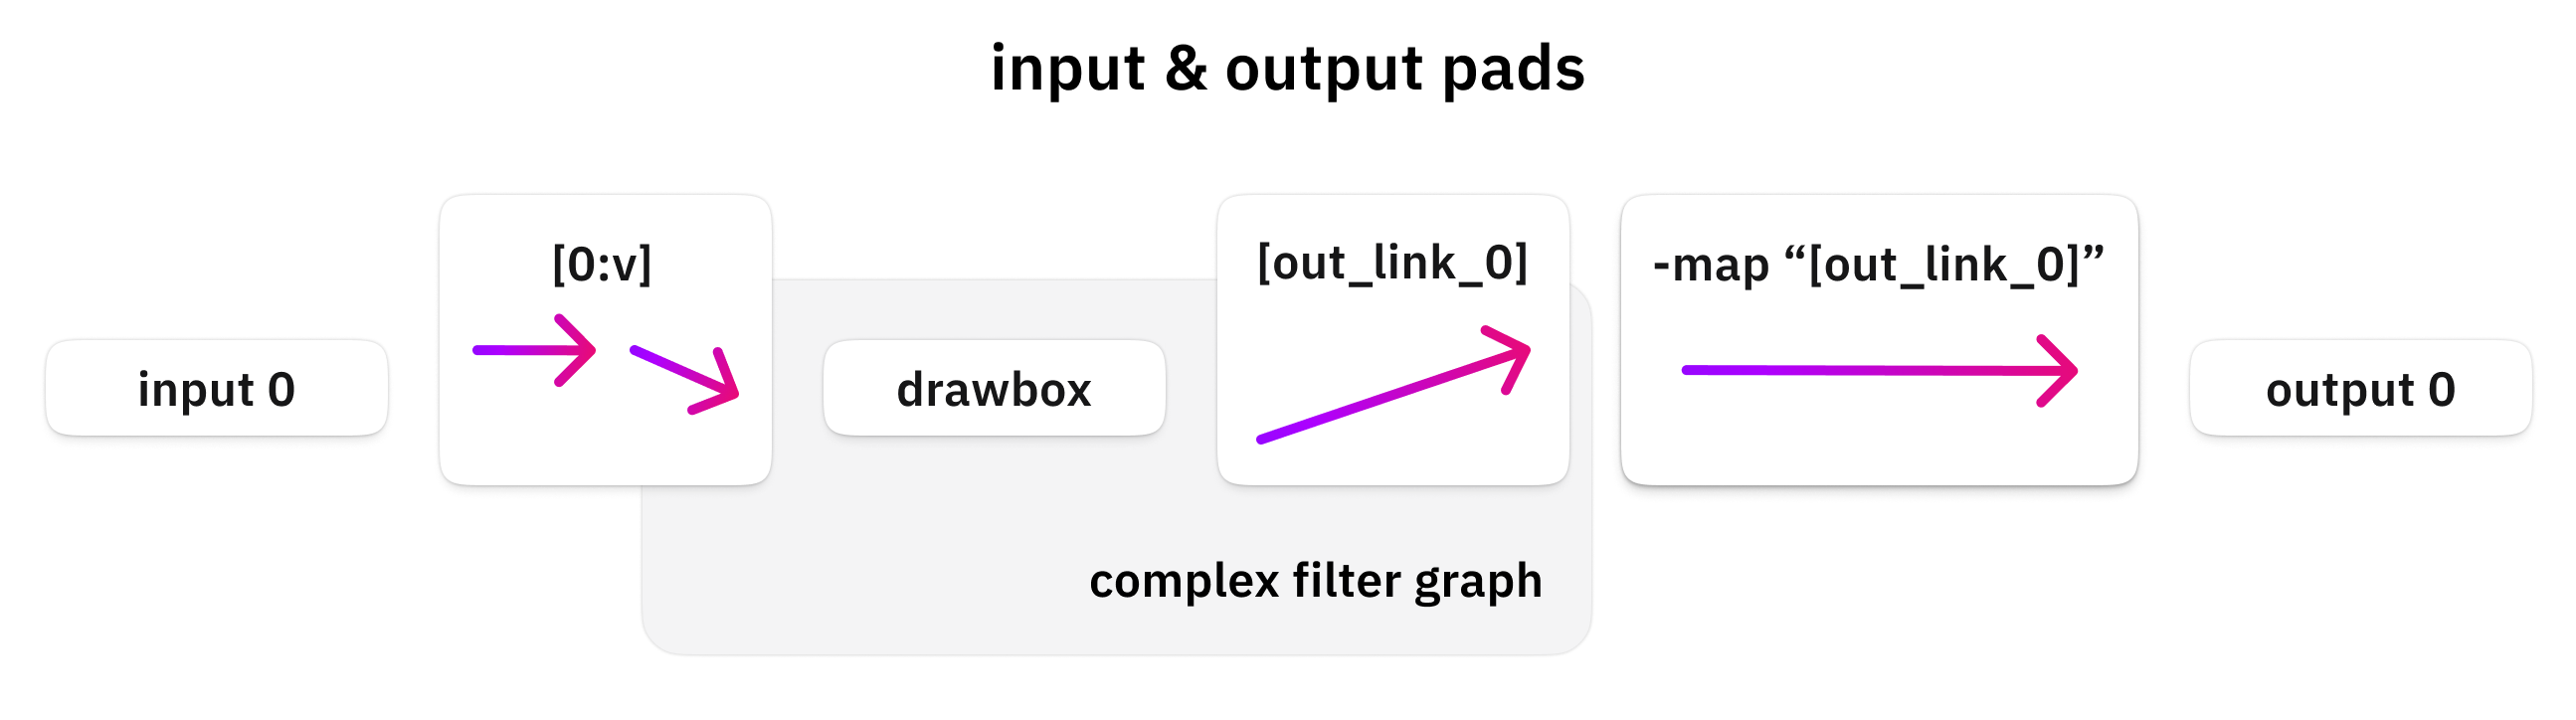
First of all, let's compare the following two command lines. They result in exactly the same result, but the second one represents what FFmpeg does internally (roughly):
ffmpeg -y  -t 5 -i bbb_sunflower_1080p_60fps_normal.mp4 -filter_complex "drawbox=x=10:y=10:w=100:h=100:color=red" filter_complex3.mp4

ffmpeg -y  -t 5 -i bbb_sunflower_1080p_60fps_normal.mp4 -filter_complex "[0:v]drawbox=x=10:y=10:w=100:h=100:color=red[out_link_0]" -map "[out_link_0]" filter_complex3.mp4
Do you see the difference? Before our filter chain, an "input pad" is defined: [0:v]. The expected format between the square brackets is documented in the stream selection section of the official documentation, and this article already covered it.
But, a quick summary:
- 0:v: This means the first video stream of the first input file.
- 0:v:0: Means exactly the same thing but in a long form.
- 0:0: Means the first stream of the first input file (not recommended, as it could be anything in theory. It could be a subtitle stream, a thumbnail, a video or an audio stream...)
- 0:a: This means the first audio stream of the first input file.
- 0:a:0: Means exactly the same thing but in a long form.
- 0:a:1: Means the second (index #1) audio stream of the first input file.
So we can specify which input file should be connected to which input of the filter graph!
Also, something similar is going on at the end! Do you see, the [out_link_0] output pad definition at the end of our filter chain?
The naming here is easier, as basically you can specify any arbitrary name in here. It roughly means, "please store the output data under this name".
And when you specify your output file, you can or need to map it by selecting one of your filter graph outputs! Therefore, we must add the -map "[out_link_0]" option before our output file.
This map option means this: "Please save the data stream with this name into the following output file."
This is how you can visualize this input/output mapping:
Multiple chains
Coming from the previous sections, you are now ready to see and understand an even more complicated configuration, which has multiple input files, output files, and filter chains!
ffmpeg -y  \
-i train.jpg \
-t 5 -i bbb_sunflower_1080p_60fps_normal.mp4 \
-filter_complex "[0:v]drawbox=x=10:y=10:w=100:h=100:color=red[train_box] ; [1:v]drawbox=x=10:y=10:w=100:h=100:color=red[bbb_box]" \
-map "[train_box]" filter_complex4_train.jpg \
-map "[bbb_box]" filter_complex4_bbb.mp4
Let's see the output (two files next to each other):
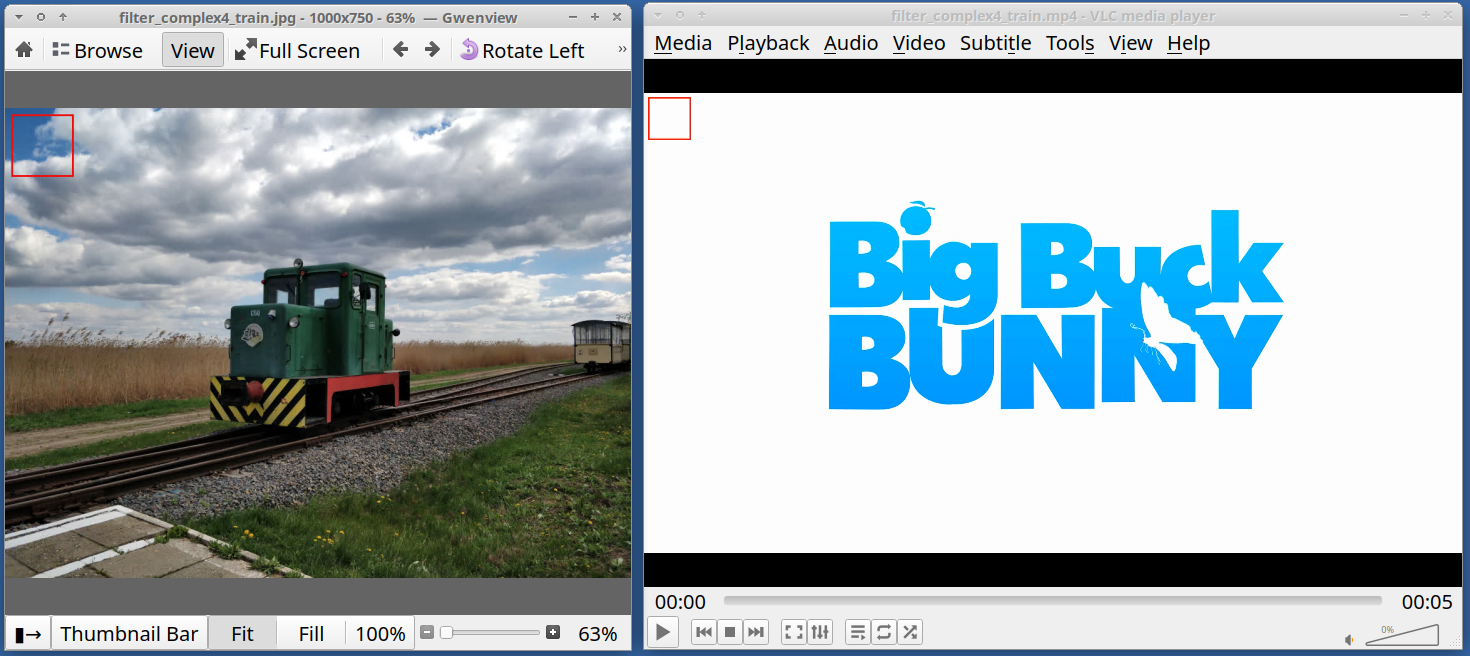
We had two inputs, and we got two output files, an image, and a video, with a red rectangle on them, with a single command!
Are you still here? I hope! Let's understand what happened in that crazy command! We have two input files:
- -i train.jpg: A simple image file
- -t 5 -i bbb_sunflower_1080p_60fps_normal.mp4: Our video file, but to make it quick, just the first five seconds of it
Then the first thing to note is that we have two filter chains! They are separated with a ";".
Our first filter graph is this: [0:v]...[train_box]
- This requests the first input file as an input
- Draws a red box
- Saves the output into the "train_box" output pad
Our second filter graph is this: [1:v]...[bbb_box]
- This requests the second input file as an input
- Draws a red box
- Saves the output into the "bbb_box" output pad
And finally, we got two outputs, each mapping to one of the outputs of the filter graph:
- -map "[train_box]" filter_complex4_train.jpg
- -map "[bbb_box]" filter_complex4_bbb.mp4
Here is the same thing visually:
If you are thinking about making it even more complex and making filter graphs that combine multiple inputs into one for example, you are on the right track! It is possible, and we will get to that!
This was the introduction to the filtering system and its syntax.
Editing video
Now let's get to know a few filters and make some interesting stuff!
Resizing or scaling
The scale filter is a simple one, yet it is quite powerful!
ffmpeg -y  \
-t 5 -i bbb_sunflower_1080p_60fps_normal.mp4 \
-filter_complex "scale=width=600:height=-1:force_original_aspect_ratio=decrease" \
filter_complex5_scaled1.mp4
The arguments speak for themselves, but a few things:
- Specifying -1 to either width or height means rescaling while keeping the aspect ratio.
- "force_original_aspect_ratio" can be
increase,decrease. Meaning it will increase or decrease the image to fit the specified bounding box while keeping the aspect ratio.
Adding text
We have already covered this a little, so let's dive deeper!
This is what we used earlier:
ffmpeg -y  \
-t 5 -i bbb_sunflower_1080p_60fps_normal.mp4 \
-filter_complex "drawtext=text='HELLO THERE':y=20:x=30:fontsize=200:fontfile=/usr/share/fonts/truetype/freefont/FreeSerif.ttf" \
filter_complex1.mp4
Now let's discover how to align the text!
Many filters, including drawtext, support variables in some of its argument's values. If you scroll down in the documentation of drawtext, you'll find this:
"The parameters for x and y are expressions containing the following constants and functions: "
And after this part, you'll see many variables which you can include in your x and y variables!
Let's see:
# Align the text to the center
ffmpeg -y  \
-t 5 -i bbb_sunflower_1080p_60fps_normal.mp4 \
-filter_complex "drawtext=text='HELLO THERE':y=h/2-text_h/2:x=w/2-text_w/2:fontsize=200:fontfile=/usr/share/fonts/truetype/freefont/FreeSerif.ttf" \
filter_complex6_center.mp4
# y=h/2-text_h/2 means: y position = (image height / 2) - (text height / 2)

# Align the text to the right:
ffmpeg -y  \
-t 5 -i bbb_sunflower_1080p_60fps_normal.mp4 \
-filter_complex "drawtext=text='HELLO THERE':y=30:x=w-text_w-20:fontsize=200:fontfile=/usr/share/fonts/truetype/freefont/FreeSerif.ttf" \
filter_complex6_right.mp4
# x=w-text_w-20 means: x position = image width - text width - 20pixel padding


# Align the text to the bottom:
ffmpeg -y  \
-t 5 -i bbb_sunflower_1080p_60fps_normal.mp4 \
-filter_complex "drawtext=text='HELLO THERE':y=h-text_h-20:x=30:fontsize=200:fontfile=/usr/share/fonts/truetype/freefont/FreeSerif.ttf" \
filter_complex6_bottom.mp4
# y=h-text_h-20 means: y position = image height - text height - 20pixel padding
And this is what we'll get in the end:

I need to mention one good trick that might not be obvious at first. So the text_h variable is a tricky one, because different text will be of different height! E.g.: "____" and "WWW" will result in a different height.
For this reason, you do not always want to use text_h or even just a constant y=value expression but rather, you need to align text by its baseline. So just remember to use the "ascent" variable whenever you need to align text vertically!
Check out these two examples! Each has two drawtext filters printing "_" and "_H":
# This one uses y=200 for both, still the text isn't aligned properly!
ffmpeg -y  \
-t 5 -i bbb_sunflower_1080p_60fps_normal.mp4 \
-filter_complex "drawtext=text='_':y=200:x=30:fontsize=200:fontfile=/usr/share/fonts/truetype/freefont/FreeSerif.ttf,drawtext=text='_H':y=200:x=500:fontsize=200:fontfile=/usr/share/fonts/truetype/freefont/FreeSerif.ttf" \
filter_complex7_bad_text.mp4

# This one uses y=200-ascent for both and the text is aligned as expected!
ffmpeg -y  \
-t 5 -i bbb_sunflower_1080p_60fps_normal.mp4 \
-filter_complex "drawtext=text='_':y=200-ascent:x=30:fontsize=200:fontfile=/usr/share/fonts/truetype/freefont/FreeSerif.ttf,drawtext=text='_H':y=200-ascent:x=500:fontsize=200:fontfile=/usr/share/fonts/truetype/freefont/FreeSerif.ttf" \
filter_complex7_good_text.mp4
Now let's compare the difference:
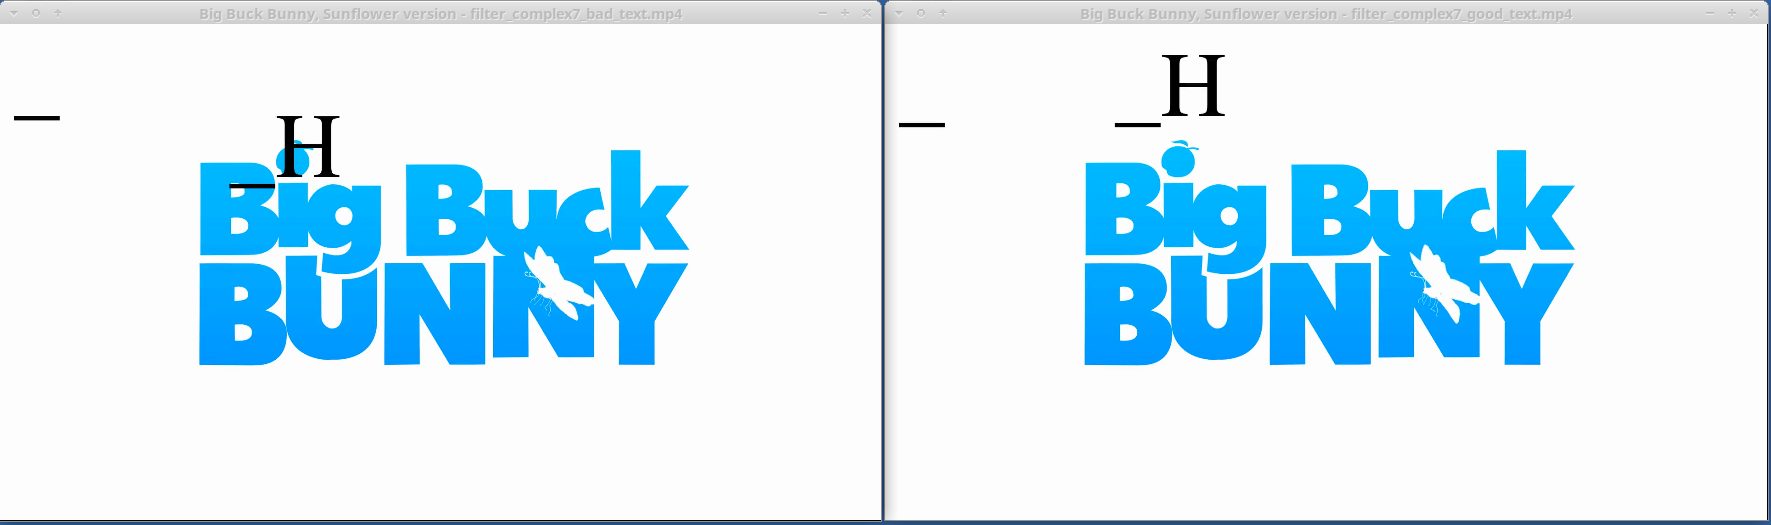
See? This is the difference between aligning the "top left" or the "baseline" of the text!
Adding an overlay
Overlaying is a very interesting thing to do with FFmpeg. Let's jump right in!
Basic
ffmpeg -y  \
-t 5 -i bbb_sunflower_1080p_60fps_normal.mp4  \
-i smiley.png \
-filter_complex "overlay" \
filter_complex8_overlay1.mp4
Easy as that!
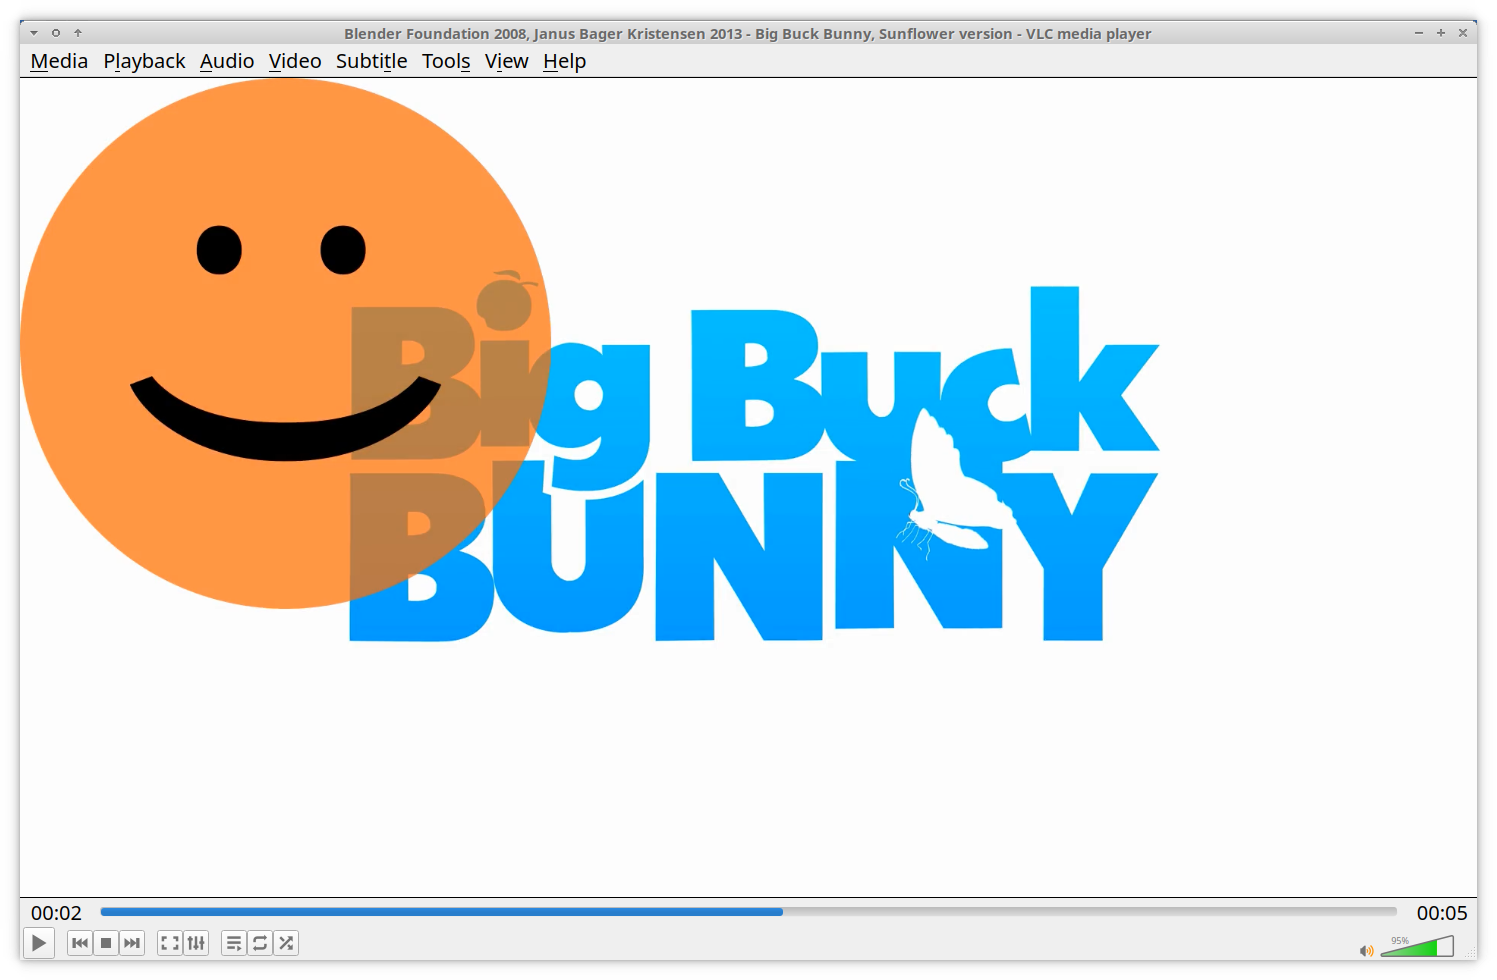
Of course, the overlay filter has a ton of options, but I wanted to demonstrate the easiest possible command line. We don't even need to mess with input/output pads, as FFmpeg automatically understands the situation: two inputs for the overlay filter and its single output into a single output.
But just to exercise, we could have executed it like this:
ffmpeg -y  \
-t 5 -i bbb_sunflower_1080p_60fps_normal.mp4  \
-i smiley.png \
-filter_complex "[0:v][1:v]overlay[output]" \
-map "[output]" filter_complex8_overlay2.mp4
And this would result in the same output! Check it out, now I have specified the two inputs for the overlay: [0:v][1:v]!
Aligned
Let's align the smiley into the center!
As we have seen with the drawtext, the overlay filter's arguments also support a few dynamic variables. We'll use those to achieve what we want!
ffmpeg -y  \
-t 5 -i bbb_sunflower_1080p_60fps_normal.mp4  \
-i smiley.png \
-filter_complex "overlay=x=main_w/2-overlay_w/2:y=main_h/2-overlay_h/2" \
filter_complex8_overlay3.mp4
Preprocessing the input for overlay
Let's get a bit creative!
I want to make it smaller, and I also want to blur it!
Now pause for a minute, and think about it, how you'd do that?!
...
Ready?
ffmpeg -y  \
-t 5 -i bbb_sunflower_1080p_60fps_normal.mp4  \
-i smiley.png \
-filter_complex "[1:v]scale=w=200:h=-1,gblur=sigma=3[smiley] ; [0:v][smiley]overlay=x=100:y=100" \
filter_complex8_overlay4.mp4
For this we needed to have two filter graphs!
The first one is this: [1:v]scale=w=200:h=-1,gblur=sigma=3[smiley]
- Scales the input image (the smiley).
- Then the scaled output is also blurred.
- Then the output is saved into the output pad named "smiley".
Then, we have our second filter graph: [0:v][smiley]overlay=x=100:y=100
- This takes as input the first input file (the video).
- This also takes as input the output pad named "smiley". (We are connecting two chains this time!)
- Then the overlay filter does its overlaying thing, and we trust FFmpeg to pair the unnamed output with the single output file we specified.
Reusing content
Let's do one more, a really complicated one!
Let's have the outro overlaid over the intro!
ffmpeg -y \
-t 5 -i bbb_sunflower_1080p_60fps_normal.mp4 \
-t 5 -ss 00:09:40 -i bbb_sunflower_1080p_60fps_normal.mp4  \
-filter_complex " [1:v]scale=w=1920/2:h=-1[outro]; [0:v][outro]overlay" \
filter_complex8_overlay5.mp4
We could have achieved it in several ways, e.g. we could use the trim filter, but to keep it easy, we just open the same file twice and seek/trim them.
- -t 5 -i bbb_sunflower_1080p_60fps_normal.mp4: Open the video, and keep the first five seconds of it.
- -t 5 -ss 00:09:40 -i bbb_sunflower_1080p_60fps_normal.mp4: Open the same video again, but seek to the end and keep five seconds from there.
Then we have two filter graphs again, one scales down the outro, and the second is just an overlay.
Are you excited?:) I hope these made-up examples opened up your eye for the possibilities, and I hope you'll create very creative stuff with this knowledge!
Chroma keying, green screen, blue screen
In this section, we'll use chroma keying to remove the background from Big Buck Bunny's intro, and then we will put the transparent logo over the original video, as if it would be some kind of a logo overlay!
ffmpeg -y \
-ss 0.5 -t 2 -i bbb_sunflower_1080p_60fps_normal.mp4 \
-ss 10 -i bbb_sunflower_1080p_60fps_normal.mp4  \
-filter_complex " [0:v]chromakey=color=0xfdfdfd:similarity=0.1:blend=0.2 , scale=w=-1:h=300 , loop=loop=-1:start=0:size=120[intro] ; [1:v][intro]overlay=x=-40:y=-40" \
-t 10 filter_complex9.mp4
So just to recap, Big Buck Bunny's first few seconds are like this:
And this is the result:
Also, the butterfly moves its wings repeatedly!
Let's examine the command!
- -ss 0.5 -t 2 -i bbb_sunflower_1080p_60fps_normal.mp4: We read in the intro from 0.5 to 2.5 seconds.
- -ss 10 -i bbb_sunflower_1080p_60fps_normal.mp4: We read in the video, starting from the 10th second.
Then we have two filter graphs, the first being this:
[0:v]chromakey=color=0xfdfdfd:similarity=0.1:blend=0.2 , scale=w=-1:h=300 , loop=loop=-1:start=0:size=120[intro]
As we see, we have three filters in here!
- chromakey: This one takes a color and a few parameters as input, and outputs transparent frames. The specified color + the blended areas will be the transparent sections. In our case we replaced the white-ish (#fdfdfd) background color with transparency.
- scale: We resize the full 1080p image into something around 300px high.
- loop: With the loop filter, we repeat all the 2 seconds worth of 120 frames (60*2) over and over again, to have the butterfly move its wings continuously.
And then, finally we have the second filter graph:
[1:v][intro]overlay=x=-40:y=-40
Nothing fancy, just an overlay of the original video and our chrome keyed intro.
What else?
You might want to check out a few more filters, that I didn't cover here.
Here are just a few interesting ones:
- colorcorrect
- colorchannelmixer
- colorize
- fps
- trim
- crop
- delogo
- derain
- deshake
- erosion
- edgedetect
- hflip
- vflip
- hstack
- vstack
- xstack
- lumakey
- reverse
- rotate
- scroll
- pad
- vignette
- zoompan
Audio manipulation
In this chapter, we'll be going to check out some audio manipulation techniques with FFmpeg!
First of all, let's see our example file:
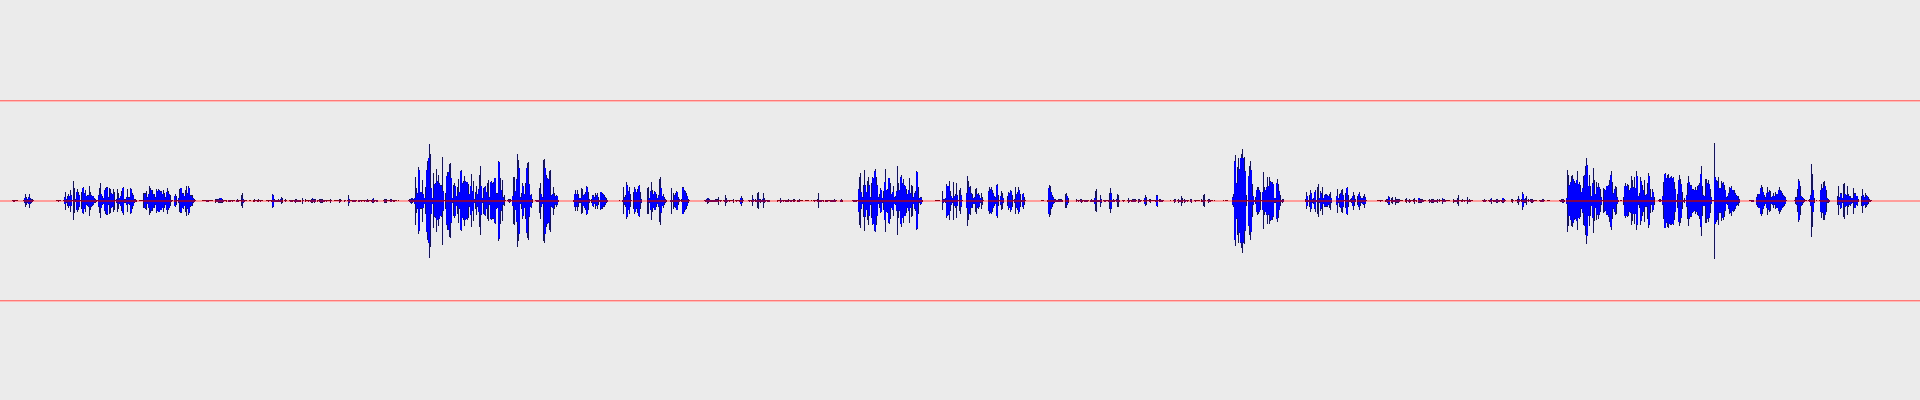
It is a voice recording, and it is intentionally... well, quite bad.
From the waveform, it is obvious that there are very different volume ranges in it. This is an example recording where each sentence was read in different strengths: "normal", "whisper" or "powerful", this is why you see repeating patterns of amplitude ranges on the image.
It isn't visible, but it has some noise too, and of course, it is not normalized or enhanced in any way. Yet.
Please note that there are different scenarios, requirements, and ways to enhance audio. This is a simplified method to show the outline of the process in this article. I'm not an audio engineer, although I have some experience in the area. So if you know it better, feel free to fine-tune it for yourself even more, or contact me and recommend improvements!
I'm showing an example here with a very rough input, one that you'd just reject in real life as it would be useless due to its quality. But it is an excellent example to show the different steps of the enhancing process and to see what can be done to it!
The following steps are built upon each other, and we'll reach the complete command at the end!
Don't forget that these settings are specific to this voice recording. Sadly this can not be generalized too much.
Gate
Let's start with the gate filter!
A gate is like a switch that opens only if the signal is stronger than the threshold. So if the signal level is lower than the threshold, it cuts to complete silence. Although you might soften or delay this cut with the knee, attack, and release arguments.
We'll use this filter as a basic noise reduction method now! This helps us remove the noise between words and sentences by cutting it to silence. It doesn't remove noise in any other way, e.g. it doesn't touch the static on the voice itself.
Check this out!
ffmpeg -y \
-i voice_recording.wav \
-filter_complex "agate=threshold=0.01:attack=80:release=840:makeup=1:ratio=3:knee=8" \
gate.wav
Let's hear it: gate.wav
And let's see it:
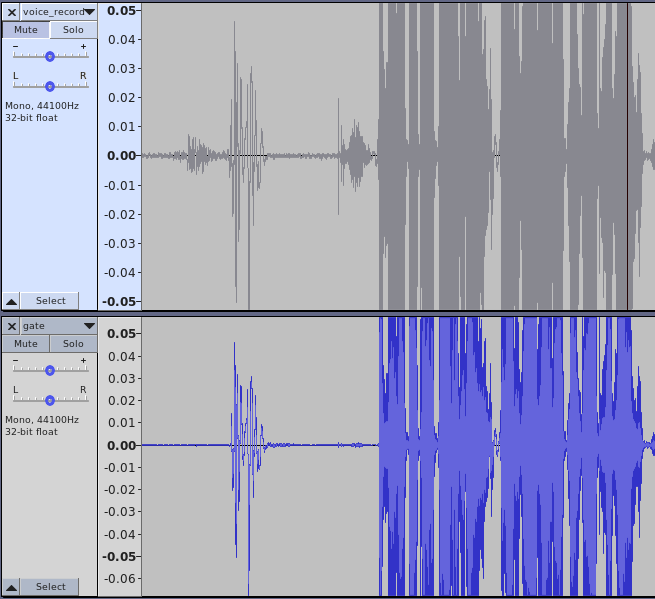
As you can see, the "silent" parts were attenuated heavily, while the above-the-threshold parts remained similar. Those parts were still affected by the knee, attack, and release arguments determining how hard (knee) and quick (attack/release) the cut is.
I've left a quite high release timeout here to avoid sudden dips in the amplitude.
This is where we are right now:

The silent parts are more silent than before, but still, the amplitude range or the dynamic range is quite high. You must change your volume levels to hear everything and void blowing your speakers/brain out.
Equalization
Before fixing that, let's do a bit more housekeeping. Let's do some equalization and frequency filtering!
We'll use these filters:
ffmpeg -y \
-i gate.wav  \
-filter_complex "highpass=f=100:width_type=q:width=0.5 , lowpass=f=10000 , anequalizer=c0 f=250 w=100 g=2 t=1|c0 f=700 w=500 g=-5 t=1|c0 f=2000 w=1000 g=2 t=1" \
gate_eq.wav
Let's hear it: gate_eq.wav
This command gradually attenuates frequencies below 100hz, as there are not much valuable content in there, but it can really lower the clarity of the speech.
Then we do the same, but for frequencies above 10 kHz. This is mostly needed because we have a lot of high-frequency noise, so this is a workaround for those. Also, a male voice is generally deeper than a woman's, so you might want to pay attention to how low you can put the bar.
Then comes anequalizer, which has a crazy an exceptional way of setting its arguments:
This: anequalizer=c0 f=250 w=100 g=2 t=1|c0 f=700 w=500 g=-5 t=1|c0 f=2000 w=1000 g=2 t=1 means:
- at 250hz with a width of 100hz boost by 2 db, with Chebyshev type 1 filter on channel 0.
- at 700hz with a width of 500hz attenuate by 5 db, with Chebyshev type 1 filter on channel 0.
- at 2000hz with a width of 1000hz attenuate by 2 db, with Chebyshev type 1 filter on channel 0.
I agree. You might have used a friendlier equalizer in your life than this one:)
Those values are based on experimentation and common recommendations for voice. Feel free to tune it for your own needs!
Let's compare the frequency plots before and after:
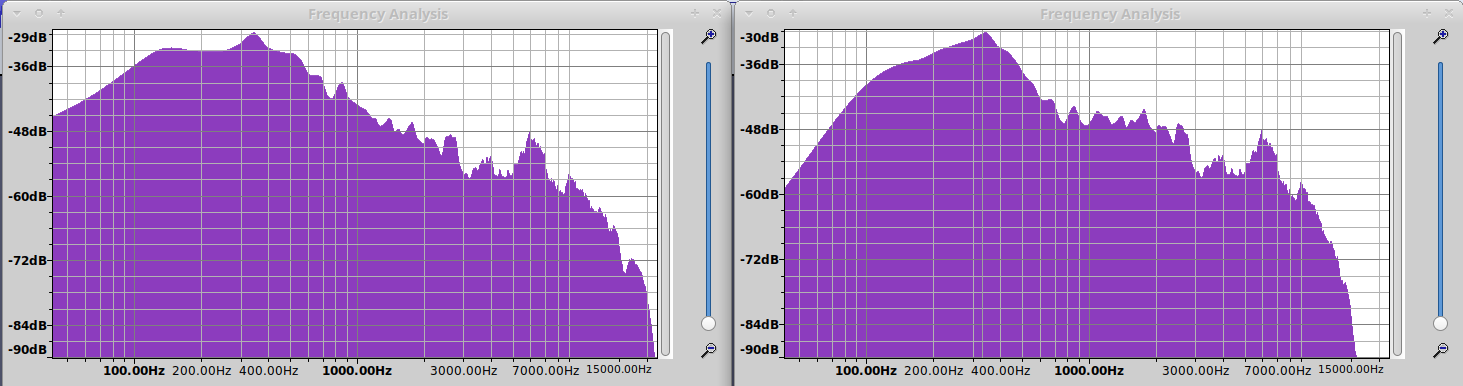
Tip: To see the frequency plot in Audacity, open a file, select all, and choose Analyze → Plot spectrum!
Compression
The compressor filter applies dynamic range compression on the incoming audio data. To simplify this, the compressor varies the attenuation based on the incoming signal level. Basically, when you watch a badly mastered movie, this is what you are doing. When it is way too loud in some action scene, you reach for the remote control or mouse to lower the volume, but in the next moment, you will not hear what your heroes are saying, so you increase it back again.
Dynamic range compression roughly does the same. You may set it up in a way so that it would attenuate louder parts, therefore keeping the overall volume range relatively small.
It often happens that performers on the stage use a high dynamic range. Many performers will shout at one moment and then whisper in the next to increase drama or keep the attention. If you want to avoid manually adjusting the volume in real-time (while blowing off your speakers and pulling your hair out), then a compressor will save you in these situations!
This is why our example audio consists of different speaking strengths, so that we could see the dramatic effect of this filter.
ffmpeg -y \
-i gate_eq.wav \
-filter_complex "acompressor=level_in=6:threshold=0.025:ratio=20:makeup=6" \
gate_eq_comp.wav
Let's hear it: gate_eq_comp.wav
And let's compare the result of this with the original waveform!
Original:

Result:
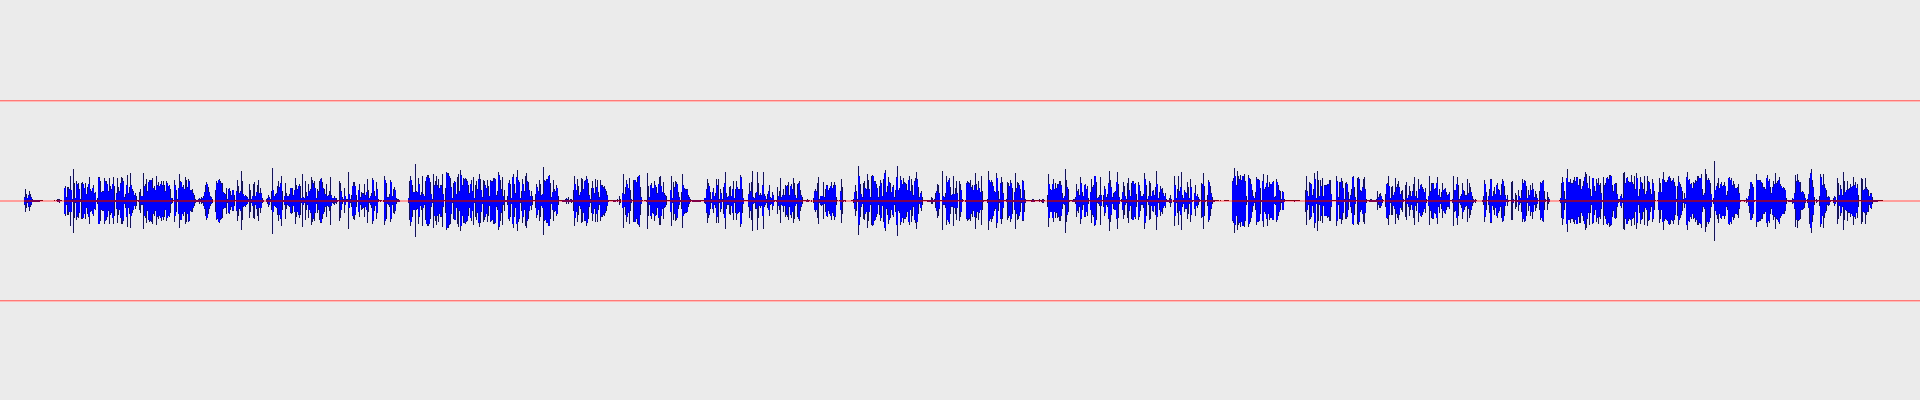
Quite dramatic, isn't it?:)
Let's analyze this: acompressor=level_in=6:threshold=0.025:ratio=20:makeup=6
First, level_in=6 sets the input gain. It is 1 by default, but since our example, audio is extremely silent at places, we boost up the whole thing before processing.
Then threshold=0.025 defines that everything above 0.025 should be attenuated.
Based on the image below, I've decided to cut at this point, as this is above most of the whispering, which cuts hard pops and "s"-es even in the "whisper zone".
Then ratio=20 means 1:20 in attenuation ratio, which means that if the level rises 20 dB above the threshold, it will be only 1 dB above the line after the attenuation. Basically, this is a very strong compression ratio, it is almost a limiter.
This far, we boosted the signal, then turned down everything that was above our "whisper line" with a quite strong ratio, and now, everything is basically at the whisper level, even the parts that are shouting.
Finally, with the makeup=6 we just bring back everything to the level where the "normal" parts were before.
Let's take a look back now, to understand why we used the gate and did the equalization before the compressor.
Generally, you want to remove unneeded parts and frequencies before compression, as the compressor will likely increase those too! So by removing most of the noise in the gaps, we avoided level_in=6 to increase them too! And the same goes for the high- and lowpass filtering.
Changing the volume
Now, if we want to make the result a bit louder, we could increase the previous step's makeup argument, or leverage the volume filter.
While we are at it, let's cut the first 4 seconds too with -ss 4.
ffmpeg -y \
-ss 4 -i gate_eq_comp.wav \
-filter_complex "volume=1.1" \
gate_eq_volume_comp.wav
Let's hear it: gate_eq_volume_comp.wav
Let's make audio gate again
Excuse me for that title:)
So as I've described earlier, compression can amplify the noises, so you might want to run the result through a gate again:
ffmpeg -y \
-i gate_eq_volume_comp.wav \
-filter_complex "agate=threshold=0.1:attack=50:release=50:ratio=1.5:knee=4" \
gate_eq_volume_comp_gate.wav
Let's hear it: gate_eq_volume_comp_gate.wav
In this case, I've used a softer gate, with ratio=1.5. Because of this, I could use shorter attack and release delays too, as the attenuation is not that strong, it isn't causing hard dips in the audio.
Putting it all together
Just a single command could have achieved all the steps above:
ffmpeg -y \
-i voice_recording.wav \
-filter_complex "agate=threshold=0.01:attack=80:release=840:makeup=1:ratio=3:knee=8 , highpass=f=100:width_type=q:width=0.5 , lowpass=f=10000 , anequalizer=c0 f=250 w=100 g=2 t=1|c0 f=700 w=500 g=-5 t=1|c0 f=2000 w=1000 g=2 t=1 , acompressor=level_in=6:threshold=0.025:ratio=20:makeup=6 , volume=1.1 , agate=threshold=0.1:attack=50:release=50:ratio=1.5:knee=4" \
gate_eq_volume_comp_gate_together.wav
I just copy-pasted all the filters right after each other with a comma between them.
Isn't it beautiful? Yeah, it isn't, but it is very practical:)
For the last time, check out the difference:
- Original: voice_recording.wav
- Final: gate_eq_volume_comp_gate.wav
It has less noise, more clear voice, and a small volume range. Therefore it is easy on your ears!
What else?
You might want to check out a few more filters that I didn't cover here.
Here are just a few interesting ones:
Documentation
For your convenience, let me list the most important documentations that might be important for you! Most of these were already linked many times in this article.
- FFmpeg main documentation
- FFmpeg WIKI
- FFmpeg compilation guide
- FFmpeg filters documentation
- FFmpeg formats documentation
- H.264 Video Encoding Guide
- H.265 Video Encoding Guide
If you got this far from top to bottom, then you are a true hero! I hope you enjoyed this, and I also hope that it inspired you to create something awesome with FFmpeg! Please consider donating to FFmpeg – they are fantastic.
If you're looking to take your creative projects to the next level, check out our products - Creative Editor SDK, Video Editor SDK, and Photo Editor SDK. These versatile tools empower you to bring your vision to life, whether you're editing images, crafting stunning videos, or unleashing your artistic talents.
Thanks for reading! Let us know what you think on Twitter! To stay in the loop, subscribe to our Newsletter.


