In this article, you will learn how to apply custom filters to an image in JavaScript, without using any external library. As you are about to learn, this goal can be achieved by employing only the HTML5 <canvas> element.
Instagram has changed image processing forever. Since its market debut, users have become increasingly interested and accustomed to applying filters to their images and photos. This desirable, valuable, and requested feature might seem complex to implement, but it is not.
So, let’s see how to implement a feature for users to apply custom filters to an image with Vanilla JavaScript. Follow this step-by-step guide to achieve the following result:
Custom Filters With <canvas>
The HTML <canvas> element allows you to edit an image. It natively offers you the possibility to implement several image-processing features, such as implementing a brush. In other words, it is the only prerequisite required to apply custom filters to an image. All you need to do is load an image, turn it into an array of pixels by using the getImageData() function, and apply a transformation to change their value according to the result you want to achieve. Finally, you can either overwrite the original image or create a new one after applying the filter.
Now, let’s see everything required to implement such a cool feature.
Clone the GitHub repository supporting this tutorial by launching the following command:
git clone https://github.com/Tonel/how-to-apply-custom-image-filters-in-javascript-img-ly
And try the application by opening the index.html file in your browser.
Otherwise, continue following this article to learn how to implement the same demo application step by step.
1. Implementing Simple Filters
Simple filters can be applied by changing the value of each pixel the image consists of. For example, you can implement a function to apply thresholding as follows:
function applyThreshold(
   sourceImageData,
   threshold = 127
) {
   const src = sourceImageData.data;

   for (let i = 0; i < src.length; i += 4) {
     const r = src[i];
     const g = src[i+1];
     const b = src[i+2];

     // thresholding the current value
     const v = (0.2126*r + 0.7152*g + 0.0722*b >= threshold) ? 255 : 0;

     src[i] = src[i+1] = src[i+2] = v
   }
   return sourceImageData;
 };
This simple function receives the ImageData object relative to the image to be thresholded as a parameter. Then, its data property representing a one-dimensional array with the image data in the RGBA order is accessed. This contains integer values between 0 (black) and 255 (white). Finally, data is iterated and modified to apply the thresholding operation, before returning the updated ImageData object.
That is just an example, but with this approach, you may implement many other simple filters.
2. Implementing Convolution-Based Filters
Convolution is one of the most important concepts when it comes to image processing. Particularly, it allows you to apply a filter by taking the weighted sum of a rectangle of pixels from an image and use it as the output value pixel by pixel. The coefficients used to perform the weighted sum are defined through a matrix, which is called kernel. By changing the kernel, the final result will change accordingly. Some kernels are more popular than others and can be used for blurring, sharpening, and edge detection. You can find a list of these well-known kernels here.
function applyConvolution(
  sourceImageData,
  outputImageData,
  kernel
) {
  const src = sourceImageData.data;
  const dst = outputImageData.data;

  const srcWidth = sourceImageData.width;
  const srcHeight = sourceImageData.height;

  const side = Math.round(Math.sqrt(kernel.length));
  const halfSide = Math.floor(side/2);

  // padding the output by the convolution kernel
  const w = srcWidth;
  const h = srcHeight;

  // iterating through the output image pixels
  for (let y = 0; y < h; y++) {
    for (let x = 0; x < w; x++) {
      let r = 0, g = 0, b = 0, a = 0;

      // calculating the weighed sum of the source image pixels that
      // fall under the convolution kernel
      for (let cy = 0; cy < side; cy++) {
        for (let cx = 0; cx < side; cx++) {
          const scy = y + cy - halfSide;
          const scx = x + cx - halfSide;

          if (scy >= 0 && scy < srcHeight && scx >= 0 && scx < srcWidth) {
            let srcOffset = (scy*srcWidth+scx) * 4;
            let wt = kernel[cy*side+cx];
            r += src[srcOffset] * wt;
            g += src[srcOffset+1] * wt;
            b += src[srcOffset+2] * wt;
            a += src[srcOffset+3] * wt;
          }
        }
      }

      const dstOffset = (y*w+x)*4;

      dst[dstOffset] = r;
      dst[dstOffset+1] = g;
      dst[dstOffset+2] = b;
      dst[dstOffset+3] = a;
    }
  }

  return outputImageData;
};
This function expects the source ImageData object as a parameter. Similarly, you must provide it with a blank ImageData object with the same size as the first one to be used as output, and a matrix representing the kernel. Then, the convolution algorithm is applied on the outputImageData object by iterating on the sourceImageData one.
Et voilà! Now, you have the building blocks required to implement a filtering feature in Vanilla JavaScript. Let’s see how in detail.
3. Filtering in Action
Let’s take a look at how to implement a simple application allowing users to upload an image, choose the filter to apply, and see the final result :
<!DOCTYPE html>
<html>
  <body>
    <h1>Image Resizer</h1>
    <p>
      Please, upload an image and apply the filter that best suits the image
    </p>
    <input id="upload" type="file" accept="image/*" />
    <div id="images" style="visibility: hidden;">
      <h2>Original image</h2>
      <img id="imageToFilter" style="max-width: 100%; height: 200px;" />
      <div style="margin-top: 5px;">
        <span>Filter: </span>
        <input type="radio" name="filterRadio" value="noFilter" checked />
        <label>No Filter</label>
        <input type="radio" name="filterRadio" value="threshold" />
        <label>Threshold</label>
        <input type="radio" name="filterRadio" value="sharpen" />
        <label>Sharpen</label>
        <input type="radio" name="filterRadio" value="blur" />
        <label>Blur</label>
      </div>
      <h2>Filtered image</h2>
      <img id="filteredImage" style="max-width: 100%;" />
    </div>
    <script src="src/index.js"></script>
  </body>
</html>
// hiding the div that will contain the images
const imagesDiv = document.querySelector("#images");
const fileInput = document.querySelector("#upload");

let imageToFilter = null;
const filteredImage = document.querySelector("#filteredImage");

// initializing the filter value
const filterElement = document.getElementsByName("filterRadio");

let filter;
filterElement.forEach((f) => {
  if (f.checked) filter = f.value;
});

// applying the selected filter
filterElement.forEach((f) => {
  f.onclick = () => {
    filter = f.value;
    filteredImage.src = filterImage(imageToFilter, filter);
  };
});

fileInput.addEventListener("change", async (e) => {
  const [file] = fileInput.files;

  // displaying the uploaded image
  imageToFilter = document.querySelector("#imageToFilter");
  imageToFilter.src = await fileToDataUri(file);

  // making the div containing the image visible
  imagesDiv.style.visibility = "visible";

  // applying the defaul filter
  imageToFilter.addEventListener("load", () => {
    filteredImage.src = filterImage(imageToFilter, filter);
  });
  return false;
});

function fileToDataUri(field) {
  return new Promise((resolve) => {
    const reader = new FileReader();
    reader.addEventListener("load", () => {
      resolve(reader.result);
    });
    reader.readAsDataURL(field);
  });
}

function filterImage(imageToFilter, filter) {
  const canvas = document.createElement("canvas");

  const context = canvas.getContext("2d");

  const canvasWidth = imageToFilter.width;
  const canvasHeight = imageToFilter.height;

  canvas.width = canvasWidth;
  canvas.height = canvasHeight;

  context.drawImage(imageToFilter, 0, 0, canvasWidth, canvasHeight);

  const sourceImageData = context.getImageData(0, 0, canvasWidth, canvasHeight);
  const blankOutputImageData = context.createImageData(canvasWidth, canvasHeight);
  const outputImageData = applyFilter(sourceImageData, blankOutputImageData, filter);

  context.putImageData(outputImageData, 0, 0);

  return canvas.toDataURL();
}

function applyFilter(sourceImageData, outputImageData, filter) {
  if (filter === "noFilter") {
    return sourceImageData;
  } else if (filter === "threshold") {
    return applyThreshold(sourceImageData);
  } else if (filter === "sharpen") {
    return applyConvolution(sourceImageData, outputImageData, [
      0, -1, 0,
     -1, 5, -1,
      0, -1,  0
    ]);
  } else if (filter === "blur") {
    return applyConvolution(sourceImageData, outputImageData, [
      1 / 16, 2 / 16, 1 / 16,
      2 / 16, 4 / 16, 2 / 16,
      1 / 16, 2 / 16, 1 / 16
    ]);
  } else {
    // fallback option
    return sourceImageData;
  }
}

function applyThreshold(sourceImageData, threshold = 127) {
  const src = sourceImageData.data;

  for (let i = 0; i < src.length; i += 4) {
    const r = src[i];
    const g = src[i + 1];
    const b = src[i + 2];

    // thresholding the current value
    const v = 0.2126 * r + 0.7152 * g + 0.0722 * b >= threshold ? 255 : 0;
    src[i] = src[i + 1] = src[i + 2] = v;
  }

  return sourceImageData;
}

function applyConvolution(sourceImageData, outputImageData, kernel) {
  const src = sourceImageData.data;
  const dst = outputImageData.data;

  const srcWidth = sourceImageData.width;
  const srcHeight = sourceImageData.height;

  const side = Math.round(Math.sqrt(kernel.length));
  const halfSide = Math.floor(side / 2);

  // padding the output by the convolution kernel
  const w = srcWidth;
  const h = srcHeight;

  // iterating through the output image pixels
  for (let y = 0; y < h; y++) {
    for (let x = 0; x < w; x++) {
      let r = 0,
        g = 0,
        b = 0,
        a = 0;

      // calculating the weighed sum of the source image pixels that
      // fall under the convolution kernel
      for (let cy = 0; cy < side; cy++) {
        for (let cx = 0; cx < side; cx++) {
          const scy = y + cy - halfSide;
          const scx = x + cx - halfSide;

          if (scy >= 0 && scy < srcHeight && scx >= 0 && scx < srcWidth) {
            let srcOffset = (scy * srcWidth + scx) * 4;
            let wt = kernel[cy * side + cx];
            r += src[srcOffset] * wt;
            g += src[srcOffset + 1] * wt;
            b += src[srcOffset + 2] * wt;
            a += src[srcOffset + 3] * wt;
          }
        }
      }

      const dstOffset = (y * w + x) * 4;
      dst[dstOffset] = r;
      dst[dstOffset + 1] = g;
      dst[dstOffset + 2] = b;
      dst[dstOffset + 3] = a;
    }
  }
  return outputImageData;
}
As you can see, the HTML page contains everything required to upload an image, and select a filter. There is also a no filter option, allowing users to restore the original image. Also, to better appreciate the effects of each filter, the original image is always shown as well.
From a technical point of view, what happens is that the input element is used to upload an optional image. Then, the uploaded image is passed to the applyFilter() function, which takes care of applying the filterselected in the HTML radio buttons by calling the right function. This can involve either a simple filter, or a convolution-based one. In this latter case, the appropriate kernel is passed to the applyConvolution() function as well. Then, the output ImageData object is used to show the resulting image by using the putImageData() function. Please, note that the example that was just implemented corresponds to the live demo you can find at the beginning of the article.
Final Considerations
Implementing image filtering is not a simple task and can easily be implemented with Vanilla JavaScript. On the other hand, the more filters you want to add, the more complicated things can get. In this tutorial, you just saw how to implement non-complex filters, but there are filtering techniques that require much more effort. Plus, the majority of them involve iterating through each pixel. As a result, on large images, this can turn into a time-consuming process. So, if you do not want to ruin the user experience, you might be forced to adapt academic and well-known algorithms to make them more efficient. Thus, implementing this feature efficiently can turn into a considerably complex task.
If you do not want to deal with such unavoidable optimizations, a commercial and all-in-one solution like PhotoEditorSDK should be taken into account. This way, you will not have to worry about accomplishing challenging and time-consuming tasks anymore. Also, whenever you need help, you can ask for support from the img.ly developers who built the SDK.
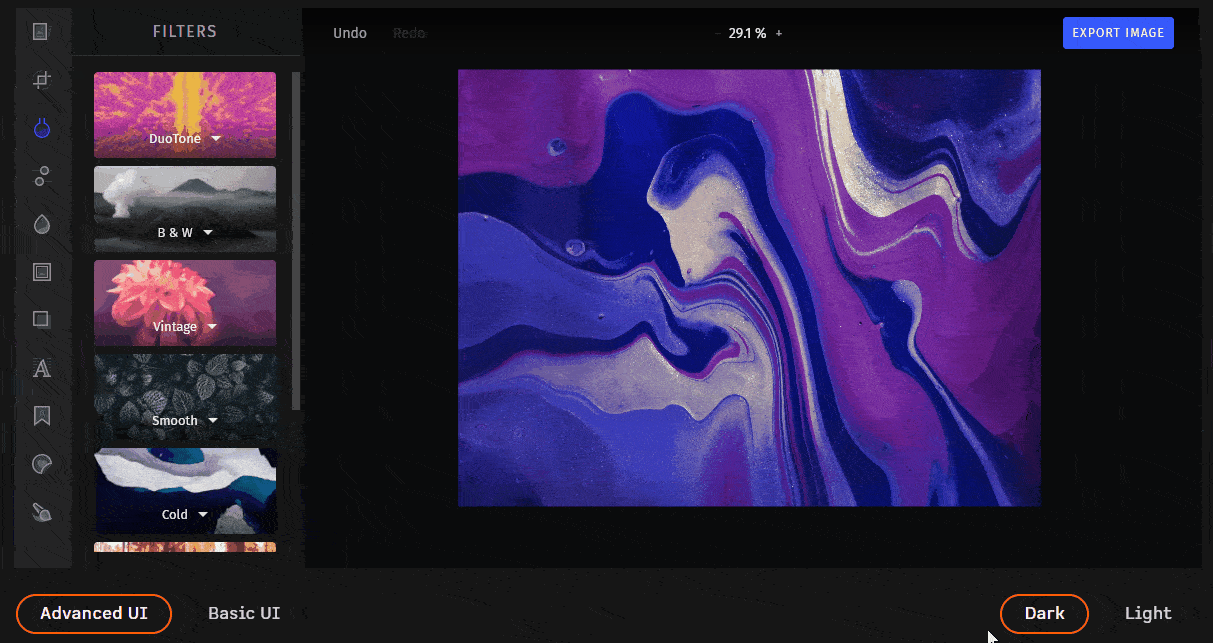
Filter an Image with photoeditorsdk
First, you should read this article from the official documentation on how to get started with PhotoEditorSDK in HTML and JavaScript. Then, by using Filters feature, you can start enjoying more than 60 high-quality filters. Moreover, each of them was optimized natively to be lightning fast. This way, you can minimize the processing time, and achieve the following result with a few clicks:
Conclusion
In this article, we looked at how to implement a feature to allows users to apply a filter on an image with JavaScript. Implementing such a feature can be entirely achieved by only using the HTML5 <canvas> element. However, making the image processing fast enough not to make users wait can become a problem. This is the real issue when dealing with such a feature, which inevitably involves iterating through each pixel of which an image is composed. Consequently, optimizing well-known filtering algorithms to avoid this issue is what makes implementing the feature challenging. So, if you do not want to deal with this issue, you can adopt an easy, complete, advanced, and all-in-one solution – such as PhotoEditorSDK.
Thanks for reading! We hope that you found this article helpful. Feel free to reach out to us on Twitter with any questions, comments, or suggestions.