
In this article, you will learn how to apply custom filters to an image in WebGL. You can achieve this goal without using any external library. That is because the HTML5 canvas element natively supports WebGL and does not require the use of plug-ins.
As we have already covered in previous articles, <canvas> is a powerful tool that equips you with everything required to manipulate images. This is true regardless of the use of WebGL. So, you can filter images also without using WebGL.
Now, let’s see how to filter images in Vanilla JavaScript with WebGL in your browser. Follow this step-by-step tutorial and learn how to build the following demo:
Getting Started with WebGL
If you are not familiar with WebGL, you need to learn a few things before approaching it. To build an application in WebGL, start with the following three concepts.
1. Textures
Keep in mind that to draw an image in WebGL you have to use a texture. To use a texture, WebGL requires you to define the texture coordinates. These coordinates go from 0.0 to 1.0, regardless of the texture size.
2. Vertex shader
The vertex shader is a function you have to write in GLSL that is in charge of computing the vertex positions. Thanks to it, WebGL can rasterize the draw primitives, which include points, lines, and triangles. When rasterizing these primitives, WebGL calls another user-defined function called fragment shader. In other words, WebGL interpolates the values provided in the vertex shader function while it draws each pixel using the fragment shader function execution.
3. Fragment shader
The fragment shader is a function you have to write in GLSL whose goal is to generate a color for each pixel of the draw primitive currently being drawn. This function has little info per pixel, but you can provide it with everything required by using the varyings variables. These allow you to pass values from the vertex shader function to the fragment shader function.
Filtering Images with Kernels in WebGL with <canvas>
There are many ways to filter images, but the most common one involves the convolution operation. This is because when used on images, convolution applies a filter by taking the weighted sum of a square of pixels and assigning the resulting value to the current pixel. This logic is applied to every pixel the image consists of. Therefore, you can now imagine why convolution is one of the most relevant concepts when it comes to image processing.
The coefficients used to perform the weighted sum come from a matrix called kernel. The kernel represents the filter you want to apply through the convolution operation. So, by changing the kernel, the resulting image will change accordingly. Some kernels are more useful than others and can be used for blurring, sharpening, performing edge detection, and other operations. You can find a list of the most popular kernels on Wikipedia.
Now, let’s see how to implement kernel image filtering in WebGL.
Clone the GitHub repository that supports this article with the following command:
git clone https://github.com/Tonel/how-to-filter-an-image-in-webgl-imglyAdditionally, try the demo application by launching how-to-filter-an-image-in-webgl-imgly/index.html in your browser.
Otherwise, you can find the JavaScript function taking care of implementing the filter logic in WebGL below:
function filterImage(canvas, originalImage, kernel) {
  // assuming the kernel is a square matrix
  const kernelSize = Math.sqrt(kernel.length);
  const gl = canvas.getContext('webgl');

  // clearing the canvas
  gl.clearColor(1, 1, 1, 1);
  gl.clear(gl.COLOR_BUFFER_BIT);

  const vertexShaderSource = `
  attribute vec2 position;
  varying vec2 v_coordinate;
  void main() {
    gl_Position = vec4(position, 0, 1);
    v_coordinate = gl_Position.xy * 0.5 + 0.5;
  }
`;

  const fragmentShaderSource = `
  precision mediump float;
  // the varible defined in the vertex shader above
  varying vec2 v_coordinate;
  uniform vec2 imageSize;
  uniform sampler2D u_texture;

  void main() {
    vec2 position = vec2(v_coordinate.x, 1.0 - v_coordinate.y);
    vec2 onePixel = vec2(1, 1) / imageSize;
    vec4 color = vec4(0);
    mat3 kernel = mat3(
      ${kernel.join(',')}
    );
    // implementing the convolution operation
    for(int i = 0; i < ${kernelSize}; i++) {
      for(int j = 0; j < ${kernelSize}; j++) {
        // retrieving the sample position pixel
        vec2 samplePosition = position + vec2(i - 1 , j - 1) * onePixel;
        // retrieving the sample color
        vec4 sampleColor = texture2D(u_texture, samplePosition);
        sampleColor *= kernel\[i\][j];
        color += sampleColor;
      }
    }
    color.a = 1.0;
    gl_FragColor = color;
 }
`;

  const vertexShader = compileShader(gl, gl.VERTEX_SHADER, vertexShaderSource);
  const fragmentShader = compileShader(
    gl,
    gl.FRAGMENT_SHADER,
    fragmentShaderSource
  );

  // iniziailing the program
  const program = createProgram(gl, vertexShader, fragmentShader);

  const positionAttributeLocation = gl.getAttribLocation(program, 'position');

  const imageSizeLocation = gl.getUniformLocation(program, 'imageSize');

  // binding the position buffer to positionBuffer
  const positionBuffer = gl.createBuffer();
  gl.bindBuffer(gl.ARRAY_BUFFER, positionBuffer);

  // using the program defined above
  gl.useProgram(program);
  // enabling the texcoord attribute
  gl.enableVertexAttribArray(positionAttributeLocation);
  // setting up the size of the image
  gl.uniform2f(imageSizeLocation, canvas.width, canvas.height);
  // telling positionAttributeLocation how to retrieve data out of positionBuffer
  gl.vertexAttribPointer(positionAttributeLocation, 2, gl.FLOAT, false, 0, 0);
  // provide the texture coordinates
  gl.bufferData(
    gl.ARRAY_BUFFER,
    new Float32Array([-1, -1, -1, 1, 1, -1, 1, 1, 1, -1, -1, 1]),
    gl.STATIC_DRAW
  );

  // loading the original image as a texture
  const texture = gl.createTexture();
  texture.image = new Image();

  // setting the anonymous mode
  // Learn more about it here:
  // https://developer.mozilla.org/en-US/docs/Web/API/HTMLImageElement/crossOrigin
  texture.image.crossOrigin = '';
  texture.image.src = originalImage.src;
  texture.image.onload = function () {
    gl.bindTexture(gl.TEXTURE_2D, texture);
    // setting the parameters to be able to render any image,
    // regardless of its size
    gl.texParameteri(gl.TEXTURE_2D, gl.TEXTURE_WRAP_S, gl.CLAMP_TO_EDGE);
    gl.texParameteri(gl.TEXTURE_2D, gl.TEXTURE_WRAP_T, gl.CLAMP_TO_EDGE);
    gl.texParameteri(gl.TEXTURE_2D, gl.TEXTURE_MAG_FILTER, gl.NEAREST);
    gl.texParameteri(gl.TEXTURE_2D, gl.TEXTURE_MIN_FILTER, gl.NEAREST);
    // loading the original image as a texture
    gl.texImage2D(
      gl.TEXTURE_2D,
      0,
      gl.RGBA,
      gl.RGBA,
      gl.UNSIGNED_BYTE,
      texture.image
    );
    gl.drawArrays(gl.TRIANGLES, 0, 6);
  };
}

function compileShader(gl, type, shaderSource) {
  const shader = gl.createShader(type);
  gl.shaderSource(shader, shaderSource);
  gl.compileShader(shader);

  const outcome = gl.getShaderParameter(shader, gl.COMPILE_STATUS);

  if (outcome === false) {
    // logging the error message on failure
    console.error(gl.getShaderInfoLog(shader));
    gl.deleteShader(shader);
  }

  return shader;
}

function createProgram(gl, vertexShader, fragmentShader) {
  const program = gl.createProgram();
  gl.attachShader(program, vertexShader);
  gl.attachShader(program, fragmentShader);
  gl.linkProgram(program);

  const outcome = gl.getProgramParameter(program, gl.LINK_STATUS);

  if (outcome === false) {
    // logging the error message on failure
    console.error(gl.getProgramInfoLog(program));
    gl.deleteProgram(program);
  }

  return program;
}
The filterImage() function is where the magic happens. It takes the following three parameters:
canvas: anElementobject representing an HTMLcanvaselementoriginalImage: anElementobject representing an HTMLimgelementkernel: an array containing the values of the kernel to use in the convolution operation
The first part of the function takes care of extracting the WebGLRenderingContext object representing a three-dimensional rendering context from the canvas element. Then, the vertex shader and fragment shader functions are defined as strings written in GLSL. Next, they are compiled and finally used to create a WebGL program.
The last part of the function creates a texture starting from the original image passed as a parameter and passes it to the WebGLRenderingContext to produce the final result. This represents the filtered image and is finally displayed by the browser in the canvas element.
The results produced by the filterImage() function depend on the kernel chosen, as you can verify by playing with the live demo you can find at the beginning of the article.
Et voilà! You just learned how to filter images in WebGL!
Final Considerations
As shown above, you can filter images with WebGL in Vanilla JavaScript with a hundred lines. At the same time, this cannot be considered an easy task to achieve. The reason is that getting into WebGL takes time and effort. Plus, you have to learn how to use GLSL to write the vertex shader and the fragment shader functions. So, things can get more complicated than expected.
Plus, you learned how to perform non-complex filters, but several filtering techniques are complex and do not involve the convolution operation. That also means that implementing them can be challenging and result in inefficient algorithms.
To avoid a headache, you should consider a complete and all-in-one solution like PhotoEditor SDK. Commercial solutions make things easier and shield you from all difficulties, offering features that would be complex, time-consuming, and challenging to implement. That is particularly true when it comes to using WebGL, which is PhotoEditor SDK’s main renderer.
You will be able to harness WebGL’s power without writing a single line of GLSL or knowing about its existence. WebGL will be used behind the scene for you! Keep also in mind that you would not be alone, since developers at IMG.LY are happy to provide support.
Filtering Images With PhotoEditor SDK
Read the article from the official documentation to learn how to get started with PhotoEditor SDK in HTML and Vanilla JavaScript. In detail, the Filters feature gives you more than 60 high-quality filters to play with. Achieve the following result with a few clicks:
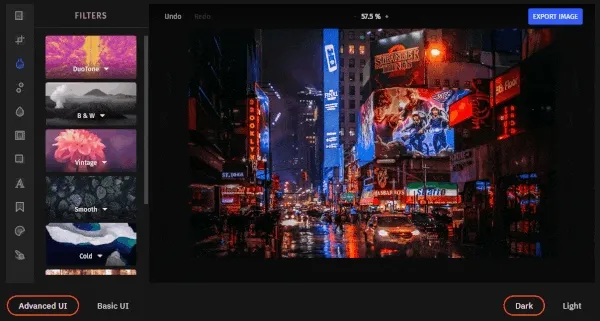
Check out this feature on the PhotoEditor SDK demo page.
Conclusion
In this article, we looked at how to filter an image in WebGL with the HTML canvas element. Implementing a feature allowing users to filter images through a kernel-based approach in WebGL involves only a dozen of lines of code. However, understanding how WebGL works and coding in GLSL cannot be considered easy tasks.
As a result, you might want to avoid dealing with WebGL entirely. In this case, consider a commercial and easy-to-adopt solution using WebGL behind the scene – such as PhotoEditor SDK.
Thanks for reading! We hope that you found this article helpful. Feel free to reach out to us on Twitter with any questions, comments, or suggestions.