Disclaimer: This article has been updated in June 2023 to reflect the changes introduced by Three.js r150
In this article, you will learn to add a sticker to a texture with WebGL. In detail, you will see how to use the Three.js JavaScript library to add an overlay image to a texture. Check out our guide to explore other image editing operations, such as resizing an image in React.
Dealing with 3D graphics used to be a challenging, complex, and time-consuming task. Thanks to libraries like three.js, it has become more accessible than ever. Follow this easy step-by-step how-to and achieve the following result:
Prerequisites
Here are all the prerequisites you need to meet to follow this tutorial and build the demo application shown above:
Explore the official documentation page to learn about how to install three.js.
What is Three.js?
As stated in the GitHub page of the project, the goal of the Three.js project is to create a lightweight 3D JavaScript library with a very low level of complexity. In other words, Three.js aims to make 3D graphics more accessible, especially considering that Three.js only requires a browser to run.
To be more specific, it allows you to create a 3D graphics project where you can modify elements in your browser and see visual feedback. The library is currently built on top of a WebGL renderer, but it also supports WebGPU, SVG, and CSS3D renderers.
If you are not familiar with these concepts, WebGL stands for “Web Graphics Library” and is a JavaScript API for rendering high-performance interactive 3D and 2D graphics. You can use it in many web browsers without external plugins or libraries.
As you can verify from the MDN compatibility page, browsers currently support the most popular WebGL features. However, keep in mind that the user’s device must meet hardware requirements for some features to work.
WebGL is undoubtedly a powerful tool but requires a lot of skill and involves a lot of boilerplate code. Here is where Three.js comes into play, making 3D development much easier.
Now, let’s see it in action!
Adding an Overlay Image to a Texture in WebGL
Clone the GitHub repository that supports this article with the following commands:
git clone https://github.com/Tonel/how-to-add-a-sticker-with-threejs-imglyAdditionally, try the demo application by launchingthe command below:
npm install
npm run start
Then, visit http://localhost:5000 in the browser.
Now that you know what the demo app looks like, keep following this tutorial and learn how to build it.
Specifically, this is the entire JavaScript code required to achieve the goal:
import * as THREE from 'three';
import { OrbitControls } from 'three/addons/controls/OrbitControls.js';

// set up the scene, camera, and renderer
const scene = new THREE.Scene();
const camera = new THREE.PerspectiveCamera(
  40,
  window.innerWidth / window.innerHeight,
  1,
  1000
);
camera.position.set(150, 100, 150);
new OrbitControls(camera, document.body);

// initialize the WebGL renderer
const renderer = new THREE.WebGLRenderer();
renderer.setSize(window.innerWidth, window.innerHeight);
document.body.appendChild(renderer.domElement);

// add light to the scene to make the texture visible
const light = new THREE.AmbientLight(0xffffff);
scene.add(light);

// add the axes helper indicator to the scene
scene.add(new THREE.AxesHelper(20));

// load the base texture
const texture = new THREE.TextureLoader().load(
  'https://threejs.org/examples/textures/hardwood2_diffuse.jpg'
);

// create a new buffer geometry and place it
// to the horizontal plane
const textureGeometry = new THREE.PlaneGeometry(50, 50);
textureGeometry.rotateX(-90 * THREE.MathUtils.DEG2RAD);
// translate the plane to the center of the scene
textureGeometry.translate(25, 0, 25);

// create a MeshBasicMaterial with the base texture
const textureMaterial = new THREE.MeshBasicMaterial({ map: texture });

// create a mesh using the geometry and material
// and add it to the scene
const textureMesh = new THREE.Mesh(textureGeometry, textureMaterial);
scene.add(textureMesh);

// repeat the same logic to place the sticker image
// over the texture
const sticker = new THREE.TextureLoader().load(
  'https://i.imgur.com/IYh17Rv.png'
);

const stickerGeometry = new THREE.PlaneGeometry(20, 20);
stickerGeometry.rotateX(-90 * THREE.MathUtils.DEG2RAD);
stickerGeometry.translate(25, 0, 25);
const stickerMaterial = new THREE.MeshBasicMaterial({
  map: sticker,
  transparent: true,
});
// create a mesh using the image geometry and material
const imageMesh = new THREE.Mesh(stickerGeometry, stickerMaterial);
scene.add(imageMesh);

// adjust the position and rotation of the sticker mesh
// by setting the y-coordinate to 1
// in order for the sticker to rest on the texture
imageMesh.position.set(0, 1, 0);

// render the scene
function launchThreeJs() {
  requestAnimationFrame(launchThreeJs);
  renderer.render(scene, camera);
}

launchThreeJs();
First, the code imports the necessary components from the Three.js library. Next, it initialize a Scene and set up a PerspectiveCamera with OrbitsControl, allowing the user to move around. Then, it creates a WebGL renderer and sets its size to match the window’s dimensions. The scene is lit by an AmbientLight instance, which illuminates all objects in the scene equally.
The snippet loads a base texture using TextureLoader from the given URL, creates a PlaneGeometry, defines a mesh with some geometries, and then add the resulting element to the scene. This logic will take care of rendering the texture image in the scene.
To add the sticker to the texture, the same procude gets repeated. This time, Three.js is instructed to load a sticker image and position it over the original texture. Note that the position of the sticker mesh is adjusted by setting its y-coordinate to 1 to ensure the new image rests on top of the old one.
Et voilà! You just learned how to add a sticker to a WebGL texture with three.js!
Adding a Sticker With PHOTOEDITORSDK
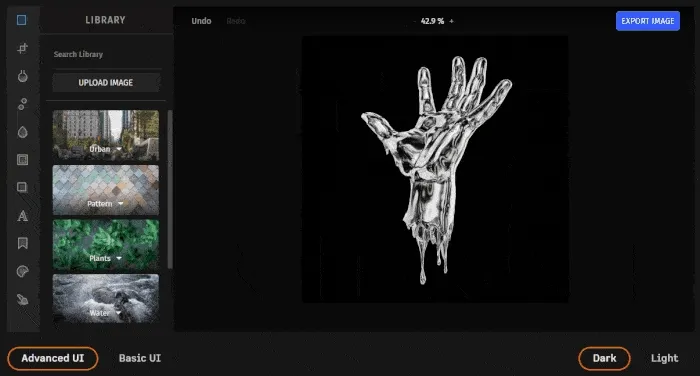
PhotoEditorSDK uses WebGL as the main renderer. You can effortlessly add a sticker to your textures without writing any line of code. WebGL will be used behind the scene. Consequently, you do not need to know WebGL or code in GLSL to harness its power.
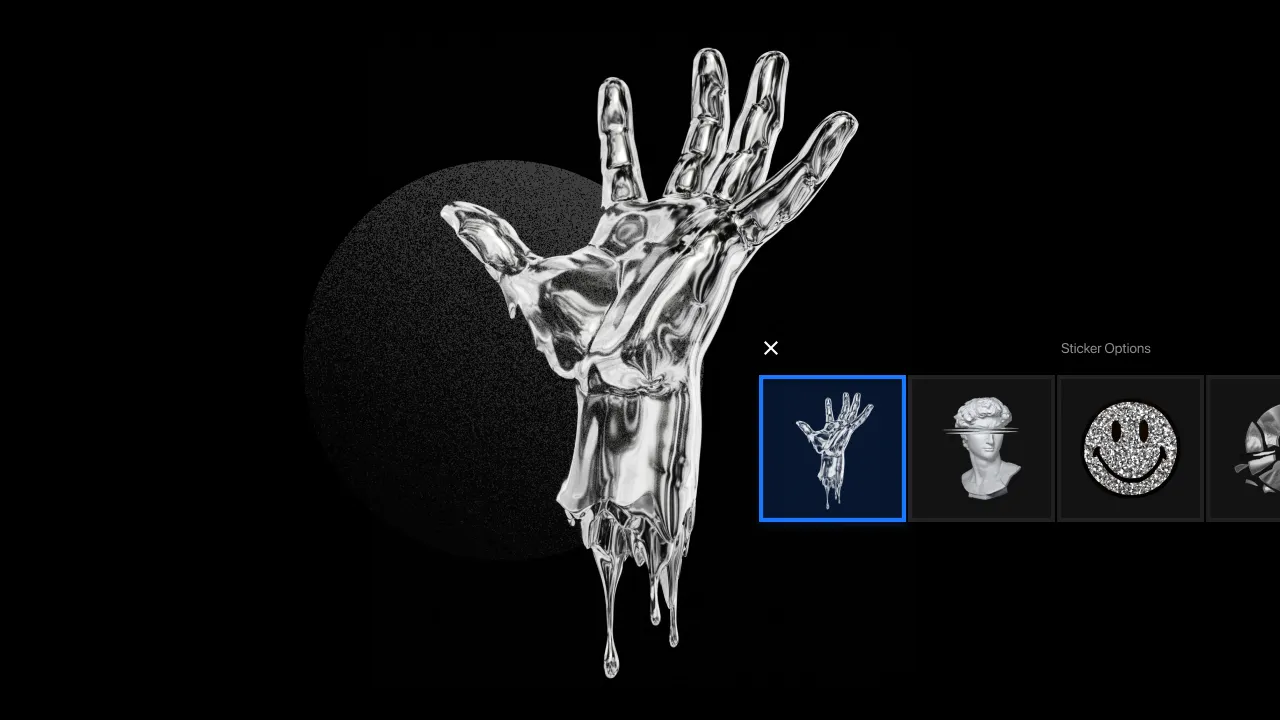
Adding a sticker to an image only takes a few seconds here. Just jump to this article from the official documentation and learn how to get started with PhotoEditorSDK in Vanilla JavaScript. Then, upload your texture image and a sticker with the Sticker feature. As shown below, you can position a sticker on top of the original image with a point-and-click UI:
Check out this feature on the PhotoEditorSDK demo page.
Conclusion
Today we learned how to add an overlay image to a WebGL texture in JavaScript with three.js. This tool makes it easier to deal with WebGL and 3D graphics. In particular, by using one of the many plugins supporting the Three.js project, we were able to add a sticker to a texture with just a bunch of lines of code.
3D graphics remains a complex topic, especially when it comes to developing in the OpenGL Shading Language. Three.js tries to hide this encumbrance as much as possible, but sometimes you still require it. If you want to avoid using WebGL directly to achieve your goal, consider an all-in-one and easy-to-use solution – such as PhotoEditorSDK.
Thanks for reading! We hope that you found this article helpful. Feel free to reach out to us on Twitter with any questions, comments, or suggestions.
To stay in the loop with our latest articles and case studies, subscribe to our Newsletter.