In this article, you will see how to use Swift to create an animated GIF file. You will also see how to extract individual frames from a video file to convert the whole video or just clips from a video into an animated GIF. The code in this article uses Swift 5 and Xcode 13. The tutorial uses AVFoundation and CoreGraphics. Clone this repository for a sample project and example code.
Animated GIF Basics
The GIF is one of the older file types on the Internet. But, every platform supports it (not every platform supports every video format). Unlike some other image formats, GIF files can contain one image or a series of images. When a GIF file has a series of images and some metadata to describe how long to show each one, it can substitute for animation and video. Because of this, a platform that doesn’t necessarily support video files can display moving images and animations.
GIF files are easy to make. However, animated GIF files are not perfect: they are large and inefficient compared to modern video files. They have a limited color palette, and none of the images in the file have compression. For example, the video file we use in the sample project is about 5MB in mp4 format but over 100MB after it becomes an animated GIF. Finally, GIF files don’t have a soundtrack. Still, they are popular and do certain tasks well, so let’s make some using AVFoundation and Swift.
The Basic Strategy
In order to create animated GIF files you need a series of images and some metadata to describe how long each image will show. This tutorial will start with how to put these images into a GIF. Then you will see some different strategies for gathering the images. A GIF file contains bitmap images, not vector graphics. When working with bitmap images, a powerful framework to explore is CoreGraphics.
Creating an Empty File
The first step is to create an empty file on the disk that will become our animated GIF.
//create empty file to hold gif
let destinationFilename = String(NSUUID().uuidString + ".gif")
let destinationURL = URL(fileURLWithPath: NSTemporaryDirectory()).appendingPathComponent(destinationFilename)
//metadata for gif file to describe it as an animated gif
let fileDictionary = [kCGImagePropertyGIFDictionary : [
  kCGImagePropertyGIFLoopCount : 0]]
//create the file and set the file properties
guard let animatedGifFile = CGImageDestinationCreateWithURL(destinationURL as CFURL, UTType.gif.identifier as CFString, totalFrames, nil) else {
  print("error creating gif file")
  return
}
CGImageDestinationSetProperties(animatedGifFile, fileDictionary as CFDictionary)
The code above creates a URL to hold the animated GIF in the user’s Temporary directory. The location is not crucial – it just needs to be where you have write permission. Next it creates a Dictionary that will describe the file as an animated GIF file that will loop forever. The Apple Documentation for GIF Image Properties contains the full list of options for the dictionary. Next, you create the empty file using CGImageDestinatonCreateWithURL. After creating the file, set the properties dictionary. Now there is an empty file ready to accept the frames that will make up the animated GIF.
When creating the file with CGImageDestinationCreateWithURL, you give parameters for the URL to the file location, the UTType identifier to show it will be a .gif file, and the totalFrames that it should expect. totalFrames is just a variable that holds how many actual frames the file will eventually hold. You will need to work out the actual number of frames for your file manually. For example, if you want to display 20 images each second and your GIF will be four seconds long, the total number of frames will be 20 * 4 or 80. The last parameter is always nil. The documentation indicates it “is reserved for future use” (but this function has been available to the Mac since 2005 and iOS since 2010, so we will see). The documentation also indicates you are responsible for releasing the memory allocated by the creation command, but Swift will handle that for you.
As you work with CoreGraphics classes and types, you will notice that they have a slightly different format than other frameworks. That is a hint that CoreGraphics is one of the older frameworks and that it is all C based. Swift has bridging code so that the system will worry about translating your Dictionary to a CFDictionary and your String to a CFString and so on.
Adding Images
To add images to the empty file, you will need an image for each frame of the animation, and you will need a small Dictionary to tell the system how long to display the image during the animation. As mentioned above, there are other options you can apply, such as color mapping or frame dimensions.
A Dictionary to display each frame for 1/20 second could look like this:
    let frameDictionary = [kCGImagePropertyGIFDictionary : [
      kCGImagePropertyGIFDelayTime: 1.0 / 20.0]]
Notice that the values above are Double and are not Int. Using 0.05 would have also been fine as it is equal to 1.0/20.0.
Compressed video files and movies are usually 30, 60, or even 120 frames per second. Recall that animated GIF images do not have compression, so you want to have as low of a frame rate (or as small of an image frame) as you can. Experiment with different frame rates depending on the speed of the action in an animation. Often times 20 or even 10 frames per second will produce high enough quality.
Now, loop through your images and append each image to the .gif file on disk using code like this:
CGImageDestinationAddImage(animatedGifFile, frameImage, frameDictionary as CFDictionary)The animatedGifFile is the URL to the empty file on the disk that you created above. The frameDictionary is the metadata to add to each frame and the frameImage is the actual image for the frame. Your image for the frame needs to be a CGImage. Depending on the source of images you may have UIImage or CIImage or something else. Most image formats in Swift have a conversion method. For example:
let cgImage = UIImage().cgImage
let anotherCGImage = CIImage().cgImage
There are also CGImage initializers to read .jpeg and .png data.
Finalizing the File
Once you finish writing every frame image to the GIF file, close the file and instruct the system to clean up using:
CGImageDestinationFinalize(animatedGifFile)This function will return true if it is successful. You must call this function after appending the frames or the resulting GIF will be unusable. Also, after you call this function, you cannot add more frames.
At this point the animatedGifFile URL points to an animated GIF file you can use as needed.
Collecting Frame Images
To create the animated GIF, it is necessary to have an image in CGImage for each frame. It will be easier if they are all rotated the same way and have the same dimensions. Where those images come from is not crucial. They might be a series of files on disk. It could be that your user snaps a series of photos that your app converts to a GIF in real-time. Your app could even intersperse photographs and bitmap drawings. Something to consider regardless of the source of the frame images is how much memory they consume. Loading the entire set of images into an array before making the animated GIF could cause your app to ask the system for gigabytes of memory.
Extracting Images from Video
A common use of animated GIF files is to display videos. So, let’s look at how to extract frames from a video. In some of the other tutorials, you have seen how we can use CoreImage and AVFoundation to manipulate each frame of a video. In those cases, you can’t easily change the frames per second. A 60 frames-per-second animated GIF would quickly become an unusably large file.
AVFoundation provides the AVAssetImageGenerator class specifically to extract frames from AVAssets at specific times. To extract a single image from an AVAsset you can use:
copyCGImage(at requestedTime: CMTime, actualTime: UnsafeMutablePointer<CMTime>?)This will create a CGImage at or near the requestedTime in the video. Sometimes, the requested time is between two frames, so the function will extract the closest frame it can and return the actualTime of that frame. Your code can then decide if it’s an acceptable substitution and what to do about it. Usually, though, you don’t care and can pass nil for the actualTime parameter. Notice that the actualTime is a pointer to a CMTime variable. This means it is an “inout” parameter. Using “inout” parameters was a common practice when CoreGraphics and AVFoundation were originally written. To use an “inout” parameter, you declare the variable before calling the function and then check its value after. Additionally, when you pass the variable into the function, place an ampersand before the variable name.
For extracting a series of images, copyCGImage is not efficient. It runs on the calling thread and may block your application. Apple provides a different function when you want to extract many frames from a video asset.
generateCGImagesAsynchronously(forTimes requestedTimes: [NSValue], completionHandler handler: @escaping AVAssetImageGeneratorCompletionHandler)This function takes an array of requestedTimes and attempts to extract the image at each of those timestamps. It will pass the extracted image to the completionHandler. The handler will execute its code one time for every extraction attempt and will not block the calling thread.
Before calling the function to extract images, you need to prepare the inputs. First, you create an AVAssetImageGenerator and configure it.
let movie = AVAsset(url: Bundle.main.url(forResource: "swish", withExtension: "mp4")!)
let frameGenerator = AVAssetImageGenerator(asset: movie)
frameGenerator.requestedTimeToleranceBefore = CMTime(seconds: 0, preferredTimescale: 600)
frameGenerator.requestedTimeToleranceAfter = CMTime(seconds: 0, preferredTimescale: 600)
This code loads a movie file from the app bundle into an AVAsset and then creates a generator for that asset. The .requestedTimeToleranceBefore and .requestedTimeToleranceAfter parameters say you want the exact frame for any requested time. This will make the extraction of frames slower. If you are trying to tune performance, consider modifying these parameters.
Now you will need to calculate the timestamp of each frame of the animated GIF. Determine the start time and the duration of the clip you want to create. Then decide what frame rate (frames per second) to use. You can see in the image below that the entire video consists of about 480 frames at 60 frames per second.
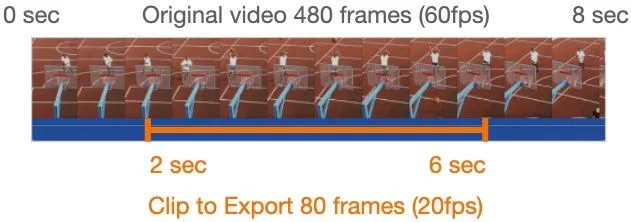
An animated GIF of just the player making the basketball shot would start at 2 seconds and end at 6 seconds of the original video. In the original video, that segment is 240 frames. An animated GIF of the same length at 20 frames per second only needs about 80 frames. The first frame is the one showing at the 2-second timestamp. The next frame should be the one shown at 2 + 1/20 or 2.05 seconds. The next frame would be the one for 2.10 seconds.
The generator requires the array of timestamps as CMTime values. You can create the array using code like this:
var startTime: Double = 2.0 //seconds
var endTime: Double =  6.0 //seconds
var frameRate = 20 //how many frames per second
let totalFrames = Int((endTime - startTime) * Double(frameRate))
var timeStamps = [NSValue]()
for currentFrame in 0..<totalFrames {
  let frameTime = Double(currentFrame) / Double(frameRate)
  let timeStamp = CMTime(seconds: startTime + Double(frameTime), preferredTimescale: 600)
  timeStamps.append(NSValue(time: timeStamp))
}
This code calculates a value for totalFrames which must be an Int so that you can use it to loop. But, startTime and endTime need to be Double since the timestamps will be sub-second times. The frameTime of the first frame is equal to zero in the animated GIF but 2.0 seconds in the original video. Convert that to the video timeStamp by adding the startTime. When creating the CMTime using “600” as the preferredTimescale is common because most frame rates are divisible into 600 evenly so the math for the timestamp will be more accurate. Finally, wrap the timeStamp in an NSValue object and add it to the array. The AVAssetImageGenerator uses timestamps wrapped in NSValue objects. NSValue is just a generic type that holds values.
With the generator configured and the array of timestamps created, you can extract the images using code like this:
frameGenerator.generateCGImagesAsynchronously(forTimes: timeStamps) { requestedTime, frameImage, actualTime, result, error in
  guard let frameImage = frameImage else {
    print("no image")
    return
  }
  if error != nil {
    print("an error")
    return
  }
  //do someting interesting with frameImage
}
The frameImage in the completion handler will be a CGImage type if the extraction was successful. As with the function to extract a single image, if the system had to choose a different time than requested, you will be informed of the actual time. You can read about the other parameters in the documentation for AVAssetImageGeneratorCompletionHandler.
Now, you can add the frame to an open CGImageDestination, you could write it to a disk to use later, and you could save it to an array. If you don’t write it to an animated GIF file right away, you will need to devise a way to keep the frames in sequence. You may notice that there is not an explicit way for the function to signal that it is finished. Because the completion handler is called for every extraction attempt, a common strategy is to make a simple counter and increment the counter in the completion handler. When the counter variable is equal to the number of frames requested, then you are finished. Another way is to match the requestedTime to the last timeStamp.
Wrapping Up
In this article, you saw how to create an animated GIF from a series of images. You also saw how to extract still images from a video at pre-determined timestamps. Clone this repository for a simple project that contains the sample code and a video file you can experiment with.
Thanks for reading! Let us know what you think on Twitter, or stay in the loop with our Newsletter.