Web-to-print sells self-service: your customer designs a postcard, a flyer, a t-shirt, a packaging label in the browser and orders it without a designer in the loop. For years, though, the self-service stopped at the hard part. Someone still had to supply a usable image. Someone still had to know what 300 DPI meant. When they didn’t, the file landed on a prepress desk to be fixed by hand.
One operator we spoke to put it bluntly: his designers spend roughly 40% of their time fixing customer artwork rather than creating templates. Tom Rowe of The Print Bar described what that looks like at the design step: “Our brand didn’t match our experience. You could see it in our bounce rates.”
Generative AI changes the economics of that hard part. It can turn a prompt into a usable asset, lift a 72-DPI logo to something printable, and strip a background in the browser before a human ever sees the file, removing the specific friction that kept self-service from being self-service in the first place.
It can also go wrong: aimed carelessly, the same models produce beautiful screen images that fall apart on press. This post is about the difference between the two: the use cases worth building, and the print-specific realities you have to design around.
The shift: from “upload a print-ready file” to “describe what you want”
The old web-to-print contract asked the customer to arrive with a finished, technically correct asset. That filter excluded most of the market: the CRM manager, the franchise owner, the small-business buyer who “knows Canva because they make their wedding invitations on it” but has never opened InDesign and never will.
Generative AI moves the burden of production off the customer. Instead of “upload a 300 DPI CMYK image with 3mm bleed,” the ask becomes “type what you want on the card.” The editor, not the customer and not your prepress team, becomes responsible for turning intent into a production-safe file.
That principle runs through everything below: AI is most valuable in web-to-print where it removes a step the customer was never qualified to do. The closer a use case sits to it, the more it returns.
The use cases worth building
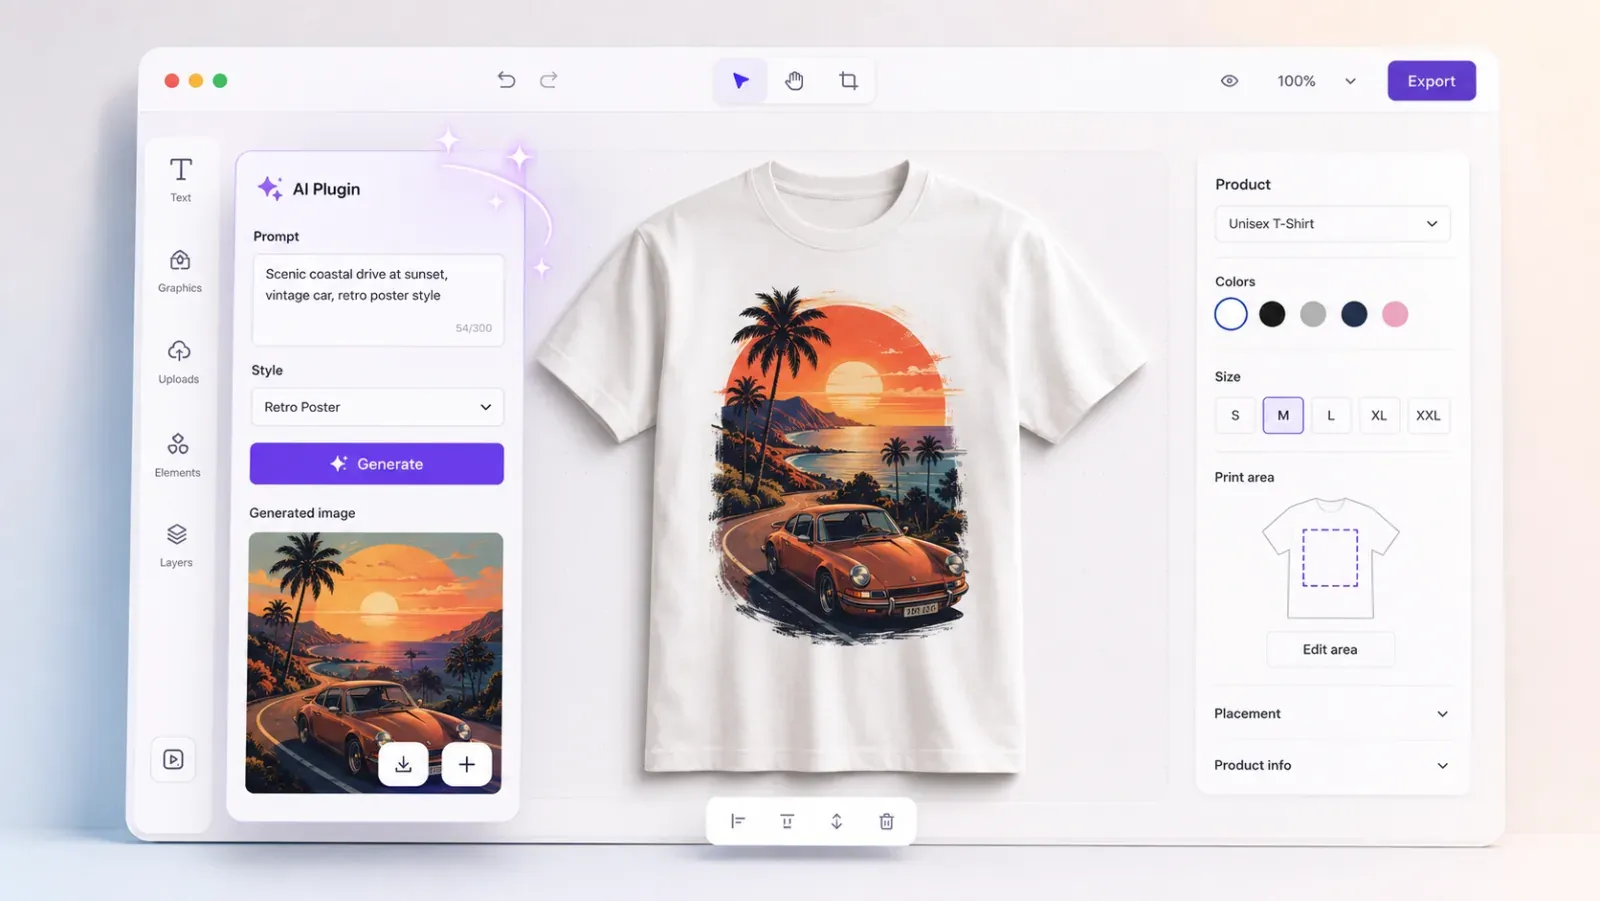
1. Generate on-brand imagery from a prompt (text-to-image)
This is the most obvious win. A customer needs a hero image, a background, a seasonal motif, or a product scene, and doesn’t have one. Text-to-image generation lets them describe it and get options in seconds, without a stock-photo license hunt or a design request ticket.
In a print context the point is unblocking the order, not novelty for its own sake. The customer who would have abandoned at “I don’t have a good image” now keeps going. Models like Recraft V3, Seedream V4, Ideogram V3, and the Nano Banana family each have different strengths here (covered in depth in the companion guide, The Best GenAI Models for Web-to-Print), but the integration pattern is the same: generation feeds a placeholder inside a locked template, so the output lands inside your bleed, safe-area, and brand constraints automatically.
Watch out: generated images are usually delivered at screen resolution, often around 1024px. That’s fine for a business card photo, marginal for an A4 flyer, and unusable for large-format. Pair generation with upscaling (below) and size validation before you let it reach export.
2. Adapt and extend customer-supplied images (image-to-image, generative fill/expand)
Customers rarely arrive with an asset that fits your canvas. It’s the wrong aspect ratio, it has the wrong background, or it’s a portrait crop where you need a landscape banner. Image-to-image editing and generative expand (outpainting) solve the most common case: extending an image to fill bleed or a different SKU’s dimensions instead of stretching or letterboxing it.
This is quietly one of the highest-value print use cases, because aspect-ratio and bleed mismatches are a top source of prepress rework. Generative fill also handles object removal (“take the coffee cup off the desk”), background swaps, and clean-up: the edits a non-designer can’t do in any tool they own.
Watch out: outpainting invents pixels. On a brand asset or a product photo, “invented” can mean “wrong.” Keep generative expand to backgrounds and ambient areas. Never let it reconstruct a logo, a face, or a product the customer is actually selling.
3. Background removal and cutouts for mockups and merch
Background removal is the workhorse. For merch and print-on-demand it’s the difference between a customer’s snapshot and a clean subject that drops onto a t-shirt, mug, or sticker. IMG.LY runs this in the browser (via the open-source @imgly/background-removal package), which matters for two reasons: it’s instant enough for an interactive editor, and the customer’s image never has to leave the device.
Paired with the cutout plugin, background removal also feeds the literal cut lines for die-cut stickers, labels, and packaging, turning a removed background into a production path.
Watch out: browser-based removal is excellent on clear subjects and struggles on hair, glass, and fine fringes. For a print product that will be inspected up close, expose a manual refine step rather than trusting the mask blindly.
4. Vectorize raster art into print-scalable graphics
This is the use case print people care about most and screen-first builders forget. A customer uploads a logo as a small, jagged PNG. Printed at size, it’s mush. Vectorization (AI raster-to-SVG) traces it into clean, resolution-independent paths that scale to any output size and reproduce crisply on press.
Vectorize is also how you get logos and simple graphics into a state your PDF/X pipeline can preserve as vector, instead of rasterizing everything and throwing away the scalability you vectorized for. Recraft V3 is notable here because it can generate natively vector output rather than only tracing after the fact.
Watch out: vectorization is great for logos, icons, and flat art. It’s the wrong tool for a photograph. Detect the asset type and route photos to upscaling, not tracing.
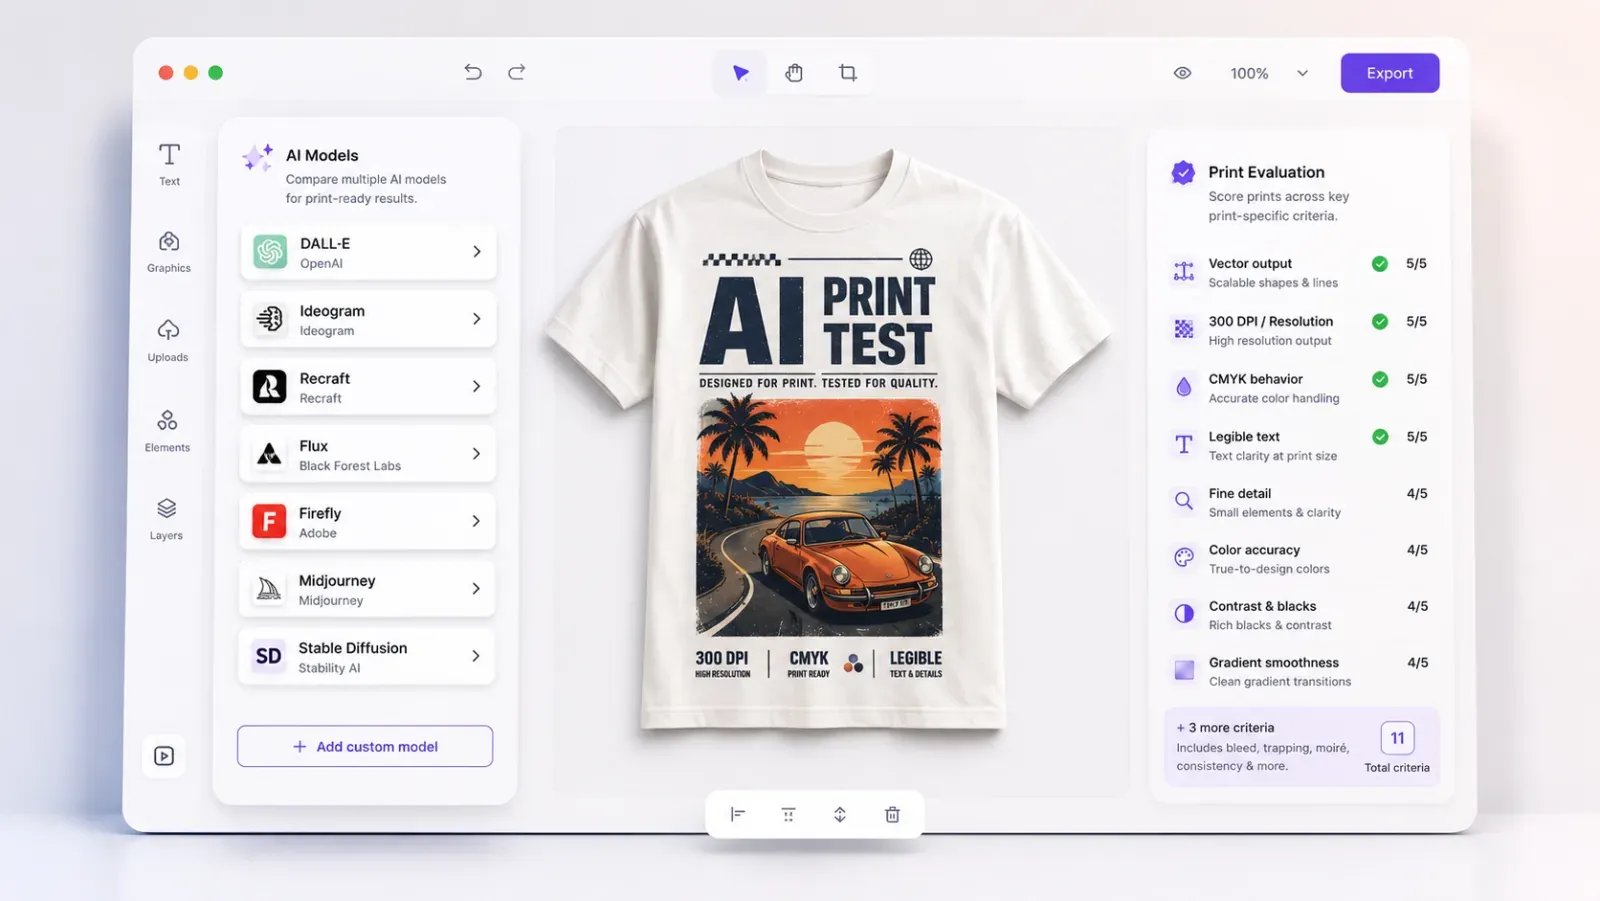
5. Resolution and image quality: upscaling, correction, and DPI repair
The single most common web-to-print failure is a low-resolution image: the 72-DPI photo that looks fine on screen and prints as a blurry mess. Two different AI operations fix it, and it pays to keep them straight, because they solve different problems.
Upscaling (super-resolution) raises the actual pixel count, reconstructing detail to lift a small image toward a printable size. It’s a generative step you route to a dedicated model, the same way you route a text-to-image prompt; the strong upscalers can take a 1024px generation to 4K. Reach for it when the source is simply too small for its placed size.
Image correction is the other half, and it ships in CE.SDK today as the Perfectly Clear plugin. It auto-corrects exposure, contrast, color, tint, sharpness, and noise in a single pass. It won’t add pixels, but it gets the most printable result out of the pixels you have, which is what a dim, soft phone photo usually needs more than raw resolution.
Tie both to your DPI validation. When the editor detects an image below your minimum threshold for its placed size, offer to correct or upscale it instead of just blocking export. You convert a dead end into a one-click fix, the kind of “they don’t need to know what DPI is” experience operators are chasing.
Watch out: upscaling fabricates detail. It rescues marginal images; it can’t conjure a sharp 4-megapixel product shot from a thumbnail, and correction can’t add resolution at all. Set honest thresholds, and still warn when the source is hopeless.
6. Copy and variable text generation (text + VDP at scale)
Generative text earns its place in two spots. First, as a writing aid inside the editor: headline options, a tagline, a “make it shorter / more formal / fit this space” rewrite for the non-writer staring at an empty text box. Second, and more powerfully for print, in Variable Data Printing: generating or localizing per-recipient copy across thousands of personalized postcards, mailers, or labels from a single template.
VDP is the highest-leverage place to use generative text: generate the variants, merge them into print-ready files in headless mode, and run the batch.
Watch out: generated copy needs guardrails. Length limits so it doesn’t overflow the text frame, tone and brand constraints, and a human-review gate for anything legally sensitive: pricing, claims, regulated industries.
7. Template adaptation and auto-resize across SKUs
A print catalog is the same design across many sizes and substrates: the same campaign as a postcard, a flyer, a poster, a social tile. AI-assisted resize and re-layout adapt one master design to every SKU’s dimensions, reflowing content intelligently instead of scaling it blindly. Combined with locked templates, you expand SKUs without re-authoring each one.
Watch out: reflow decisions still need brand rules. Lock what must stay fixed (logo size, safe area, mandatory legal text) so the AI rearranges within your constraints, not over them.
8. Guided prepress correction
Instead of rejecting a bad file after the fact, use AI to catch and fix problems inside the editor: flag the low-res image and offer to upscale it, detect text outside the safe area and nudge it in, notice a near-white “white” that won’t print and correct it. The same problems your prepress team used to fix by hand get caught here, before the order is placed.
Watch out: auto-correction must be transparent and reversible. Show the customer what changed and let them undo it. Silent “helpful” edits to someone’s artwork erode trust fast.
9. Localization and market variants
For franchise networks and multi-market brands, AI translation plus regeneration of localized imagery and copy turns one approved master into 12 market versions, each print-ready and on-brand, without a translation agency or 12 design tickets. A 200-location franchise can ship 200 localized flyers with the same brand guideline enforced by the editor on every one.
Watch out: machine translation in regulated or legal copy needs human sign-off, and text expansion (German runs roughly 30% longer than English) will break tight layouts unless your template frames can flex.
10. Realistic product previews
Generative and 3D-assisted mockups show the design on the actual product: the shirt, the mug, the folded brochure, the box, not an abstract artboard. Operators consistently tie this to higher conversion and fewer “will this look right?” support tickets, because the preview matches what arrives on the doorstep.
Watch out: a preview that’s prettier than the print sets up a disappointed customer and a reprint. Calibrate mockups to real output, including substrate color and finish.
The print-specific realities
Most generative models are built for screens. Print adds requirements the web doesn’t have, and the ones below are where projects most often break.
Resolution and DPI
Generated images typically arrive at around 1024px. At 300 DPI that’s about a 3.4-inch image: fine for a business card, not for a poster. Always validate output resolution against placed size, and route undersized assets through upscaling before export. Treat raw generation resolution as a starting point, not a deliverable.
Color: sRGB in, CMYK out
Models generate in RGB. Print is CMYK, plus spot colors. The vivid blues, greens, and oranges that look great on screen sit outside the CMYK gamut and will shift on press. Your pipeline, not the model, owns this: convert with the right ICC profile, validate against the print provider’s color requirements, and preserve named spot colors through to the PDF/X. Show the customer a soft-proof so the shift isn’t a surprise on delivery.
Vector vs. raster (and the “everything got rastered” trap)
Most models output raster. For logos, type, and line art that need to scale and print crisply, raster is the wrong format, and a PDF that rasterizes all text and vectors is, in one operator’s words, “death for the printer.” Use vector-native generation (e.g. Recraft) and vectorization for the elements that need it, and make sure your export keeps vector and text as vector with CMYK values preserved (PDF/X-3), not flattened to pixels.
Text rendering inside images
Generative models are notoriously unreliable at rendering legible text inside an image: garbled words, invented letters, wrong kerning. For anything that must be readable in print, don’t bake text into a generated image. Generate the imagery, then set real, editable, vectorizable type as a separate layer in the editor. If you must generate text-in-image, Ideogram and Recraft are the stronger choices; see the companion guide.
Brand safety and guardrails
Let customers generate anything and you lose brand control. Box generation inside locked templates instead: it fills a defined placeholder, within fixed margins, alongside a logo and palette the customer can’t move. A franchisee can change the headline and the photo; the logo size, position, and safe area stay locked. AI expands what the customer can create without expanding what they can break.
Commercial and licensing rights
A web-to-print product is sold. That makes the IP status of generated assets a question you have to answer before you ship. Does your model provider grant commercial-use rights to outputs? Are there indemnities? Does training-data provenance create exposure for a customer reselling the printed product? Pick models and providers whose commercial terms you’ve actually read, and surface usage terms where they matter.
Cost and latency (the unit economics)
Every generation costs money and time. In an interactive editor, a 30-second generation is a broken experience. In a high-volume VDP run, a few cents per asset multiplied by 100,000 recipients is a real line item. Match the model to the job: a fast, cheap model for interactive iteration, a higher-quality (slower, pricier) model for the final render. Cache aggressively. The companion guide scores models on that trade-off.
Data privacy and sovereignty
Customer-uploaded images can be sensitive: faces, IDs, confidential product designs. Browser-based processing (background removal, some editing) keeps data on-device. API-based generation sends it to a third party, which has GDPR and data-residency implications, especially for European customers and government buyers who “prioritize a European vendor for data sovereignty.” Be explicit about what runs locally vs. in the cloud, and choose providers accordingly.
Hallucination and consistency
Generative output is non-deterministic. The same prompt yields different results, and details drift. For brand assets, product likenesses, and anything a customer will compare against reality, constrain hard (reference images, seeds, image-to-image rather than free generation) and keep a human gate on the outputs that matter.
How IMG.LY approaches it
All of these constraints point the same way: AI is a step inside a print pipeline, not a feature bolted onto an editor. A few principles shape how CE.SDK handles it:
- Model-agnostic by design. The AI plugins connect to any third-party model or API: bring your own model. You’re not locked to one provider’s quality, price, or licensing terms. You route each task to the model that wins it, and swap models as better ones ship every few weeks.
- The AI Gateway provides managed access to models for editors, so you’re not stitching together a dozen API integrations and key-management schemes yourself.
- Generation lands inside the print pipeline. Outputs flow into locked templates with bleed, safe areas, DPI thresholds, and brand constraints already enforced, then through a CMYK / spot-color / PDF/X-3 export that keeps vectors and text as vectors. The model never gets to bypass print correctness.
- Drop-in generative features. Background removal, generative fill, image-to-image, vectorize, and text-to-image are available as plugins, so you adopt the use cases above incrementally rather than rebuilding your editor.
- Headless mode runs the same generation and export server-side for batch and variable-data runs.
The result is the experience operators actually want to sell: the customer describes what they want, the AI does the part they were never qualified to do, and the file that reaches the press is print-correct because the pipeline enforced it, not because the customer got lucky. For the product-level view of this stack, see AI for Print on Demand.
What customers are doing with it
High-volume print and direct-mail platforms are already building on this foundation. IMG.LY powers print and personalization workflows for operators including Postbuddy (personalized direct mail), Swiss Post, Digitas, and HP, alongside hundreds of smaller print, merch, and franchise platforms.
The pattern that recurs in those conversations is narrow and specific: AI removed a bottleneck. The prepress team that fixed 40% of incoming files now lets the editor catch problems upstream. The customers who bounced at “I don’t have a good image” finish the order. The franchise network that needed a designer for every local variant generates them inside guardrails. It comes back to the point from the top: AI pays off where it deletes a step the customer couldn’t do and the operator didn’t want to.
Where to start
You don’t need all ten use cases on day one. The highest-ROI starting points, in order:
- Background removal: instant, in-browser, immediately useful for any merch or photo product.
- Image correction and DPI validation: catches and cleans up weak uploads before they ever reach the printer.
- Generative expand / fill: kills aspect-ratio and bleed rework.
- Text-to-image into locked placeholders: unblocks the “I don’t have an image” abandoner.
- Vectorize: rescues logos and protects your PDF/X output.
Each one removes a documented source of friction or rework. Add them inside locked templates and a real CMYK/PDF/X pipeline, and self-service web-to-print finally works the way it was always sold: the customer really can do it themselves.
Next: which models to actually use. See the companion guide, The Best GenAI Models for Web-to-Print: A Buyer’s Guide, for a criteria-based comparison across output quality, vector/SVG support, text rendering, color, responsiveness, and cost.