Create custom sidebar panels that integrate with CE.SDK’s user interface using the builder system and built-in components.
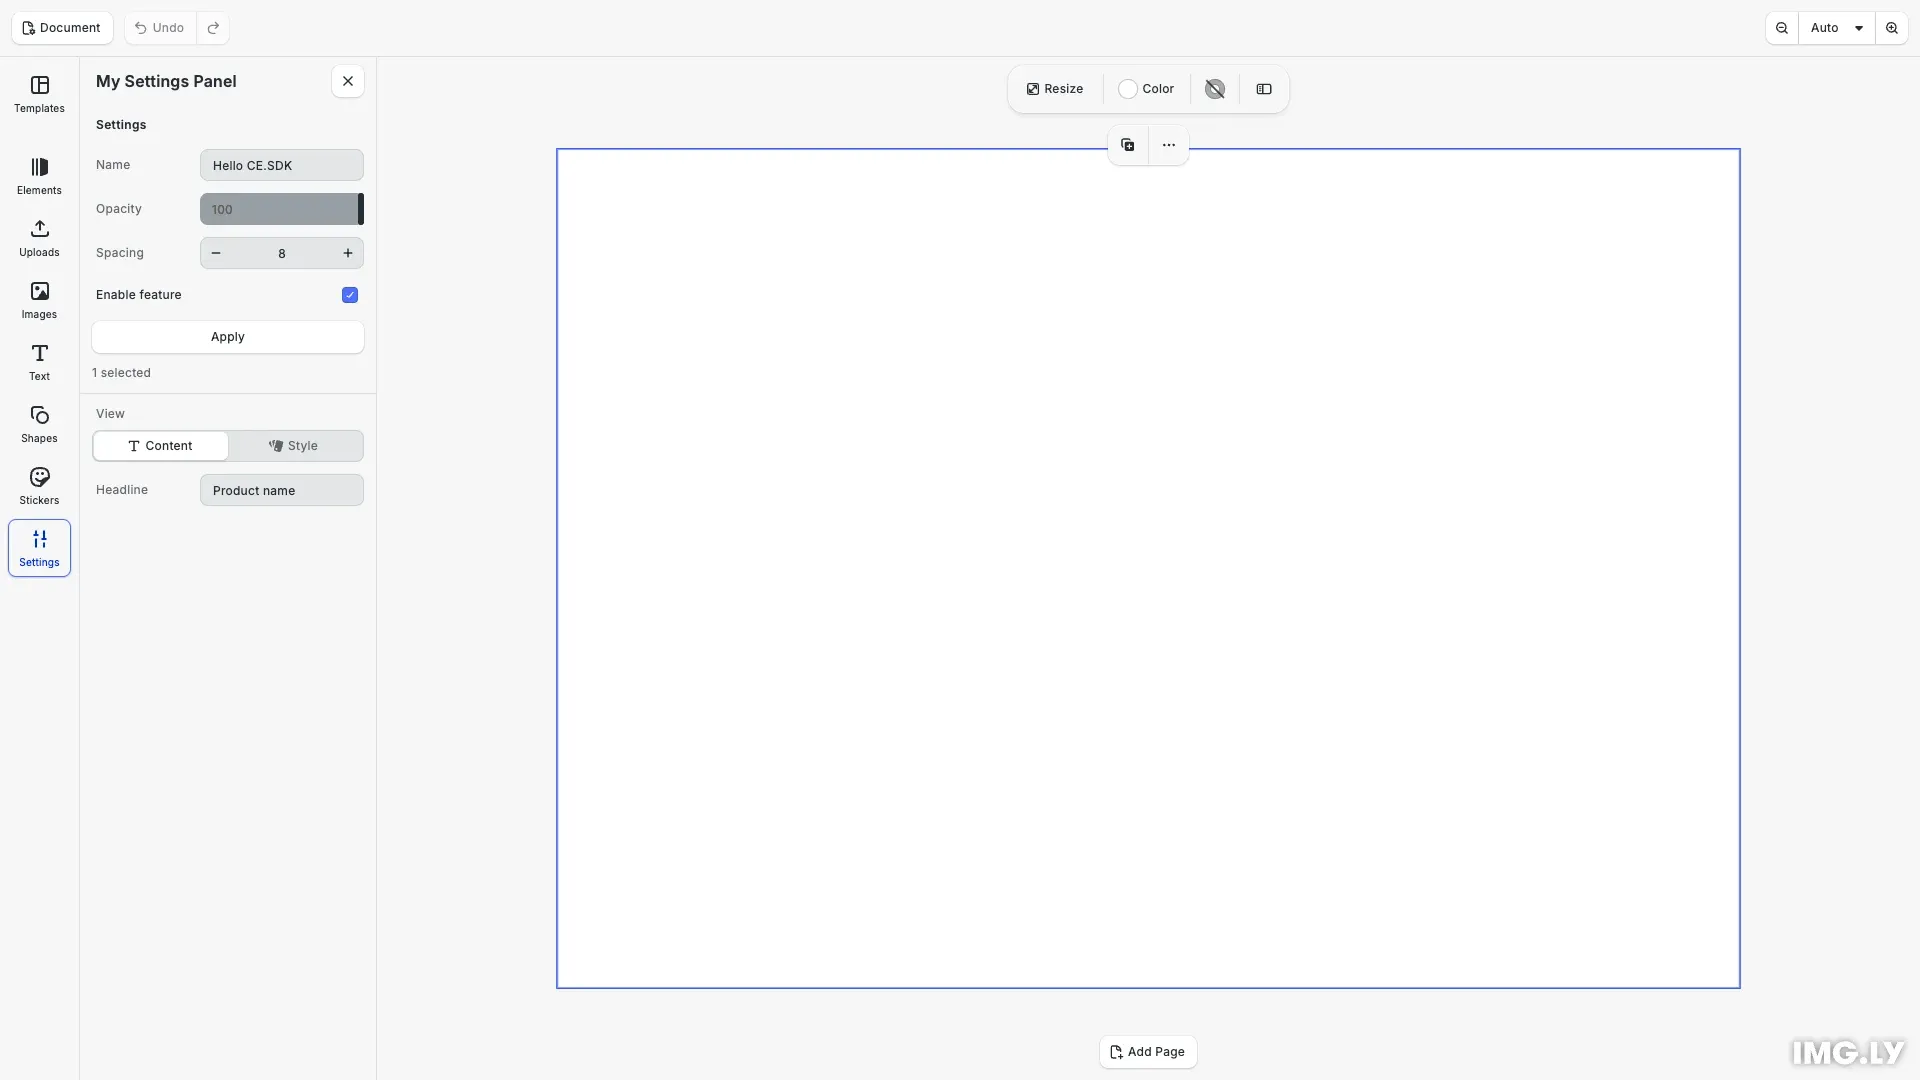
Custom panels extend CE.SDK by adding sidebar interfaces that match the editor’s design language. The builder system provides pre-built components for forms, buttons, and media display, allowing you to create rich editing experiences without building UI from scratch.
This guide covers how to register panels, use builder components, manage local state, respond to engine changes, set panel titles, and integrate panels with the dock.
Registering a Custom Panel#
Register a panel using cesdk.ui.registerPanel() with a unique ID and a render function. The render function receives builder, engine, and state as arguments.
cesdk.ui.registerPanel('my-settings', ({ builder, engine, state }) => {The panel renders whenever the function is called. CE.SDK tracks engine method calls within the render function and re-invokes it when relevant state changes.
Managing Local State#
Use the state function to create panel-local state that persists across re-renders. Call state('key', defaultValue) to get value and setValue properties.
const textState = state('text', 'Hello CE.SDK');const opacityState = state('opacity', 100);const spacingState = state('spacing', 8);const headlineState = state('headline', 'Product name');const viewState = state('view', 'content');const enabledState = state('enabled', true);const shadowState = state('shadow', false);State objects integrate directly with input components by spreading the object into the component props.
Structuring with Sections#
Group related components using builder.Section(). Sections accept a title and a children function containing nested components.
builder.Section('settings', { title: 'Settings', children: () => {Sections provide visual organization and collapsible areas within your panel.
Using Input Components#
Text Input#
Capture text with builder.TextInput(). Bind to state using the value and setValue properties.
builder.TextInput('name', { inputLabel: 'Name', ...textState});Slider#
Handle numeric ranges with builder.Slider(). Configure min, max, and step values.
builder.Slider('opacity', { inputLabel: 'Opacity', min: 0, max: 100, ...opacityState});Number Input#
Capture precise values with builder.NumberInput(). Set showStepper to true to add decrement and increment buttons inside the field. Each press moves the value by step and stops at min and max, and holding a button repeats the step.
builder.NumberInput('spacing', { inputLabel: 'Spacing', min: 0, max: 64, step: 4, showStepper: true, ...spacingState});Pressing Tab skips the stepper buttons and moves to the next control. Keyboard users step the value with the field’s Up and Down arrow keys instead.
Checkbox#
Toggle boolean values with builder.Checkbox().
builder.Checkbox('enabled', { inputLabel: 'Enable feature', ...enabledState});Adding Buttons#
Add interactive buttons with builder.Button(). Configure the label, icon, and onClick handler.
builder.Button('apply', { label: 'Apply', onClick: () => {Switching Views with Tabs#
Split a panel into alternating views with builder.Tabs(). You control the selection: value holds the id of the selected tab, and setValue receives the id of the tab the user picks, so panel state drives the bar.
builder.Section('view', { children: () => { builder.Tabs('view-tabs', { inputLabel: 'View', inputLabelPosition: 'top', ...viewState, tabs: [ { id: 'content', label: 'Content', icon: '@imgly/Text', children: () => { builder.TextInput('headline', { inputLabel: 'Headline', ...headlineState }); } }, { id: 'style', label: 'Style', icon: '@imgly/Appearance', isActive: opacityState.value < 100, children: () => { builder.Checkbox('shadow', { inputLabel: 'Drop shadow', ...shadowState }); } } ] }); }});Only the selected tab runs its children callback, so a hidden tab builds nothing.
Each tab takes an optional icon, tooltip and isDisabled. Setting isActive draws a small indicator below the tab icon to signal that the tab holds a value, such as an applied animation. It does not mark the selected tab, and it needs an icon to anchor to.
The arrow keys move focus between tabs. Home and End jump to the first and last tab, and Enter or Space selects the focused tab. Focus alone does not select.
Showing a Loading Spinner#
Display an indeterminate loading spinner while awaiting async work with builder.Spinner(). The optional label renders beneath the spinner and supports i18n keys.
builder.Spinner('loading', { label: 'Loading…' });Accessing Engine State#
Access engine state within the render function to create reactive panels. The panel re-renders when tracked engine state changes.
const selected = engine.block.findAllSelected();if (selected.length > 0) { builder.Text('info', { content: `${selected.length} selected` });}Modifying Engine State#
Use engine APIs within event handlers to modify the scene based on panel input.
const page = engine.block.findByType('page')[0];engine.block.setOpacity(page, opacityState.value / 100);Setting the Panel Title#
Set panel titles through i18n translations. The translation key follows the pattern panel.[panelId].
cesdk.i18n.setTranslations({ en: { 'panel.my-settings': 'My Settings Panel' }});Adding a Dock Button#
Register a component that renders a button to toggle your panel. Use cesdk.ui.isPanelOpen() to track state.
cesdk.ui.registerComponent('settings-btn', ({ builder }) => { builder.Button('toggle', { label: 'Settings', icon: '@imgly/Settings', isActive: cesdk.ui.isPanelOpen('my-settings'), onClick: () => cesdk.ui.openPanel('my-settings') });});Add the component to the dock order.
cesdk.ui.setComponentOrder({ in: 'ly.img.dock' }, [ ...cesdk.ui.getComponentOrder({ in: 'ly.img.dock' }), 'settings-btn']);Opening the Panel#
Open your custom panel programmatically using cesdk.ui.openPanel().
cesdk.ui.openPanel('my-settings');API Reference#
| Method | Description |
|---|---|
cesdk.ui.registerPanel(id, renderFn) |
Registers a panel with a unique ID and render function. The render function receives builder, engine, and state. |
cesdk.ui.openPanel(id) |
Opens a registered panel by ID. |
cesdk.ui.isPanelOpen(id) |
Returns true if the panel is currently open. |
state(key, defaultValue) |
Creates panel-local state. Returns { value, setValue } for use with input components. |
cesdk.i18n.setTranslations(translations) |
Sets translation strings. Use key panel.[panelId] for panel titles. |
Next Steps#
Register New Component — Create reusable custom components for use across panels.
Customize UI Behavior — Control UI programmatically with events and notifications.
Add Action Buttons — Add buttons to navigation bar, canvas menu, and other UI areas.
Dock — Configure the editor dock area and component ordering.