Replace specific colors with transparency using CE.SDK’s green screen effect for video compositing and virtual background applications.
The green screen effect (chroma key) replaces a specified color with transparency, enabling compositing workflows where foreground subjects appear over different backgrounds. While green is the most common key color due to its contrast with skin tones, the effect works with any solid color—blue screens, white backgrounds, or custom colors. CE.SDK processes chroma keying in real-time using GPU-accelerated shaders.
This guide covers how to apply the green screen effect programmatically, configure color selection and keying parameters, composite with background layers, and manage effects on blocks.
Apply the Green Screen Effect#
We start by creating an image block and applying the green screen effect to it. The effect immediately processes the target color, making matching pixels transparent.
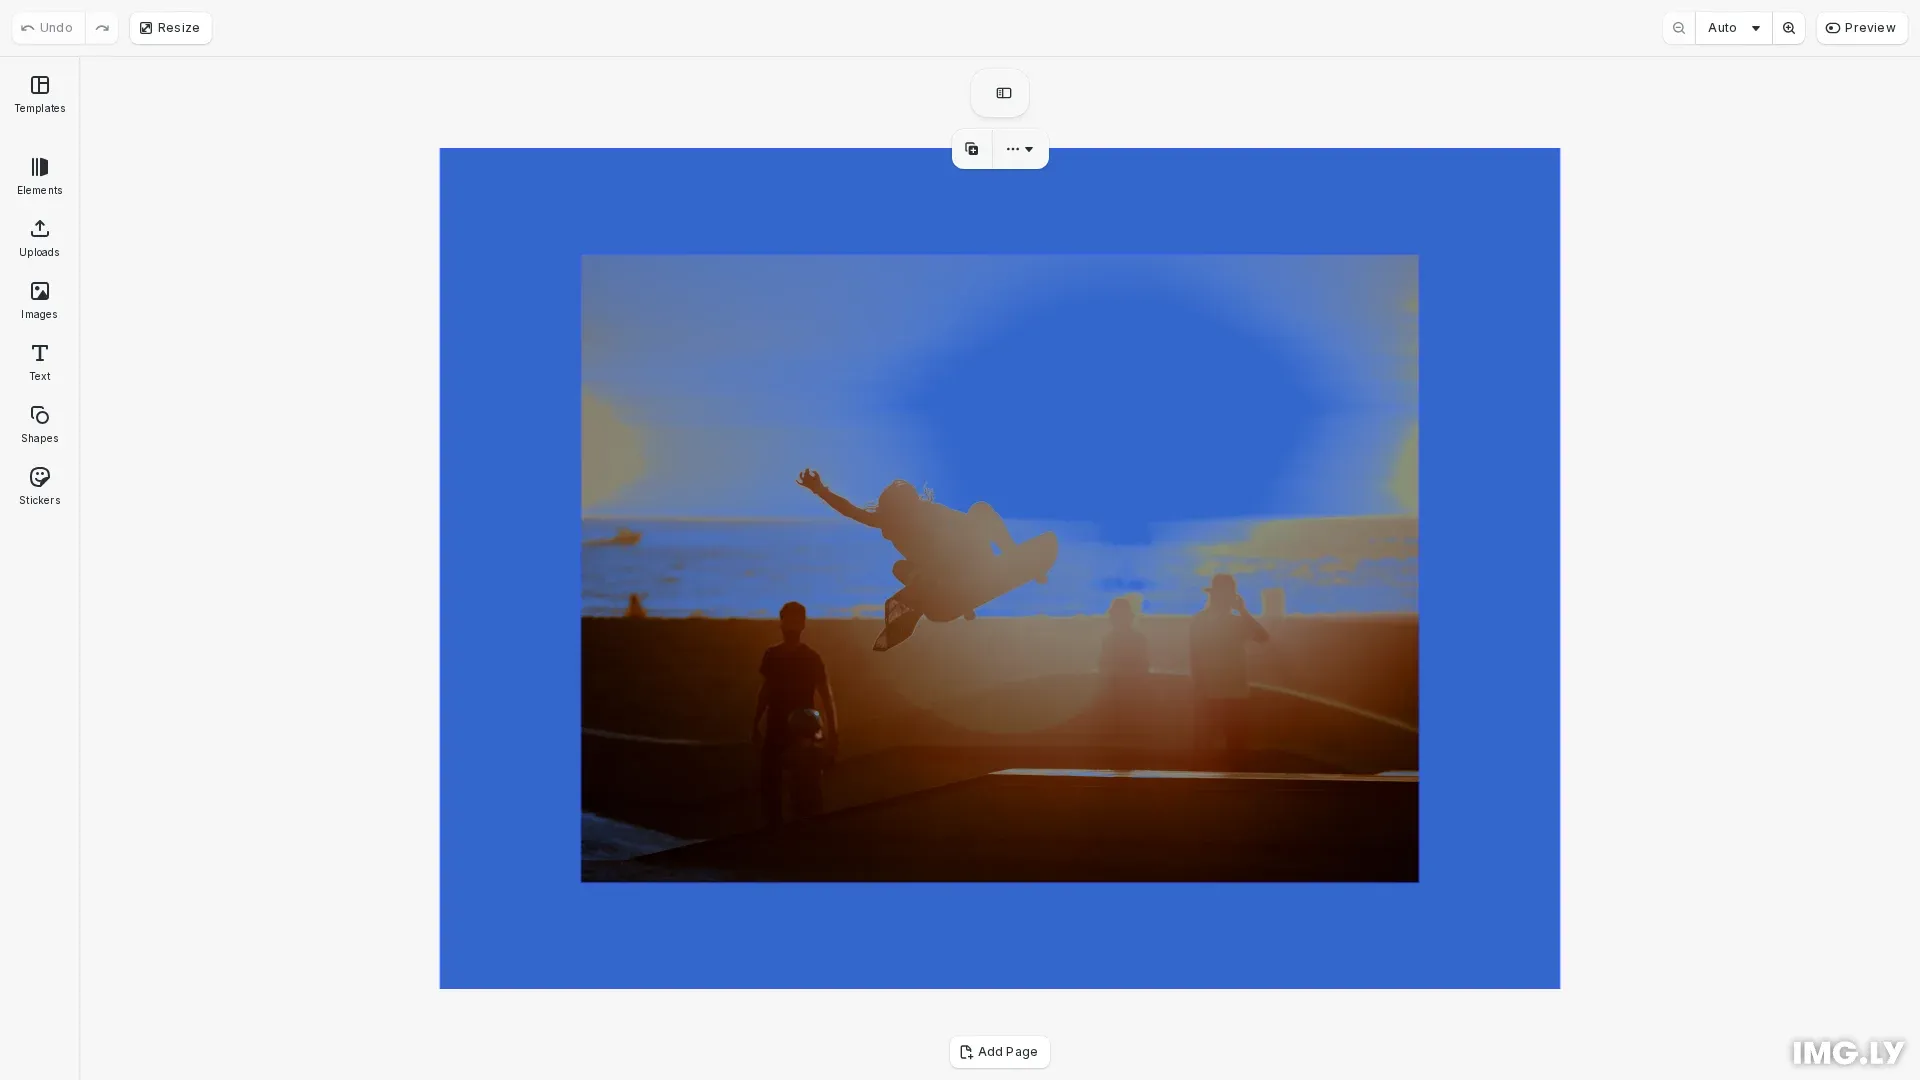
// Create an image block to apply the green screen effectconst imageBlock = await engine.block.addImage(  'https://img.ly/static/ubq_samples/sample_4.jpg',  {    size: { width: 600, height: 450 }  });engine.block.appendChild(page, imageBlock);engine.block.setPositionX(imageBlock, 100);engine.block.setPositionY(imageBlock, 75);
// Create the green screen effectconst greenScreenEffect = engine.block.createEffect('green_screen');
// Apply the effect to the image blockengine.block.appendEffect(imageBlock, greenScreenEffect);
The createEffect('green_screen') method creates a new green screen effect instance. We then attach it to the image block using appendEffect(), which adds the effect to the block’s effect stack.
Configure Color Selection#
The green screen effect targets a specific color to key out. We set this color using setColor() with the effect/green_screen/fromColor property.
// Set the target color to key out// Use off-white to remove the bright sky background// For traditional green screen footage, use { r: 0.0, g: 1.0, b: 0.0, a: 1.0 }engine.block.setColor(greenScreenEffect, 'effect/green_screen/fromColor', { r: 0.98, g: 0.98, b: 0.98, a: 1.0});The example uses off-white (r: 0.98, g: 0.98, b: 0.98) to key out a bright sky background. For traditional green screen footage, use pure green (r: 0.0, g: 1.0, b: 0.0). For blue screen footage, set the color to pure blue. Match the exact color you want to remove for best results.
Adjust Color Matching Tolerance#
The colorMatch parameter controls how closely pixels must match the target color to be keyed out. We adjust this using setFloat().
// Adjust color matching tolerance// Higher values (closer to 1.0) key out more color variations// Lower values create more precise keyingengine.block.setFloat( greenScreenEffect, 'effect/green_screen/colorMatch', 0.26);Higher values (closer to 1.0) key out a wider range of similar colors, which is useful for footage with uneven lighting or color variations in the background. Lower values create more precise keying for well-lit footage with uniform backgrounds.
Control Edge Smoothness#
The smoothness parameter controls the transition between opaque and transparent areas. This affects how sharp or soft the edges appear around keyed subjects.
// Control edge smoothness for natural transitions// Higher values create softer edges that blend with backgroundsengine.block.setFloat( greenScreenEffect, 'effect/green_screen/smoothness', 1.0);Higher smoothness values create softer edges that blend naturally with new backgrounds, reducing harsh outlines. Lower values produce sharper edges, which may be preferable for high-contrast composites or when preserving fine detail.
Remove Color Spill#
Color spill occurs when the key color reflects onto the foreground subject, creating a green or blue tint on edges. The spill parameter reduces this color cast.
// Remove color spill from reflective surfaces// Reduces color tint on edges near the keyed backgroundengine.block.setFloat(greenScreenEffect, 'effect/green_screen/spill', 1.0);Increase the spill value when you notice the key color appearing on subject edges or reflective surfaces. This is common with shiny hair, glasses, or metallic objects near the screen.
Composite with Background Layers#
After keying, we can layer the transparent content over backgrounds using block ordering. We create a background block and use sendToBack() to place it behind the keyed image.
// Create a background layer for compositingconst backgroundBlock = engine.block.create('graphic');const backgroundShape = engine.block.createShape('rect');engine.block.setShape(backgroundBlock, backgroundShape);
// Create a solid color fill for the backgroundconst backgroundFill = engine.block.createFill('color');engine.block.setColor(backgroundFill, 'fill/color/value', {  r: 0.2,  g: 0.4,  b: 0.8,  a: 1.0});engine.block.setFill(backgroundBlock, backgroundFill);
// Size and position the background to cover the pageengine.block.setWidth(backgroundBlock, 800);engine.block.setHeight(backgroundBlock, 600);engine.block.setPositionX(backgroundBlock, 0);engine.block.setPositionY(backgroundBlock, 0);
// Add to page and send to backengine.block.appendChild(page, backgroundBlock);engine.block.sendToBack(backgroundBlock);
// Bring the keyed image to frontengine.block.bringToFront(imageBlock);
The background appears through the transparent areas where the key color was removed. You can use image or video fills instead of solid colors for more dynamic backgrounds.
Toggle the Effect#
We can check whether an effect is enabled using isEffectEnabled().
// Check if the effect is currently enabledconst isEnabled = engine.block.isEffectEnabled(greenScreenEffect);To toggle the effect on or off, use setEffectEnabled(). This preserves the effect configuration while temporarily removing its visual impact.
// Toggle the effect on or offengine.block.setEffectEnabled(greenScreenEffect, !isEnabled);Toggling effects is useful for before/after comparisons or conditional processing without removing and recreating the effect.
Manage the Effect#
Beyond toggling, you can query, remove, and clean up effects. Use supportsEffects() to check if a block can have effects, getEffects() to list all applied effects, removeEffect() to detach an effect from a block, and destroy() to free the effect’s resources.
// Check if the block supports effectsconst supportsEffects = engine.block.supportsEffects(imageBlock);console.log('Block supports effects:', supportsEffects);
// Get all effects applied to the blockconst effects = engine.block.getEffects(imageBlock);console.log('Number of effects:', effects.length);
// Remove the effect from the block (by index)engine.block.removeEffect(imageBlock, 0);console.log('Effect removed from block');
// Destroy the effect instance to free resourcesengine.block.destroy(greenScreenEffect);console.log('Effect destroyed');
When removing effects, use the index from getEffects() to specify which effect to remove. After removing an effect from a block, call destroy() on the effect instance to release its resources. This is important for memory management in long-running applications.
Troubleshooting#
Keying Results Appear Rough or Incomplete#
- Increase
colorMatchvalue to capture more color variations - Ensure source footage has even lighting on the screen
- Check that the target color accurately matches the screen color
Edges Have Color Fringing#
- Increase
spillvalue to remove color cast - Adjust
smoothnessto soften hard edges - Consider using a higher
colorMatchfor gradual color transitions
Transparent Areas Appear in Wrong Places#
- Decrease
colorMatchto be more selective about which colors are keyed - Verify the
fromColormatches only the intended background color - Check that foreground subjects don’t contain colors similar to the key color
API Reference#
| Method | Description |
|---|---|
block.createEffect('green_screen') | Create a green screen effect instance |
block.appendEffect(block, effect) | Add effect to a block’s effect stack |
block.setColor(effect, 'effect/green_screen/fromColor', color) | Set the color to key out |
block.setFloat(effect, 'effect/green_screen/colorMatch', value) | Set color matching tolerance (0.0-1.0) |
block.setFloat(effect, 'effect/green_screen/smoothness', value) | Set edge smoothness (0.0-1.0) |
block.setFloat(effect, 'effect/green_screen/spill', value) | Set spill removal intensity (0.0-1.0) |
block.isEffectEnabled(effect) | Check if an effect is enabled |
block.setEffectEnabled(effect, enabled) | Enable or disable an effect |
block.supportsEffects(block) | Check if a block supports effects |
block.getEffects(block) | Get all effects applied to a block |
block.removeEffect(block, index) | Remove effect at specified index |
block.destroy(effect) | Destroy an effect instance |
Next Steps#
- Apply Filters and Effects - Learn the fundamentals of the effect system
- Blur - Add blur effects for depth of field
- Duotone - Create two-color artistic treatments