Apply professional color grading, blur effects, and artistic treatments to design elements using CE.SDK’s visual effects system.
While CE.SDK uses a unified effect API for both filters and effects, they serve different purposes. Filters typically apply color transformations like LUT filters and duotone, while effects apply visual modifications such as blur, pixelize, vignette, and image adjustments. You can combine multiple effects on a single element, creating complex visual treatments by stacking them in a customizable order.
This guide covers how to enable the built-in effects panel for interactive editing and how to apply and manage effects programmatically using the block API.
Using the Built-in Effects UI#
Enable Effects Features#
To give users access to effects in the inspector panel, we enable the effects features using CE.SDK’s Feature API. Effects and filters appear in the inspector bar and advanced inspector when a user selects a supported element.
// Enable effects and filters in the inspector panel using the Feature APIcesdk.feature.enable('ly.img.effect'); // Enable all effectscesdk.feature.enable('ly.img.filter'); // Enable all filterscesdk.feature.enable('ly.img.blur'); // Enable blur effectcesdk.feature.enable('ly.img.adjustment'); // Enable adjustmentsThe Feature API controls which capabilities are available to users. By enabling ly.img.effect and ly.img.filter, the inspector panel displays effect and filter options when users select compatible blocks. You can also enable specific effects individually like ly.img.blur or ly.img.adjustment for more granular control.
Effects are enabled by default for graphic blocks with image or video fills. The Feature API shown above allows you to control which specific effects appear in the inspector panel UI.
User Workflow#
With effects features enabled, users can enhance their designs through a visual workflow in the inspector panel:
- Select an element - Click on any image or supported graphic block in the canvas
- Access inspector - The inspector panel shows available options for the selected element
- Find effects section - Scroll to the effects and filters sections within the inspector
- Browse and apply - Click through available effects to apply them
- Adjust parameters - Use sliders and controls to fine-tune intensity and other effect properties
- Manage effects - Toggle effects on/off, switch between effects, or reset effect parameters
This interactive approach is perfect for creative exploration and allows users to see results immediately without any coding knowledge.
Programmatic Effect Application#
Initialize CE.SDK#
For applications that need to apply effects programmatically—whether for automation, batch processing, or dynamic user experiences—we start by setting up CE.SDK with the proper configuration.
await cesdk.addPlugin(new DesignEditorConfig());
// Add asset source pluginsawait cesdk.addPlugin(new BlurAssetSource());await cesdk.addPlugin(new ColorPaletteAssetSource());await cesdk.addPlugin(new CropPresetsAssetSource());await cesdk.addPlugin(new UploadAssetSources({ include: ['ly.img.image.upload'] }));await cesdk.addPlugin(  new DemoAssetSources({    include: [      'ly.img.templates.blank.*',      'ly.img.templates.presentation.*',      'ly.img.templates.print.*',      'ly.img.templates.social.*',      'ly.img.image.*'    ]  }));await cesdk.addPlugin(new EffectsAssetSource());await cesdk.addPlugin(new FiltersAssetSource());await cesdk.addPlugin(new PagePresetsAssetSource());await cesdk.addPlugin(new StickerAssetSource());await cesdk.addPlugin(new TextAssetSource());await cesdk.addPlugin(new TextComponentAssetSource());await cesdk.addPlugin(new TypefaceAssetSource());await cesdk.addPlugin(new VectorShapeAssetSource());
await cesdk.actions.run('scene.create', {  page: { width: 800, height: 600, unit: 'Pixel' }});
const engine = cesdk.engine;const page = engine.block.findByType('page')[0];
const pageWidth = engine.block.getWidth(page);const pageHeight = engine.block.getHeight(page);
This initializes the full CE.SDK interface with the effects panel enabled, giving you both UI and API access to the effects system.
Check Effect Support#
Before applying effects to a block, we check whether it supports them. Not all block types can have effects applied—for example, page blocks and scene blocks do not support effects.
// Pattern #2: Use Convenience APIs - addImage() simplifies block creation// Create a sample block to demonstrate effect support checkingconst blockSize = { width: blockWidth, height: blockHeight };const sampleBlock = await engine.block.addImage(imageUri, {  size: blockSize});engine.block.appendChild(page, sampleBlock);
// Check if a block supports effectsconst supportsEffects = engine.block.supportsEffects(sampleBlock);console.log('Block supports effects:', supportsEffects); // true for graphics
// Page blocks don't support effectsconst pageSupportsEffects = engine.block.supportsEffects(page);console.log('Page supports effects:', pageSupportsEffects); // false
// Select this block so effects panel is visibleengine.block.setSelected(sampleBlock, true);
Effect support is available for:
- Graphic blocks with image fills
- Graphic blocks with video fills (with performance considerations)
- Shape blocks with fills
- Text blocks (with limited effect types)
- Page blocks (particularly when they have fills applied, such as background fills)
Always verify support before creating and applying effects to avoid errors and ensure a smooth user experience.
Apply Basic Effects#
Once we’ve confirmed a block supports effects, we can create and apply effects using the effect API. Here we create a separate image block using the convenience addImage() API and apply a blur effect to it.
// Pattern #1: Demonstrate Individual Before Combined// Create a separate image block for blur demonstrationconst blurImageBlock = await engine.block.addImage(imageUri, {  size: blockSize});engine.block.appendChild(page, blurImageBlock);
// Create and apply a blur effectconst blurEffect = engine.block.createEffect('extrude_blur');engine.block.appendEffect(blurImageBlock, blurEffect);
// Adjust blur intensityengine.block.setFloat(blurEffect, 'effect/extrude_blur/amount', 0.5);
CE.SDK provides several built-in effect types:
extrude_blur- Gaussian blur with configurable intensityadjustments- Brightness, contrast, saturation, exposurepixelize- Pixelation effectvignette- Darkened cornershalf_tone- Halftone patternlut_filter- Color grading with LUT filesduotone- Two-color tinting
Each effect type has its own set of configurable properties that control its visual appearance.
Configure Effect Parameters#
After creating an effect, we can customize its appearance by setting properties. Each effect exposes different parameters depending on its type and capabilities.
// Create a separate image block for adjustments demonstrationconst adjustmentsImageBlock = await engine.block.addImage(imageUri, {  size: blockSize});engine.block.appendChild(page, adjustmentsImageBlock);
// Create adjustments effect for brightness and contrastconst adjustmentsEffect = engine.block.createEffect('adjustments');engine.block.appendEffect(adjustmentsImageBlock, adjustmentsEffect);
// Find all available properties for this effectconst adjustmentProperties =  engine.block.findAllProperties(adjustmentsEffect);console.log('Available adjustment properties:', adjustmentProperties);
// Set brightness, contrast, and saturationengine.block.setFloat(  adjustmentsEffect,  'effect/adjustments/brightness',  0.2);engine.block.setFloat(  adjustmentsEffect,  'effect/adjustments/contrast',  0.15);engine.block.setFloat(  adjustmentsEffect,  'effect/adjustments/saturation',  0.1);
CE.SDK provides typed setter methods for different parameter types:
setFloat()- For intensity, amount, and radius values (typically 0.0 to 1.0)setInt()- For discrete values like pixel sizessetString()- For file URIs (LUT files, image references)setBool()- For enabling or disabling specific features
Using the correct setter method ensures type safety and proper value validation.
Apply LUT Filters#
LUT (Look-Up Table) filters apply professional color grading by transforming colors through a predefined mapping. These are particularly useful for creating consistent brand aesthetics or applying cinematic color treatments.
The example demonstrates querying LUT filters from the asset library using engine.asset.findAssets('ly.img.filter'), then applying them using metadata from the asset results. This approach matches how CE.SDK’s built-in filter panel works.
// Demonstrate LUT filters by applying the first 2 from asset library// These filters are fetched from the demo asset sources (Grid positions 3-4)const lutImageBlocks = [];for (let i = 0; i < Math.min(2, lutAssets.length); i++) {  const lutAsset = lutAssets[i];
  const lutImageBlock = await engine.block.addImage(imageUri, {    size: blockSize  });  engine.block.appendChild(page, lutImageBlock);  lutImageBlocks.push(lutImageBlock);
  // Create LUT filter effect using the full effect type URI  const lutEffect = engine.block.createEffect(    '//ly.img.ubq/effect/lut_filter'  );
  // Use asset metadata for LUT configuration  // The asset provides the LUT file URI and grid dimensions  engine.block.setString(    lutEffect,    'effect/lut_filter/lutFileURI',    lutAsset.meta?.uri as string  );  engine.block.setInt(    lutEffect,    'effect/lut_filter/horizontalTileCount',    parseInt(lutAsset.meta?.horizontalTileCount as string, 10)  );  engine.block.setInt(    lutEffect,    'effect/lut_filter/verticalTileCount',    parseInt(lutAsset.meta?.verticalTileCount as string, 10)  );  engine.block.setFloat(lutEffect, 'effect/lut_filter/intensity', 0.85);
  engine.block.appendEffect(lutImageBlock, lutEffect);}
LUT filters are ideal for:
- Creating consistent brand aesthetics across all designs
- Applying cinematic or film-style color grading
- Matching reference images or maintaining color continuity
- Building curated filter collections for users
Asset metadata structure: Each LUT asset provides uri (the LUT file URL), horizontalTileCount, and verticalTileCount describing the grid layout of color transformation cubes.
Apply Duotone Filters#
Duotone filters create artistic two-color effects by mapping image tones to two colors (dark and light). This effect is popular for creating stylized visuals, vintage aesthetics, or brand-specific color treatments.
The example queries duotone filters from the asset library, then applies them using color metadata. The hexToRgba utility converts hex color values from asset metadata to RGBA format required by the setColorRGBA API.
// Demonstrate Duotone filters by applying the first 2 from asset library// Duotone filters create artistic two-color treatments (Grid positions 5-6)const duotoneImageBlocks = [];for (let i = 0; i < Math.min(2, duotoneAssets.length); i++) {  const duotoneAsset = duotoneAssets[i];
  const duotoneImageBlock = await engine.block.addImage(imageUri, {    size: blockSize  });  engine.block.appendChild(page, duotoneImageBlock);  duotoneImageBlocks.push(duotoneImageBlock);
  // Create Duotone filter effect using the full effect type URI  const duotoneEffect = engine.block.createEffect(    '//ly.img.ubq/effect/duotone_filter'  );
  // Convert hex colors from asset metadata to RGBA (0-1 range)  const darkColor = hexToRgba(duotoneAsset.meta?.darkColor as string);  engine.block.setColor(    duotoneEffect,    'effect/duotone_filter/darkColor',    darkColor  );
  const lightColor = hexToRgba(duotoneAsset.meta?.lightColor as string);  engine.block.setColor(    duotoneEffect,    'effect/duotone_filter/lightColor',    lightColor  );
  engine.block.setFloat(    duotoneEffect,    'effect/duotone_filter/intensity',    0.8  );
  engine.block.appendEffect(duotoneImageBlock, duotoneEffect);}
Duotone filters work by:
- Mapping darker image tones to the dark color
- Mapping lighter image tones to the light color
- Blending between the two colors based on pixel brightness
- Adjusting intensity to control the effect strength (0.0 to 1.0)
Asset metadata structure: Each duotone asset provides darkColor and lightColor as hex strings (e.g., "#1a2b3c") which must be converted to RGBA values for the effect API.
Combine Multiple Effects#
One of the most powerful features of CE.SDK’s effect system is the ability to stack multiple effects on a single block. Each effect is applied sequentially, allowing you to build complex visual treatments.
// Pattern #5: Progressive Complexity - now combining multiple effects// Create a separate image block to demonstrate combining multiple effects (Grid position 7)const combinedImageBlock = await engine.block.addImage(imageUri, {  size: blockSize});engine.block.appendChild(page, combinedImageBlock);
// Apply effects in order - the stack will contain:// 1. adjustments (brightness/contrast) - applied first// 2. blur - applied second// 3. duotone (color tinting) - applied third// 4. pixelize - applied last
const combinedAdjustments = engine.block.createEffect('adjustments');engine.block.appendEffect(combinedImageBlock, combinedAdjustments);engine.block.setFloat(  combinedAdjustments,  'effect/adjustments/brightness',  0.2);engine.block.setFloat(  combinedAdjustments,  'effect/adjustments/contrast',  0.15);
const combinedBlur = engine.block.createEffect('extrude_blur');engine.block.appendEffect(combinedImageBlock, combinedBlur);engine.block.setFloat(combinedBlur, 'effect/extrude_blur/amount', 0.3);
const combinedDuotone = engine.block.createEffect('duotone_filter');engine.block.appendEffect(combinedImageBlock, combinedDuotone);engine.block.setColor(combinedDuotone, 'duotone_filter/darkColor', {  r: 0.1,  g: 0.2,  b: 0.4,  a: 1.0});engine.block.setColor(combinedDuotone, 'duotone_filter/lightColor', {  r: 0.9,  g: 0.8,  b: 0.6,  a: 1.0});engine.block.setFloat(combinedDuotone, 'duotone_filter/intensity', 0.6);
const pixelizeEffect = engine.block.createEffect('pixelize');engine.block.appendEffect(combinedImageBlock, pixelizeEffect);engine.block.setInt(pixelizeEffect, 'pixelize/horizontalPixelSize', 8);engine.block.setInt(pixelizeEffect, 'pixelize/verticalPixelSize', 8);
Effect ordering matters: Effects are applied from the bottom of the stack to the top. In this example:
- First, we adjust brightness and contrast
- Then, we apply blur
- Then, we apply color grading with a LUT filter
- Finally, we add stylization with pixelization
Experiment with different orderings to achieve the desired visual result—changing the order can significantly impact the final appearance.
Managing Applied Effects#
List and Access Effects#
We can retrieve all effects applied to a block and inspect their properties. This is useful for building effect management interfaces or debugging effect configurations.
// Get all effects applied to the combined blockconst effects = engine.block.getEffects(combinedImageBlock);console.log('Applied effects:', effects);
// Access properties of specific effectseffects.forEach((effect, index) => {  const effectType = engine.block.getType(effect);  const isEnabled = engine.block.isEffectEnabled(effect);  console.log(`Effect ${index}: ${effectType}, enabled: ${isEnabled}`);});
This allows you to iterate through all applied effects, read their properties, and make modifications as needed.
Enable/Disable Effects#
CE.SDK allows you to temporarily toggle effects on and off without removing them from the block. This is particularly useful for before/after comparisons or when you need to optimize rendering performance during interactive editing sessions.
// Check if effect is enabledconst isBlurEnabled = engine.block.isEffectEnabled(combinedBlur);console.log('Blur effect is enabled:', isBlurEnabled);When you disable an effect, it remains attached to the block but won’t be rendered until you enable it again. This preserves all effect parameters while giving you full control over when the effect is applied.
You can use this feature to create interactive preview modes, implement undo-like functionality, or conditionally apply effects based on user preferences or device capabilities.
Remove Effects#
When you no longer need an effect, you can remove it from the effect stack and free its resources. Always destroy effects that are no longer in use to prevent memory leaks.
// Create a temporary block to demonstrate effect removalconst tempBlock = await engine.block.addImage(imageUri, {  size: blockSize});engine.block.appendChild(page, tempBlock);
const tempEffect = engine.block.createEffect('pixelize');engine.block.appendEffect(tempBlock, tempEffect);engine.block.setInt(tempEffect, 'pixelize/horizontalPixelSize', 12);
// Remove the effectconst tempEffects = engine.block.getEffects(tempBlock);const effectIndex = tempEffects.indexOf(tempEffect);if (effectIndex !== -1) {  engine.block.removeEffect(tempBlock, effectIndex);}
// Destroy the removed effect to free memoryengine.block.destroy(tempEffect);
The removeEffect() method takes an index position, so you can remove effects selectively from any position in the stack. After removal, destroy the effect instance to ensure proper cleanup.
Additional Techniques#
Batch Processing#
For applications that need to apply the same effects to multiple elements, we can iterate through a collection of blocks and apply effects efficiently.
// Apply same effects to multiple blocksconst allGraphics = engine.block.findByType('graphic');
allGraphics.forEach((graphic) => {  if (engine.block.supportsEffects(graphic)) {    // Only apply to blocks that don't already have effects    const existingEffects = engine.block.getEffects(graphic);    if (existingEffects.length === 0) {      const effect = engine.block.createEffect('adjustments');      engine.block.appendEffect(graphic, effect);      engine.block.setFloat(effect, 'effect/adjustments/brightness', 0.1);    }  }});
When batch processing, check effect support before creating effects to avoid unnecessary work. You can also reuse effect instances when applying the same configuration to multiple blocks, though be careful to destroy them properly when done.
Dynamic Effects with Animations#
You can combine effects with CE.SDK’s built-in animation system to create dynamic visual treatments that change over time.
For dynamic visual effects in video projects, explore CE.SDK’s animation system which provides professionally designed transitions and effects that integrate seamlessly with the rendering pipeline.
Custom Effect Combinations#
Creating reusable effect presets allows you to maintain consistent styling across your application and speed up common effect applications. Here’s a pattern for building reusable effect configurations:
// Create a reusable preset functionasync function applyVintagePreset(engine: CreativeEngine, imageBlock: number) {  // Apply LUT filter  const lutEffect = engine.block.createEffect('lut_filter');  engine.block.setString(    lutEffect,    'lut_filter/lutFileURI',    'https://img.ly/static/ubq_luts/vintage.png',  );  engine.block.appendEffect(imageBlock, lutEffect);
  // Add vignette  const vignetteEffect = engine.block.createEffect('vignette');  engine.block.setFloat(vignetteEffect, 'vignette/intensity', 0.5);  engine.block.appendEffect(imageBlock, vignetteEffect);
  return { lutEffect, vignetteEffect };}
// Use the presetconst effects = await applyVintagePreset(engine, myImageBlock);
Preset strategies include:
- Brand filters - Maintain a consistent look across campaigns
- Style templates - Provide quick application of complex multi-effect treatments
- User favorites - Allow users to save and recall their preferred settings
Performance Considerations#
CE.SDK’s effect system is optimized for real-time performance, but understanding these considerations helps you build responsive applications:
- GPU acceleration: Effects leverage GPU rendering for smooth performance on modern devices
- Mobile optimization: Limit effects to 2-3 per element on mobile devices to maintain responsiveness
- Effect complexity: Blur and LUT filters are computationally expensive compared to simple adjustments
- Video effects: Apply effects sparingly to video blocks to maintain smooth playback
- Real-time editing: Temporarily disable effects during intensive editing operations for better interactivity
Test your effect combinations on target devices early in development to ensure acceptable performance.
Troubleshooting#
Effect Not Visible#
If an effect doesn’t appear after applying it, check these common issues:
- Verify the block type supports effects using
supportsEffects() - Check that the effect is enabled with
isEffectEnabled() - Ensure effect parameters are in valid ranges (e.g., intensity values between 0.0 and 1.0)
- Confirm the effect is in the effect stack with
getEffects()
Performance Degradation#
If you experience slow rendering or laggy interactions:
- Reduce the number of effects per element (aim for 2-3 maximum on mobile)
- Lower blur radius values or use smaller LUT files
- Temporarily disable effects during editing with
setEffectEnabled() - Test on target devices early to identify performance bottlenecks
Effects Not Persisting#
Effects should save automatically with the scene, but verify:
- You’re not destroying effects prematurely before saving
- Save/load operations complete successfully
- Effect URIs (LUT files, images) remain accessible after loading
Incompatible Block Types#
If you can’t apply an effect:
- Remember that graphic blocks (with image or video fills), shape blocks, and text blocks support effects
- Page blocks themselves don’t support effects directly, but page fills (such as background fills) do support effects
- Scene blocks cannot have effects applied
- Check the block type with
block.getType()and useblock.supportsEffects()before attempting to apply effects
API Reference#
| Method | Description |
|---|---|
block.supportsEffects(block) | Check if a block supports effects |
block.createEffect(type) | Create a new effect instance |
block.appendEffect(block, effect) | Add effect to the end of the effect stack |
block.insertEffect(block, effect, index) | Insert effect at a specific position |
block.removeEffect(block, index) | Remove effect at the specified index |
block.getEffects(block) | Get all effects applied to a block |
block.setEffectEnabled(effect, enabled) | Enable or disable an effect |
block.isEffectEnabled(effect) | Check if an effect is currently enabled |
block.findAllProperties(effect) | Get all available properties for an effect |
block.setFloat(effect, property, value) | Set a floating-point property value |
block.setInt(effect, property, value) | Set an integer property value |
block.setString(effect, property, value) | Set a string property value |
block.setBool(effect, property, value) | Set a boolean property value |
block.destroy(effect) | Destroy an unused effect instance |
About the Example Code#
The example code accompanying this guide follows educational design patterns to help you learn effectively:
- Individual demonstrations: Each effect type is demonstrated on its own image block before showing combinations, making it easier to understand what each effect does
- Convenience API usage: The code uses
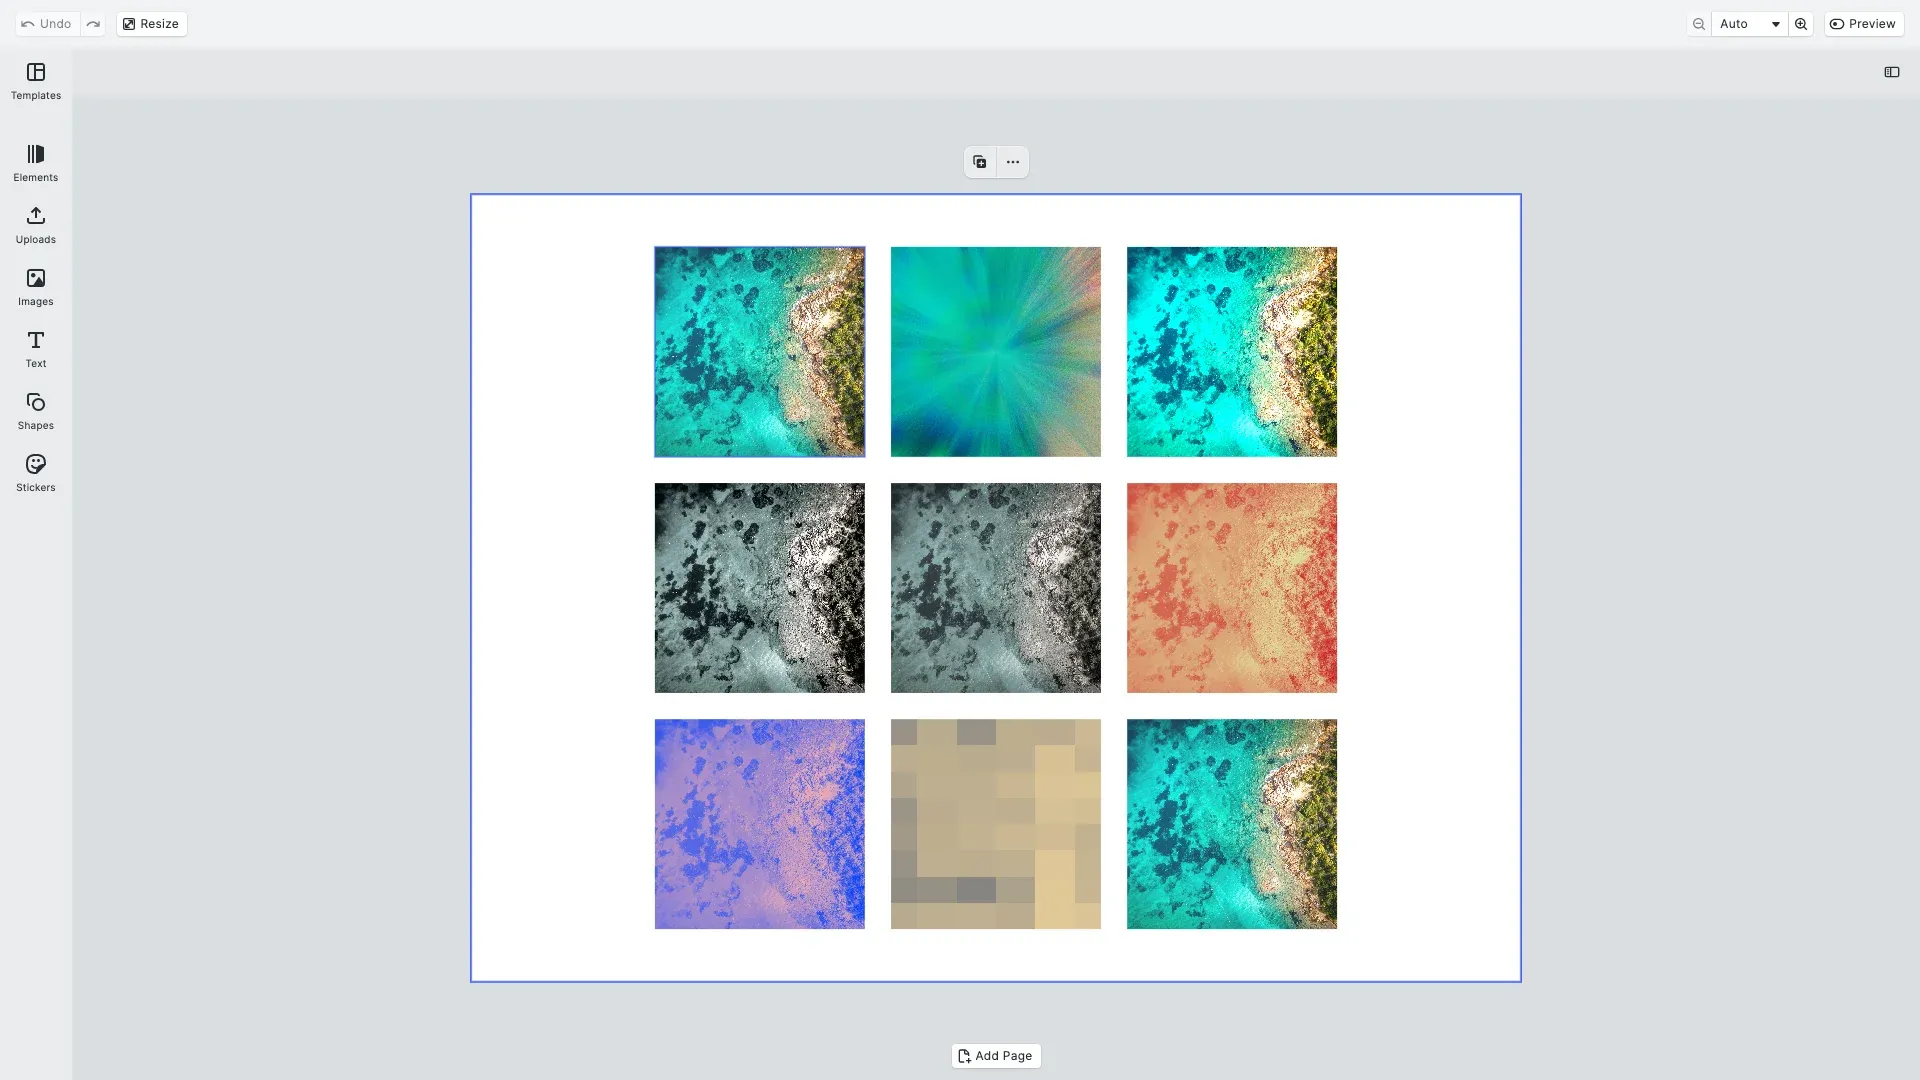
engine.block.addImage()instead of manual block construction—this is the recommended approach for simplicity and maintainability - Spatial layout: Image blocks are positioned in a grid layout (x/y coordinates) so you can visually see the results of each effect when running the example
- Progressive complexity: The example starts with simple single effects and gradually builds to complex multi-effect combinations
In your production code, you can apply multiple effects directly to the same block without creating separate demonstration blocks. The example structure is optimized for learning, not production usage.
Next Steps#
Now that you understand how to apply and manage filters and effects, explore specific effect types and advanced techniques:
- LUT Filters - Create custom color grading filters for cinematic looks
- Blur Effects - Apply depth of field and motion blur techniques
- Duotone Effects - Create striking two-color artistic treatments
- Adjustments - Fine-tune brightness, contrast, and saturation
- Effect Combinations - Build sophisticated multi-effect visual treatments