CreativeEditor SDK (CE.SDK) Headless Mode allows your web app to control the Engine API without loading the built-in user interface.
Instead of starting the full editor with panels and toolbars, your browser code talks directly to the Engine. That keeps the experience within your own design system—ideal for automation running on the client.
Common Use Cases#
- Automating workflows: Merge data into templates or generate variations with no user input.
- Automated exports: Render custom images or videos in the browser and hand them off to storage or your backend.
- Custom interfaces: Embed the Engine beneath your own UI components.
- Background actions: Run batch jobs or event-driven edits without overlaying the default UI.
When to Use Headless Mode#
| Scenario | Headless Mode | UI-Based Mode |
|---|---|---|
| Automate design generation from a script | ✅ | ❌ |
| Export scenes without user interaction | ✅ | ❌ |
| Let users visually edit a design | ❌ | ✅ |
| Build a custom editor interface | ✅ | Requires custom UI |
How Headless Mode Works#
The standard editor wires UI events (button clicks, drag interactions) to the Engine under the hood. In headless mode, you call the same Engine APIs yourself.
Features Available in Headless Mode#
In headless mode, you keep access to the CE.SDK features while staying entirely within your app’s DOM lifecycle, such as:
- Scene management
- Asset manipulation
- Rendering and export
- Templates and dynamic content
Requirements to Run the CreativeEngine in the Client#
CE.SDK’s Engine needs a WebGL-capable environment. When you ship a headless build in the browser:
- Point the
baseURLin your config at a publicly reachable asset directory (CDN or self-hosted) so the browser can load fonts and other Engine files—even when you install the npm package. - Only start the Engine after the DOM is available (for example, inside
useEffect,mounted, orDOMContentLoaded). - Dispose of the Engine during tear down with
engine.dispose()to release WebGL resources. - Ensure iframes or workers that boot the Engine expose
documentand a WebGL context.
Set Up Headless Mode in a Web App#
-
Install the Engine package:
Terminal window npm install @cesdk/engine -
Configure your license and asset location. The global CDN works for prototypes; production apps commonly self-host the asset bundle for faster loads.
const config = {license: '<YOUR_LICENSE_KEY>',baseURL: 'https://cdn.img.ly/packages/imgly/cesdk-engine/1.71.0/assets'}; -
Start the Engine from client-side code and reuse the instance across interactions.
Quick Start: Initialize the Engine Headlessly#
When you import @cesdk/engine, you get the same runtime that powers the full editor. Using the CreativeEngine instead of the CreativeEditor allows you to expose the Engine interface while skipping all UI bootstrapping that comes with the editor.
import CreativeEngine from '@cesdk/engine';
const config = {  license: '<YOUR_LICENSE_KEY>',  baseURL: 'https://cdn.img.ly/packages/imgly/cesdk-engine/1.71.0/assets'};
let engine;
export async function getEngine() {  if (!engine) {    engine = await CreativeEngine.init(config);  }  return engine;}
Once started, you can trigger Engine operations inside your app logic from:
- Buttons
- Keyboard shortcuts
- Background tasks
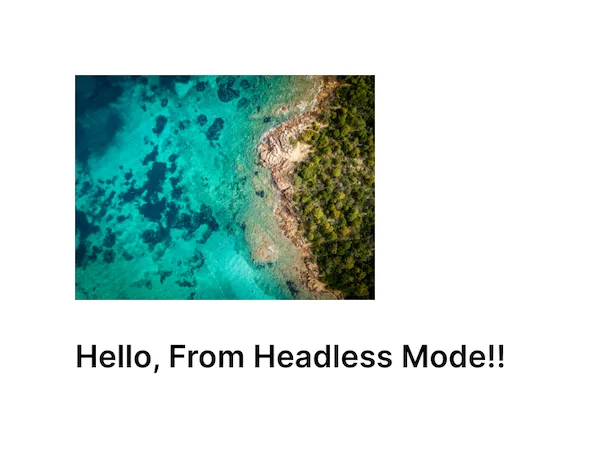
Example: Build and Export a Scene on a Single Click#
The workflow below wires the Engine to a button, so the user automatically downloads an edited PNG when clicking on a button:
- Copy paste the following code (adjust to your stack as needed):
// Grab the button elementconst downloadButton = document.querySelector('#download-headless');
// Register an async click handlerdownloadButton?.addEventListener('click', async () => {  // Wait for the Engine  const engine = await getEngine();
  // Build a fresh scene  const scene = engine.scene.create();  const page = engine.block.create('page');  engine.block.setWidth(page, 800);  engine.block.setHeight(page, 600);  // Attach the page to the scene  engine.block.appendChild(scene, page);
  // Add an image layer  const imageBlock = engine.block.create('graphic');  engine.block.setShape(imageBlock, engine.block.createShape('rect'));  const imageFill = engine.block.createFill('image');  // Load an image fill from the CDN  engine.block.setString(    imageFill,    'fill/image/imageFileURI',    'https://img.ly/static/ubq_samples/sample_1.jpg'  );  engine.block.setFill(imageBlock, imageFill);  // Set position and dimensions  engine.block.setPosition(imageBlock, 100, 100);  engine.block.setWidth(imageBlock, 300);  engine.block.setHeight(imageBlock, 300);  // Append the image to the page  engine.block.appendChild(page, imageBlock);
  // Add a text layer  const textBlock = engine.block.create('text');  // Set the text content  engine.block.setString(textBlock, 'text/text', 'Hello from Headless Mode!');  // Set position and dimensions  engine.block.setPosition(textBlock, 100, 450);  engine.block.setWidth(textBlock, 600);  // Append the text to the page  engine.block.appendChild(page, textBlock);
  // Export the page as a PNG  const exportResult = await engine.block.export(page, 'image/png');  // Normalize the result to a blob  const blob =    exportResult instanceof Blob      ? exportResult      : new Blob([exportResult], { type: 'image/png' });
  triggerDownload(blob, 'headless-output.png');});

function triggerDownload(blob, filename) { // Build a temporary object URL const url = URL.createObjectURL(blob); const link = document.createElement('a'); link.href = url; link.download = filename; document.body.appendChild(link); // Start the download on click link.click(); // Revoke the link and URL to release resources document.body.removeChild(link); URL.revokeObjectURL(url);}- Add a clickable element with the matching ID somewhere in your page’s markup. For example:
<button id="download-headless">Download headless export</button>If you’re in a component-based setup (React, Vue, Svelte, etc.), include the same button inside the component’s render/template:
return (<button id="download-headless"> Download headless export</button>);Once that element is in the DOM, the snippet’s querySelector(‘#download-headless’) finds it and wires up the click handler that runs the export.
See full module
import CreativeEngine from '@cesdk/engine';
const config = {  license: '<YOUR_LICENSE_KEY>',  baseURL: 'https://cdn.img.ly/packages/imgly/cesdk-engine/1.71.0/assets'};
let engine;
export async function getEngine() {  if (!engine) {    engine = await CreativeEngine.init(config);  }  return engine;}
const downloadButton = document.querySelector('#download-headless');
downloadButton?.addEventListener('click', async () => {  const engine = await getEngine();
  const scene = engine.scene.create();  const page = engine.block.create('page');  engine.block.setWidth(page, 800);  engine.block.setHeight(page, 600);  engine.block.appendChild(scene, page);
  const imageBlock = engine.block.create('graphic');  engine.block.setShape(imageBlock, engine.block.createShape('rect'));  const imageFill = engine.block.createFill('image');  engine.block.setString(    imageFill,    'fill/image/imageFileURI',    'https://img.ly/static/ubq_samples/sample_1.jpg'  );  engine.block.setFill(imageBlock, imageFill);  engine.block.setPosition(imageBlock, 100, 100);  engine.block.setWidth(imageBlock, 300);  engine.block.setHeight(imageBlock, 300);  engine.block.appendChild(page, imageBlock);
  const textBlock = engine.block.create('text');  engine.block.setString(textBlock, 'text/text', 'Hello from Headless Mode!');  engine.block.setPosition(textBlock, 100, 450);  engine.block.setWidth(textBlock, 600);  engine.block.appendChild(page, textBlock);
  const exportResult = await engine.block.export(page, 'image/png');  const blob =    exportResult instanceof Blob      ? exportResult      : new Blob([exportResult], { type: 'image/png' });
  triggerDownload(blob, 'headless-output.png');});
function triggerDownload(blob, filename) {  const url = URL.createObjectURL(blob);  const link = document.createElement('a');  link.href = url;  link.download = filename;  document.body.appendChild(link);  link.click();  document.body.removeChild(link);  URL.revokeObjectURL(url);}
After you add the script to your app and run the dev server:
- Click the
#download-headlessbutton in your interface. - The Engine assembles the scene in memory and exports it as a PNG.
- The PNG downloads locally (or you can upload it to your backend).
Go Further#
Need a hybrid approach? Engine interface guides show how to combine headless logic with the standard editor UI.