Combine multiple video clips into sequences and organize them on the timeline using CE.SDK’s track system and programmatic APIs.
Video compositions in CE.SDK use a hierarchy: Scene → Page → Track → Clip. Tracks organize clips for sequential playback—when you add clips to a track, they play one after another. You can control precise timing using time offsets and create layered compositions by adding multiple tracks to a page.
In CE.SDK’s block-based architecture, a clip is a graphic block with a video fill. This means video clips share the same APIs and capabilities as other blocks—you can position, rotate, scale, and apply effects to video just like images or shapes. The addVideo() helper creates this structure automatically and loads the video metadata.
This guide covers how to join clips using the built-in timeline UI, how to programmatically add and arrange clips in tracks, and how to create multi-track compositions.
Joining Clips via UI#
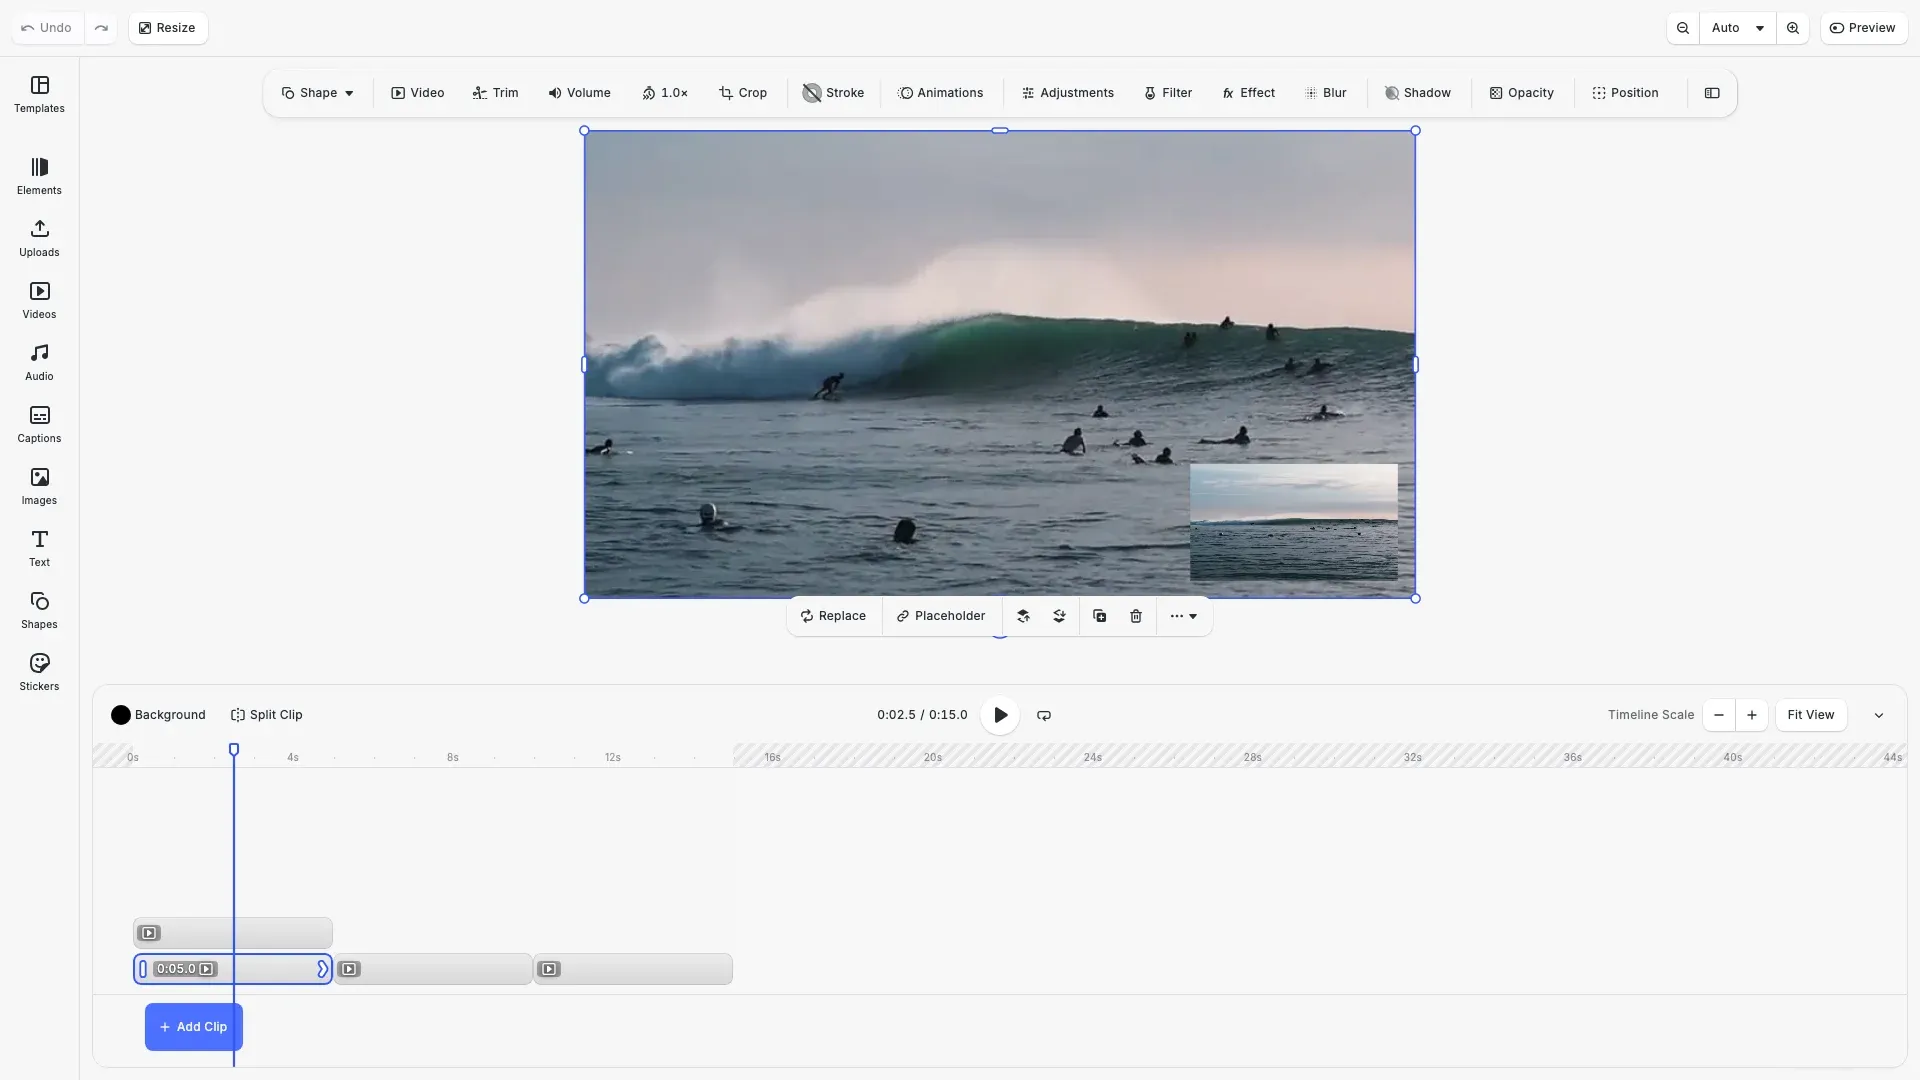
CE.SDK’s timeline UI provides visual tools for arranging video clips. Select the Video mode to access timeline-based editing.
Adding Clips to Timeline#
Drag clips from the asset panel directly onto the timeline. When you drop a clip on an existing track, it joins the sequence. Dropping on an empty area creates a new track for that clip.
The timeline displays clip duration visually—longer clips take more horizontal space. You can see at a glance how clips relate to each other in time.
Reordering Clips#
Drag clips within a track to reorder them. As you drag, CE.SDK shows where the clip will land. Release to confirm the new position.
The timeline UI updates time offsets when you reorder clips via drag-and-drop, positioning clips sequentially without gaps.
Creating Additional Tracks#
Add multiple tracks to create layered compositions. Tracks stack vertically in the timeline, and clips on upper tracks render on top of clips below. This enables picture-in-picture effects, overlays, and complex multi-layer edits.
Programmatic Clip Joining#
Prerequisites and Setup#
For applications that need to join clips programmatically—whether for automation, batch processing, or dynamic compositions—we start by setting up CE.SDK in Video mode.
// Enable video editing features in CE.SDKcesdk.feature.enable('ly.img.video');cesdk.feature.enable('ly.img.timeline');cesdk.feature.enable('ly.img.playback');Video mode enables timeline features and playback controls. The ly.img.timeline feature provides the timeline panel, and ly.img.playback enables play/pause controls.
Creating a Video Scene#
We create a video scene to access timeline-based editing capabilities. Design mode doesn’t support tracks and sequential playback.
await cesdk.addPlugin(new VideoEditorConfig());
// Add asset source pluginsawait cesdk.addPlugin(new BlurAssetSource());await cesdk.addPlugin(new CaptionPresetsAssetSource());await cesdk.addPlugin(new ColorPaletteAssetSource());await cesdk.addPlugin(new CropPresetsAssetSource());await cesdk.addPlugin(  new UploadAssetSources({    include: ['ly.img.image.upload', 'ly.img.video.upload', 'ly.img.audio.upload']  }));await cesdk.addPlugin(  new DemoAssetSources({    include: [      'ly.img.templates.video.*',      'ly.img.image.*',      'ly.img.audio.*',      'ly.img.video.*'    ]  }));await cesdk.addPlugin(new EffectsAssetSource());await cesdk.addPlugin(new FiltersAssetSource());await cesdk.addPlugin(  new PagePresetsAssetSource({    include: [      'ly.img.page.presets.instagram.*',      'ly.img.page.presets.facebook.*',      'ly.img.page.presets.x.*',      'ly.img.page.presets.linkedin.*',      'ly.img.page.presets.pinterest.*',      'ly.img.page.presets.tiktok.*',      'ly.img.page.presets.youtube.*',      'ly.img.page.presets.video.*'    ]  }));await cesdk.addPlugin(new StickerAssetSource());await cesdk.addPlugin(new TextAssetSource());await cesdk.addPlugin(new TextComponentAssetSource());await cesdk.addPlugin(new TypefaceAssetSource());await cesdk.addPlugin(new VectorShapeAssetSource());
await cesdk.actions.run('scene.create', {  mode: 'Video',  page: { width: 1920, height: 1080, unit: 'Pixel' }});
const engine = cesdk.engine;const page = engine.block.findByType('page')[0];
// Set page duration to accommodate all clips (15 seconds total)engine.block.setDuration(page, 15);
The page duration determines how long the composition plays. Set it to accommodate all your clips—in this example, 15 seconds for three 5-second clips.
Creating Video Clips#
We create video clips as graphic blocks with video fills. Each clip needs a video fill that references the source media.
// Create video clips using the addVideo helper method// Each clip is sized to fill the canvas (1920x1080 is standard video resolution)const clipA = await engine.block.addVideo(videoUrl, 1920, 1080, {  timeline: { duration: 5, timeOffset: 0 }});
const clipB = await engine.block.addVideo(videoUrl, 1920, 1080, {  timeline: { duration: 5, timeOffset: 5 }});
const clipC = await engine.block.addVideo(videoUrl, 1920, 1080, {  timeline: { duration: 5, timeOffset: 10 }});
The addVideo helper method creates a graphic block with an attached video fill and automatically loads the video resource metadata. We set width and height to control how the clip appears in the composition. The timeline options let us set duration and time offset in one call.
Creating Tracks#
Tracks organize clips for sequential playback. We create a track and attach it to the page.
// Create a track and add it to the page// Tracks organize clips for sequential playback on the timelineconst track = engine.block.create('track');engine.block.appendChild(page, track);A track acts as a container for clips. When you add clips to a track, they play in the order they were added.
Adding Clips to Track#
We add clips to the track using appendChild. Clips join the sequence in the order they’re added.
// Add clips to the trackengine.block.appendChild(track, clipA);engine.block.appendChild(track, clipB);engine.block.appendChild(track, clipC);
// Resize all track children to fill the page dimensionsengine.block.fillParent(track);
// Query track children to verify orderconst trackClips = engine.block.getChildren(track);console.log('Track clip count:', trackClips.length, 'clips');
After adding clips, you can query the track’s children to verify the order. getChildren returns an array of clip IDs in playback order.
Setting Clip Durations#
Each clip needs a duration that determines how long it plays in the timeline.
// Set durations for each clipengine.block.setDuration(clipA, 5);engine.block.setDuration(clipB, 5);engine.block.setDuration(clipC, 5);Duration is measured in seconds. A 5-second duration means the clip occupies 5 seconds of timeline space.
Arranging Clips#
Time Offsets#
Time offsets control when each clip starts playing. We set offsets to position clips at specific points in the timeline.
// Set time offsets to position clips sequentially on the timelineengine.block.setTimeOffset(clipA, 0);engine.block.setTimeOffset(clipB, 5);engine.block.setTimeOffset(clipC, 10);
console.log('Track offsets set: Clip A: 0s, Clip B: 5s, Clip C: 10s');
Clip A starts at 0 seconds, Clip B at 5 seconds, and Clip C at 10 seconds. Combined with 5-second durations, this creates a continuous 15-second sequence with no gaps.
Reordering Clips#
Use insertChild to move clips to specific positions within a track. This moves an existing child to a new index.
// Reorder clips: move Clip C to the beginning (index 0)// This demonstrates using insertChild for precise positioningengine.block.insertChild(track, clipC, 0);
// After reordering, update time offsets to reflect the new sequenceengine.block.setTimeOffset(clipC, 0);engine.block.setTimeOffset(clipA, 5);engine.block.setTimeOffset(clipB, 10);
console.log('After reorder - updated offsets: C=0s, A=5s, B=10s');
When we insert Clip C at index 0, it becomes the first clip. The order changes from A-B-C to C-A-B. We update time offsets to match the new sequence.
Querying Track Children#
Use getChildren to inspect the current clip order and verify arrangements.
// Get all clips in the track to verify arrangementconst finalClips = engine.block.getChildren(track);console.log('Final track arrangement:');finalClips.forEach((clipId, index) => { const offset = engine.block.getTimeOffset(clipId); const duration = engine.block.getDuration(clipId); console.log( ` Clip ${index + 1}: offset=${offset}s, duration=${duration}s` );});This loop outputs each clip’s position, time offset, and duration—useful for debugging or building custom timeline UIs.
Multi-Track Compositions#
Adding Multiple Tracks#
Create layered compositions by adding multiple tracks to a page. Track order determines rendering order—clips in later tracks appear on top.
// Create a second track for layered compositions// Track order determines z-index: last track renders on topconst overlayTrack = engine.block.create('track');engine.block.appendChild(page, overlayTrack);
// Create an overlay clip for picture-in-picture effect (1/4 size)const overlayClip = await engine.block.addVideo(  videoUrl,  1920 / 4,  1080 / 4,  {    timeline: { duration: 5, timeOffset: 2 }  });engine.block.appendChild(overlayTrack, overlayClip);
// Position overlay in bottom-right corner with paddingengine.block.setPositionX(overlayClip, 1920 - 1920 / 4 - 40);engine.block.setPositionY(overlayClip, 1080 - 1080 / 4 - 40);
console.log('Multi-track composition created with overlay starting at 2s');
The overlay track contains a smaller clip positioned in the corner. It starts at 2 seconds and lasts 5 seconds, creating a picture-in-picture effect during that time range.
Track Rendering Order#
CE.SDK renders tracks from first to last. The first track added appears at the bottom, and subsequent tracks layer on top. Use this to create:
- Background layers: Full-screen videos or images on the first track
- Overlays: Smaller clips positioned on upper tracks
- Titles: Text or graphics that appear over video content
Troubleshooting#
Clips Not Appearing#
If clips don’t show on the timeline, verify they’re attached to a track that’s attached to the page. Use getParent and getChildren to inspect the hierarchy:
const parent = engine.block.getParent(clipId);const children = engine.block.getChildren(trackId);Wrong Playback Order#
If clips play in unexpected order, check time offsets. Clips play based on their time offset values, not their order in the children array. Set explicit offsets when precise timing matters.
Video Not Loading#
If video content doesn’t appear when using addVideo, check that the video URL is accessible and the format is supported. The addVideo helper automatically loads video metadata.
API Reference#
| Method | Description | Parameters | Returns |
|---|---|---|---|
block.addVideo(uri, width, height, options) | Create video clip with automatic resource loading | uri: string, width: number, height: number, options?: { timeline: { duration, timeOffset } } | Promise<DesignBlockId> |
block.create('track') | Create a new track | type: 'track' | DesignBlockId |
block.appendChild(parent, child) | Add child to parent | parent: DesignBlockId, child: DesignBlockId | void |
block.insertChild(parent, child, index) | Insert child at specific position | parent: DesignBlockId, child: DesignBlockId, index: number | void |
block.getChildren(id) | Get all children of a block | id: DesignBlockId | DesignBlockId[] |
block.setTimeOffset(id, offset) | Set when block starts in timeline | id: DesignBlockId, offset: number | void |
block.getTimeOffset(id) | Get block’s time offset | id: DesignBlockId | number |
block.setDuration(id, duration) | Set block’s duration | id: DesignBlockId, duration: number | void |
block.getDuration(id) | Get block’s duration | id: DesignBlockId | number |
Next Steps#
Now that you understand how to join and arrange clips, explore related video editing features:
- Trim Video Clips - Control which portion of media plays back
- Control Audio and Video - Master playback timing and audio mixing
- Video Timeline Overview - Understand the complete timeline editing system