Apply duotone effects to images with the CE.SDK Engine, mapping image tones to two colors for stylized visuals, vintage aesthetics, and brand-consistent treatments.
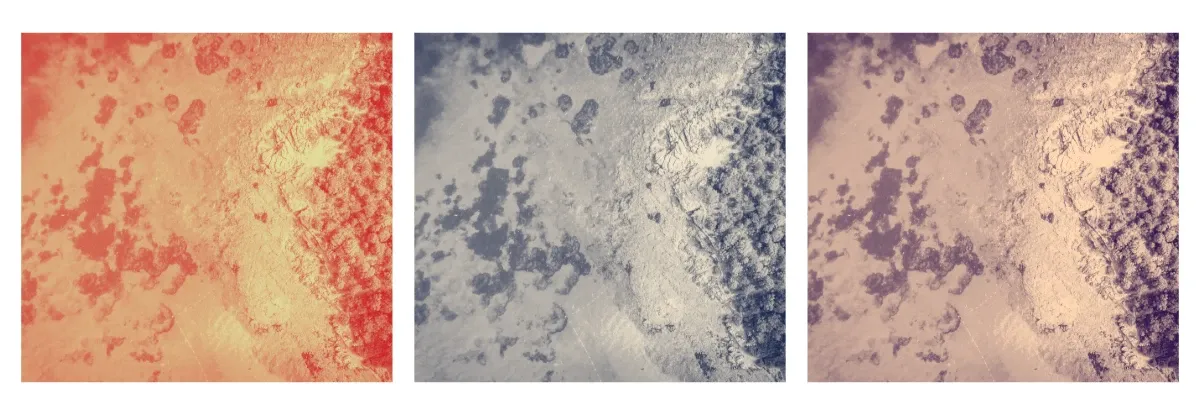
Duotone is a color effect that maps image brightness to two colors: a dark color for shadows and a light color for highlights. The result is a striking two-tone image where the original colors are replaced by gradations between your chosen pair. This guide covers applying duotone presets from the asset library, creating custom color combinations, combining duotone with other effects, and managing applied effects.
Understanding Duotone#
Unlike filters that tint or shift colors, duotone remaps the tonal range of an image. The effect reads each pixel’s brightness and assigns a color based on where it falls between black and white:
- Dark tones (shadows, blacks) adopt the dark color.
- Light tones (highlights, whites) adopt the light color.
- Midtones blend between the two colors.
This produces a consistent palette regardless of the original colors, which makes duotone effective for:
- Brand consistency — apply your brand colors across diverse imagery.
- Visual cohesion — unify photos from different sources in one design.
- Vintage aesthetics — recreate classic print techniques like cyanotype or sepia.
- Bold statements — create eye-catching visuals for social media or marketing.
An intensity value from -1.0 to 1.0 controls the tonal balance: negative values push the mapping toward the dark color, positive values toward the light color, and 0.0 maps tones evenly between the two. The output is always a two-color image — intensity shifts the balance rather than fading back toward the original colors.
Using the Built-in Duotone UI#
On iOS, CE.SDK’s prebuilt editor lets users apply duotone interactively: selecting an image block surfaces a filters section in the inspector, where they can browse duotone presets, apply one with a tap, and adjust its intensity. The rest of this guide covers the Engine API behind that experience, which applies duotone programmatically on every Apple platform. See Apply Filters and Effects for the unified effects system the filters section builds on.
Check Effect Support#
Not all blocks accept effects — graphic blocks and pages do, but the scene does not. Verify support with supportsEffects(_:) before applying anything. Duotone is most useful on graphic blocks with an image or video fill, since it remaps the tones of visible pixel content.
let canApplyEffects = try engine.block.supportsEffects(presetImage)guard canApplyEffects else { return }Applying an effect to a block that doesn’t support effects throws, so gate the call on supportsEffects(_:).
Applying Duotone Presets#
CE.SDK ships a library of professionally designed duotone presets. Each preset defines a dark/light color pair as hex strings in its metadata.
Query Built-in Presets#
Register the bundled filter source and query it with the Asset API. The matcher argument limits the registered assets to the duotone presets, so the query returns only duotone entries rather than the full filter library.
let filterSourceID = try await engine.asset.addLocalAssetSourceFromJSON( baseURL.appendingPathComponent("ly.img.filter/content.json"), matcher: ["ly.img.filter.duotone.*"],)let presetResult = try await engine.asset.findAssets( sourceID: filterSourceID, query: AssetQueryData(query: nil, page: 0, perPage: 10),)let duotonePresets = presetResult.assetsEach preset exposes darkColor and lightColor in meta as hex strings. Convert them to the engine’s Color type, whose channels run from 0.0 to 1.0, before applying them.
Create the Effect Block#
Create a duotone effect with createEffect(_:), passing the .duotoneFilter effect type. The effect is a standalone block you configure and then attach to an image.
let presetEffect = try engine.block.createEffect(.duotoneFilter)Convert Preset Colors#
Preset colors arrive as hex strings, so convert them to Color values. This helper parses a #rrggbb string into a .rgba color with channels normalized to the 0.0–1.0 range.
/// Converts a `#rrggbb` (or `rrggbb`) hex string to a `Color` with channels in the 0–1 range.private func hexToRGBA(_ hex: String) -> Color { let cleaned = hex.hasPrefix("#") ? String(hex.dropFirst()) : hex let value = UInt64(cleaned, radix: 16) ?? 0 let red = Float((value >> 16) & 0xFF) / 255 let green = Float((value >> 8) & 0xFF) / 255 let blue = Float(value & 0xFF) / 255 return .rgba(r: red, g: green, b: blue, a: 1.0)}Apply the converted colors to the effect with setColor(_:property:color:), and set intensity with setFloat(_:property:value:). intensity ranges from -1.0 to 1.0 (default 0.0): negative values emphasize the dark color, positive values emphasize the light color, and 0.0 keeps the two balanced.
if let preset = duotonePresets.first, let darkHex = preset.meta?["darkColor"], let lightHex = preset.meta?["lightColor"] { try engine.block.setColor(presetEffect, property: "effect/duotone_filter/darkColor", color: hexToRGBA(darkHex)) try engine.block.setColor(presetEffect, property: "effect/duotone_filter/lightColor", color: hexToRGBA(lightHex)) try engine.block.setFloat(presetEffect, property: "effect/duotone_filter/intensity", value: 0.9)}Append the Effect#
Attach the configured effect to the image block. The duotone takes effect as soon as it joins the block’s effect stack.
try engine.block.appendEffect(presetImage, effectID: presetEffect)Creating Custom Colors#
For brand-specific treatments, define your own pair directly with setColor(_:property:color:). The dark color maps to shadows and the light color to highlights.
let customEffect = try engine.block.createEffect(.duotoneFilter)// Dark color maps to shadows, light color maps to highlights.try engine.block.setColor( customEffect, property: "effect/duotone_filter/darkColor", color: .rgba(r: 0.1, g: 0.15, b: 0.3, a: 1.0),)try engine.block.setColor( customEffect, property: "effect/duotone_filter/lightColor", color: .rgba(r: 0.95, g: 0.9, b: 0.8, a: 1.0),)try engine.block.setFloat(customEffect, property: "effect/duotone_filter/intensity", value: 0.85)try engine.block.appendEffect(customImage, effectID: customEffect)Choosing Effective Color Pairs#
The relationship between the dark and light colors determines the final look:
| Color Relationship | Visual Effect | Example Use Case |
|---|---|---|
| High contrast | Bold, graphic look | Social media, posters |
| Low contrast | Subtle, sophisticated | Editorial, luxury brands |
| Warm to cool | Dynamic temperature shift | Lifestyle, fashion |
| Monochromatic | Tinted photography style | Vintage, noir aesthetic |
Classic combinations to try:
- Cyanotype: deep blue to light cyan
- Sepia: dark brown to cream
- Corporate: navy to silver
Combining with Other Effects#
Effects apply in stack order, so you can pair duotone with adjustments, blur, or other effects. Here, brightness and contrast adjustments run first, then duotone maps the adjusted tones.
// Adjustments run first, then duotone maps the adjusted tones.let adjustments = try engine.block.createEffect(.adjustments)try engine.block.setFloat(adjustments, property: "effect/adjustments/brightness", value: 0.1)try engine.block.setFloat(adjustments, property: "effect/adjustments/contrast", value: 0.15)try engine.block.appendEffect(combinedImage, effectID: adjustments)
let combinedDuotone = try engine.block.createEffect(.duotoneFilter)try engine.block.setColor(  combinedDuotone,  property: "effect/duotone_filter/darkColor",  color: .rgba(r: 0.2, g: 0.1, b: 0.3, a: 1.0),)try engine.block.setColor(  combinedDuotone,  property: "effect/duotone_filter/lightColor",  color: .rgba(r: 1.0, g: 0.85, b: 0.7, a: 1.0),)try engine.block.setFloat(combinedDuotone, property: "effect/duotone_filter/intensity", value: 0.75)try engine.block.appendEffect(combinedImage, effectID: combinedDuotone)
Reversing the order — duotone first, then adjustments — produces a different result, because the adjustments would then operate on the duotone’s output rather than the original image.
Managing Duotone Effects#
Once effects are applied, you can list, toggle, and remove them.
List Applied Effects#
Retrieve the ordered list of effect IDs attached to a block with getEffects(_:).
let appliedEffects = try engine.block.getEffects(presetImage)print("Image has \(appliedEffects.count) effect(s) applied")Toggle Effect Visibility#
Disable an effect without removing it using setEffectEnabled(effectID:enabled:), and query its state with isEffectEnabled(effectID:). Disabled effects are skipped when the block renders.
if let firstEffect = appliedEffects.first { try engine.block.setEffectEnabled(effectID: firstEffect, enabled: false) let isEnabled = try engine.block.isEffectEnabled(effectID: firstEffect) print("Effect enabled: \(isEnabled)") try engine.block.setEffectEnabled(effectID: firstEffect, enabled: true)}Remove and Destroy Effects#
Detach an effect from a block by its index with removeEffect(_:index:). Effects are independent blocks that persist after removal, so destroy the detached effect with destroy(_:) to free its resources.
let customEffects = try engine.block.getEffects(customImage)if let effectToRemove = customEffects.first { // Detach the effect from the block's stack, then destroy it to free its resources. try engine.block.removeEffect(customImage, index: 0) try engine.block.destroy(effectToRemove)}Troubleshooting#
Duotone Not Visible#
Confirm the block supports effects with supportsEffects(_:) — graphic blocks and pages do, the scene does not. Duotone also needs visible image or video content to remap; a solid color fill maps to a single flat tone.
Colors Look Wrong#
Color.rgba channels run from 0.0 to 1.0, not 0 to 255. Use .rgba(r: 0.5, g: 0.5, b: 0.5, a: 1.0) rather than raw byte values.
Duotone Leans Too Dark or Too Light#
The intensity property controls the tonal balance, not opacity — the image is always fully duotoned. If the result leans too dark, raise intensity toward 1.0 to emphasize the light color; if it leans too light, lower it toward -1.0 to emphasize the dark color. 0.0 maps tones evenly.
API Reference#
Methods#
| Method | Description |
|---|---|
engine.asset.addLocalAssetSourceFromJSON(_:matcher:) |
Register a local asset source, optionally filtered by ID pattern |
engine.asset.findAssets(sourceID:query:) |
Query assets from a registered source |
engine.block.supportsEffects(_:) |
Return whether a block can have effects applied |
engine.block.createEffect(_:) |
Create an effect block of the given EffectType |
engine.block.setColor(_:property:color:) |
Set a color property on a block |
engine.block.setFloat(_:property:value:) |
Set a float property on a block |
engine.block.appendEffect(_:effectID:) |
Append an effect to a block’s effect stack |
engine.block.getEffects(_:) |
Return the ordered effect IDs applied to a block |
engine.block.setEffectEnabled(effectID:enabled:) |
Enable or disable an effect |
engine.block.isEffectEnabled(effectID:) |
Return whether an effect is enabled |
engine.block.removeEffect(_:index:) |
Remove an effect at the given index |
engine.block.destroy(_:) |
Destroy a block and free its resources |
Properties#
| Property | Type | Description |
|---|---|---|
effect/duotone_filter/darkColor |
Color | Color applied to shadows and dark tones |
effect/duotone_filter/lightColor |
Color | Color applied to highlights and light tones |
effect/duotone_filter/intensity |
Float | Tonal balance from -1.0 to 1.0 (default 0.0); negative emphasizes the dark color, positive emphasizes the light color |
Next Steps#
- Apply Filters and Effects — Learn about the unified effects system.
- Blur Effects — Apply blur for depth and focus.
- Create a Custom LUT Filter — Build custom color grading filters.