Chroma keying removes a uniform background color (often green or blue) from a video or image so you can composite the foreground over a new scene. In CE.SDK, chroma keying is an effect you attach to an image or video block, with parameters for color selection, similarity threshold, edge smoothing, and spill suppression. This guide walks you through applying the effect in SwiftUI or in one of the prebuilt editors, dialing it in for clean edges, and composing the keyed result with a replacement background.
What You’ll Learn#
- How to add the Green Screen effect to image and video blocks.
- How to set the key color (green by default, but any color works).
- How to tune colorMatch (similarity), smoothness (edge falloff), and spill (desaturating color cast).
- How to layer a new background behind the keyed subject.
- How to persist, export, and protect templates that include chroma key.
When to Use It#
Use chroma key when your source contains a uniform backdrop (green, blue, or a solid brand color) and you want to:
- Replace the background with a virtual set, branded plate, or blurred depth backdrop.
- Place talent over slides or product footage.
- Standardize a team’s talking‑head videos with consistent backgrounds.
- Composite when using an asset formats such as MP4, H.264 or, JPEG that don’t support transparency.
Avoid chroma key if the subject’s clothing, props, or lighting contains the same hue as your key color, or if the background is highly textured.
Apply the Green Screen Effect In a Prebuilt Editor#
Chroma key is one of the standard effects available for images and video clips in the prebuilt editors, such as the Design Editor and the Video Editor. Use it as follows:
- Select a key image or video clip.
- Look for the
Effectsbutton in the inspector and tap it.
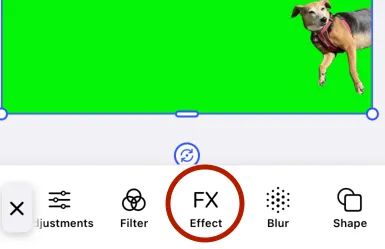
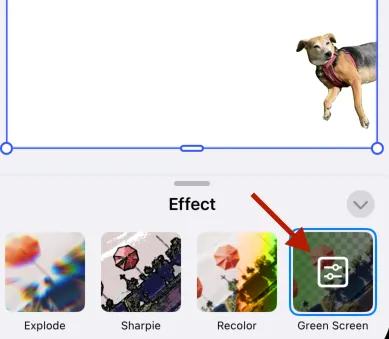
Scroll through the effects until you find “Green Screen”. Once you tap it, the effect implements immediately.
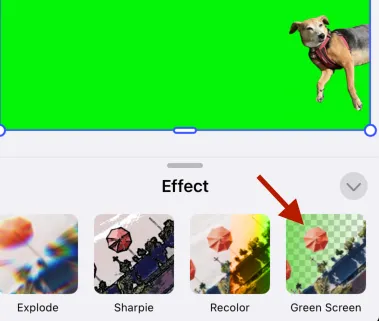
An options indicator appears for the effect. Tap it to show the options.
Use the sliders and the color wheel, to change the settings for:
- key color
- color match
- smoothness
- spill
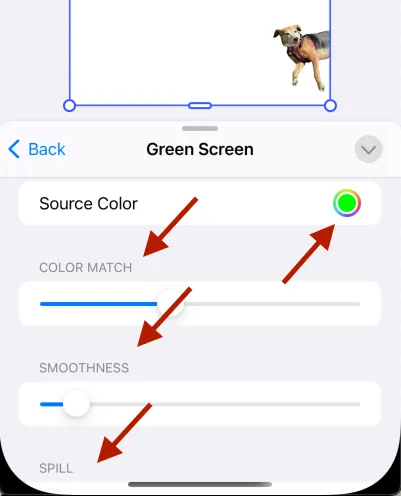
The “Tuning the Effect” section below explains each of these in detail.
Apply the Green Screen Effect In Code#
CE.SDK exposes chroma key as the .greenScreen effect type with the following key properties:
effect/green_screen/fromColorthe color to key out (default green).effect/green_screen/colorMatchsimilarity threshold [0…1].effect/green_screen/smoothnessedge falloff [0…1].effect/green_screen/spilldesaturates remaining color spill [0…1].
Not all platforms expose a typed enum for every effect. The string form shown here is fully supported and future‑proof.
Key an Image Block#
@MainActorfunc applyGreenScreenToImage(engine: Engine, imageBlock: DesignBlockID) throws {  // 1) Create the effect and attach it to the block  let keyer = try engine.block.createEffect(.greenScreen)  try engine.block.appendEffect(imageBlock, effectID: keyer)
  // 2) Choose the key color (here: pure green); any color works  try engine.block.setColor(    keyer,    property: "effect/green_screen/fromColor",    color: .rgba(r: 0.0, g: 1.0, b: 0.0, a: 1.0)  )
  // 3) Tune similarity, smoothness, and spill  try engine.block.setFloat(keyer, property: "effect/green_screen/colorMatch", value: 0.40)  try engine.block.setFloat(keyer, property: "effect/green_screen/smoothness", value: 0.08)  try engine.block.setFloat(keyer, property: "effect/green_screen/spill", value: 0.15)}
Key a Video Block#
Video blocks use video fills instead of image fills, but the rest of the workflow is identical.
@MainActorfunc applyGreenScreenToVideo(engine: Engine, videoBlock: DesignBlockID) throws {  let keyer = try engine.block.createEffect(.greenScreen)  try engine.block.appendEffect(videoBlock, effectID: keyer)
  // Blue screen example  try engine.block.setColor(    keyer,    property: "effect/green_screen/fromColor",    color: .rgba(r: 0.0, g: 0.25, b: 1.0, a: 1.0)  )
  try engine.block.setFloat(keyer, property: "effect/green_screen/colorMatch", value: 0.35)  try engine.block.setFloat(keyer, property: "effect/green_screen/smoothness", value: 0.10)  try engine.block.setFloat(keyer, property: "effect/green_screen/spill", value: 0.25)}
Order matters: if you add other effects, like color adjustments, place the keyer first in the stack so later effects operate on the premultiplied result.
Pick the Key Color from the Image#
Hard‑coding fromColor works for controlled shoots. In general, sample the background color under the user’s tap.
struct ColorPickerOverlay: View { let onPick: (Color) -> Void var body: some View { Rectangle().fill(.clear) .gesture(DragGesture(minimumDistance: 0).onEnded { value in // Map screen point -> scene pixel, then sample via your image source. // Convert sampled sRGBA to engine Color.rgba and call onPick. }) }}Tie the sampled color back to the effect:
func setKeyColor(engine: Engine, keyer: DesignBlockID, rgba: (Double, Double, Double)) throws { try engine.block.setColor( keyer, property: "effect/green_screen/fromColor", color: .rgba(r: rgba.0, g: rgba.1, b: rgba.2, a: 1.0) )}For polished UIs, show a zoomed loupe and a live matte preview as the user drags.
Composite over a Replacement Background#
A keyed subject is transparent where the background was, so you layer a background block beneath the keyed block.
@MainActorfunc addBackgroundBehind(engine: Engine, subject: DesignBlockID, imageURL: URL) throws {  let bg = try engine.block.create(.graphic)  let shape = try engine.block.createShape(.rect)  try engine.block.setShape(bg, shape: shape)
  let fill = try engine.block.createFill(.image)  try engine.block.setURL(fill, property: "fill/image/fileURI", value: imageURL.absoluteString)
  try engine.block.setFill(bg, fill: fill)
  // Make background full‑bleed on the page  // Place background **behind** subject  try engine.block.insertChild(into: page, child: bg, index: 0)  try engine.block.fillParent(bg)  try engine.block.sendToBack(bg)}
For video, create a video fill instead of an image fill and align durations in your export.
Tuning the Effect#
The three parameters for tuning chroma key composition are:
- color match
- spill
- smoothness
Knowing what they impact can help decide your strategy when the composition doesn’t look correct. The examples below all show how these values can change this chroma key image.
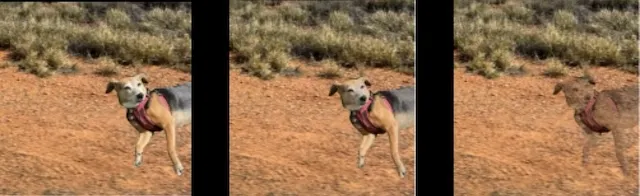
Color Match#
Color Match determines how close a pixel’s color has to be to the key color to be considered background. When the value is low, only exact matches are removed. When the value is high, a larger range of colors similar to the key color get removed.
What to watch for when the value is wrong:
- Too low: you may see patches of the green screen still visible around edges, especially if lighting is uneven or shadows present.
- Too high: you risk keying out part of the subject (hair strands, clothing edges, reflective items) creating holes or transparency because the effect is too aggressive.

The preceding image shows color match values of 0.0, 0.5 and 1.0.
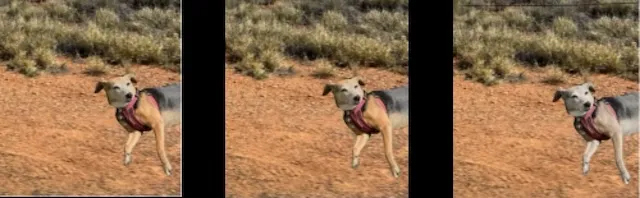
Smoothness#
Smoothness controls how gradually or sharply the transitions occur, how soft the matte edges of the gradients are. A low value produces sharp transition between keyed and un-keyed areas. When the value is high, there is softer transition.
What to watch for when the value is wrong:
- Too low: harsh edges, visible fringes around hair or “hard cutouts” that look unnatural.
- Too high: a halo effect or the subject blends into the background.
The preceding image shows smoothness values of 0.0, 0.5 and 1.0.
Spill#
Spill impacts the unwanted “color spill”, when your key color reflects or bleeds onto the subject. This is especially noticeable around edges, hair and, shiny objects.
What to watch for when the value is wrong:
- Too low: you may see green reflection on the subject (especially edges/hair/shoulders) that doesn’t get cleaned up, making it look unnatural or floating.
- Too high: the subject’s actual color edges are desaturated, making hair or detail look gray, faded or too soft.
The preceding image shows spill values of 0.0, 0.5 and 1.0.
Lighting & Capture Tips#
- Keep your backdrop evenly lit and 1–2 stops brighter than your subject.
- Avoid shadows or wrinkles—uneven color creates transparency artifacts.
- Separate your subject from the background by at least 1 m to reduce spill.
Template & Scope Considerations#
If you ship templates that include a keyer, you might want to lock down parameters to protect quality:
- Use Scopes/Permissions to limit which effect properties the end‑user can change.
- Store platform‑tested defaults (match, smoothness, spill) in the template.
- Provide preset chips like “Green Screen”, “Blue Screen”, “Brand Cyan” to switch
fromColorquickly.
Performance and Rendering Pipeline#
CE.SDK runs chroma keying directly on the graphics card for smooth, real-time results. Place the keyer near the start of your effect list so that later effects, like color or tone adjustments, apply correctly to the transparent areas. To keep playback fast, avoid heavy effects such as blur or LUTs before the keyer.
Export Tips#
- Prefer ProRes 4444 (or other alpha‑carrying formats) when exporting an intermediate keyed asset to reuse elsewhere.
- For final composites, export with the background enabled and a standard delivery codec/format.
Testing Checklist#
- Verify background color is uniform and well lit.
- Check for reflective surfaces that might cause spill.
- Test both 720p and 4K previews to compare performance.
- Try different wardrobe colors. Avoid those close to the key color.
- Examine edges on hair or fine detail under motion.
- Validate output formats (e.g., MP4 with solid background vs. ProRes with alpha).
Troubleshooting#
❌ Holes in the matte (background not fully removed):
- Increase
colorMatchslightly. If edges get harsh, bumpsmoothnesstoo.
❌ Foreground punched out (you lose subject detail):
- Lower
colorMatchuntil detail returns; then reducespillif the subject appears tinted.
❌ Green/blue color cast on edges:
- Raise
spill(try 0.2–0.4). If it looks gray, back it down.
❌ Jagged edges:
- Increase
smoothnessin small steps (0.05–0.15). - Consider adding a light
effect/blurafter the keyer for video.
❌ Uneven backgrounds / shadows:
- Sample a darker patch of the backdrop or increase
colorMatchand compensate withspill.
❌ Nothing turns transparent:
- Verify the effect is attached to the right block and not to the page.
- Check
fromColoris close to the actual backdrop hue (sample it!). - Ensure your block type supports effects (graphic, video are supported).
❌ Performance drops with 4K video:
- Avoid stacking extra heavy effects before the keyer.
- Render proxies or downscale the preview while tuning; export at full res.
❌ Skin tones look dull:
- Reduce
spilland re‑tunecolorMatch.
❌ Hair/fur looks crunchy:
- Raise
smoothnessincrementally (and consider light post‑blur).
Next Steps#
With the core of chroma key compositing mastered, here are some other topics that may be interesting:
- Learn about other Filters & Effects and try combining the keyer with adjustments for color matching.