Apply color grading, blur, pixelization, and other visual treatments to design elements using CE.SDK’s effect system, then configure, stack, and manage them with the engine API.
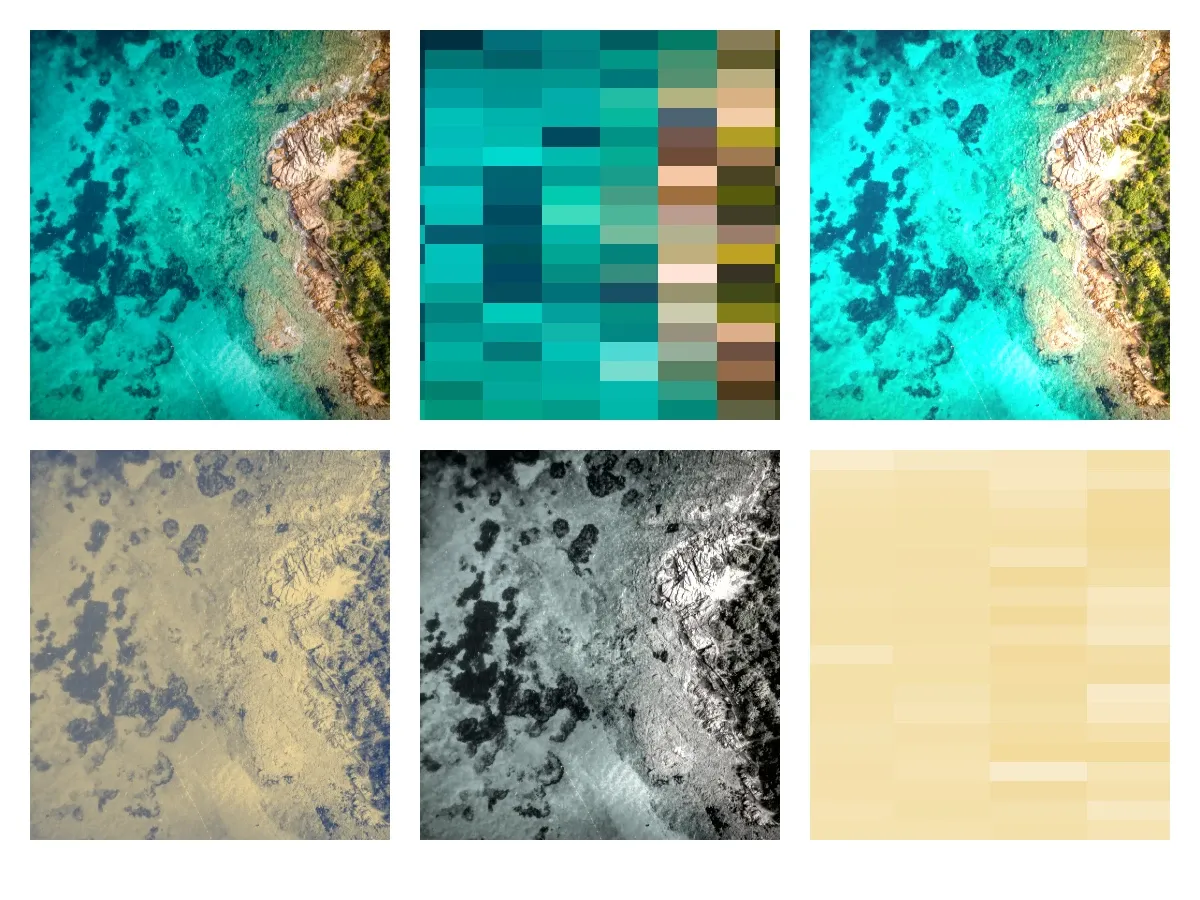
CE.SDK uses a single effect API for both filters and effects. Filters apply color transformations such as LUT filters and duotone, while effects apply visual modifications such as blur, pixelize, vignette, and image adjustments. Both are created with createEffect and attached to a block’s effect list, where they render in order and can be stacked, toggled, and removed individually.
Many design blocks — such as pages and graphic blocks — support effects, while others like the scene block do not. The examples below apply effects to graphic blocks with image fills, laying out the same photo in a grid so each effect can be compared against the original.
Programmatic Effect Application#
Apply, configure, and combine effects directly through the engine’s block API.
Check Effect Support#
Not every block type accepts effects, so call supportsEffects(_:) before reaching for any of the other effect APIs. It returns false for the scene block and true for a graphic block.
let sceneSupportsEffects = try engine.block.supportsEffects(scene) // falselet blockSupportsEffects = try engine.block.supportsEffects(originalCell) // trueprint("scene supports effects: \(sceneSupportsEffects)")print("graphic block supports effects: \(blockSupportsEffects)")Create an Effect#
Create a new effect instance with createEffect(_:), passing the EffectType you want. Here we create a pixelize effect and an adjustments effect. Creating an effect does not change the rendered output yet — the effect has to be attached to a block first.
let pixelize = try engine.block.createEffect(.pixelize)let adjustments = try engine.block.createEffect(.adjustments)Add Effects to a Block#
Attach an effect to the end of a block’s effect list with appendEffect(_:effectID:), or place it at a specific position with insertEffect(_:effectID:index:). Use removeEffect(_:index:) to take one out of the list. Here the pixelize and adjustments effects are each appended to their own image block.
try engine.block.appendEffect(pixelizeCell, effectID: pixelize)try engine.block.appendEffect(adjustmentsCell, effectID: adjustments)Configure Effect Properties#
Each effect type exposes its own set of properties. List them with findAllProperties(_:), then set each value with the typed setter that matches the property — for example setFloat(_:property:value:) for amounts like brightness and contrast, and setInt(_:property:value:) for discrete values like pixel size.
let pixelizeProperties = try engine.block.findAllProperties(pixelize)let adjustmentProperties = try engine.block.findAllProperties(adjustments)print("pixelize properties: \(pixelizeProperties)")print("adjustment properties: \(adjustmentProperties)")The adjustments effect leaves the image unchanged until at least one of its properties — such as brightness — is set to a non-zero value.
try engine.block.setInt(pixelize, property: "effect/pixelize/horizontalPixelSize", value: 10)try engine.block.setFloat(adjustments, property: "effect/adjustments/brightness", value: 0.2)try engine.block.setFloat(adjustments, property: "effect/adjustments/contrast", value: 0.15)Apply LUT Filters#
A LUT (look-up table) filter applies color grading by mapping each source color through a lookup-table image. Set the LUT image with setURL(_:property:value:) on effect/lut_filter/lutFileURI, match horizontalTileCount and verticalTileCount to the grid baked into that image, and control the blend with intensity (from 0.0 for the original to 1.0 for the full filter).
let lutFilter = try engine.block.createEffect(.lutFilter)try engine.block.setURL( lutFilter, property: "effect/lut_filter/lutFileURI", value: baseURL.appendingPathComponent("ly.img.filter.lut/LUTs/imgly_lut_ad1920_5_5_128.png"),)try engine.block.setInt(lutFilter, property: "effect/lut_filter/horizontalTileCount", value: 5)try engine.block.setInt(lutFilter, property: "effect/lut_filter/verticalTileCount", value: 5)try engine.block.setFloat(lutFilter, property: "effect/lut_filter/intensity", value: 0.9)try engine.block.appendEffect(lutCell, effectID: lutFilter)In a full editor you can also browse the available LUT filters through the asset library with engine.asset.findAssets(...) and apply them by their metadata. See Create a Custom LUT Filter for the complete LUT workflow, including the tile-count layout.
Apply Duotone Filters#
A duotone filter remaps the image’s tones onto two colors, mapping darker areas toward a dark color and lighter areas toward a light color. Set both colors with setColor(_:property:color:). The intensity property is a mixing weight from -1.0 to 1.0: positive values emphasize the light color and negative values emphasize the dark color.
let duotone = try engine.block.createEffect(.duotoneFilter)try engine.block.setColor( duotone, property: "effect/duotone_filter/darkColor", color: .rgba(r: 0.1, g: 0.2, b: 0.4, a: 1),)try engine.block.setColor( duotone, property: "effect/duotone_filter/lightColor", color: .rgba(r: 0.95, g: 0.85, b: 0.6, a: 1),)try engine.block.setFloat(duotone, property: "effect/duotone_filter/intensity", value: 0.8)try engine.block.appendEffect(duotoneCell, effectID: duotone)Combine Multiple Effects#
Stack several effects on a single block to build a layered treatment. Effects render in the order they appear in the list, so the insertion position matters. Here the adjustments effect is inserted at index 0 so it runs before the duotone and pixelize effects.
let comboAdjustments = try engine.block.createEffect(.adjustments)try engine.block.setFloat(comboAdjustments, property: "effect/adjustments/brightness", value: 0.2)let comboDuotone = try engine.block.createEffect(.duotoneFilter)try engine.block.setColor(  comboDuotone,  property: "effect/duotone_filter/lightColor",  color: .rgba(r: 0.95, g: 0.85, b: 0.6, a: 1),)try engine.block.setFloat(comboDuotone, property: "effect/duotone_filter/intensity", value: 0.6)let comboPixelize = try engine.block.createEffect(.pixelize)try engine.block.setInt(comboPixelize, property: "effect/pixelize/horizontalPixelSize", value: 6)
try engine.block.appendEffect(combinedCell, effectID: comboDuotone)try engine.block.appendEffect(combinedCell, effectID: comboPixelize)try engine.block.insertEffect(combinedCell, effectID: comboAdjustments, index: 0)
Managing Applied Effects#
Inspect, toggle, and remove the effects already attached to a block.
Query Applied Effects#
Use getEffects(_:) to read a block’s ordered list of effect ids. This is the entry point for building an effect-management interface or inspecting what is currently applied; the order reflects how the effects render.
let effectsList = try engine.block.getEffects(combinedCell)print("applied effects: \(effectsList)")Enable and Disable Effects#
Toggle an individual effect without removing it using setEffectEnabled(effectID:enabled:). Disabled effects are skipped when the block renders, while their properties stay intact for when you enable them again. Read the current state with isEffectEnabled(effectID:).
try engine.block.setEffectEnabled(effectID: comboPixelize, enabled: false)let pixelizeEnabled = try engine.block.isEffectEnabled(effectID: comboPixelize)print("pixelize enabled: \(pixelizeEnabled)")Destroy Unused Effects#
Removing an effect from a block’s list does not free it. Destroy an effect you no longer need with destroy(_:), the same API used for design blocks. Effects still attached to a block are destroyed automatically when the block itself is destroyed.
try engine.block.removeEffect(combinedCell, index: 2)try engine.block.destroy(comboPixelize)Additional Techniques#
Patterns for applying effects at scale and packaging them for reuse.
Batch Processing#
Apply the same effect across many blocks by iterating over them. Check supportsEffects(_:) on each block before creating an effect so unsupported blocks are skipped. Here every graphic block on the page receives a small brightness lift.
let graphicBlocks = try engine.block.find(byType: .graphic)for graphic in graphicBlocks { guard try engine.block.supportsEffects(graphic) else { continue } let batchAdjustments = try engine.block.createEffect(.adjustments) try engine.block.setFloat(batchAdjustments, property: "effect/adjustments/brightness", value: 0.1) try engine.block.appendEffect(graphic, effectID: batchAdjustments)}Reusable Effect Presets#
Bundle a set of effects into a reusable function to apply a consistent look — a brand filter or a film emulation — across blocks or sessions. The preset below stacks a desaturating adjustments effect with a warm duotone.
@MainActorprivate func applyVintagePreset(engine: Engine, to block: DesignBlockID) throws {  let adjustments = try engine.block.createEffect(.adjustments)  try engine.block.setFloat(adjustments, property: "effect/adjustments/contrast", value: -0.15)  try engine.block.setFloat(adjustments, property: "effect/adjustments/saturation", value: -0.2)  try engine.block.appendEffect(block, effectID: adjustments)
  let duotone = try engine.block.createEffect(.duotoneFilter)  try engine.block.setColor(    duotone,    property: "effect/duotone_filter/darkColor",    color: .rgba(r: 0.2, g: 0.15, b: 0.1, a: 1),  )  try engine.block.setColor(    duotone,    property: "effect/duotone_filter/lightColor",    color: .rgba(r: 0.95, g: 0.9, b: 0.75, a: 1),  )  try engine.block.setFloat(duotone, property: "effect/duotone_filter/intensity", value: 0.4)  try engine.block.appendEffect(block, effectID: duotone)}
Effect properties are fixed values rather than keyframes. To vary an effect over time, animate the block itself with the engine’s animation APIs rather than mutating effect properties on a timer.
Performance Considerations#
Effects render on the GPU, but each one adds work to every frame the block appears in. A few guidelines keep rendering responsive:
- Stack only the effects you need — every entry in a block’s list is evaluated on each render.
- Color adjustments are inexpensive, while LUT filters and blurs are heavier. Favor adjustments when either would achieve the look.
- On lower-powered devices, keep the number of simultaneous effects per block small.
- When applying the same treatment across many blocks, reuse the same property values rather than recomputing them per block, and disable effects with
setEffectEnabled(effectID:enabled:)during heavy editing instead of removing and recreating them.
Troubleshooting#
| Symptom | Cause | Solution |
|---|---|---|
| Effect has no visible result | The effect was created but never attached | Call appendEffect or insertEffect to add it to the block’s list |
| Adjustments effect does nothing | All adjustment properties are still at their default of zero | Set a property such as effect/adjustments/brightness to a non-zero value |
| LUT filter has no visible result | The LUT image URL does not resolve, or the tile counts do not match the image | Confirm the URL loads and set horizontalTileCount and verticalTileCount to match the LUT image’s grid |
| Effect still renders after removal | removeEffect detaches but does not destroy |
Call destroy on the effect to free it |
| Effect missing after saving and reloading a scene | Effects serialize with the scene, but a referenced resource such as a LUT image may no longer resolve, or the effect was destroyed before saving | Keep the lutFileURI reachable after load, and avoid destroying effects you still need |
| Attaching an effect throws an error | The target block does not support effects | Verify with supportsEffects before attaching |
API Reference#
Methods#
| Method | Description |
|---|---|
engine.block.supportsEffects(_:) |
Check whether a block supports effects |
engine.block.createEffect(_:) |
Create a new effect instance of an EffectType |
engine.block.appendEffect(_:effectID:) |
Add an effect to the end of a block’s effect list |
engine.block.insertEffect(_:effectID:index:) |
Insert an effect at a specific position |
engine.block.removeEffect(_:index:) |
Remove the effect at an index from a block’s list |
engine.block.getEffects(_:) |
Get the ordered list of effect ids applied to a block |
engine.block.findAllProperties(_:) |
List all property keys of an effect |
engine.block.find(byType:) |
Find all blocks of a DesignBlockType |
engine.block.setInt(_:property:value:) |
Set an integer effect property |
engine.block.setFloat(_:property:value:) |
Set a floating-point effect property |
engine.block.setURL(_:property:value:) |
Set a URL effect property such as a LUT file |
engine.block.setColor(_:property:color:) |
Set a color effect property |
engine.block.setEffectEnabled(effectID:enabled:) |
Enable or disable an effect |
engine.block.isEffectEnabled(effectID:) |
Check whether an effect is enabled |
engine.block.destroy(_:) |
Destroy an effect instance |
Properties#
| Property | Type | Description |
|---|---|---|
effect/pixelize/horizontalPixelSize |
Int | Size of the pixelization blocks |
effect/adjustments/brightness |
Float | Brightness adjustment |
effect/adjustments/contrast |
Float | Contrast adjustment |
effect/lut_filter/lutFileURI |
URL | URL of the LUT image |
effect/lut_filter/horizontalTileCount |
Int | Number of LUT tiles per row |
effect/lut_filter/verticalTileCount |
Int | Number of LUT tiles per column |
effect/lut_filter/intensity |
Float | LUT blend amount, from 0.0 to 1.0 |
effect/duotone_filter/darkColor |
Color | Color mapped to shadows |
effect/duotone_filter/lightColor |
Color | Color mapped to highlights |
effect/duotone_filter/intensity |
Float | Mixing weight from -1.0 to 1.0; positive emphasizes the light color, negative the dark |
Next Steps#
- Filters & Effects Overview — Browse every filter and effect CE.SDK provides.
- Create a Custom LUT Filter — Apply professional color grading with a LUT file.
- Blur Effects — Soften backgrounds and create depth with the blur API.
- Chroma Key (Green Screen) — Remove a background color from an image or video.