Add vector shapes and pre-made stickers to your designs programmatically with the Swift Engine API. Shapes require fills or strokes to be visible and offer type-specific properties like corner radius and star points.
Shapes are vector graphics created with engine.block.createShape(_:) and attached to graphic blocks. CE.SDK supports six shape types: rect, ellipse, star, polygon, line, and vectorPath. Stickers are pre-made graphic assets loaded from sources like ly.img.sticker.
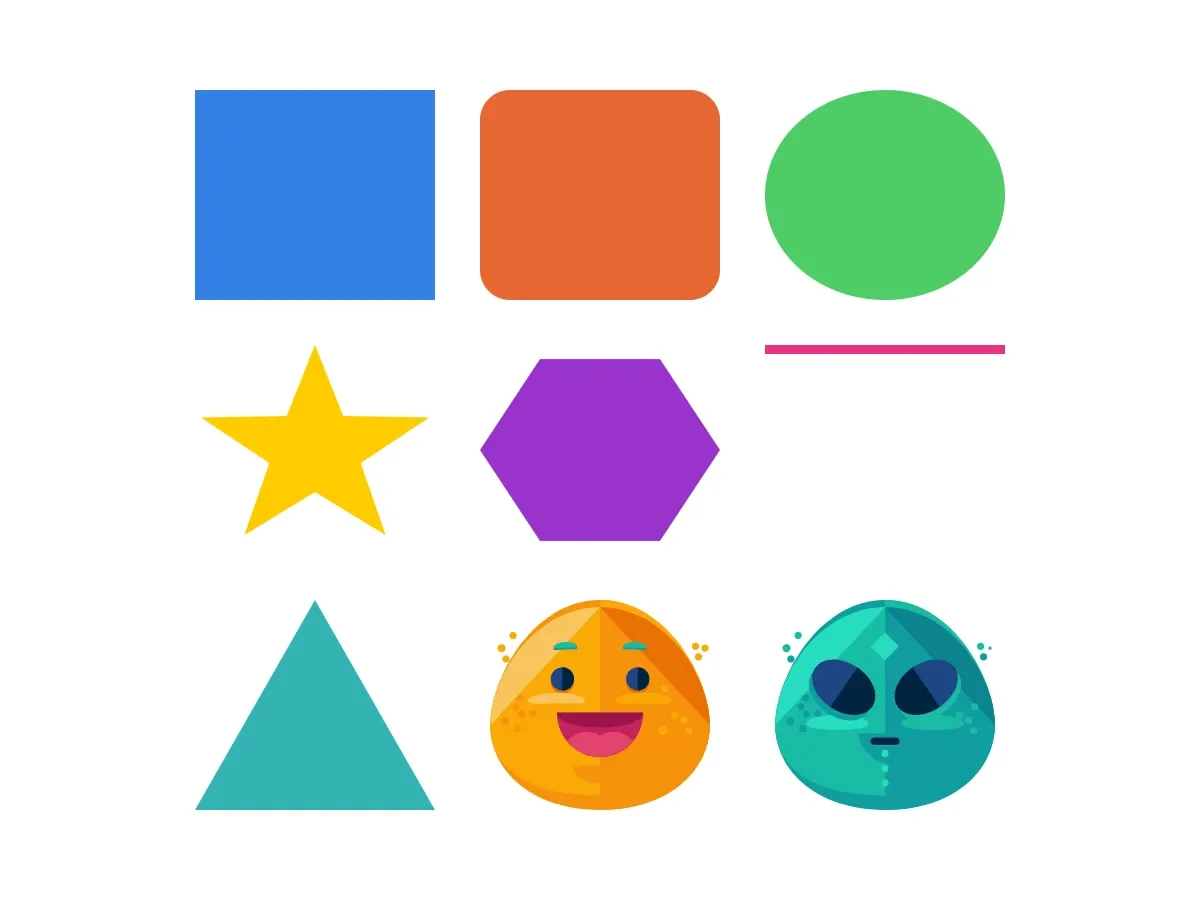
This guide covers creating each shape type, configuring shape-specific properties, applying fills, inserting stickers by hand, and querying stickers from the asset library.
Programmatic Shape Creation#
Check Shape Support#
Before attaching a shape to a block, confirm the block supports shapes with supportsShape(_:). Graphic blocks return true; text blocks return false.
// Graphic blocks support shapes.let testBlock = try engine.block.create(.graphic)let supportsShape = try engine.block.supportsShape(testBlock)print("Graphic block supports shapes: \(supportsShape)")
// Text blocks do not.let textBlock = try engine.block.create(.text)let textSupportsShape = try engine.block.supportsShape(textBlock)print("Text block supports shapes: \(textSupportsShape)")try engine.block.destroy(textBlock)try engine.block.destroy(testBlock)
Create Rectangle#
Create rectangles with createShape(.rect) and attach them to a graphic block with setShape(_:shape:). Apply a color fill to make the shape visible.
// Create a graphic block, attach a rect shape, then apply a solid color fill.let rectBlock = try engine.block.create(.graphic)let rectShape = try engine.block.createShape(.rect)try engine.block.setShape(rectBlock, shape: rectShape)
let rectFill = try engine.block.createFill(.color)try engine.block.setColor(  rectFill,  property: "fill/color/value",  color: .rgba(r: 0.2, g: 0.5, b: 0.9, a: 1.0),)try engine.block.setFill(rectBlock, fill: rectFill)
try engine.block.setWidth(rectBlock, value: blockWidth)try engine.block.setHeight(rectBlock, value: blockHeight)try engine.block.appendChild(to: page, child: rectBlock)
A bare graphic block has empty shape and fill placeholders on creation, so a shape and a fill are both required before the block renders.
Create Rounded Rectangle#
Rectangles support per-corner radii. Set each corner individually with setFloat(_:property:value:) using shape/rect/cornerRadiusTL, cornerRadiusTR, cornerRadiusBL, and cornerRadiusBR.
// A rounded rectangle is a rect shape with non-zero corner radii.let roundedBlock = try engine.block.create(.graphic)let roundedShape = try engine.block.createShape(.rect)try engine.block.setShape(roundedBlock, shape: roundedShape)
try engine.block.setFloat(roundedShape, property: "shape/rect/cornerRadiusTL", value: 20)try engine.block.setFloat(roundedShape, property: "shape/rect/cornerRadiusTR", value: 20)try engine.block.setFloat(roundedShape, property: "shape/rect/cornerRadiusBL", value: 20)try engine.block.setFloat(roundedShape, property: "shape/rect/cornerRadiusBR", value: 20)
let roundedFill = try engine.block.createFill(.color)try engine.block.setColor(  roundedFill,  property: "fill/color/value",  color: .rgba(r: 0.9, g: 0.4, b: 0.2, a: 1.0),)try engine.block.setFill(roundedBlock, fill: roundedFill)
try engine.block.setWidth(roundedBlock, value: blockWidth)try engine.block.setHeight(roundedBlock, value: blockHeight)try engine.block.appendChild(to: page, child: roundedBlock)
Use different values per corner for asymmetric rounding, or the same value for a uniformly rounded rectangle.
Create Ellipse#
Create circles and ovals with createShape(.ellipse). The block’s width and height determine the rendered shape: pass equal values for a circle, unequal values — like the 160×140 in the example below — for an oval.
// An ellipse with equal width and height renders as a circle.let ellipseBlock = try engine.block.create(.graphic)let ellipseShape = try engine.block.createShape(.ellipse)try engine.block.setShape(ellipseBlock, shape: ellipseShape)
let ellipseFill = try engine.block.createFill(.color)try engine.block.setColor(  ellipseFill,  property: "fill/color/value",  color: .rgba(r: 0.3, g: 0.8, b: 0.4, a: 1.0),)try engine.block.setFill(ellipseBlock, fill: ellipseFill)
try engine.block.setWidth(ellipseBlock, value: blockWidth)try engine.block.setHeight(ellipseBlock, value: blockHeight)try engine.block.appendChild(to: page, child: ellipseBlock)
Create Star#
Create stars with createShape(.star). Configure the point count with shape/star/points and the inner diameter with shape/star/innerDiameter, which is normalized to 0.0–1.0. Lower values produce thinner points.
// A 5-point star. `shape/star/innerDiameter` is normalized 0.0–1.0.let starBlock = try engine.block.create(.graphic)let starShape = try engine.block.createShape(.star)try engine.block.setShape(starBlock, shape: starShape)
try engine.block.setInt(starShape, property: "shape/star/points", value: 5)try engine.block.setFloat(starShape, property: "shape/star/innerDiameter", value: 0.4)
let starFill = try engine.block.createFill(.color)try engine.block.setColor(  starFill,  property: "fill/color/value",  color: .rgba(r: 1.0, g: 0.8, b: 0.0, a: 1.0),)try engine.block.setFill(starBlock, fill: starFill)
try engine.block.setWidth(starBlock, value: blockWidth)try engine.block.setHeight(starBlock, value: blockHeight)try engine.block.appendChild(to: page, child: starBlock)
Create Polygon#
Create regular polygons with createShape(.polygon). Set the number of sides with shape/polygon/sides to render triangles (3), pentagons (5), hexagons (6), and beyond.
// A regular hexagon: 6 sides.let polygonBlock = try engine.block.create(.graphic)let polygonShape = try engine.block.createShape(.polygon)try engine.block.setShape(polygonBlock, shape: polygonShape)
try engine.block.setInt(polygonShape, property: "shape/polygon/sides", value: 6)
let polygonFill = try engine.block.createFill(.color)try engine.block.setColor(  polygonFill,  property: "fill/color/value",  color: .rgba(r: 0.6, g: 0.2, b: 0.8, a: 1.0),)try engine.block.setFill(polygonBlock, fill: polygonFill)
try engine.block.setWidth(polygonBlock, value: blockWidth)try engine.block.setHeight(polygonBlock, value: blockHeight)try engine.block.appendChild(to: page, child: polygonBlock)
Create Line#
Create lines with createShape(.line). Lines render through their stroke, so enable the stroke, set the color with setStrokeColor(_:color:) and the thickness with setStrokeWidth(_:width:), then size the block so its height matches the stroke width — that’s what makes the bounding box read as a line in the canvas.
// Attaching a line shape promotes the parent's fill into its stroke// automatically — `setStrokeEnabled(true)` here is explicit.let lineBlock = try engine.block.create(.graphic)let lineShape = try engine.block.createShape(.line)try engine.block.setShape(lineBlock, shape: lineShape)
try engine.block.setStrokeEnabled(lineBlock, enabled: true)try engine.block.setStrokeWidth(lineBlock, width: 6)try engine.block.setStrokeColor(  lineBlock,  color: .rgba(r: 0.9, g: 0.2, b: 0.5, a: 1.0),)
try engine.block.setWidth(lineBlock, value: blockWidth)try engine.block.setHeight(lineBlock, value: 6)try engine.block.appendChild(to: page, child: lineBlock)
Attaching a line shape configures the parent block for line rendering: the engine disables the fill and enables the stroke for you. Calling setStrokeEnabled(_:enabled:) explicitly in the snippet keeps the intent visible.
Create Vector Path#
Create custom shapes with createShape(.vectorPath). Set the SVG path with setString(_:property:value:) using the shape/vector_path/path property. Path coordinates scale proportionally with the block’s width and height.
// Custom shapes are defined by an SVG path. Coordinates scale with the block.let vectorPathBlock = try engine.block.create(.graphic)let vectorPathShape = try engine.block.createShape(.vectorPath)try engine.block.setShape(vectorPathBlock, shape: vectorPathShape)
let trianglePath = "M 50,0 L 100,100 L 0,100 Z"try engine.block.setString(  vectorPathShape,  property: "shape/vector_path/path",  value: trianglePath,)
let vectorPathFill = try engine.block.createFill(.color)try engine.block.setColor(  vectorPathFill,  property: "fill/color/value",  color: .rgba(r: 0.2, g: 0.7, b: 0.7, a: 1.0),)try engine.block.setFill(vectorPathBlock, fill: vectorPathFill)
try engine.block.setWidth(vectorPathBlock, value: blockWidth)try engine.block.setHeight(vectorPathBlock, value: blockHeight)try engine.block.appendChild(to: page, child: vectorPathBlock)
The example draws a triangle by moving to the top center, then to the bottom-right and bottom-left corners. Any valid SVG path syntax works.
Discover Shape Properties#
Use findAllProperties(_:) to list every configurable property for a given shape. This is useful when exploring an unfamiliar shape type or building generic editing tools.
let starProperties = try engine.block.findAllProperties(starShape)print("Star shape properties: \(starProperties)")Each shape type exposes its own set of properties:
- Rectangle:
shape/rect/cornerRadiusTL,cornerRadiusTR,cornerRadiusBL,cornerRadiusBR - Star:
shape/star/points,shape/star/innerDiameter,shape/star/cornerRadius - Polygon:
shape/polygon/sides - Vector Path:
shape/vector_path/path
Programmatic Sticker Insertion#
Insert a Sticker#
A sticker is a graphic block with a rect shape and an image fill. Set the fill’s fill/image/imageFileURI to point at the sticker source, then tag the block as a sticker with setKind(_:kind:) so the editor categorizes it correctly.
// A sticker is a graphic block with a rect shape and an image fill.let stickerBlock = try engine.block.create(.graphic)let stickerShape = try engine.block.createShape(.rect)try engine.block.setShape(stickerBlock, shape: stickerShape)
let stickerFill = try engine.block.createFill(.image)let stickerURL = baseURL.appendingPathComponent(  "ly.img.sticker/images/emoticons/imgly_sticker_emoticons_grin.svg",)try engine.block.setURL(stickerFill, property: "fill/image/imageFileURI", value: stickerURL)try engine.block.setFill(stickerBlock, fill: stickerFill)
// Preserve the sticker's aspect ratio inside the block bounds.if try engine.block.supportsContentFillMode(stickerBlock) {  try engine.block.setContentFillMode(stickerBlock, mode: .contain)}
// Tag the block as a sticker so the editor categorizes it correctly.try engine.block.setKind(stickerBlock, kind: "sticker")
try engine.block.setWidth(stickerBlock, value: blockWidth)try engine.block.setHeight(stickerBlock, value: blockHeight)try engine.block.appendChild(to: page, child: stickerBlock)
setContentFillMode(_:mode:) with .contain preserves the sticker’s aspect ratio inside the block bounds. Guard the call with supportsContentFillMode(_:) since some block configurations don’t expose the property.
Query Stickers from Asset Library#
Register the sticker asset source with addLocalAssetSourceFromJSON(_:matcher:) pointed at the ly.img.sticker manifest. Once registered, browse the catalog with findAssets(sourceID:query:).
// Register the sticker asset source by loading its content.json. The// returned ID matches the `id` field in the JSON (here, `ly.img.sticker`).let stickerSourceID = try await engine.asset.addLocalAssetSourceFromJSON(  baseURL.appendingPathComponent("ly.img.sticker/content.json"),)
// Query the first page of stickers. `query` accepts a fuzzy search string;// `groups` narrows the result to a single category.let stickerResults = try await engine.asset.findAssets(  sourceID: stickerSourceID,  query: .init(    query: nil,    page: 0,    groups: ["emoticons"],    perPage: 5,  ),)print("Stickers in emoticons category: \(stickerResults.total)")
The query parameter accepts a fuzzy search string; groups narrows the result to a single category. Pass query: nil to retrieve every sticker. For vector-based shape assets, use ly.img.vector.shape as the source ID instead.
Apply a Sticker from the Library#
apply(sourceID:assetResult:) builds a graphic block from an asset’s metadata — shape, image fill, kind, dimensions — and attaches it to the current page, so the manual appendChild(to:child:) step is unnecessary. The return value is an optional DesignBlockID that’s nil when the asset source declines to materialize a block.
// `apply(sourceID:assetResult:)` creates a graphic block from the asset's// metadata, attaches it to the current page, and returns its handle — there// is no need to call `appendChild` again.if let firstSticker = stickerResults.assets.first, let stickerFromLibrary = try await engine.asset.apply( sourceID: stickerSourceID, assetResult: firstSticker, ) { // The default content fill mode for an applied block is `.crop`. Switch to // `.contain` so the sticker preserves its aspect ratio inside the cell. if try engine.block.supportsContentFillMode(stickerFromLibrary) { try engine.block.setContentFillMode(stickerFromLibrary, mode: .contain) } try engine.block.setWidth(stickerFromLibrary, value: blockWidth) try engine.block.setHeight(stickerFromLibrary, value: blockHeight)}The engine’s default content fill mode for an applied sticker is .crop. Switch to .contain after apply() returns to preserve the sticker’s aspect ratio — the snippet does this before the explicit setWidth(_:value:) and setHeight(_:value:) calls that resize the block into the demo grid.
This is the recommended path when the sticker URL comes from the asset library. The manual construction path above is better when the sticker URL is known up front.
Troubleshooting#
Shape Not Visible#
If a shape doesn’t appear after creation:
- Verify a fill is applied. Shapes without fills are invisible. Create a fill with
createFill(_:)and apply it withsetFill(_:fill:). - Check the block is added to the page. Call
appendChild(to:child:)to attach the block to the scene hierarchy. - Ensure dimensions are set. Call
setWidth(_:value:)andsetHeight(_:value:)to give the shape a size.
Line Not Visible#
Lines render through their stroke, not a fill. Enable the stroke with setStrokeEnabled(_:enabled:) and set a stroke width — a line without an enabled stroke is invisible even when its color is set.
Sticker Appears Cropped#
Set setContentFillMode(_:mode:) to .contain to preserve the sticker’s aspect ratio inside the block bounds. Check supportsContentFillMode(_:) before calling, since some block configurations don’t expose the property.
Invalid Shape Type#
createShape(_:) accepts only the ShapeType enum cases: .rect, .ellipse, .star, .polygon, .line, .vectorPath. String-based overloads are deprecated; prefer the enum.
API Reference#
| Method | Description |
|---|---|
engine.block.create(_:) |
Create a graphic block to host a shape |
engine.block.createShape(_:) |
Create a shape of the specified ShapeType |
engine.block.supportsShape(_:) |
Check whether a block supports shapes |
engine.block.setShape(_:shape:) |
Attach a shape to a graphic block |
engine.block.findAllProperties(_:) |
List every configurable property of a block |
engine.block.setInt(_:property:value:) |
Set an integer property (points, sides) |
engine.block.setFloat(_:property:value:) |
Set a float property (corner radius, diameter) |
engine.block.setString(_:property:value:) |
Set a string property (vector path, image URI) |
engine.block.createFill(_:) |
Create a fill of the specified FillType |
engine.block.setFill(_:fill:) |
Apply a fill to a block |
engine.block.setColor(_:property:color:) |
Set a color property |
engine.block.setKind(_:kind:) |
Set a block’s kind for categorization |
engine.block.setContentFillMode(_:mode:) |
Set how a fill is laid out within the block |
engine.block.supportsContentFillMode(_:) |
Check whether the block supports content fill modes |
engine.block.setStrokeEnabled(_:enabled:) |
Enable or disable a block’s stroke |
engine.block.setStrokeWidth(_:width:) |
Set the stroke thickness |
engine.block.setStrokeColor(_:color:) |
Set the stroke color |
engine.block.setWidth(_:value:maintainCrop:) |
Set the block width |
engine.block.setHeight(_:value:maintainCrop:) |
Set the block height |
engine.block.appendChild(to:child:) |
Attach a block to a parent |
engine.asset.addLocalAssetSourceFromJSON(_:matcher:) |
Register an asset source from a content.json URL |
engine.asset.findAssets(sourceID:query:) |
Query assets from a registered source |
engine.asset.apply(sourceID:assetResult:) |
Materialize a block from an asset result |
Next Steps#
- Colors — Work with colors, fills, and gradients
- Filters and Effects — Apply visual effects to design elements
- Position and Align — Position elements precisely on the canvas