Transform images by swapping specific colors using the Recolor effect or remove backgrounds with the Green Screen effect in CE.SDK.
CE.SDK offers two color replacement effects. The Recolor effect swaps one color for another while preserving image details. The Green Screen effect removes background colors with transparency. Both effects provide precise control over color matching, edge smoothness, and intensity.
This guide shows how to enable the built-in effects UI for interactive color replacement and apply effects programmatically using the block API.
Using the Built-in Effects UI#
Enable Effects Panel#
We enable the effects feature using CE.SDK’s Feature API. The effects panel appears in the inspector when users select a compatible graphic block.
// Enable effects in the inspector panel using the Feature APIcesdk.feature.enable('ly.img.effect'); // Enable all effects including recolor and green screenEnabling ly.img.effect makes all effect options available in the inspector panel, including Recolor and Green Screen.
User Workflow#
With effects enabled, users can replace colors through the inspector panel:
- Select an image block - Click an image or graphic block on the canvas
- Open inspector - The inspector shows available options for the selected element
- Find effects section - Scroll to the effects section
- Choose Recolor or Green Screen - Click the desired effect
- Select colors - Use the color picker to specify source and target colors
- Adjust parameters - Fine-tune color matching, smoothness, and intensity
- Toggle effects - Enable or disable effects to compare results
Users can experiment with color replacements and see results immediately.
Programmatic Color Replacement#
Initialize CE.SDK#
To apply color replacement programmatically, we set up CE.SDK with the proper configuration.
await cesdk.addPlugin(new DesignEditorConfig());
// Add asset source pluginsawait cesdk.addPlugin(new BlurAssetSource());await cesdk.addPlugin(new ColorPaletteAssetSource());await cesdk.addPlugin(new CropPresetsAssetSource());await cesdk.addPlugin(new UploadAssetSources({ include: ['ly.img.image.upload'] }));await cesdk.addPlugin(  new DemoAssetSources({    include: [      'ly.img.templates.blank.*',      'ly.img.templates.presentation.*',      'ly.img.templates.print.*',      'ly.img.templates.social.*',      'ly.img.image.*'    ]  }));await cesdk.addPlugin(new EffectsAssetSource());await cesdk.addPlugin(new FiltersAssetSource());await cesdk.addPlugin(new PagePresetsAssetSource());await cesdk.addPlugin(new StickerAssetSource());await cesdk.addPlugin(new TextAssetSource());await cesdk.addPlugin(new TextComponentAssetSource());await cesdk.addPlugin(new TypefaceAssetSource());await cesdk.addPlugin(new VectorShapeAssetSource());
await cesdk.actions.run('scene.create', {  page: { width: 800, height: 600, unit: 'Pixel' }});
const engine = cesdk.engine;const page = engine.block.findByType('page')[0];
const pageWidth = engine.block.getWidth(page);const pageHeight = engine.block.getHeight(page);
This initializes CE.SDK with the effects panel enabled, providing both UI and API access.
Creating and Applying Recolor Effects#
The Recolor effect swaps one color for another throughout an image. We create a Recolor effect using engine.block.createEffect('recolor') and specify the source and target colors.
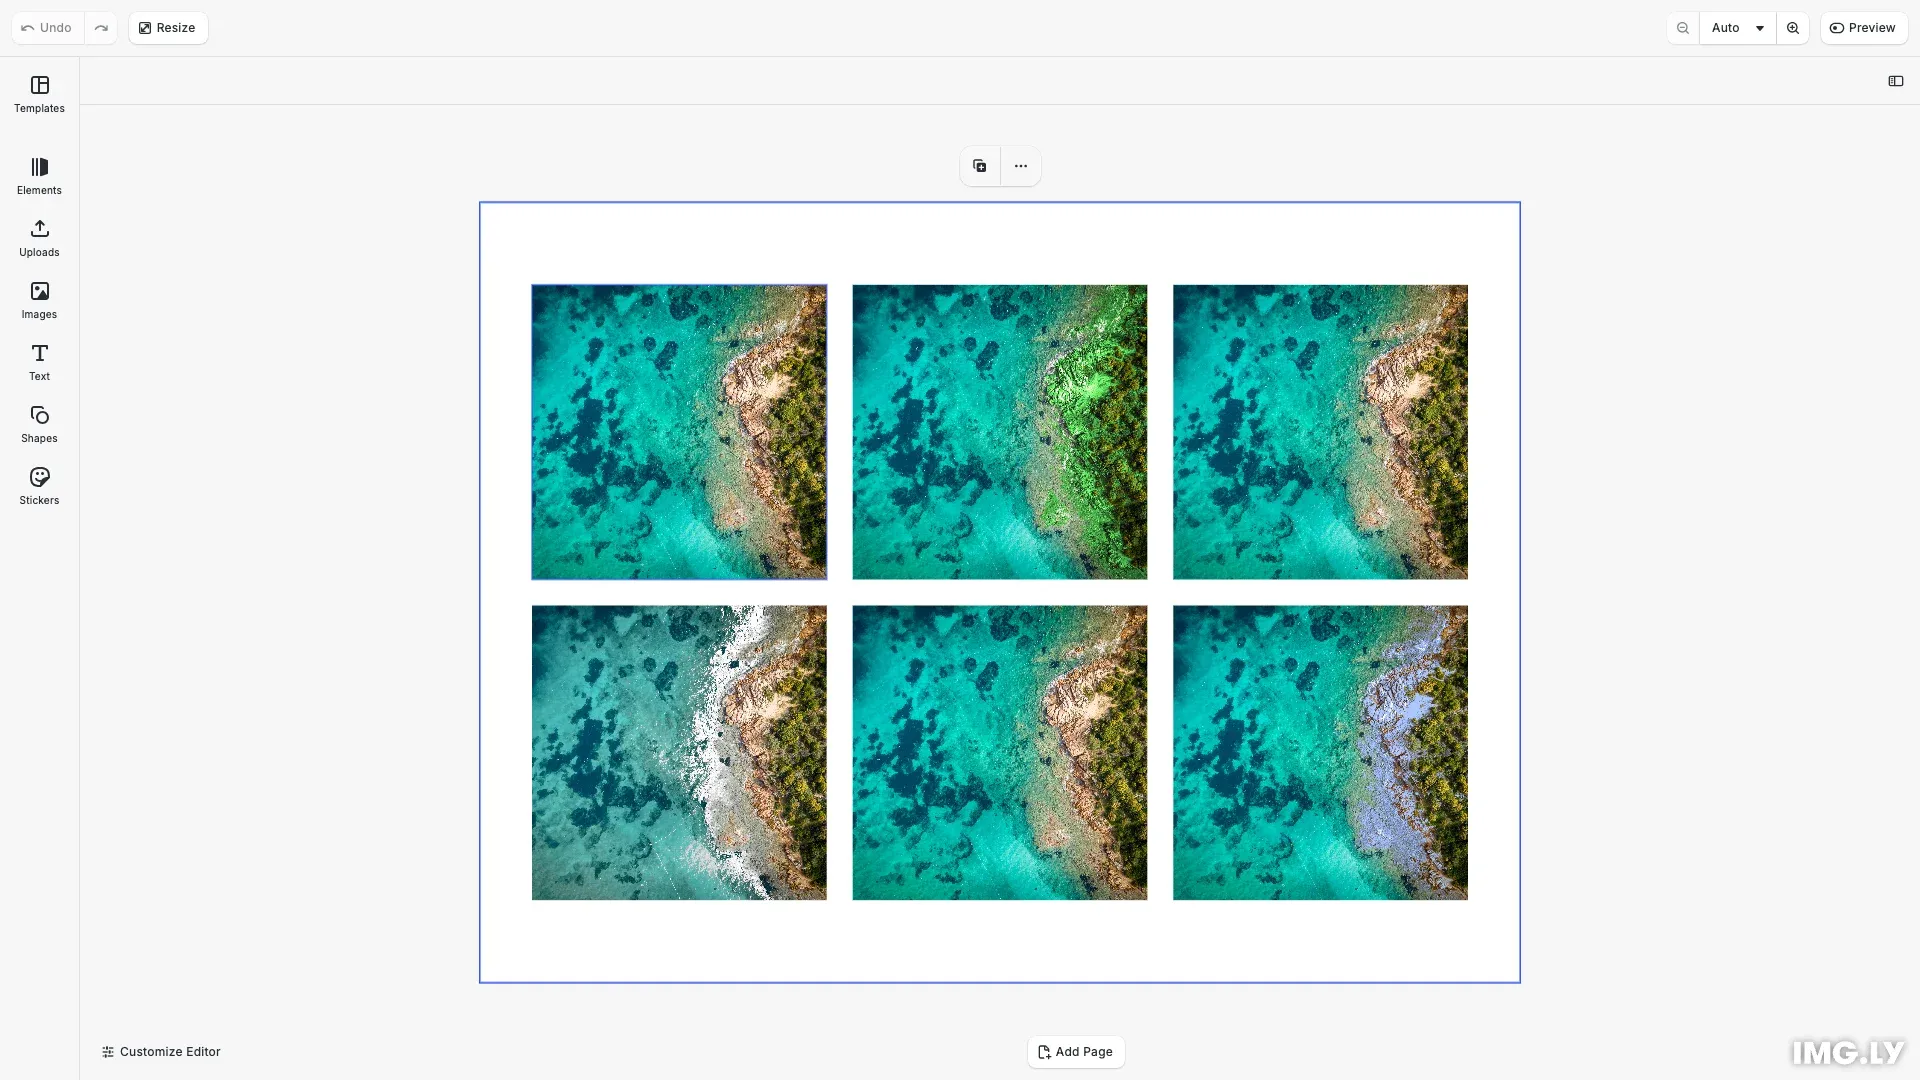
// Create a Recolor effect to swap red colors to blueconst block1 = await engine.block.addImage(imageUri, { size: blockSize });engine.block.appendChild(page, block1);
const recolorEffect = engine.block.createEffect('recolor');engine.block.setColor(recolorEffect, 'effect/recolor/fromColor', {  r: 1.0,  g: 0.0,  b: 0.0,  a: 1.0}); // Red source colorengine.block.setColor(recolorEffect, 'effect/recolor/toColor', {  r: 0.0,  g: 0.5,  b: 1.0,  a: 1.0}); // Blue target colorengine.block.appendEffect(block1, recolorEffect);
// Select this block to show the effects panelengine.block.setSelected(block1, true);
The Recolor effect identifies pixels matching the source color (fromColor) and replaces them with the target color (toColor). Color values use RGBA format with values from 0.0 to 1.0.
Configuring Color Matching#
We adjust the matching tolerance and smoothness parameters to control how precisely colors must match before replacement.
// Configure color matching precision for Recolor effectconst block2 = await engine.block.addImage(imageUri, { size: blockSize });engine.block.appendChild(page, block2);
const recolorEffect2 = engine.block.createEffect('recolor');engine.block.setColor(recolorEffect2, 'effect/recolor/fromColor', {  r: 0.8,  g: 0.6,  b: 0.4,  a: 1.0}); // Skin tone sourceengine.block.setColor(recolorEffect2, 'effect/recolor/toColor', {  r: 0.3,  g: 0.7,  b: 0.3,  a: 1.0}); // Green tint// Adjust color match tolerance (0-1, higher = more inclusive)engine.block.setFloat(recolorEffect2, 'effect/recolor/colorMatch', 0.3);// Adjust brightness match toleranceengine.block.setFloat(  recolorEffect2,  'effect/recolor/brightnessMatch',  0.2);// Adjust edge smoothnessengine.block.setFloat(recolorEffect2, 'effect/recolor/smoothness', 0.1);engine.block.appendEffect(block2, recolorEffect2);
The Recolor effect provides these parameters:
- colorMatch (0-1) - How closely colors must match the source. Lower values match exact colors, higher values match broader ranges
- brightnessMatch (0-1) - Tolerance for brightness variations
- smoothness (0-1) - Edge blending to reduce artifacts
These parameters help handle images where colors vary due to lighting, shadows, or compression.
Creating and Applying Green Screen Effects#
The Green Screen effect removes backgrounds by making specific colors transparent.
// Create a Green Screen effect to remove green backgroundsconst block3 = await engine.block.addImage(imageUri, { size: blockSize });engine.block.appendChild(page, block3);
const greenScreenEffect = engine.block.createEffect('green_screen');// Specify the color to remove (green)engine.block.setColor(greenScreenEffect, 'effect/green_screen/fromColor', {  r: 0.0,  g: 1.0,  b: 0.0,  a: 1.0});engine.block.appendEffect(block3, greenScreenEffect);
The Green Screen effect identifies pixels matching the specified color (fromColor) and makes them transparent. This works best with solid-color backgrounds like green screens or blue screens.
Fine-Tuning Green Screen Removal#
We adjust the color matching tolerance, edge smoothness, and spill suppression parameters.
// Fine-tune Green Screen removal parametersconst block4 = await engine.block.addImage(imageUri, { size: blockSize });engine.block.appendChild(page, block4);
const greenScreenEffect2 = engine.block.createEffect('green_screen');engine.block.setColor(greenScreenEffect2, 'effect/green_screen/fromColor', {  r: 0.2,  g: 0.8,  b: 0.3,  a: 1.0}); // Specific green shade// Adjust color match toleranceengine.block.setFloat(  greenScreenEffect2,  'effect/green_screen/colorMatch',  0.4);// Adjust edge smoothness for cleaner removalengine.block.setFloat(  greenScreenEffect2,  'effect/green_screen/smoothness',  0.2);// Reduce color spill from green backgroundengine.block.setFloat(greenScreenEffect2, 'effect/green_screen/spill', 0.5);engine.block.appendEffect(block4, greenScreenEffect2);
The Green Screen effect provides these parameters:
- colorMatch (0-1) - Tolerance for color variations in the background
- smoothness (0-1) - Edge feathering for natural transitions
- spill (0-1) - Reduces color spill from the background onto foreground objects
These parameters help create clean composites without harsh edges or color artifacts.
Managing Multiple Effects#
We can apply multiple color replacement effects to the same block. CE.SDK maintains an effect stack for each block, applying effects in the order they were added.
// Demonstrate managing multiple effects on a blockconst block5 = await engine.block.addImage(imageUri, { size: blockSize });engine.block.appendChild(page, block5);
// Add multiple effects to the same blockconst recolor1 = engine.block.createEffect('recolor');engine.block.setColor(recolor1, 'effect/recolor/fromColor', {  r: 1.0,  g: 0.0,  b: 0.0,  a: 1.0});engine.block.setColor(recolor1, 'effect/recolor/toColor', {  r: 0.0,  g: 0.0,  b: 1.0,  a: 1.0});engine.block.appendEffect(block5, recolor1);
const recolor2 = engine.block.createEffect('recolor');engine.block.setColor(recolor2, 'effect/recolor/fromColor', {  r: 0.0,  g: 1.0,  b: 0.0,  a: 1.0});engine.block.setColor(recolor2, 'effect/recolor/toColor', {  r: 1.0,  g: 0.5,  b: 0.0,  a: 1.0});engine.block.appendEffect(block5, recolor2);
// Get all effects on the blockconst effects = engine.block.getEffects(block5);console.log('Number of effects:', effects.length); // 2
// Disable the first effect without removing itengine.block.setEffectEnabled(effects[0], false);
// Check if effect is enabledconst isEnabled = engine.block.isEffectEnabled(effects[0]);console.log('First effect enabled:', isEnabled); // false
Effect management capabilities:
- Get effects - Retrieve all effects with
engine.block.getEffects() - Enable/disable - Toggle effects with
engine.block.setEffectEnabled()without removing them - Check status - Query effect state with
engine.block.isEffectEnabled() - Remove effects - Delete effects by index with
engine.block.removeEffect()
Disabling effects is useful for before/after comparisons or performance optimization.
Batch Processing Multiple Images#
We can loop through all image blocks in a scene and apply the same effect configuration to each.
// Apply consistent color replacement across multiple blocksconst block6 = await engine.block.addImage(imageUri, { size: blockSize });engine.block.appendChild(page, block6);
// Find all image blocks in the sceneconst allBlocks = engine.block.findByType('//ly.img.ubq/graphic');
// Apply a consistent recolor effect to each blockallBlocks.forEach((blockId) => {  // Skip if block already has effects  if (engine.block.getEffects(blockId).length > 0) {    return;  }
  const batchRecolor = engine.block.createEffect('recolor');  engine.block.setColor(batchRecolor, 'effect/recolor/fromColor', {    r: 0.8,    g: 0.7,    b: 0.6,    a: 1.0  });  engine.block.setColor(batchRecolor, 'effect/recolor/toColor', {    r: 0.6,    g: 0.7,    b: 0.9,    a: 1.0  });  engine.block.setFloat(batchRecolor, 'effect/recolor/colorMatch', 0.25);  engine.block.appendEffect(blockId, batchRecolor);});
Batch processing use cases:
- Product variations - Generate multiple color variants
- Brand consistency - Apply consistent color corrections
- Automated workflows - Process multiple images with the same adjustments
The engine.block.findByType() method locates all graphic blocks in the scene.
Troubleshooting#
Common issues and solutions when working with color replacement effects:
Effect not visible
- Verify the effect is enabled with
engine.block.isEffectEnabled() - Check that the effect is attached to the correct block using
engine.block.getEffects() - Ensure the block type supports effects with
engine.block.supportsEffects()
Wrong colors being replaced
- Decrease
colorMatchfor more precise matching - Increase
colorMatchto capture broader color ranges - Adjust
brightnessMatchfor Recolor effects with lighting variations
Harsh edges or artifacts
- Increase
smoothnessto blend edges more gradually - For Green Screen, adjust
spillto reduce color contamination - Use higher resolution images for smoother results
Performance issues
- Limit active effects on a single block
- Use
engine.block.setEffectEnabled(false)to disable effects during editing - Process effects sequentially rather than simultaneously
API Reference#
| Method | Category | Purpose |
|---|---|---|
engine.block.createEffect() | Block | Create a new Recolor or Green Screen effect block |
engine.block.appendEffect() | Block | Attach an effect to an image block |
engine.block.insertEffect() | Block | Insert an effect at a specific position in the effect stack |
engine.block.removeEffect() | Block | Remove an effect from a block by index |
engine.block.getEffects() | Block | Get all effects attached to a block |
engine.block.supportsEffects() | Block | Check if a block can render effects |
engine.block.setColor() | Block | Set color properties on effect blocks |
engine.block.getColor() | Block | Get color properties from effect blocks |
engine.block.setFloat() | Block | Set numeric effect properties |
engine.block.getFloat() | Block | Get numeric effect properties |
engine.block.setEffectEnabled() | Block | Enable or disable an effect |
engine.block.isEffectEnabled() | Block | Check if an effect is enabled |
engine.block.findByType() | Block | Find all blocks of a specific type |
Next Steps#
- Apply Filters and Effects — Explore other visual effects available in CE.SDK
- Export Designs — Save your color-replaced images in various formats