Support right-to-left text, complex scripts, and multilingual typography in Android designs using CE.SDK text rendering and font APIs.
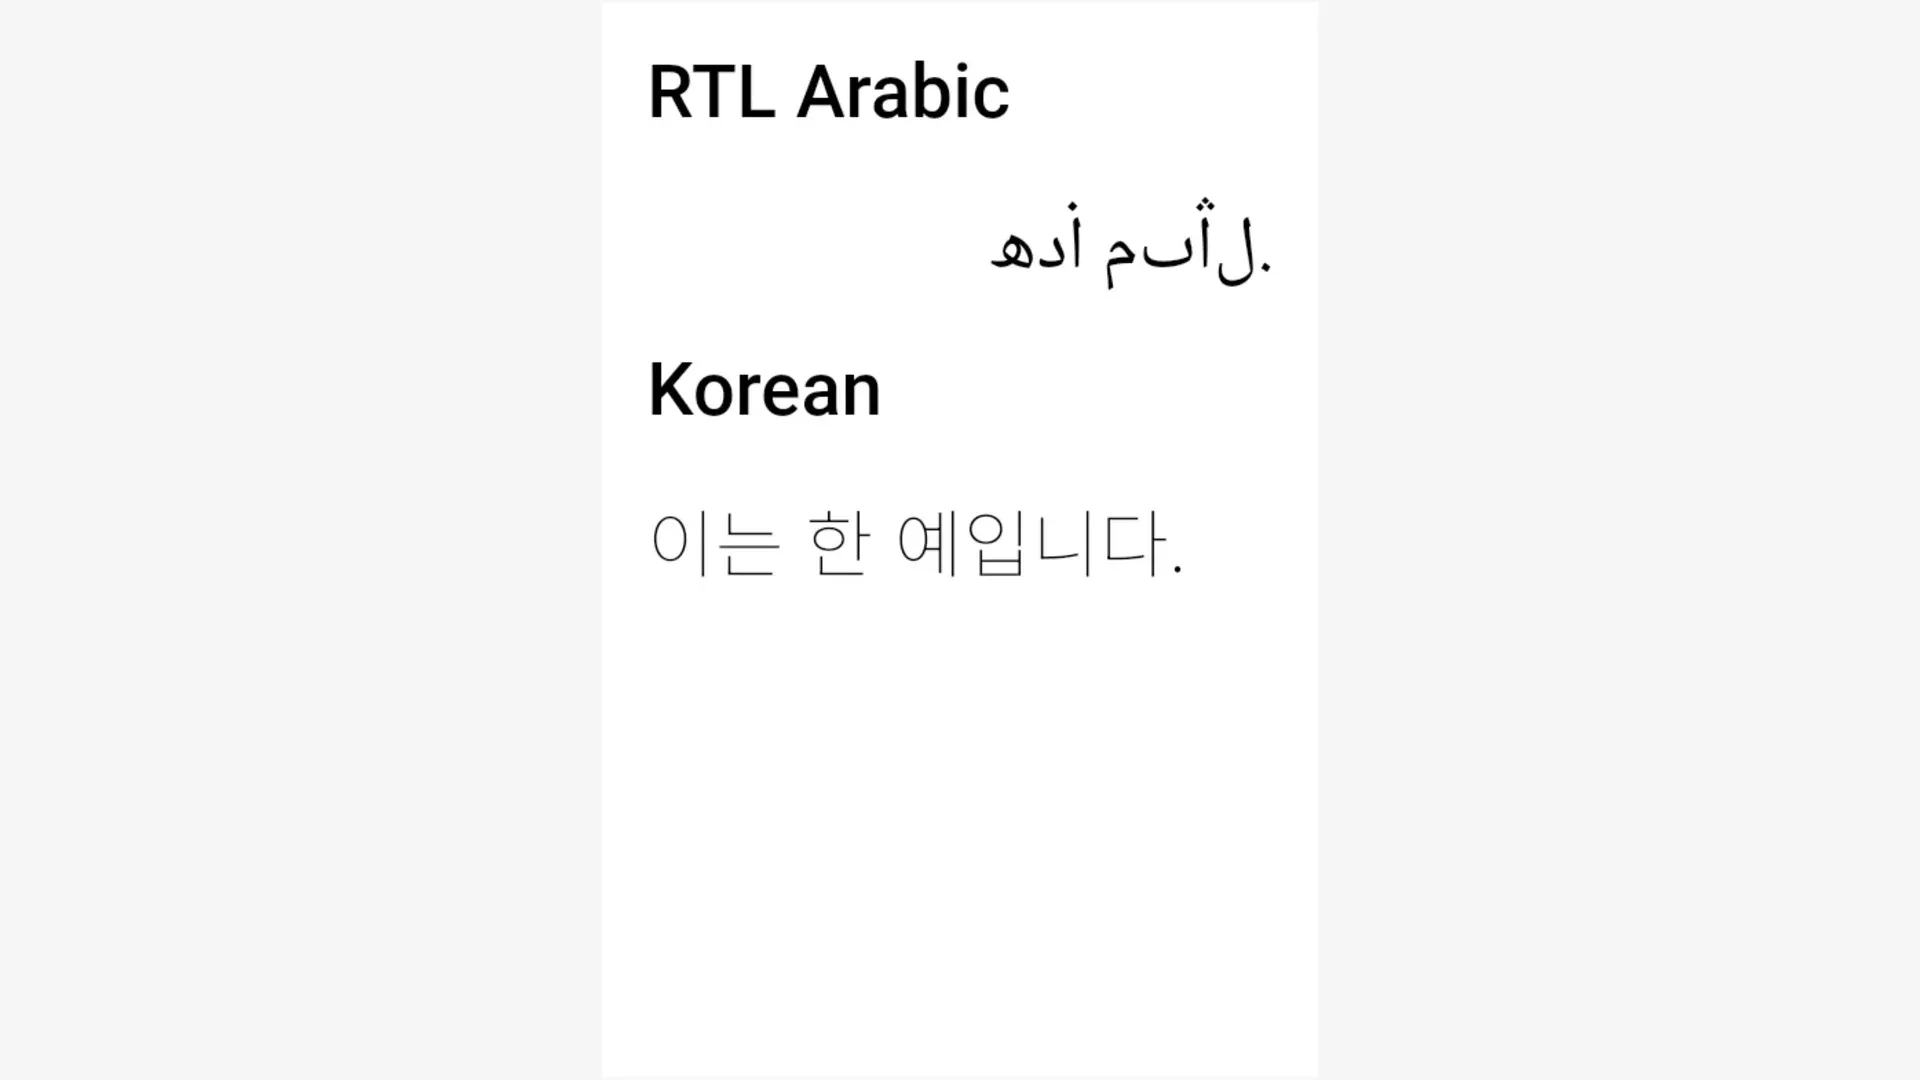
CE.SDK renders Unicode text, bidirectional layout, and script-specific glyph shaping through the Engine. This guide shows how to define typefaces for different scripts, apply them to text blocks, control right-to-left alignment, and bind multilingual template text to variables.
Using the Built-in Text UI for Multilingual Content#
The CE.SDK editor UI accepts text in any Unicode script and uses the Engine’s text shaping to render right-to-left and complex-script content. Users can type Arabic, Hebrew, Korean, Indic scripts, and mixed-direction text directly on the canvas while the editor preserves the text content as a normal text block.
The text formatting controls expose typeface, size, color, and horizontal alignment settings. If your integration adds custom typefaces for specific scripts, expose them through your typeface asset source so users can pick them from the font panel.
Programmatic Font and Typeface Management#
Configure Typefaces for Language Support#
Define one Typeface per font family you want to apply. Each Font points to a
font file URI and declares its weight and style so CE.SDK can keep formatting
stable when you switch typefaces.
private data class MultilingualTypefaces(    val label: Typeface,    val rtl: Typeface,    val korean: Typeface,)
private fun multilingualTypefaces() = MultilingualTypefaces(    label = Typeface(        name = "BrandLabel",        fonts = listOf(            Font(                uri = BRAND_LABEL_FONT_URI,                subFamily = "Regular",                weight = FontWeight.NORMAL,                style = FontStyle.NORMAL,            ),        ),    ),    rtl = Typeface(        name = "ArabicSupport",        fonts = listOf(            Font(                uri = ARABIC_SUPPORT_FONT_URI,                subFamily = "Regular",                weight = FontWeight.NORMAL,                style = FontStyle.NORMAL,            ),        ),    ),    korean = Typeface(        name = "KoreanSupport",        fonts = listOf(            Font(                uri = KOREAN_SUPPORT_FONT_URI,                subFamily = "Regular",                weight = FontWeight.NORMAL,                style = FontStyle.NORMAL,            ),        ),    ),)
The sample uses bundled Android asset fonts for the Latin labels, Arabic text, and Korean text. In your app, use font files that include the glyphs and OpenType layout tables required by the scripts you support.
Create a Text Block Helper#
Keep layout and text-block setup in one helper so every multilingual text block uses the same sizing, typeface, font size, and alignment defaults.
private data class LanguageTextElement(    val text: String,    val typeface: Typeface,    val fontWeight: FontWeight,    val fontStyle: FontStyle = FontStyle.NORMAL,    val fontSubFamily: String? = null,    val height: Float = 140F,    val alignment: HorizontalAlignment = HorizontalAlignment.Auto,)
private fun createTextBlock(    engine: Engine,    page: DesignBlock,    element: LanguageTextElement,    yPosition: Float,): DesignBlock {    val textBlock = engine.block.create(DesignBlockType.Text)    engine.block.replaceText(block = textBlock, text = element.text)    engine.block.setPositionX(textBlock, value = LanguageLayout.TEXT_X)    engine.block.setPositionY(textBlock, value = yPosition)    engine.block.setWidth(textBlock, value = LanguageLayout.TEXT_WIDTH)    engine.block.setHeight(textBlock, value = element.height)    engine.block.setTextFontSize(textBlock, fontSize = LanguageLayout.FONT_SIZE)    val font = element.typeface.fonts.firstOrNull { font ->        font.weight == element.fontWeight &&            font.style == element.fontStyle &&            (element.fontSubFamily == null || font.subFamily == element.fontSubFamily)    } ?: error(        "Missing ${element.fontWeight}/${element.fontStyle}" +            " font variant for ${element.typeface.name}",    )    engine.block.setFont(        block = textBlock,        fontFileUri = font.uri,        typeface = element.typeface,    )    engine.block.setTextHorizontalAlignment(block = textBlock, alignment = element.alignment)    engine.block.appendChild(parent = page, child = textBlock)    return textBlock}
HorizontalAlignment.Auto lets the Engine resolve left or right alignment from
the text direction. Use an explicit alignment only when the design requires a
fixed visual position.
Create the Scene#
Create a page for the multilingual text blocks. The sample uses a simple design scene because this guide teaches text behavior, not editor UI setup.
val scene = engine.scene.create()val page = engine.block.create(DesignBlockType.Page)engine.block.setWidth(page, value = LanguageLayout.PAGE_WIDTH)engine.block.setHeight(page, value = LanguageLayout.PAGE_HEIGHT)engine.block.appendChild(parent = scene, child = page)Apply Fonts Programmatically#
Build a small list of text elements and create one block per language. The same
helper applies the matching typeface and leaves alignment on Auto unless a
specific block needs an override.
val textElements = listOf(    LanguageTextElement(        text = "RTL Arabic",        typeface = typefaces.label,        fontWeight = FontWeight.NORMAL,        fontSubFamily = "Regular",    ),    LanguageTextElement(        text = "هذا مثال.",        typeface = typefaces.rtl,        fontWeight = FontWeight.NORMAL,        fontSubFamily = "Regular",        height = 160F,    ),    LanguageTextElement(        text = "Korean",        typeface = typefaces.label,        fontWeight = FontWeight.NORMAL,        fontSubFamily = "Regular",    ),    LanguageTextElement(        text = "이는 한 예입니다.",        typeface = typefaces.korean,        fontWeight = FontWeight.NORMAL,        fontSubFamily = "Regular",    ),)
val textBlocks = mutableListOf<DesignBlock>()var currentY = 50Ffor (element in textElements) {    textBlocks.add(createTextBlock(engine, page, element, currentY))    currentY += element.height + LanguageLayout.GAP}
Use this pattern for templates that combine labels, right-to-left copy, and
other scripts on one page. The text content stays in normal text/text
properties, so you can still edit, style, or bind it later.
Working with Right-to-Left Text#
Understand Automatic RTL Detection#
CE.SDK determines text direction from Unicode bidirectional properties. Strong right-to-left characters, such as Arabic or Hebrew letters, establish RTL flow; Latin words, numbers, spaces, and punctuation are laid out in context.
Resolve Effective Alignment#
Use setTextHorizontalAlignment(...) with HorizontalAlignment.Auto to keep a
block direction-aware, then read getTextEffectiveHorizontalAlignment(...) when
your UI needs the concrete resolved direction. In interactive editor UI, this
readback usually happens as the UI state refreshes.
For offscreen or headless samples, load the text block resources before reading the effective alignment:
engine.block.setTextHorizontalAlignment( block = rtlBlock, alignment = HorizontalAlignment.Auto,)engine.block.forceLoadResources(listOf(rtlBlock))val effectiveRtlAlignment = engine.block.getTextEffectiveHorizontalAlignment(rtlBlock)getTextEffectiveHorizontalAlignment(...) returns the alignment the Engine lays the
block out with. Only Auto is resolved — against the text content — so the getter
never returns Auto. Every other value, Justify included, comes back verbatim.
Apply a Typeface to a Text Range#
You can apply a typeface to an entire text block or to a substring. The Android
from and to arguments are UTF-16 code unit offsets, so derive them from the
Kotlin string instead of counting user-perceived characters by hand.
val mixedText = "Campaign: مرحبا"val mixedBlock = createTextBlock( engine = engine, page = page, element = LanguageTextElement( text = mixedText, typeface = typefaces.label, fontWeight = FontWeight.NORMAL, fontSubFamily = "Regular", ), yPosition = currentY,)val rtlStart = mixedText.indexOf("مرحبا")engine.block.setTypeface( block = mixedBlock, typeface = typefaces.rtl, from = rtlStart, to = mixedText.length,)val mixedTypefaces = engine.block.getTypefaces(mixedBlock)This example applies the Latin label typeface to the whole block first, then uses the Arabic substring range to apply the RTL typeface only where it is needed.
Override Paragraph Alignment#
Text blocks have a block-level horizontal alignment and optional paragraph-level
overrides. Use getTextParagraphIndices(...) to discover valid paragraph
indices, set an override for one paragraph, and pass null to clear it again.
val paragraphBlock = createTextBlock(    engine = engine,    page = page,    element = LanguageTextElement(        text = "English headline\nمرحبا بالعالم",        typeface = typefaces.rtl,        fontWeight = FontWeight.NORMAL,        fontSubFamily = "Regular",        height = 180F,    ),    yPosition = currentY,)val paragraphIndices = engine.block.getTextParagraphIndices(paragraphBlock)val rtlParagraphIndex = paragraphIndices.last()
engine.block.setTextHorizontalAlignment(    block = paragraphBlock,    alignment = HorizontalAlignment.Right,    paragraphIndex = rtlParagraphIndex,)val paragraphOverride = engine.block.getTextHorizontalAlignment(    block = paragraphBlock,    paragraphIndex = rtlParagraphIndex,)
engine.block.setTextHorizontalAlignment(    block = paragraphBlock,    alignment = null,    paragraphIndex = rtlParagraphIndex,)val clearedParagraphOverride = engine.block.getTextHorizontalAlignment(    block = paragraphBlock,    paragraphIndex = rtlParagraphIndex,)
Changing the block-level alignment clears paragraph overrides. Reapply any paragraph-specific overrides after you change the whole block.
Complex Script Support#
CE.SDK applies complex-script shaping automatically when the selected font contains the required glyphs and layout tables. Arabic contextual forms, mandatory ligatures, diacritical marks, Indic conjuncts, Thai marks, and Korean syllables do not need separate Engine configuration.
For reliable output, test each target language with representative production copy. Fonts that cover the Unicode block but lack shaping data can still render ligatures or marks incorrectly.
Creating Multilingual Design Templates#
Variables let one design carry different localized strings without rebuilding
the scene. Set values through engine.variable, then reference the variable key
inside the text block with double curly braces.
engine.variable.set(key = "localized_headline", value = "عنوان الحملة")createTextBlock( engine = engine, page = page, element = LanguageTextElement( text = "{{localized_headline}}", typeface = typefaces.rtl, fontWeight = FontWeight.NORMAL, fontSubFamily = "Regular", height = 120F, ), yPosition = currentY,)val localizedHeadline = engine.variable.get(key = "localized_headline")When you build templates for multiple markets, leave enough room for text expansion, test both left-to-right and right-to-left strings, and choose typefaces that cover every target script.
Font Fallback and Character Coverage#
When text contains characters that the selected typeface cannot render, CE.SDK falls back to other available fonts before showing replacement glyphs. This keeps text visible, but fallback fonts can change visual weight, metrics, or line breaks.
To keep multilingual output predictable:
- Use fonts with explicit coverage for the scripts in your templates.
- Include the required weights and styles for each typeface you expose.
- Test representative Arabic, Hebrew, CJK, Indic, and mixed-direction strings.
- Keep font URIs reachable from the Android runtime before export or rendering.
Troubleshooting#
Text Displays as Squares or Question Marks#
The selected font does not contain glyphs for the text. Use a typeface with the required Unicode coverage and make sure every referenced font URI is reachable from the device.
RTL Text Renders Left-to-Right#
Keep block alignment on Auto or set it to Right for fixed RTL layouts. If
mixed content still looks wrong, verify that the string contains strong RTL
characters and that the selected font supports the script.
Ligatures or Diacritics Display Incorrectly#
Use a font designed for the target script. Complex scripts need OpenType shaping tables such as GSUB and GPOS in addition to the base character glyphs.
Variable Placeholders Render Literally#
Set variables before rendering or exporting the scene, and make sure the
placeholder key in the text block matches the key passed to engine.variable.
API Reference#
| Method | Purpose |
|---|---|
engine.scene.create() |
Create the design scene that owns the page. |
engine.block.create(blockType=_) |
Create text and page blocks. |
engine.block.appendChild(parent=_, child=_) |
Add a page to the scene or a text block to the page. |
engine.block.setWidth(block=_, value=_) |
Set block width. |
engine.block.setHeight(block=_, value=_) |
Set block height. |
engine.block.setPositionX(block=_, value=_) |
Set the text block’s horizontal position. |
engine.block.setPositionY(block=_, value=_) |
Set the text block’s vertical position. |
engine.block.replaceText(block=_, text=_) |
Set text content, including variable placeholders. |
engine.block.getString(block=_, property="text/text") |
Read text content from a text block. |
engine.block.setTextFontSize(block=_, fontSize=_) |
Set text size for the block or range. |
engine.block.setFont(block=_, fontFileUri=_, typeface=_) |
Apply a concrete font file from a typeface to a text block. |
engine.block.setTypeface(block=_, typeface=_, from=_, to=_) |
Apply a typeface to the whole text block or a UTF-16 range. |
engine.block.getTypefaces(block=_, from=_, to=_) |
Read the typefaces used by the whole block or range. |
engine.block.forceLoadResources(blocks=_) |
Load referenced font resources before deterministic offscreen readback. |
engine.block.setTextHorizontalAlignment(block=_, alignment=_, paragraphIndex=_) |
Set block-level or paragraph-level horizontal alignment; pass null to clear a paragraph override. |
engine.block.getTextHorizontalAlignment(block=_, paragraphIndex=_) |
Read the block-level value or a paragraph override. |
engine.block.getTextEffectiveHorizontalAlignment(block=_) |
Read the alignment used for layout: explicit values, including Justify, come back unchanged; Auto resolves to Left or Right from the text direction. |
engine.block.getTextParagraphIndices(block=_, from=_, to=_) |
Find paragraph indices that overlap a text range. |
engine.variable.set(key=_, value=_) |
Set a text variable value. |
engine.variable.get(key=_) |
Read a text variable value. |
Next Steps#
- Customize Fonts - Load and manage custom fonts to match brand guidelines or user preferences.
- Text Styling - Apply fonts, colors, alignment, and other styling options to customize text appearance.
- Text Variables - Define dynamic text elements that can be populated with custom values during design generation.
- Edit Text - Edit text content directly on the canvas or through the properties panel.