Apply color grading, pixelization, duotone, LUT filters, and other visual treatments to design elements with CE.SDK’s effect system.
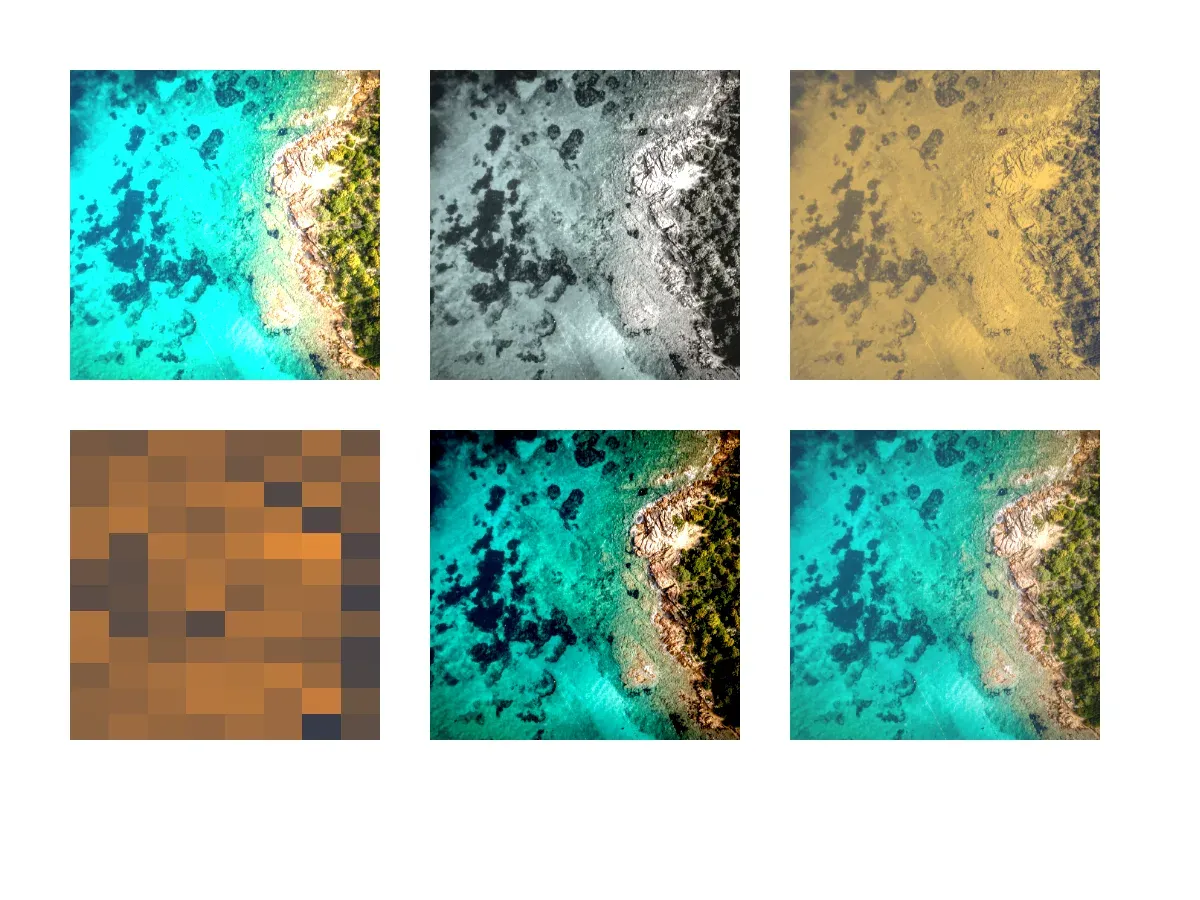
CE.SDK uses one effect stack for both filters and effects. Filters apply color transformations such as LUT filters and duotone, while effects apply visual modifications such as pixelize, vignette, Extrude Blur, and image adjustments. You create both with createEffect(), attach them to a compatible block, and then configure their properties with the same typed property APIs used for design blocks.
Using the Built-in Effects UI#
The default Android editor exposes filters, effects, and adjustments through its appearance controls when the current selection supports them. The UI uses the same effect stack APIs shown below: it creates or reuses an effect block, attaches it to the selected design block, writes effect properties, and removes incompatible effects from the same UI group.
Programmatic Effect Application#
Apply, configure, and combine effects directly through the engine’s block API.
Check Effect Support#
Not every block can render effects, so check compatibility before creating effect blocks. The sample verifies that scene blocks do not support effects, while pages and image-backed graphic blocks do.
val sceneSupportsEffects = engine.block.supportsEffects(scene)val pageSupportsEffects = engine.block.supportsEffects(page)val imageSupportsEffects = engine.block.supportsEffects(imageBlock)
require(!sceneSupportsEffects) { "Scene blocks do not render effect stacks." }require(pageSupportsEffects) { "Pages can render effects." }require(imageSupportsEffects) { "Image-backed graphic blocks can render effects." }
Create an Effect#
Create effect blocks with the type-safe EffectType overload. Creating an effect does not change the image yet; the effect has to be attached to a compatible block.
val pixelizeEffect = engine.block.createEffect(type = EffectType.Pixelize)val adjustmentsEffect = engine.block.createEffect(type = EffectType.Adjustments)Add Effects to a Block#
Attach an effect to the end of a block’s effect stack with appendEffect(), or place it at a specific position with insertEffect(). Effects render in stack order, so the inserted adjustments effect runs before the pixelize effect in this example.
engine.block.appendEffect(block = imageBlock, effectBlock = pixelizeEffect)engine.block.insertEffect(block = imageBlock, effectBlock = adjustmentsEffect, index = 0)
val orderedEffects = engine.block.getEffects(imageBlock)
Configure Effect Properties#
Each effect exposes its own property keys. Use findAllProperties() to inspect them, then write values with the typed setter that matches the property type.
val pixelizeProperties = engine.block.findAllProperties(pixelizeEffect)val adjustmentProperties = engine.block.findAllProperties(adjustmentsEffect)
engine.block.setInt(pixelizeEffect, property = "effect/pixelize/horizontalPixelSize", value = 18)engine.block.setInt(pixelizeEffect, property = "effect/pixelize/verticalPixelSize", value = 18)engine.block.setFloat(adjustmentsEffect, property = "effect/adjustments/brightness", value = 0.18F)engine.block.setFloat(adjustmentsEffect, property = "effect/adjustments/contrast", value = 0.22F)
val brightness = engine.block.getFloat(adjustmentsEffect, property = "effect/adjustments/brightness")val horizontalPixelSize = engine.block.getInt(pixelizeEffect, property = "effect/pixelize/horizontalPixelSize")
Common setters for effects are:
| Setter | Use |
|---|---|
setFloat() |
Intensity, brightness, contrast, saturation, and other continuous values |
setInt() |
Discrete values such as pixel size and LUT tile counts |
setString() |
URI-like string properties such as LUT file paths |
setColor() |
Color properties such as duotone dark and light colors |
Apply LUT Filters#
A LUT filter maps source colors through a lookup-table image. Set the LUT file URI, the horizontal and vertical tile counts baked into that image, and the blend intensity before attaching the filter to the block.
val lutFilter = engine.block.createEffect(type = EffectType.LutFilter)
engine.block.setString(lutFilter, property = "effect/lut_filter/lutFileURI", value = sampleLutUri)engine.block.setInt(lutFilter, property = "effect/lut_filter/horizontalTileCount", value = 5)engine.block.setInt(lutFilter, property = "effect/lut_filter/verticalTileCount", value = 5)engine.block.setFloat(lutFilter, property = "effect/lut_filter/intensity", value = 0.85F)engine.block.appendEffect(block = lutBlock, effectBlock = lutFilter)
Use the Create a Custom LUT Filter guide when you need to build or package your own LUT assets.
Apply Duotone Filters#
A duotone filter maps darker image tones toward one color and lighter tones toward another. Set both colors with setColor() and adjust the intensity with a float value.
val duotoneFilter = engine.block.createEffect(type = EffectType.DuoToneFilter)
engine.block.setColor(    duotoneFilter,    property = "effect/duotone_filter/darkColor",    value = Color.fromRGBA(r = 0.08F, g = 0.12F, b = 0.22F, a = 1F),)engine.block.setColor(    duotoneFilter,    property = "effect/duotone_filter/lightColor",    value = Color.fromRGBA(r = 0.96F, g = 0.76F, b = 0.34F, a = 1F),)engine.block.setFloat(duotoneFilter, property = "effect/duotone_filter/intensity", value = 0.65F)engine.block.appendEffect(block = duotoneBlock, effectBlock = duotoneFilter)
The duotone intensity value ranges from -1F to 1F: positive values emphasize the light color and negative values emphasize the dark color.
Combine Multiple Effects#
Stack effects to create a layered treatment. This sample inserts adjustments at index 0, then applies duotone and pixelization after it so color changes happen before the stylized effects.
val combinedAdjustments = engine.block.createEffect(type = EffectType.Adjustments)engine.block.setFloat(combinedAdjustments, property = "effect/adjustments/saturation", value = -0.35F)
val combinedDuotone = engine.block.createEffect(type = EffectType.DuoToneFilter)engine.block.setColor(    combinedDuotone,    property = "effect/duotone_filter/darkColor",    value = Color.fromRGBA(r = 0.1F, g = 0.18F, b = 0.3F, a = 1F),)engine.block.setColor(    combinedDuotone,    property = "effect/duotone_filter/lightColor",    value = Color.fromRGBA(r = 0.9F, g = 0.55F, b = 0.22F, a = 1F),)engine.block.setFloat(combinedDuotone, property = "effect/duotone_filter/intensity", value = 0.5F)
val combinedPixelize = engine.block.createEffect(type = EffectType.Pixelize)engine.block.setInt(combinedPixelize, property = "effect/pixelize/horizontalPixelSize", value = 12)engine.block.setInt(combinedPixelize, property = "effect/pixelize/verticalPixelSize", value = 12)
engine.block.appendEffect(block = combinedBlock, effectBlock = combinedDuotone)engine.block.appendEffect(block = combinedBlock, effectBlock = combinedPixelize)engine.block.insertEffect(block = combinedBlock, effectBlock = combinedAdjustments, index = 0)
val combinedEffects = engine.block.getEffects(combinedBlock)
Use getEffects() to verify the order whenever your preset depends on stack position.
Managing Applied Effects#
Inspect, toggle, and remove effects after they are attached to a block.
Query Applied Effects#
Read a block’s ordered effect list with getEffects(). This is the entry point for custom effect-management UI, validation, and preset synchronization.
val currentEffects = engine.block.getEffects(imageBlock)val currentAdjustmentProperties = engine.block.findAllProperties(adjustmentsEffect)Enable and Disable Effects#
Toggle an effect without removing it from the stack. Disabled effects keep their configured properties and render again when you enable them.
engine.block.setEffectEnabled(effectBlock = pixelizeEffect, enabled = false)val disabledState = engine.block.isEffectEnabled(pixelizeEffect)
engine.block.setEffectEnabled(effectBlock = pixelizeEffect, enabled = true)val enabledState = engine.block.isEffectEnabled(pixelizeEffect)
This pattern is useful for before/after previews and for temporarily reducing work during heavier editing operations.
Remove Effects#
removeEffect() detaches the effect at a specific stack index. If you no longer need that effect block, call destroy() after removing it.
val removableIndex = engine.block.getEffects(imageBlock).indexOf(pixelizeEffect)require(removableIndex >= 0) { "The pixelize effect must be attached before removal." }
engine.block.removeEffect(block = imageBlock, index = removableIndex)engine.block.destroy(pixelizeEffect)
val removed = engine.block.getEffects(imageBlock).none { effect -> effect == pixelizeEffect }
Effects still attached to a design block are destroyed automatically when that block is destroyed.
Additional Techniques#
Patterns for applying effects at scale and packaging effect values for reuse.
Batch Processing#
When applying the same treatment to multiple blocks, iterate over the targets and check supportsEffects() for each one before creating an effect.
val batchTargets = listOf(imageBlock, lutBlock, duotoneBlock, batchBlock)val batchEffects = mutableListOf<DesignBlock>()
for (targetBlock in batchTargets) {    if (engine.block.supportsEffects(targetBlock)) {        val batchAdjustment = engine.block.createEffect(type = EffectType.Adjustments)        engine.block.setFloat(batchAdjustment, property = "effect/adjustments/brightness", value = 0.08F)        engine.block.appendEffect(block = targetBlock, effectBlock = batchAdjustment)        batchEffects += batchAdjustment    }}
Create a fresh effect instance per target block unless you intentionally want to share the same effect block.
Reusable Effect Presets#
Represent presets as data and write each property to a new effect block. This keeps brand styles, campaign looks, or user favorites consistent across blocks and sessions.
val presetValues = mapOf(    "effect/adjustments/brightness" to -0.08F,    "effect/adjustments/contrast" to 0.3F,    "effect/adjustments/saturation" to -0.2F,)
val presetAdjustment = engine.block.createEffect(type = EffectType.Adjustments)for ((property, value) in presetValues) {    engine.block.setFloat(presetAdjustment, property = property, value = value)}engine.block.appendEffect(block = presetBlock, effectBlock = presetAdjustment)
Effect properties are fixed values, not animation keyframes. To create animated visual changes, animate the block or use CE.SDK’s animation APIs instead of mutating effect properties on a timer.
Performance Considerations#
Effects render on the GPU, but every effect in a visible block’s stack still adds work:
- Keep stacks short on lower-powered Android devices.
- Prefer adjustments when they can achieve the desired look; LUT filters and blur-style effects are usually heavier.
- Apply effects sparingly to video blocks to keep preview and export responsive.
- Disable effects with
setEffectEnabled()during intensive editing when the final look does not need to be visible.
Test effect presets on the devices your app supports before shipping them as defaults.
Troubleshooting#
| Issue | Fix |
|---|---|
| Effect has no visible result | Make sure the effect is attached with appendEffect() or insertEffect() and that at least one non-default property is set. |
| Effect cannot be attached | Check supportsEffects() on the target block before creating or inserting the effect. |
| LUT filter is missing or neutral | Verify the LUT URI is reachable and that horizontalTileCount and verticalTileCount match the LUT image. |
| Effect still renders after removal | removeEffect() detaches the effect from the stack. Call destroy() on unused effect blocks you no longer need. |
| Saved scene reloads without the expected LUT look | Keep external resources such as effect/lut_filter/lutFileURI reachable after loading the scene. |
API Reference#
Methods#
| API | Description |
|---|---|
engine.block.supportsEffects(block=_) |
Checks whether a block can render effects |
engine.block.createEffect(type=EffectType.Pixelize) |
Creates a pixelize effect block |
engine.block.createEffect(type=EffectType.Adjustments) |
Creates an adjustments effect block |
engine.block.createEffect(type=EffectType.LutFilter) |
Creates a LUT filter effect block |
engine.block.createEffect(type=EffectType.DuoToneFilter) |
Creates a duotone filter effect block |
engine.block.appendEffect(block=_, effectBlock=_) |
Adds an effect to the end of a block’s effect stack |
engine.block.insertEffect(block=_, effectBlock=_, index=_) |
Inserts an effect at a specific stack index |
engine.block.getEffects(block=_) |
Returns the ordered effects attached to a block |
engine.block.findAllProperties(block=_) |
Lists the properties available on an effect block |
engine.block.setInt(block=_, property="effect/pixelize/horizontalPixelSize", value=_) |
Writes an integer effect property |
engine.block.setInt(block=_, property="effect/pixelize/verticalPixelSize", value=_) |
Writes the vertical pixel block size |
engine.block.getInt(block=_, property="effect/pixelize/horizontalPixelSize") |
Reads an integer effect property |
engine.block.setFloat(block=_, property="effect/adjustments/brightness", value=_) |
Writes a float effect property |
engine.block.setFloat(block=_, property="effect/adjustments/contrast", value=_) |
Writes the contrast adjustment |
engine.block.setFloat(block=_, property="effect/adjustments/saturation", value=_) |
Writes the saturation adjustment |
engine.block.getFloat(block=_, property="effect/adjustments/brightness") |
Reads a float effect property |
engine.block.setString(block=_, property="effect/lut_filter/lutFileURI", value=_) |
Writes a string effect property |
engine.block.setInt(block=_, property="effect/lut_filter/horizontalTileCount", value=_) |
Writes the LUT tile count per row |
engine.block.setInt(block=_, property="effect/lut_filter/verticalTileCount", value=_) |
Writes the LUT tile count per column |
engine.block.setFloat(block=_, property="effect/lut_filter/intensity", value=_) |
Writes the LUT blend intensity |
engine.block.setColor(block=_, property="effect/duotone_filter/darkColor", value=_) |
Writes a color effect property |
engine.block.setColor(block=_, property="effect/duotone_filter/lightColor", value=_) |
Writes the duotone highlight color |
engine.block.setFloat(block=_, property="effect/duotone_filter/intensity", value=_) |
Writes the duotone mixing weight |
Color.fromRGBA(r=_, g=_, b=_, a=_) |
Creates a color value for color effect properties |
engine.block.setEffectEnabled(effectBlock=_, enabled=_) |
Enables or disables an effect block |
engine.block.isEffectEnabled(effectBlock=_) |
Returns whether an effect block is enabled |
engine.block.removeEffect(block=_, index=_) |
Removes the effect at a stack index |
engine.block.destroy(block=_) |
Destroys an unused effect block |
Properties#
| Property | Type | Description |
|---|---|---|
effect/adjustments/brightness |
Float | Brightness adjustment |
effect/adjustments/contrast |
Float | Contrast adjustment |
effect/adjustments/saturation |
Float | Saturation adjustment |
effect/pixelize/horizontalPixelSize |
Int | Horizontal pixel block size |
effect/pixelize/verticalPixelSize |
Int | Vertical pixel block size |
effect/lut_filter/lutFileURI |
String | LUT image URI |
effect/lut_filter/horizontalTileCount |
Int | Number of LUT tiles per row |
effect/lut_filter/verticalTileCount |
Int | Number of LUT tiles per column |
effect/lut_filter/intensity |
Float | LUT blend amount from 0F to 1F |
effect/duotone_filter/darkColor |
Color | Color mapped to shadows |
effect/duotone_filter/lightColor |
Color | Color mapped to highlights |
effect/duotone_filter/intensity |
Float | Duotone mixing weight from -1F to 1F |
Next Steps#
- Filters & Effects Overview - Browse every filter and effect CE.SDK provides.
- Create a Custom LUT Filter - Apply professional color grading with a LUT file.
- Blur Effects - Soften backgrounds and create depth with the blur API.
- Chroma Key (Green Screen) - Remove a background color from an image or video.