In this article, you will see how to use Swift and AVMutableVideoComposition to add a text overlay to a video clip. The code in this article uses Swift 5. Clone this repository for a Swift Playground with the example code.
Setting up
To access the AVFoundation and CoreImage objects, be sure to add these imports to your code
import AVFoundation
import CoreImage.CIFilterBuiltins
Importing the CIFilterBuiltins lets you use autocompletion when working with CIFilters. Otherwise, just import CoreImage. But then you will need to access the filter properties using strings.
When working with video clips and movie files, the basic starting point is the AVAsset class. This class combines all of the timed video and audio tracks that make up a movie. Additionally there may be subtitles and timed metadata or captions.
Creating a Video Composition
After you create a video composition for an asset, you can apply it to an AVPlayerItem to display on screen or to an AVAssetExportSession to write to a file. The composition for this tutorial will use the init(asset:applyingCIFiltersWithHandler:) initializer. Then you can apply CIFilters to each frame of the video.
First, load a movie file as an AVAsset using its URL.
//Fetch a URL for the movie from the bundle
let waterfallURL = Bundle.main.url(forResource: "waterfall", withExtension: "mov")
//Create an AVAsset with the url
let waterfallAsset = AVAsset(url: waterfallURL!)
Now you can create a AVMutableVideoComposition with the asset
let titleComposition = AVMutableVideoComposition(asset: waterfallAsset) {request in
//apply filters here
request.finish(with: request.sourceImage, context: nil)
}
The code above passes the video frame unaltered. The request is the current video frame. It is an AVAsynchronousCIImageFilteringRequest object. The request object has three properties:
- the
sourceImagewhich is the video frame as aCIImage - the
renderSizewhich is the size of the video frame compositionTimewhich is the timestamp of the current frame
The code in the handler will run once for each frame of the video clip.
Generating a Text Image
Because the sourceImage is a CIImage, you can use any of the over 200 CIFilter objects that Core Image provides. There are two text generator filters: CIAttributedTextImageGenerator and CITextImageGenerator. Either of these will render a string as a CIImage. This tutorial will use the Attributed Text version so you can modify the color and add a shadow.

Start by creating a shadow and then creating a dictionary of attributes to apply to the string.
let whiteShadow = NSShadow()
whiteShadow.shadowBlurRadius = 5
whiteShadow.shadowColor = UIColor.white
let attributes = [
  NSAttributedString.Key.foregroundColor : UIColor.blue,
  NSAttributedString.Key.font : UIFont(name: "Marker Felt", size: 36.0)!,
  NSAttributedString.Key.shadow : whiteShadow
]
Create the attributed string by combining the string and the attributes
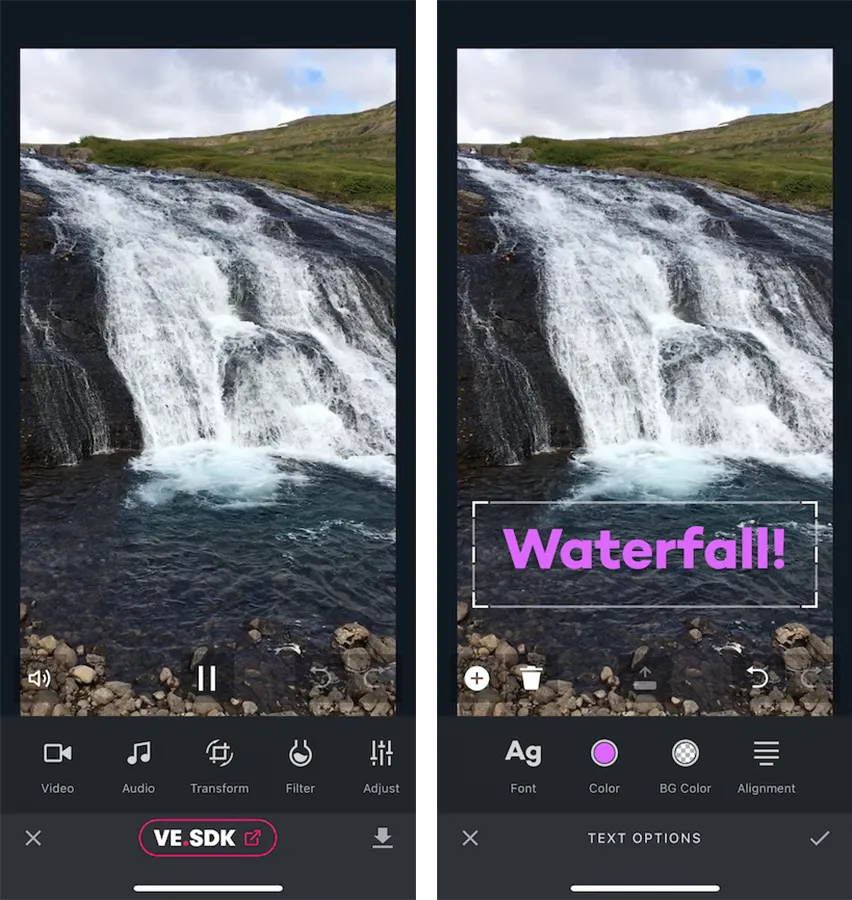
let waterfallText = NSAttributedString(string: "Waterfall!", attributes: attributes)Provide the attributed string and a scale factor to the filter to generate an image like the one shown above.
let textFilter = CIFilter.attributedTextImageGenerator()
textFilter.text = waterfallText
textFilter.scaleFactor = 4.0
The textFilter.outputImage will be the image of the rendered text with the attributes applied. The extent of the outputImage will be a rectangle that is large enough to encompass the text. The text will render on a single line, it doesn’t wrap using this method.
If you were to place the text on the video image at this point, the bottom-left of the text would be at the bottom-left of the video. Unlike UIView objects, the origin point (0,0) is at the bottom-left, not the top-left. To center the text and move it off of the bottom, you can apply a standard CGAffineTransform
let centerHorizontal = (request.renderSize.width - textFilter.outputImage!.extent.width)/2
let moveTextTransform = CGAffineTransform(translationX: centerHorizontal, y: 200)
let positionedText = textFilter.outputImage!.transformed(by: moveTextTransform)
Now finish the pipeline by composing the new text image over the original source image.
positionedText.composited(over: request.sourceImage)All together, the original composition now becomes
let titleComposition = AVMutableVideoComposition(asset: waterfallAsset) { request in
//Create a white shadow for the text
let whiteShadow = NSShadow()
whiteShadow.shadowBlurRadius = 5
whiteShadow.shadowColor = UIColor.white
let attributes = [
  NSAttributedString.Key.foregroundColor : UIColor.blue,
  NSAttributedString.Key.font : UIFont(name: "Marker Felt", size: 36.0)!,
  NSAttributedString.Key.shadow : whiteShadow
]
//Create an Attributed String
let waterfallText = NSAttributedString(string: "Waterfall!", attributes: attributes)
//Convert attributed string to a CIImage
let textFilter = CIFilter.attributedTextImageGenerator()
textFilter.text = waterfallText
textFilter.scaleFactor = 4.0
//Center text and move 200 px from the origin
//source image is 720 x 1280
let positionedText = textFilter.outputImage!.transformed(by: CGAffineTransform(translationX: (request.renderSize.width - textFilter.outputImage!.extent.width)/2, y: 200))
//Compose text over video image
request.finish(with: positionedText.composited(over: request.sourceImage), context: nil)
}
Displaying The Finished Video
With an AVAsset and an AVMutableVideoComposition you can now combine the two into an AVPlayer to display in an AVPlayerViewController or in your own UIViewController
let waterFallItem = AVPlayerItem(asset: waterfallAsset)
waterFallItem.videoComposition = titleComposition
let player = AVPlayer(playerItem: waterFallItem)
As stated above, you can also combine the asset and the composition and write them to a new movie file using an AVAssetExportSession.
Going Further
The method in this tutorial is suitable for adding watermark or title text to videos. If you want to give users the ability to add custom text, there is more work to do. You will need to create font and color pickers as well as code to position the text in the frame.
You can use an editor such as VideoEditorSDK to allow your users to add annotations, text and filters to their clips. They can even add audio or combine clips to make a great creation.
Wrapping Up
In this article, you saw how to use AVMutableVideoComposition to add text to a video clip. Further, you saw how using an SDK such as VideoEditorSDK allows you to annotate and enhance your clips before sharing. Including typography, audio support and video composition, IMG.LY provides a comprehensive solution for mobile video editing – find the documentation here.
Looking for more video capabilities? Check out our solutions for Short Video Creation, and Camera SDK!
Thanks for reading! We hope that you found this tutorial helpful. Feel free to reach out to us on Twitter with any questions, comments, or suggestions!