---
title: "PhotoEditor SDK + React Native"
description: ""
url: "https://img.ly/blog/photoeditor-sdk-react-native-15179c589a55/"
type: "blog"
date: "2017-03-20"
author: "Malte"
tags: ["React Native","iOS","Android","Photo Editing","Photo Editor","Tech","How-To","Push2Medium","Company"]
---
> This is the markdown version of [PhotoEditor SDK + React Native](https://img.ly/blog/photoeditor-sdk-react-native-15179c589a55/). For all pages in one file, see [llms-full.txt](https://img.ly/llms-full.txt). For an index of all available pages, see [llms.txt](https://img.ly/llms.txt).
---
Often our users ask whether it’s possible to use the [PhotoEditor SDK](https://img.ly/products/photo-sdk.md) for iOS and Android with React Native (the good news right away: Yes, it is possible and fairly easy as well). So, we set out to create a demo app and put together a guide on how to easily set up the PhotoEditor SDK with React Native and how to avoid eventual pitfalls.
## Setup
We started our demo project by creating a new React Native project using `react-native init PESDKDemo`. We then added [`react-native-navigation`](https://github.com/wix/react-native-navigation), a navigation library from the awesome folks at Wix, to get a base for our demo app. However, `react-native-navigation` is not required for embedding the PESDK into your React Native application.
## Launching the PhotoEditor SDK from React Native
To successfully launch our editor from React Native we needed to do three things:
1. Add the PESDK library to our iOS project.
2. Create a native module that bridges between React Native and the PhotoEditor SDK.
3. Add a method to create a `ToolbarController`, push a `PhotoEditController` and present them from the current view controller.
4. Call the method, wherever we want to edit an image in our React Native code
The first step was rather easy. We just followed the [steps for a manual installation](https://img.ly/docs/pesdk/ios/getting-started/integration/swift-package-manager/) and had the PESDK library ready in minutes.
Creating a native module in React Native was fairly easy as well. We simply created `PESDKModule.h` and `PESDKModule.m` and defined a `PESDKModule` class that inherits from NSObject and implements the `RCTBridgeModule` protocol. In the classes implementation we registered our module with React Native by calling `RCT_EXPORT_MODULE(PESDK)`:
In order to create a new photo editor view controller we needed to create a new `ToolbarController` and push a `PhotoEditController` that loads a sample image. As we'll always use such a hierarchy, we bundled this setup into the `present()` method of our native module and exported it to React Native using the `RCT_EXPORT_METHOD` macro:
The final step was putting our newly created module to good use and actually pushing our photo editor from React Native. To do so, we imported the `PESDK` native module using `var PESDK = NativeModules.PESDK`. We could then call `PESDK.present()` and the native module created the `ToolbarController` and `PhotoEditViewController` objects and pushed them from the current view controller. If you were to use a simple `TouchableHighlight`, this could look like this:
Bringing it all together, we were now able to open the native iOS PESDK `PhotoEditController` from our React Native code. Surprisingly easy, isn't it?
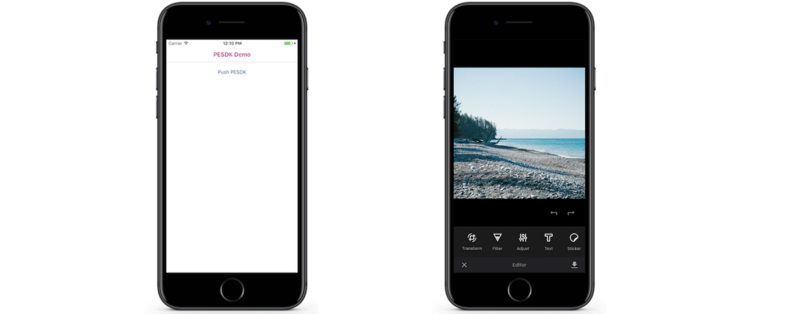
## Passing an image to the editor
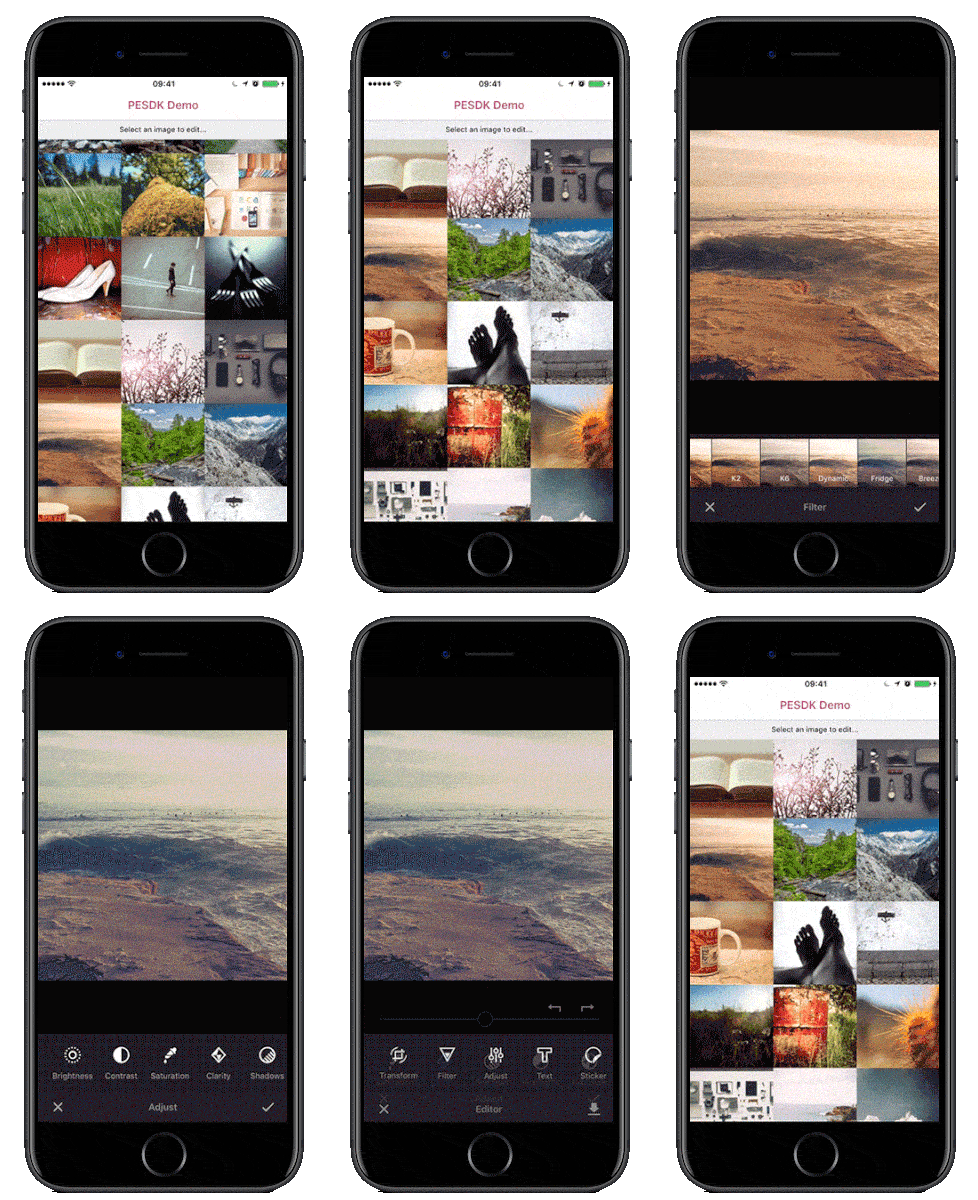
Opening an image editor with a sample image is nice but wasn’t really our intention, when we started integrating the [PhotoEditor SDK](https://img.ly/products/photo-sdk.md). Instead, we wanted to be able to edit **any** image and save the result into our camera roll or share it with our friends. For our little demo, we decided to present a grid of images from unsplash.com to the user, so he can choose any image from the list and edit it with our editor.
The JavaScript for creating the image grid is a little out of scope for this article, so we won’t cover it in detail. It basically uses a `ListView` to create rows of three cells and fills them with images loaded from the unsplash.it service. All image fetching, scrolling, etc. is handled by React Native, so we only needed to handle the user's taps on an image:
We used `[react-native-fs](https://github.com/itinance/react-native-fs)` to download a larger resolution image to the local filesystem, pass the path of the local file to our `present()` call and modify our iOS native module:
We then had a nice little app, that shows a grid of images, loads a high-resolution image upon selection and opens the PhotoEditor SDK:
## Android implementation
As we have seen, opening the PESDK from React Native can easily be done on iOS. But why use React Native, if the app only runs on iOS? It was time to add Android support to our little demo app. To accomplish this we needed to repeat some of the previous steps for Android:
1. Add the PESDK to our Android project.
2. Create a native module that bridges between React Native and the PESDK.
3. Add a method to launch an `ImglyIntent` using the `PhotoEditorBuilder` from the current `Activity`.
Installing the SDK is again done by following the instructions for integrating the PESDK and shouldn’t take more than a few minutes. Creating a native module on Android is quite similar to iOS, although a little more setup code is required: We created our `PESDKModule` that recreates the `present(path)`method from iOS, a `PESDKPackage` containing our module and finally added the package to our `Application`:
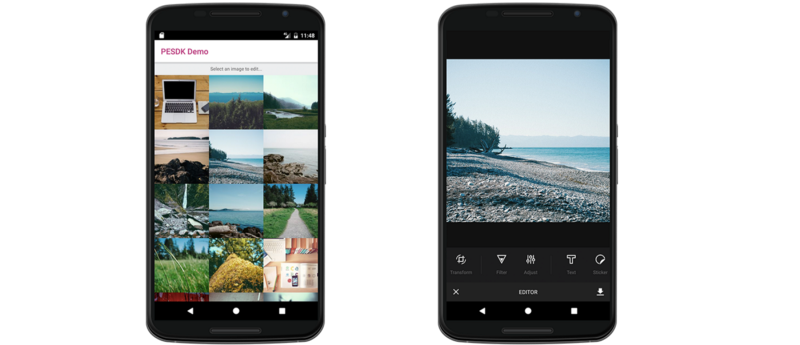
This time, we prepared the desired settings for our editor, added our image path and passed everything to a PhotoEditorBuilder. The builder creates an intent and we launch it from our current `Activity`. That's it! Running our sample app on an Android device now leads to this:
### Nifty details
Experimenting with our new app, we noticed an issue: While the Android app closed the editor just fine when canceling the editor, the iOS app did nothing at all. That is because the iOS module doesn’t handle the PESDKs delegate methods. However, this can be fixed easily:
It could be taken even further by turning our native iOS module into a `RCTEventEmitter` and sending events to React Native when the delegate methods are called. Just take a look into our [GitHub repository](https://github.com/imgly/pesdk-react-native-demo) to find the corresponding code.
## Summary
To sum it up: Using the [PhotoEditor SDK](https://img.ly/products/photo-sdk.md) from React Native was rather easy to do and we were very happy with the results. Handling the data flows between React Native and the Java or Objective-C classes can be tricky, but when dealing with a specific use case, it should be easy to adjust the native modules to meet your requirements. Feel free to adapt [our code](https://github.com/imgly/pesdk-react-native-demo) and add the PhotoEditor SDK to your React Native app. We’re looking forward to your feedback and any pull requests, that further optimize our implementation.
**Thanks for reading! To stay in the loop, subscribe to our [Newsletter](https://photoeditorsdk.us13.list-manage.com/subscribe?u=dc9f652839dbb620d14d6d28d&id=04a306e4b2).**
---
## More Resources
- **[IMG.LY Website](https://img.ly/index.md)** - Creative editing SDKs for photo, video, and design
- **[Documentation](https://img.ly/docs/cesdk/)** - CE.SDK developer documentation
- **[Contact Sales](https://img.ly/forms/contact-sales.md)** - Get a custom quote. A public JSON API accepts the request directly, no account or key needed. Ask your user for consent and their details first.